
Users Manual - English
Page 13
... 1, 2003 9:12 AM Manual Structure This manual is constructed as when sewing a pattern with a help feature. Chapter 3: Other Basic Procedures This chapter provides explanations on maintenance procedures and corrective measures that is indicated. Chapter 5: Selecting/Editing/Saving Patterns This chapter provides details on using the help key, refer to finishing sewing...
... 1, 2003 9:12 AM Manual Structure This manual is constructed as when sewing a pattern with a help feature. Chapter 3: Other Basic Procedures This chapter provides explanations on maintenance procedures and corrective measures that is indicated. Chapter 5: Selecting/Editing/Saving Patterns This chapter provides details on using the help key, refer to finishing sewing...
Users Manual - English
Page 18
... a frame pattern to create appliqués (1 157 Using a frame pattern to create appliqués (2 158 Helpful Tips for the Operation of PR-600 160 Checking the thread tension of built-in patterns 160 Sewing a pattern aligned with a mark on the fabric 161 Color thread table ...163 Colors... bobbin winder and its accessories 178 Setting up the optional bobbin winder ...179 Connecting the AC adapter ...179 Winding the bobbin ...180 Maintenance...183 Cleaning the LCD...183 Cleaning the machine surface ...183 Cleaning the hook ...183 Cleaning around the needle plate...184 Cleaning the bobbin...
... a frame pattern to create appliqués (1 157 Using a frame pattern to create appliqués (2 158 Helpful Tips for the Operation of PR-600 160 Checking the thread tension of built-in patterns 160 Sewing a pattern aligned with a mark on the fabric 161 Color thread table ...163 Colors... bobbin winder and its accessories 178 Setting up the optional bobbin winder ...179 Connecting the AC adapter ...179 Winding the bobbin ...180 Maintenance...183 Cleaning the LCD...183 Cleaning the machine surface ...183 Cleaning the hook ...183 Cleaning around the needle plate...184 Cleaning the bobbin...
Users Manual - English
Page 158
...TRIP COUNT counter show the number of the basic embroidery machine settings. Use counters 4 and 5 as a standard for performing periodic maintenance and for receiving maintenance for the machine. 6 VERSION Shows the version of the software installed on this machine. A screen containing a description of the screen... embroidery machine Note ● Version 1.0 is the version of upper thread that is created with your local authorized Brother dealer or at www.brother.com for the pattern display area can specify whether or not connected jump codes (stitches that become jumpstitches when the...
...TRIP COUNT counter show the number of the basic embroidery machine settings. Use counters 4 and 5 as a standard for performing periodic maintenance and for receiving maintenance for the machine. 6 VERSION Shows the version of the software installed on this machine. A screen containing a description of the screen... embroidery machine Note ● Version 1.0 is the version of upper thread that is created with your local authorized Brother dealer or at www.brother.com for the pattern display area can specify whether or not connected jump codes (stitches that become jumpstitches when the...

Users Manual - English
Page 169
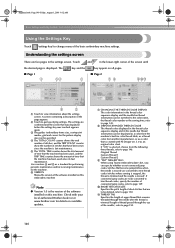
Touch . 2 Maintenance X The list of the Operation Manual, such as basic machine operations. Sapphire.book Page 151 Friday, August 1, 2003 9:12 AM Using the Machine Operations Guide ...
Touch . 2 Maintenance X The list of the Operation Manual, such as basic machine operations. Sapphire.book Page 151 Friday, August 1, 2003 9:12 AM Using the Machine Operations Guide ...

Users Manual - English
Page 173
... Techniques / 166 Fabric/stabilizer compatibility chart / 167 OPTIONAL ACCESSORIES Attaching an optional embroidery frame for creating beautiful embroidery, and details on maintenance procedures and corrective measures that should be read / 204 If the machine does not respond when a key is pressed / 204 Specifications...Cap Frame 169 Cap frame and its accessories / 169 Preparing to create appliqués (2) / 158 Helpful Tips for the Operation of PR-600 160 Checking the thread tension of built-in patterns / 160 Sewing a pattern aligned with a mark on the fabric / 161 Color thread...
... Techniques / 166 Fabric/stabilizer compatibility chart / 167 OPTIONAL ACCESSORIES Attaching an optional embroidery frame for creating beautiful embroidery, and details on maintenance procedures and corrective measures that should be read / 204 If the machine does not respond when a key is pressed / 204 Specifications...Cap Frame 169 Cap frame and its accessories / 169 Preparing to create appliqués (2) / 158 Helpful Tips for the Operation of PR-600 160 Checking the thread tension of built-in patterns / 160 Sewing a pattern aligned with a mark on the fabric / 161 Color thread...
Users Manual - English
Page 201
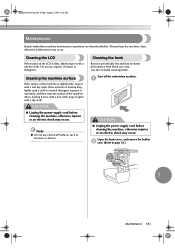
Sapphire.book Page 183 Friday, August 1, 2003 9:12 AM Maintenance Simple embroidery machine maintenance operations are described below. Cleaning the LCD If the surface of the machine. If the machine is heavily dirty, lightly soak a cloth in neutral detergent, ... before cleaning the machine, otherwise injuries or an electric shock may occur. Open the hook cover, and remove the bobbin 2 case. (Refer to page 18.) 7 Maintenance 183 Cleaning the hook Remove periodically lint and dust for better performance from Hook race area. After cleaning it once with a wet cloth, wipe it...
Sapphire.book Page 183 Friday, August 1, 2003 9:12 AM Maintenance Simple embroidery machine maintenance operations are described below. Cleaning the LCD If the surface of the machine. If the machine is heavily dirty, lightly soak a cloth in neutral detergent, ... before cleaning the machine, otherwise injuries or an electric shock may occur. Open the hook cover, and remove the bobbin 2 case. (Refer to page 18.) 7 Maintenance 183 Cleaning the hook Remove periodically lint and dust for better performance from Hook race area. After cleaning it once with a wet cloth, wipe it...
Users Manual - English
Page 203
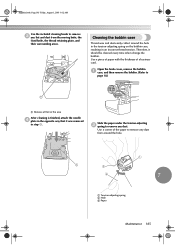
... thread retaining plate, and their surrounding areas. Cleaning the bobbin case Thread wax and dust easily collect around the hole. 1 7 1 Tension-adjusting spring 2 Hole 3 Paper Maintenance 185 Slide the paper under the tension-adjusting 2 spring to page 18.) 1 1 Remove all lint in this area After cleaning is finished, attach the needle...
... thread retaining plate, and their surrounding areas. Cleaning the bobbin case Thread wax and dust easily collect around the hole. 1 7 1 Tension-adjusting spring 2 Hole 3 Paper Maintenance 185 Slide the paper under the tension-adjusting 2 spring to page 18.) 1 1 Remove all lint in this area After cleaning is finished, attach the needle...

Users Manual - English
Page 205
... breaks while sewing or the operating noise of the hook to a position where it can easily be oiled. 1 1 Handwheel • Be sure to page 18.) 7 Maintenance 187
... breaks while sewing or the operating noise of the hook to a position where it can easily be oiled. 1 1 Handwheel • Be sure to page 18.) 7 Maintenance 187

Users Manual - English
Page 226
... 167 Lock stitching key 54, 86 Locking mechanism 41 Locking the needle bar 70 M Machine operations guide key 48, 151 Main power switch 3, 20, 46 Maintenance 151, 183 Manual needle bar settings 94 Maximum sewing speed key 54, 55 Merge key 52 Mounting jig 172 Moving needle 40 Multi color key...
... 167 Lock stitching key 54, 86 Locking mechanism 41 Locking the needle bar 70 M Machine operations guide key 48, 151 Main power switch 3, 20, 46 Maintenance 151, 183 Manual needle bar settings 94 Maximum sewing speed key 54, 55 Merge key 52 Mounting jig 172 Moving needle 40 Multi color key...

Users Manual - English
Page 13
... the index at the left for the desired information. By condition Various possible conditions and the corresponding operations are provided in order-from turning on maintenance procedures and corrective measures that appear in the main LCD screens are described on the use a screen feature Touch the help key. Follow the steps...
... the index at the left for the desired information. By condition Various possible conditions and the corresponding operations are provided in order-from turning on maintenance procedures and corrective measures that appear in the main LCD screens are described on the use a screen feature Touch the help key. Follow the steps...

Users Manual - English
Page 18
... a frame pattern to create appliqués (1 157 Using a frame pattern to create appliqués (2 158 Helpful Tips for the Operation of PR-600 160 Checking the thread tension of built-in patterns 160 Sewing a pattern aligned with a mark on the fabric 161 Color thread table ...163 Colors... bobbin winder and its accessories 178 Setting up the optional bobbin winder ...179 Connecting the AC adapter ...179 Winding the bobbin ...180 Maintenance...183 Cleaning the LCD...183 Cleaning the machine surface ...183 Cleaning the hook ...183 Cleaning around the needle plate...184 Cleaning the bobbin...
... a frame pattern to create appliqués (1 157 Using a frame pattern to create appliqués (2 158 Helpful Tips for the Operation of PR-600 160 Checking the thread tension of built-in patterns 160 Sewing a pattern aligned with a mark on the fabric 161 Color thread table ...163 Colors... bobbin winder and its accessories 178 Setting up the optional bobbin winder ...179 Connecting the AC adapter ...179 Winding the bobbin ...180 Maintenance...183 Cleaning the LCD...183 Cleaning the machine surface ...183 Cleaning the hook ...183 Cleaning around the needle plate...184 Cleaning the bobbin...

Users Manual - English
Page 158
... length of upper thread that is created with your local authorized Brother dealer or at www.brother.com for the pattern display area can specify whether or not connected jump codes (stitches that the machine has been used since its last maintenance. Use counters 4 and 5 as an original color chart. ... shows the total number of stitches, and the TRIP COUNT counter show the number of stitches that have been sewn since the machine's last maintenance. 5 The TOTAL TIME counter shows the total amount of time that become jumpstitches when the needle is moved). The settings are to view...
... length of upper thread that is created with your local authorized Brother dealer or at www.brother.com for the pattern display area can specify whether or not connected jump codes (stitches that the machine has been used since its last maintenance. Use counters 4 and 5 as an original color chart. ... shows the total number of stitches, and the TRIP COUNT counter show the number of stitches that have been sewn since the machine's last maintenance. 5 The TOTAL TIME counter shows the total amount of time that become jumpstitches when the needle is moved). The settings are to view...

Users Manual - English
Page 169
... key), and then select from the four topics that appear to thread the upper thread Touch . 1 Operations Troubleshooting X The sewing machine help screen appears. Touch . 2 Maintenance X The list of Machine Principal Parts and Their Functions Example: To learn how to display the available information. ■ Contents of Categories Names of basic...
... key), and then select from the four topics that appear to thread the upper thread Touch . 1 Operations Troubleshooting X The sewing machine help screen appears. Touch . 2 Maintenance X The list of Machine Principal Parts and Their Functions Example: To learn how to display the available information. ■ Contents of Categories Names of basic...
Users Manual - English
Page 173
...(1) / 157 Using a frame pattern to use the cap frame / 170 Attaching the cap frame / 173 Installing the embroidery frame holder / 176 Maintenance ...183 Cleaning the LCD / 183 Cleaning the machine surface / 183 Cleaning the hook / 183 Cleaning around the needle plate / 184 Cleaning the ... 169 Preparing to create appliqués (2) / 158 Helpful Tips for the Operation of PR-600 160 Checking the thread tension of built-in patterns / 160 Sewing a pattern aligned with a mark on maintenance procedures and corrective measures that should be read / 204 If the machine does not respond...
...(1) / 157 Using a frame pattern to use the cap frame / 170 Attaching the cap frame / 173 Installing the embroidery frame holder / 176 Maintenance ...183 Cleaning the LCD / 183 Cleaning the machine surface / 183 Cleaning the hook / 183 Cleaning around the needle plate / 184 Cleaning the ... 169 Preparing to create appliqués (2) / 158 Helpful Tips for the Operation of PR-600 160 Checking the thread tension of built-in patterns / 160 Sewing a pattern aligned with a mark on maintenance procedures and corrective measures that should be read / 204 If the machine does not respond...

Users Manual - English
Page 201
... Remove periodically lint and dust for better performance from Hook race area. Open the hook cover, and remove the bobbin 2 case. (Refer to page 18.) 7 Maintenance 183 Always keep the machine clean, otherwise malfunctions may occur. Note ● Do not use organic cleansers or detergents. Sapphire.book Page 183 Friday, August...
... Remove periodically lint and dust for better performance from Hook race area. Open the hook cover, and remove the bobbin 2 case. (Refer to page 18.) 7 Maintenance 183 Always keep the machine clean, otherwise malfunctions may occur. Note ● Do not use organic cleansers or detergents. Sapphire.book Page 183 Friday, August...

Users Manual - English
Page 203
... tension-adjusting 2 spring to remove any dust. Cleaning the bobbin case Thread wax and dust easily collect around the hole. 1 7 1 Tension-adjusting spring 2 Hole 3 Paper Maintenance 185 Sapphire.book Page 185 Friday, August 1, 2003 9:12 AM Use the included cleaning brush to remove 3 any lint and dust from around the hole...
... tension-adjusting 2 spring to remove any dust. Cleaning the bobbin case Thread wax and dust easily collect around the hole. 1 7 1 Tension-adjusting spring 2 Hole 3 Paper Maintenance 185 Sapphire.book Page 185 Friday, August 1, 2003 9:12 AM Use the included cleaning brush to remove 3 any lint and dust from around the hole...

Users Manual - English
Page 205
... of oil into the hook race. 4 Note ● Apply 1 drop of oil into the 5 hook, and then close the hook cover. (Refer to page 18.) 7 Maintenance 187 Sapphire.book Page 187 Friday, August 1, 2003 9:12 AM Rotate the handwheel (about 50 degrees) to 3 move the race of the hook to a position...
... of oil into the hook race. 4 Note ● Apply 1 drop of oil into the 5 hook, and then close the hook cover. (Refer to page 18.) 7 Maintenance 187 Sapphire.book Page 187 Friday, August 1, 2003 9:12 AM Rotate the handwheel (about 50 degrees) to 3 move the race of the hook to a position...
Users Manual - English
Page 226
... 167 Lock stitching key 54, 86 Locking mechanism 41 Locking the needle bar 70 M Machine operations guide key 48, 151 Main power switch 3, 20, 46 Maintenance 151, 183 Manual needle bar settings 94 Maximum sewing speed key 54, 55 Merge key 52 Mounting jig 172 Moving needle 40 Multi color key...
... 167 Lock stitching key 54, 86 Locking mechanism 41 Locking the needle bar 70 M Machine operations guide key 48, 151 Main power switch 3, 20, 46 Maintenance 151, 183 Manual needle bar settings 94 Maximum sewing speed key 54, 55 Merge key 52 Mounting jig 172 Moving needle 40 Multi color key...


