

Users Manual - English
Page 5
... Foot 15 Zipper Foot 16 Invisible Zipper Foot 17 1/4" Foot 17 Quilting Foot 18 Walking Foot 18 Fabric Separator (for joining lining to fabric 19 Seam Guide 19 Caring for Your Machine 20 Cleaning the Machine 20 Lubrication Points 20 Trouble Shooting 21
... Foot 15 Zipper Foot 16 Invisible Zipper Foot 17 1/4" Foot 17 Quilting Foot 18 Walking Foot 18 Fabric Separator (for joining lining to fabric 19 Seam Guide 19 Caring for Your Machine 20 Cleaning the Machine 20 Lubrication Points 20 Trouble Shooting 21

Users Manual - English
Page 6
... 12 Bobbin (5) 13 Spool Cap 14 Rolled Hem Foot 15 Zipper Foot 16 Invisible Zipper Foot 17 1/4" Foot 18 Quilting Foot 19 Walking Foot 20 Seam Guide 21 Foot Controller 22 Fabric Extension Table Part Code XA0917-052 125877-001 125878-001 XA4527-001 XA0830-051 X80805-001 062670-812 184720-001...
... 12 Bobbin (5) 13 Spool Cap 14 Rolled Hem Foot 15 Zipper Foot 16 Invisible Zipper Foot 17 1/4" Foot 18 Quilting Foot 19 Walking Foot 20 Seam Guide 21 Foot Controller 22 Fabric Extension Table Part Code XA0917-052 125877-001 125878-001 XA4527-001 XA0830-051 X80805-001 062670-812 184720-001...

Users Manual - English
Page 18
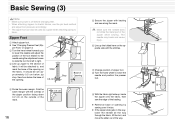
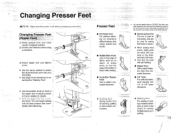
... zipper foot has a position knob. Each foot is off before changing presser feet. Use of the seam. ✽ Can also be used for sewing thick fabrics or seams.) ✽ When sewing thick seams, lightly guide the fabric with your hand on hems of fabric, such as in three while sewing. G Zipper ... is specially designed for this machine and has clearance for darning, quilting or free-motion embroidery. ✽ Use only feet supplied with the PQ series machines may damage or break the pin feed mechanism. G Walking Foot For sewing or quilting on back of the zipper foot to adjust...
... zipper foot has a position knob. Each foot is off before changing presser feet. Use of the seam. ✽ Can also be used for sewing thick fabrics or seams.) ✽ When sewing thick seams, lightly guide the fabric with your hand on hems of fabric, such as in three while sewing. G Zipper ... is specially designed for this machine and has clearance for darning, quilting or free-motion embroidery. ✽ Use only feet supplied with the PQ series machines may damage or break the pin feed mechanism. G Walking Foot For sewing or quilting on back of the zipper foot to adjust...
Users Manual - English
Page 21
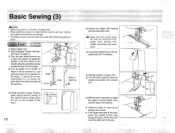
... the way, lower the needle all the way 16 through the fabric, lift the foot, and move the slider out of the way. Fold the seam margin with the overlap of the zipper position facing down 0.2 cm on the fabric. Basic Sewing (3) Note • Make sure power is off before changing... folded hem on the opposite side with basting and sew along the mark. It should be used as a guide when attaching piping to lower the needle and position the presser foot. 4 Divide the seam margin. Slide 0.5 cm " Stop Base of Opening 5 Secure the zipper with the stitches. 7 Change position of zipper foot...
... the way, lower the needle all the way 16 through the fabric, lift the foot, and move the slider out of the way. Fold the seam margin with the overlap of the zipper position facing down 0.2 cm on the fabric. Basic Sewing (3) Note • Make sure power is off before changing... folded hem on the opposite side with basting and sew along the mark. It should be used as a guide when attaching piping to lower the needle and position the presser foot. 4 Divide the seam margin. Slide 0.5 cm " Stop Base of Opening 5 Secure the zipper with the stitches. 7 Change position of zipper foot...

Users Manual - English
Page 22
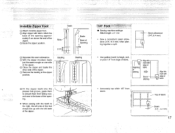
...zipper with the left side of the foot should line up with fabric. Seam allowance (1/4", 6.4 mm) • Use guides (mark) to the right, the left teeth of the zipper. 1/4" Foot G Sewing machine settings: Stitch length = 2 - 2.5 • Sew a consistent seam allowance (1/4", 6.4 mm) when piecing together a quilt. Mark the base...of the opening . ✽ When sewing with the teeth to begin, end, or pivot 1/4" from seam. Basting Basting 8 Fit the zipper teeth into the presser foot groove, guide them to prevent them from falling over, and sew to the base of the opening approximately 2 cm ...
...zipper with the left side of the foot should line up with fabric. Seam allowance (1/4", 6.4 mm) • Use guides (mark) to the right, the left teeth of the zipper. 1/4" Foot G Sewing machine settings: Stitch length = 2 - 2.5 • Sew a consistent seam allowance (1/4", 6.4 mm) when piecing together a quilt. Mark the base...of the opening . ✽ When sewing with the teeth to begin, end, or pivot 1/4" from seam. Basting Basting 8 Fit the zipper teeth into the presser foot groove, guide them to prevent them from falling over, and sew to the base of the opening approximately 2 cm ...

Users Manual - English
Page 24
Adjustment 19 Fabric Separator Needle Lining Separator Velvets Seam Guide 1 Tighten the screw securely with a screwdriver since it might otherwise loosen due to vibration. 1 Installation To be swung off to the side as illustrated in ...drawing. Needle Separator • Use the separator to neatly sew 2 hard to manage fabrics together by keeping them together in a perfect seam. Note • Lighten the presser foot pressure slightly when using separator, it is lined up so that the needle passes through the slot of the...
Adjustment 19 Fabric Separator Needle Lining Separator Velvets Seam Guide 1 Tighten the screw securely with a screwdriver since it might otherwise loosen due to vibration. 1 Installation To be swung off to the side as illustrated in ...drawing. Needle Separator • Use the separator to neatly sew 2 hard to manage fabrics together by keeping them together in a perfect seam. Note • Lighten the presser foot pressure slightly when using separator, it is lined up so that the needle passes through the slot of the...

User Manual - French
Page 5
... Foot 15 Zipper Foot 16 Invisible Zipper Foot 17 1/4" Foot 17 Quilting Foot 18 Walking Foot 18 Fabric Separator (for joining lining to fabric) 19 Seam Guide 19 Caring for Your Machine 20 Cleaning the Machine 20 Lubrication Points 20 Trouble Shooting 21 •
... Foot 15 Zipper Foot 16 Invisible Zipper Foot 17 1/4" Foot 17 Quilting Foot 18 Walking Foot 18 Fabric Separator (for joining lining to fabric) 19 Seam Guide 19 Caring for Your Machine 20 Cleaning the Machine 20 Lubrication Points 20 Trouble Shooting 21 •

User Manual - French
Page 6
... Zipper Foot 112797-001 16 Invisible Zipper Foot 148475-001 17 1/4" Foot XA7258-001 18 Quilting Foot XA7255-101 19 Walking Foot XA7253-001 20 Seam Guide XA7256-001 21 Foot Controller XC1220-051 22 Fabric Extension Table XC1387-051 Note Foot controller: Model P This foot controller is used for sewing machine...
... Zipper Foot 112797-001 16 Invisible Zipper Foot 148475-001 17 1/4" Foot XA7258-001 18 Quilting Foot XA7255-101 19 Walking Foot XA7253-001 20 Seam Guide XA7256-001 21 Foot Controller XC1220-051 22 Fabric Extension Table XC1387-051 Note Foot controller: Model P This foot controller is used for sewing machine...
User Manual - French
Page 18
... Make sure the power is used for most sewing. (Can also be used for sewing thick fabrics or seams.) * When sewing thick seams, lightly guide the fabric with your hand on the downward side of the seam. * Can also be used with pin feeding. • Zipper Foot Use to attach fasteners other than concealed... damaoe or break the pin feed mechanism. • General purpose Foot This foot is off before changing presser feet. You can begin sewing with 1/4" or 1/8" seam allowance.
... Make sure the power is used for most sewing. (Can also be used for sewing thick fabrics or seams.) * When sewing thick seams, lightly guide the fabric with your hand on the downward side of the seam. * Can also be used with pin feeding. • Zipper Foot Use to attach fasteners other than concealed... damaoe or break the pin feed mechanism. • General purpose Foot This foot is off before changing presser feet. You can begin sewing with 1/4" or 1/8" seam allowance.
User Manual - French
Page 21
... gets in the way, ). C) Change position of the opening . Fold the seam margin with the stitches. Sew from left to lower the needle and position the presser foot. ® Divide the... seam margin. lower the needle all the way • through the fabric, lift the foot, ...using the adjustment screw to slide the foot from below zip stop. errox.r.. • It should be used as a guide when attaching piping to fabric. - C) Line up , baste the zipper onto the fabric, then sew the edge of...
... gets in the way, ). C) Change position of the opening . Fold the seam margin with the stitches. Sew from left to lower the needle and position the presser foot. ® Divide the... seam margin. lower the needle all the way • through the fabric, lift the foot, ...using the adjustment screw to slide the foot from below zip stop. errox.r.. • It should be used as a guide when attaching piping to fabric. - C) Line up , baste the zipper onto the fabric, then sew the edge of...
User Manual - French
Page 22
...Align this J mark with the left side of the foot should line up with edge of Beginning fabric of the zipper. Seam allowance (114", 6.4 mm) • Use guides (mark) to the right, the left teeth of stitching p--at the zipper I fe .:,,,....e-,:4C.L.e.maelbaMtaltIldOWLSINNIMI • Accurately ... ® Fit the zipper teeth into the presser foot groove, guide them 1 to prevent them from falling over, and sew to the base of the opening approximately 2 cm above the end of fabric. Mark the base of fabric Seam {uts, Mali 17 • • %. • invisible...
...Align this J mark with the left side of the foot should line up with edge of Beginning fabric of the zipper. Seam allowance (114", 6.4 mm) • Use guides (mark) to the right, the left teeth of stitching p--at the zipper I fe .:,,,....e-,:4C.L.e.maelbaMtaltIldOWLSINNIMI • Accurately ... ® Fit the zipper teeth into the presser foot groove, guide them 1 to prevent them from falling over, and sew to the base of the opening approximately 2 cm above the end of fabric. Mark the base of fabric Seam {uts, Mali 17 • • %. • invisible...

