

Users Manual - English
Page 2
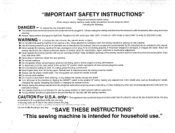
... manufacturer as contained in a polarized outlet only one blade wider than the other user servicing adjustments mentioned in the needle area, such as threading the needle, changing the needle, threading the bobbin or changing the presser foot etc. G Keep fingers away from outlet. G Do not use by pulling on cord. G Do not...
... manufacturer as contained in a polarized outlet only one blade wider than the other user servicing adjustments mentioned in the needle area, such as threading the needle, changing the needle, threading the bobbin or changing the presser foot etc. G Keep fingers away from outlet. G Do not use by pulling on cord. G Do not...

Users Manual - English
Page 4
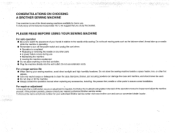
...convenient dealer locator. Do not touch moving parts such as the balance wheel, thread take-up or needle while the machine is operating. For a longer service life G When storing your nearest authorized Brother service center. For repair or adjustment In the event that you study this ...Do not use G Maintaining the machine G Leaving the machine unattended G Do not place anything on the foot controller. CONGRATULATIONS ON CHOOSING A BROTHER SEWING MACHINE Your machine is one of the operation manual to turn off the power switch and unplug the cord when: G Operation is completed ...
...convenient dealer locator. Do not touch moving parts such as the balance wheel, thread take-up or needle while the machine is operating. For a longer service life G When storing your nearest authorized Brother service center. For repair or adjustment In the event that you study this ...Do not use G Maintaining the machine G Leaving the machine unattended G Do not place anything on the foot controller. CONGRATULATIONS ON CHOOSING A BROTHER SEWING MACHINE Your machine is one of the operation manual to turn off the power switch and unplug the cord when: G Operation is completed ...

Users Manual - English
Page 5
... Length Regulator 3 Reverse Stitch Lever 3 Presser Foot Lift Lever 4 Knee Lift 4 Presser Foot Pressure Adjustment Dial 4 Fabric Extension Table 4 Thread Cutter Button 5 Needle Stop Position Button 5 Light Switch 5 Feed Dog Adjustment Knob 5 Changing Needles and Light Bulb 6 Changing the Needle ...6 Changing the Feed Pin 6 Changing Light Bulbs 6 Threading 7 Bobbin Winding 7 Bobbin Insertion 9 Upper Threading 10 Using the Automatic Needle Threader 10 Stitch Samples and Needle Chart 12 Stitch Samples 12 Thread Tension 12 Changing Presser Feet 13 Changing Presser Feet (Zipper...
... Length Regulator 3 Reverse Stitch Lever 3 Presser Foot Lift Lever 4 Knee Lift 4 Presser Foot Pressure Adjustment Dial 4 Fabric Extension Table 4 Thread Cutter Button 5 Needle Stop Position Button 5 Light Switch 5 Feed Dog Adjustment Knob 5 Changing Needles and Light Bulb 6 Changing the Needle ...6 Changing the Feed Pin 6 Changing Light Bulbs 6 Threading 7 Bobbin Winding 7 Bobbin Insertion 9 Upper Threading 10 Using the Automatic Needle Threader 10 Stitch Samples and Needle Chart 12 Stitch Samples 12 Thread Tension 12 Changing Presser Feet 13 Changing Presser Feet (Zipper...

Users Manual - English
Page 7
... Sewing Area Light (Page 6) Automatic Needle Threader (Page 10 and 11) Quick Bobbin Thread Device (Page 9) Thread Cutter Button (Page 5) Thread Tension Dial (Page 3 and 12) Feed Dogs (Page 5 and 14) Thread Guide Bar (Page 7) Stitch Length Regulator (Page 3) Bobbin Winder (Page 7) Hand Wheel (Page 3) Indicator Lamp Needle ... Lever (Page 3) Power Socket (Page 3) Feed Dog Adjustment Knob (Page 5) Foot Controller Jack (Page 3) Knee Lift (Page 4) Air Vents Handle Thread Guide for Bobbin Winding (Page 7) Presser Foot Lift Lever (Page 4) Spool Cushion (Page 7) Spool Pin (Page 7) 2
... Sewing Area Light (Page 6) Automatic Needle Threader (Page 10 and 11) Quick Bobbin Thread Device (Page 9) Thread Cutter Button (Page 5) Thread Tension Dial (Page 3 and 12) Feed Dogs (Page 5 and 14) Thread Guide Bar (Page 7) Stitch Length Regulator (Page 3) Bobbin Winder (Page 7) Hand Wheel (Page 3) Indicator Lamp Needle ... Lever (Page 3) Power Socket (Page 3) Feed Dog Adjustment Knob (Page 5) Foot Controller Jack (Page 3) Knee Lift (Page 4) Air Vents Handle Thread Guide for Bobbin Winding (Page 7) Presser Foot Lift Lever (Page 4) Spool Cushion (Page 7) Spool Pin (Page 7) 2

Users Manual - English
Page 8
...: Model P This foot controller is desired, turn on wrong side of the fabric. Upper and bobbin threads will then meet on right side of fabric. Upper Thread Tension Loosen Tighten Tension Block Hand Wheel G Position needle using stitch regulator dial. 67 23 Stitch Length Reference... the left. Power Switch G Flip power switch to "I O Thread Tension Dial G When tighter thread tension is desired, turn hand wheel towards you. G When looser thread tension is used for sewing machine model PQ1500S. Upper and lower threads will meet on . G Plug in the lowered position. ✽...
...: Model P This foot controller is desired, turn on wrong side of the fabric. Upper and bobbin threads will then meet on right side of fabric. Upper Thread Tension Loosen Tighten Tension Block Hand Wheel G Position needle using stitch regulator dial. 67 23 Stitch Length Reference... the left. Power Switch G Flip power switch to "I O Thread Tension Dial G When tighter thread tension is desired, turn hand wheel towards you. G When looser thread tension is used for sewing machine model PQ1500S. Upper and lower threads will meet on . G Plug in the lowered position. ✽...

Users Manual - English
Page 9
... Knob" on page 12. Presser Foot Lift Lever G Lowering the presser foot lift lever lowers the sewing foot down onto the fabric and engages the thread tension function. ✽ When working with heavy fabrics or other fabrics that don't slide easily under the foot, raise the presser foot lever to lift...
... Knob" on page 12. Presser Foot Lift Lever G Lowering the presser foot lift lever lowers the sewing foot down onto the fabric and engages the thread tension function. ✽ When working with heavy fabrics or other fabrics that don't slide easily under the foot, raise the presser foot lever to lift...
Users Manual - English
Page 10
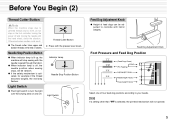
... operate. 5 Note If a setting other than is lit up, the machine will stop sewing with the needle lowered through the fabric. G The thread cutter trims upper and bobbin threads at the end of feed dogs can be random. G When indicator lamp is activated, for example if the... mechanism is off and moving the needle with the hand wheel, check the situation. Thread Cutter Button ✽ Press with the presser lever down. Otherwise broken needles could result. Before You Begin (2) Thread Cutter Button Note When the machine stops due to coincide with fabric weights. Indicator Lamp...
... operate. 5 Note If a setting other than is lit up, the machine will stop sewing with the needle lowered through the fabric. G The thread cutter trims upper and bobbin threads at the end of feed dogs can be random. G When indicator lamp is activated, for example if the... mechanism is off and moving the needle with the hand wheel, check the situation. Thread Cutter Button ✽ Press with the presser lever down. Otherwise broken needles could result. Before You Begin (2) Thread Cutter Button Note When the machine stops due to coincide with fabric weights. Indicator Lamp...
Users Manual - English
Page 12
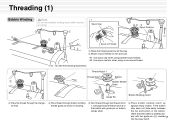
...Winding Clutch 3 Pass the thread through the triangular hole. 4 Pass thread through bobbin winding thread guide as shown in drawing. 5 Run thread through top thread notch 1, and align bottom thread notch 2 of Thread 2 ]2 Spool Cushion 1 1 Raise the thread guide bar all the way. 2 Mount a spool thread on bobbin winder shaft. ...prop- 7 erly with guide pin on the spool pin. ✽1 Use spool cap when using parallel-wound thread. ✽2 Use spool cushion when using cross-wound thread. 5 - 0: See the following illustrations. If the bobbin stop does not slide easily between the top and...
...Winding Clutch 3 Pass the thread through the triangular hole. 4 Pass thread through bobbin winding thread guide as shown in drawing. 5 Run thread through top thread notch 1, and align bottom thread notch 2 of Thread 2 ]2 Spool Cushion 1 1 Raise the thread guide bar all the way. 2 Mount a spool thread on bobbin winder shaft. ...prop- 7 erly with guide pin on the spool pin. ✽1 Use spool cap when using parallel-wound thread. ✽2 Use spool cushion when using cross-wound thread. 5 - 0: See the following illustrations. If the bobbin stop does not slide easily between the top and...

Users Manual - English
Page 13
] Place the thread end so that it does not protrude from the bobbin. Bobbin Winding Clutch 7 While holding the end of the thread, step on the foot controller. 8 Stop winding process when bobbin is full. Continue to wind the bobbin while pressing down on the foot controller for a few seconds. Once enough thread has wound itself around the bobbin to original position. 0 Cut thread and remove bobbin. 8 Take the foot off foot controller. 9 Manually move bobbin winding clutch back to hold itself in place, release the foot controller and trim the excess thread.
] Place the thread end so that it does not protrude from the bobbin. Bobbin Winding Clutch 7 While holding the end of the thread, step on the foot controller. 8 Stop winding process when bobbin is full. Continue to wind the bobbin while pressing down on the foot controller for a few seconds. Once enough thread has wound itself around the bobbin to original position. 0 Cut thread and remove bobbin. 8 Take the foot off foot controller. 9 Manually move bobbin winding clutch back to hold itself in place, release the foot controller and trim the excess thread.
Users Manual - English
Page 14
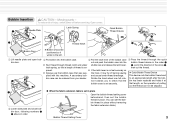
...race and release the latch lever. the hook, it at that the bobbin case is ex- Bobbin Thread Setting Cover 9 Open covers. 1 Needle Plate Latch Spring Quick Bobbin Thread Device 1 2 Thread Notch Bobbin Door ✽ Bobbin should be positioned so it winds to an appropriate length after the ...removing the fabric extension table.) 5 Lower slide plate and close bob- latch spring, so that was sup- A secondary bob- and cause lower thread breakage. Rotate the hand wheel one full rota- 2 tion towards you to check that length, so the operation of the bobbin case bin door....
...race and release the latch lever. the hook, it at that the bobbin case is ex- Bobbin Thread Setting Cover 9 Open covers. 1 Needle Plate Latch Spring Quick Bobbin Thread Device 1 2 Thread Notch Bobbin Door ✽ Bobbin should be positioned so it winds to an appropriate length after the ...removing the fabric extension table.) 5 Lower slide plate and close bob- latch spring, so that was sup- A secondary bob- and cause lower thread breakage. Rotate the hand wheel one full rota- 2 tion towards you to check that length, so the operation of the bobbin case bin door....
Users Manual - English
Page 15
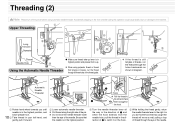
... eye of the needle. Accidentally stepping on the foot controller during this the hook that it is caught on the hook. 5 While holding the thread gently, return the needle threader lever to the machine. As you until needle is in the highest position, and lower presser foot. 10 2 Take... is in the highest position. 4 Turn the needle threader lever all three holes of the thread guide. ✽ If the thread is still tangles or breaks, run the thread through the holes backwards as well, pulling a loop of thread through the eye of the needle. Be sure that tangles or breaks, run the...
... eye of the needle. Accidentally stepping on the foot controller during this the hook that it is caught on the hook. 5 While holding the thread gently, return the needle threader lever to the machine. As you until needle is in the highest position, and lower presser foot. 10 2 Take... is in the highest position. 4 Turn the needle threader lever all three holes of the thread guide. ✽ If the thread is still tangles or breaks, run the thread through the holes backwards as well, pulling a loop of thread through the eye of the needle. Be sure that tangles or breaks, run the...

Users Manual - English
Page 16
Needle (HLX5) #9 #11 #14 #16 Thread #20 #30 #50 #60 #20 #30 #20 #30 #20 G The automatic needle threader cannot be used regardless of the chart, providing the needle used with the threadneedle combinations illustrated in the chart to the right. 11 Transparent nylon thread can be used is a #14 or #16. 6 Pull thread loop to the left.
Needle (HLX5) #9 #11 #14 #16 Thread #20 #30 #50 #60 #20 #30 #20 #30 #20 G The automatic needle threader cannot be used regardless of the chart, providing the needle used with the threadneedle combinations illustrated in the chart to the right. 11 Transparent nylon thread can be used is a #14 or #16. 6 Pull thread loop to the left.

Users Manual - English
Page 17
...hand wheel forward to lower the needle through the fabric, then step gently on knit fabrics such as messy stitches, puckered seams Upper Thread and thread breakage. Needles Cloth Thread Velvet Silk, Polyester #30 - #50 Quilt Polyester #20 - #50 Synthetic Suede Polyester #20 - #50 Knit Polyester #...cause fabric to bunch up lever to their highest positions. 6 Lift presser foot, remove fabric and then cut thread. ✽ When using thread cutter: 5 Press the thread cutter button while the presser foot lever in raised position, insert a test strip from the garment fabric under ...
...hand wheel forward to lower the needle through the fabric, then step gently on knit fabrics such as messy stitches, puckered seams Upper Thread and thread breakage. Needles Cloth Thread Velvet Silk, Polyester #30 - #50 Quilt Polyester #20 - #50 Synthetic Suede Polyester #20 - #50 Knit Polyester #...cause fabric to bunch up lever to their highest positions. 6 Lift presser foot, remove fabric and then cut thread. ✽ When using thread cutter: 5 Press the thread cutter button while the presser foot lever in raised position, insert a test strip from the garment fabric under ...

Users Manual - English
Page 19
...raised position). 5 Lift presser foot and remove fabric. 1 Make sure needle is in the right position in the matching color coded area. 3 Gently pull thread until feed pin catches fabric and sew. Backstitches 1 cm Finish Sewing. ✽ When changing sewing directions. 1 cm 1 Lift foot, pull about 15 cm... of upper and bobbin thread under and behind foot, and position fabric under foot. 2 Lower presser foot lever to lower foot. 3 Turn the hand wheel forward you to lower...
...raised position). 5 Lift presser foot and remove fabric. 1 Make sure needle is in the right position in the matching color coded area. 3 Gently pull thread until feed pin catches fabric and sew. Backstitches 1 cm Finish Sewing. ✽ When changing sewing directions. 1 cm 1 Lift foot, pull about 15 cm... of upper and bobbin thread under and behind foot, and position fabric under foot. 2 Lower presser foot lever to lower foot. 3 Turn the hand wheel forward you to lower...

Users Manual - English
Page 20
... Make sure power is off before changing feet. Insert the edge so that it lies directly under the presser foot, from the spot where the threads come out. Rolled Hem 15 Rolled Hem Foot 1 Attach rolled hem foot. ✽ Refer to page 13 for instructions on changing sewing feet. 2 Insert ...sew 2 stitches. 0.5 cm 0.5 cm 3 Turn the hand wheel towards you to raise the needle, raise the presser foot, then pull the fabric forward. 4 Hold the 4 threads in your left hand while sewing the first 3-4 stitches to hold them in place. 7 Fold hem over about 0.5 cm and continue feeding folded hem under...
... Make sure power is off before changing feet. Insert the edge so that it lies directly under the presser foot, from the spot where the threads come out. Rolled Hem 15 Rolled Hem Foot 1 Attach rolled hem foot. ✽ Refer to page 13 for instructions on changing sewing feet. 2 Insert ...sew 2 stitches. 0.5 cm 0.5 cm 3 Turn the hand wheel towards you to raise the needle, raise the presser foot, then pull the fabric forward. 4 Hold the 4 threads in your left hand while sewing the first 3-4 stitches to hold them in place. 7 Fold hem over about 0.5 cm and continue feeding folded hem under...

Users Manual - English
Page 24
... Needle Separator • Use the separator to neatly sew 2 hard to adjust the position of sewing feet and feed position to pin feeding position. 6 Pull thread until lower needle catches fabric. ✽ Sew 2-3 reinforcement stitches. 7 When not using the fabric separator. Fabric Separator Needle Lining Separator Velvets Seam Guide 1 Tighten the...
... Needle Separator • Use the separator to neatly sew 2 hard to adjust the position of sewing feet and feed position to pin feeding position. 6 Pull thread until lower needle catches fabric. ✽ Sew 2-3 reinforcement stitches. 7 When not using the fabric separator. Fabric Separator Needle Lining Separator Velvets Seam Guide 1 Tighten the...
Users Manual - English
Page 25
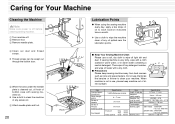
...containing a neutral detergent. When machine is very dirty, wipe with a dry cloth. Item Sewing Speed (maximum) Stitch Length (pitch) Stroke of Needle Stroke of Thread Take-Up Lever Foot Height Specification 1,500 stitches per minute 0 - 7 mm 34.1 mm 64.7 mm Foot Lift Knee control One 6 mm Two 9 ...Make sure power is off before cleaning sewing machine. 1 Turn machine off. 2 Remove foot. 3 Remove needle plate. 4 Clean out dust and thread scraps. ✽ Thread scraps can be used SCHMETZ 130/705H #65 - #110 Bed dimensions 439 mm × 178 mm Total weight 11 kg Sewing Light 120V model...
...containing a neutral detergent. When machine is very dirty, wipe with a dry cloth. Item Sewing Speed (maximum) Stitch Length (pitch) Stroke of Needle Stroke of Thread Take-Up Lever Foot Height Specification 1,500 stitches per minute 0 - 7 mm 34.1 mm 64.7 mm Foot Lift Knee control One 6 mm Two 9 ...Make sure power is off before cleaning sewing machine. 1 Turn machine off. 2 Remove foot. 3 Remove needle plate. 4 Clean out dust and thread scraps. ✽ Thread scraps can be used SCHMETZ 130/705H #65 - #110 Bed dimensions 439 mm × 178 mm Total weight 11 kg Sewing Light 120V model...

Users Manual - English
Page 26
... your sewing machine in . 3 Reattach foot controller. 3 Machine is The area under the needle plate needs to choose the needle that best fits your fabric-thread combination. 12 Bobbin tension is too high. Clean and oil the machine. 20 Using the automatic needle threader incorrectly. The foot controller has come unplugged... bobbin case. See chart on . Check to make sure the machine's plugged in for repair. 21 Adjust stitch length. 3 Wrong needle for the fabric and thread you purchased it, or your nearest Brother dealer for service, check the following chart.
... your sewing machine in . 3 Reattach foot controller. 3 Machine is The area under the needle plate needs to choose the needle that best fits your fabric-thread combination. 12 Bobbin tension is too high. Clean and oil the machine. 20 Using the automatic needle threader incorrectly. The foot controller has come unplugged... bobbin case. See chart on . Check to make sure the machine's plugged in for repair. 21 Adjust stitch length. 3 Wrong needle for the fabric and thread you purchased it, or your nearest Brother dealer for service, check the following chart.
User Manual - French
Page 2
... before using a sewing machine, basic safety precautions should always be left unattended while plugged in. Use only accessories recommended by the manufacturer as threading the needle, changing the needle, threading the bobbin or changing the presser foot etc. • Always unplug the sewing machine from outlet. • Do not unplug by pulling...
... before using a sewing machine, basic safety precautions should always be left unattended while plugged in. Use only accessories recommended by the manufacturer as threading the needle, changing the needle, threading the bobbin or changing the presser foot etc. • Always unplug the sewing machine from outlet. • Do not unplug by pulling...
User Manual - French
Page 4
... • Be sure to watch the placement of your hands in the back of the finest sewing machines available for your authorised Brother service center visit www.brother.com and use extension cords. To fully enjoy all the features incorporated into the wall outlet. To find out the name and ...objects. • Use only neutral soaps or detergents to inspect and adjust the machine yourself. Do not touch moving parts such as the balance wheel, thread take-up or needle while the machine is operating. • Remember to turn off the power switch and unplug the cord when: • Operation...
... • Be sure to watch the placement of your hands in the back of the finest sewing machines available for your authorised Brother service center visit www.brother.com and use extension cords. To fully enjoy all the features incorporated into the wall outlet. To find out the name and ...objects. • Use only neutral soaps or detergents to inspect and adjust the machine yourself. Do not touch moving parts such as the balance wheel, thread take-up or needle while the machine is operating. • Remember to turn off the power switch and unplug the cord when: • Operation...


