

Users Manual - English
Page 2
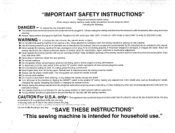
... Always unplug the sewing machine from the electrical outlet when removing covers, lubricating, or when making any opening. G Always unplug before cleaning. Replace bulb with this sewing machine if it has a damaged cord or plug, if it has been dropped or damaged, or dropped into any adjustments in ... etc. G Do not unplug by the manufacturer as described in this sewing machine to the symbol "O" before using and before changing the light bulb. The wrong plate can cause the needle to break. G Do not use ." It may deflect the needle causing it still does not fit...
... Always unplug the sewing machine from the electrical outlet when removing covers, lubricating, or when making any opening. G Always unplug before cleaning. Replace bulb with this sewing machine if it has a damaged cord or plug, if it has been dropped or damaged, or dropped into any adjustments in ... etc. G Do not unplug by the manufacturer as described in this sewing machine to the symbol "O" before using and before changing the light bulb. The wrong plate can cause the needle to break. G Do not use ." It may deflect the needle causing it still does not fit...

Users Manual - English
Page 5
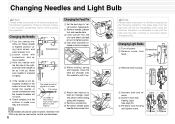
... 4 Fabric Extension Table 4 Thread Cutter Button 5 Needle Stop Position Button 5 Light Switch 5 Feed Dog Adjustment Knob 5 Changing Needles and Light Bulb 6 Changing the Needle 6 Changing the Feed Pin 6 Changing Light Bulbs 6 Threading 7 Bobbin Winding 7 Bobbin Insertion 9 Upper Threading 10 Using the Automatic Needle Threader 10 Stitch Samples and Needle Chart 12 Stitch...
... 4 Fabric Extension Table 4 Thread Cutter Button 5 Needle Stop Position Button 5 Light Switch 5 Feed Dog Adjustment Knob 5 Changing Needles and Light Bulb 6 Changing the Needle 6 Changing the Feed Pin 6 Changing Light Bulbs 6 Threading 7 Bobbin Winding 7 Bobbin Insertion 9 Upper Threading 10 Using the Automatic Needle Threader 10 Stitch Samples and Needle Chart 12 Stitch...
Users Manual - English
Page 11
...attach needle plate, needle and presser foot. Flat surface Lay needle on a flat surface to cool down before changing bulbs. Screwdriver 2 Remove screw from head. 3 Remove bulb housing. 4 Unscrew bulb and remove. 5 Screw in tightly. Screwdriver ✽ If the needle is not adequately inserted or the screw is... changer, lower and attach while holding spring with the flat side to wait until feed pin is screwed in new bulb. Changing Needles and Light Bulb Note Please make sure power is off before carrying out the following operation. There is loose, this operation. Changing...
...attach needle plate, needle and presser foot. Flat surface Lay needle on a flat surface to cool down before changing bulbs. Screwdriver 2 Remove screw from head. 3 Remove bulb housing. 4 Unscrew bulb and remove. 5 Screw in tightly. Screwdriver ✽ If the needle is not adequately inserted or the screw is... changer, lower and attach while holding spring with the flat side to wait until feed pin is screwed in new bulb. Changing Needles and Light Bulb Note Please make sure power is off before carrying out the following operation. There is loose, this operation. Changing...
User Manual - French
Page 2
Replace bulb with any air openings blocked. only - This appliance has a polarized plug (one way. Special care is not intended for household use as a toy. nal f!t acntact ... ) to be left unattended while plugged in the outlet, reverse the plug. !f !: at:!! Always unplug the sewing machine from all instructions before changing the light bulb. "IMPORTANT SAFETY INSTRUCTIONS" "Read all moving parts. "This sewing machine is intended for use outdoors. • Do not operate where aerosol (spray) products are being...
Replace bulb with any air openings blocked. only - This appliance has a polarized plug (one way. Special care is not intended for household use as a toy. nal f!t acntact ... ) to be left unattended while plugged in the outlet, reverse the plug. !f !: at:!! Always unplug the sewing machine from all instructions before changing the light bulb. "IMPORTANT SAFETY INSTRUCTIONS" "Read all moving parts. "This sewing machine is intended for use outdoors. • Do not operate where aerosol (spray) products are being...

User Manual - French
Page 5
... 4 Fabric Extension Table 4 Thread Cutter Button 5 Needle Stop Position Button 5 Light Switch 5 Feed Dog Adjustment Knob 5 Changing Needles and Light Bulb 6 Changing the Needle 6 Changing the Feed Pin 6 Changing Light Bulbs 6 Threading 7 Bobbin Winding 7 Bobbin Insertion 9 Upper Threading 10 Using the Automatic Needle Threader 10 Stitch Samples and Needle Chart 12 Stitch...
... 4 Fabric Extension Table 4 Thread Cutter Button 5 Needle Stop Position Button 5 Light Switch 5 Feed Dog Adjustment Knob 5 Changing Needles and Light Bulb 6 Changing the Needle 6 Changing the Feed Pin 6 Changing Light Bulbs 6 Threading 7 Bobbin Winding 7 Bobbin Insertion 9 Upper Threading 10 Using the Automatic Needle Threader 10 Stitch Samples and Needle Chart 12 Stitch...

User Manual - French
Page 11
... machine, therefore it is loose, this operation. p * If the needle is not adequately inserted or the screw is advisable to cool down before changing bulbs. ..17,5r^".• 1,! (D Turn off . Flat surface Lay needle on a flat surface to a surface. move needle. ® Hold the ...needle with screwdriver, and re- Make with fingertip. Sewing Light: See page 20. ® Re-attach bulb housing and tighten screw. 230V 120V Light Light `it up. if the machine accidentally starts running during this may also be used under normal ...
... machine, therefore it is loose, this operation. p * If the needle is not adequately inserted or the screw is advisable to cool down before changing bulbs. ..17,5r^".• 1,! (D Turn off . Flat surface Lay needle on a flat surface to a surface. move needle. ® Hold the ...needle with screwdriver, and re- Make with fingertip. Sewing Light: See page 20. ® Re-attach bulb housing and tighten screw. 230V 120V Light Light `it up. if the machine accidentally starts running during this may also be used under normal ...


