Users Manual - English
Page 3
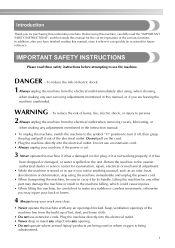
... or service center for examination, repair, electrical or mechanical adjustment. • While the machine is being used or where oxygen is stored or in use extension cords. Return the machine to use an extension cord. • Always unplug your work area clear: • Never operate the machine with...lubricating, or when making any sudden or careless movements, otherwise you have finished reading this manual for future reference. Do not use the machine. Plug the machine directly into the electrical outlet. • Never drop or insert any air openings blocked. In addition, after...
... or service center for examination, repair, electrical or mechanical adjustment. • While the machine is being used or where oxygen is stored or in use extension cords. Return the machine to use an extension cord. • Always unplug your work area clear: • Never operate the machine with...lubricating, or when making any sudden or careless movements, otherwise you have finished reading this manual for future reference. Do not use the machine. Plug the machine directly into the electrical outlet. • Never drop or insert any air openings blocked. In addition, after...
Users Manual - English
Page 4
... or adjustment is intended for its intended use bent or damaged needles. • Keep fingers away from all moving parts. Never allow children to clean the machine. For additional product information and updates, visit our web site at www.brother.com SAVE THESE INSTRUCTIONS This machine is ... table in fire or an electric shock. • Do not place this manual. If the problem persists, please consult your local authorized Brother dealer. otherwise, the machine, power cord or garment being embroidered may fall, resulting in should be replaced by or near children. •...
... or adjustment is intended for its intended use bent or damaged needles. • Keep fingers away from all moving parts. Never allow children to clean the machine. For additional product information and updates, visit our web site at www.brother.com SAVE THESE INSTRUCTIONS This machine is ... table in fire or an electric shock. • Do not place this manual. If the problem persists, please consult your local authorized Brother dealer. otherwise, the machine, power cord or garment being embroidered may fall, resulting in should be replaced by or near children. •...
Users Manual - English
Page 5
... with the fuse cover omitted. • If the available electrical outlet is not intended for use by ASTA to ensure that they have been given supervision or instruction concerning use a fuse approved by persons (including children) with reduced physical, sensory or mental capabilities, or lack of the appliance...with the appliance. FOR USERS IN THE UK, EIRE, MALTA AND CYPRUS ONLY IMPORTANT • In the event of replacing the plug fuse, use of experience and knowledge, unless they do not play with this equipment, you should be supervised to BS 1362, i.e. carrying the mark, ...
... with the fuse cover omitted. • If the available electrical outlet is not intended for use by ASTA to ensure that they have been given supervision or instruction concerning use a fuse approved by persons (including children) with reduced physical, sensory or mental capabilities, or lack of the appliance...with the appliance. FOR USERS IN THE UK, EIRE, MALTA AND CYPRUS ONLY IMPORTANT • In the event of replacing the plug fuse, use of experience and knowledge, unless they do not play with this equipment, you should be supervised to BS 1362, i.e. carrying the mark, ...
Users Manual - English
Page 6
... Declaration of Conformity (For USA Only) Responsible Party: Brother International Corporation 100 Somerset Corporate Boulevard Bridgewater, NJ 08807-0911 USA TEL : (908) 704-1700 declares that the product Product Name: Model Number: Brother Sewing Machine HE1, PE500 This device complies with Part 15 of the FCC Rules.... the equipment off and on a circuit different from that to which can radiate radio frequency energy and, if not installed and used in order to operate the equipment. 4 Operation is no guarantee that may cause undesired operation. However, there is subject to ...
... Declaration of Conformity (For USA Only) Responsible Party: Brother International Corporation 100 Somerset Corporate Boulevard Bridgewater, NJ 08807-0911 USA TEL : (908) 704-1700 declares that the product Product Name: Model Number: Brother Sewing Machine HE1, PE500 This device complies with Part 15 of the FCC Rules.... the equipment off and on a circuit different from that to which can radiate radio frequency energy and, if not installed and used in order to operate the equipment. 4 Operation is no guarantee that may cause undesired operation. However, there is subject to ...
Users Manual - English
Page 7
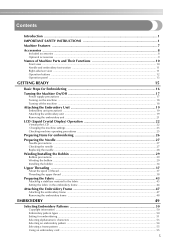
... 50 Copyright information ...50 Embroidery pattern types ...50 Setting for embroidering ...51 Selecting alphanumeric characters ...53 Selecting an embroidery pattern ...54 Selecting a frame pattern ...55 Using an embroidery card ...55 5
... 50 Copyright information ...50 Embroidery pattern types ...50 Setting for embroidering ...51 Selecting alphanumeric characters ...53 Selecting an embroidery pattern ...54 Selecting a frame pattern ...55 Using an embroidery card ...55 5

Users Manual - English
Page 8
... tension ...63 Adjusting the bobbin thread tension ...64 Connecting character patterns ...65 Resewing ...66 Thread runs out partway through a design ...67 Stopping while embroidering ...67 Using the Memory Function 69 Embroidery data precautions ...69 Saving patterns ...70 Retrieving embroidery patterns from the computer 71 APPENDIX 73 Care and Maintenance ...74 Cleaning...
... tension ...63 Adjusting the bobbin thread tension ...64 Connecting character patterns ...65 Resewing ...66 Thread runs out partway through a design ...67 Stopping while embroidering ...67 Using the Memory Function 69 Embroidery data precautions ...69 Saving patterns ...70 Retrieving embroidery patterns from the computer 71 APPENDIX 73 Care and Maintenance ...74 Cleaning...
Users Manual - English
Page 9
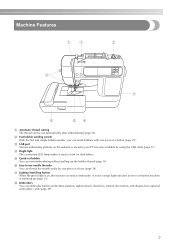
f Easy-to work on dark fabrics. d Bright light The convenient LED lamp makes it easy to -use needle threader You can thread the needle easily by using the USB cable (page 71). h Embroidery You can start embroidering without pulling up (page 12). g Lighting Start/Stop button When the green light is on ...
f Easy-to work on dark fabrics. d Bright light The convenient LED lamp makes it easy to -use needle threader You can thread the needle easily by using the USB cable (page 71). h Embroidery You can start embroidering without pulling up (page 12). g Lighting Start/Stop button When the green light is on ...

Users Manual - English
Page 12
...frame. h Presser foot lever (page 28) Raise and lower the presser foot lever to thread the needle. l Needle threader lever (page 41) Use the needle threader lever to raise and lower the embroidery foot . m Thread tension dial (page 63) Adjust the upper thread tension with this ...thread guide when winding the bobbin thread and threading the machine. Before using the machine, carefully read these buttons to operate the machine. n Thread take-up lever (page 40) o Bobbin-winding thread guide and pretension disc...
...frame. h Presser foot lever (page 28) Raise and lower the presser foot lever to thread the needle. l Needle threader lever (page 41) Use the needle threader lever to raise and lower the embroidery foot . m Thread tension dial (page 63) Adjust the upper thread tension with this ...thread guide when winding the bobbin thread and threading the machine. Before using the machine, carefully read these buttons to operate the machine. n Thread take-up lever (page 40) o Bobbin-winding thread guide and pretension disc...

Users Manual - English
Page 13
...e Air vent The air vent allows the air surrounding the motor to the computer. d Needle plate cover (page 74) Remove the needle plate cover to use your machine. 11 a Handle Carry the machine by its handle when transporting the machine. Memo z Refer to pages 10 through the thread guide disk when... Thread guide disk (page 40) Pass the thread through 13 while you (counterclockwise) to raise and lower the needle. c Needle plate When the needle is used . b Handwheel (page 38) Turn the handwheel toward you are learning to clean the bobbin case and race. Do not cover the air vent while the...
...e Air vent The air vent allows the air surrounding the motor to the computer. d Needle plate cover (page 74) Remove the needle plate cover to use your machine. 11 a Handle Carry the machine by its handle when transporting the machine. Memo z Refer to pages 10 through the thread guide disk when... Thread guide disk (page 40) Pass the thread through 13 while you (counterclockwise) to raise and lower the needle. c Needle plate When the needle is used . b Handwheel (page 38) Turn the handwheel toward you are learning to clean the bobbin case and race. Do not cover the air vent while the...
Users Manual - English
Page 14
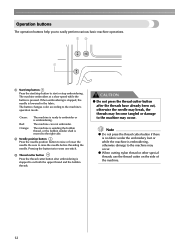
... machine is pressed. Be sure to the machine may occur. Pressing the button twice sews one stitch. z When cutting nylon thread or other special threads, use the thread cutter on the side of the machine. 12
... machine is pressed. Be sure to the machine may occur. Pressing the button twice sews one stitch. z When cutting nylon thread or other special threads, use the thread cutter on the side of the machine. 12
Users Manual - English
Page 15
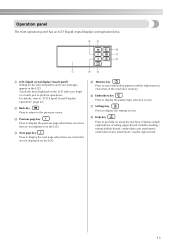
... key Press to display the settings screen. c Previous page key Press to display the next page when there are items that are not displayed on using the machine. g Settings key Press to display the pattern type selection screen. Touch the keys displayed on the LCD. For details, refer to perform operations...
... key Press to display the settings screen. c Previous page key Press to display the next page when there are items that are not displayed on using the machine. g Settings key Press to display the pattern type selection screen. Touch the keys displayed on the LCD. For details, refer to perform operations...
Users Manual - English
Page 18
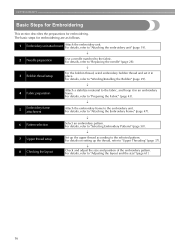
... hoop it in an embroidery frame. For details, refer to the fabric. For details, refer to "Attaching the embroidery unit" (page 19). ↓ 2 Needle preparation Use a needle matched to "Adjusting the layout and the size" (page 61). 16 The basic steps for embroidering. GETTING READY Basic Steps for Embroidering This section...
... hoop it in an embroidery frame. For details, refer to the fabric. For details, refer to "Attaching the embroidery unit" (page 19). ↓ 2 Needle preparation Use a needle matched to "Adjusting the layout and the size" (page 61). 16 The basic steps for embroidering. GETTING READY Basic Steps for Embroidering This section...
Users Manual - English
Page 19
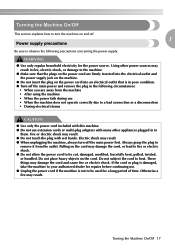
...and off the main power first. These things may result. Electric shock may result in the following precautions concerning the power supply. WARNING ● Use only regular household electricity for a long period of time. If the cord or plug is damaged, take the machine to your authorized dealer for ...repairs before continuing use. ● Unplug the power cord if the machine is in poor condition. ● Turn off the main power and remove the plug in fire...
...and off the main power first. These things may result. Electric shock may result in the following precautions concerning the power supply. WARNING ● Use only regular household electricity for a long period of time. If the cord or plug is damaged, take the machine to your authorized dealer for ...repairs before continuing use. ● Unplug the power cord if the machine is in poor condition. ● Turn off the main power and remove the plug in fire...

Users Manual - English
Page 20
... Embroidery Unit" (page 19).) Prepare the included power supply cord. If the embroidery unit is turned on. Turning off the machine When you have finished using the machine, turn the machine on b the right side of electrical shock, this is being operated, turn it to "|"). In addition, before transporting the machine...
... Embroidery Unit" (page 19).) Prepare the included power supply cord. If the embroidery unit is turned on. Turning off the machine When you have finished using the machine, turn the machine on b the right side of electrical shock, this is being operated, turn it to "|"). In addition, before transporting the machine...
Users Manual - English
Page 24
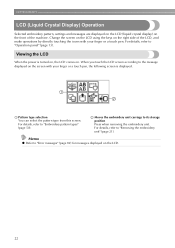
... by directly touching the icons with your finger or a touch pen. Viewing the LCD When the power is displayed. Change the screen on the LCD using the keys on the right side of the machine. For details, refer to "Error messages" (page 82) for messages displayed on . Memo z Refer to "Removing...
... by directly touching the icons with your finger or a touch pen. Viewing the LCD When the power is displayed. Change the screen on the LCD using the keys on the right side of the machine. For details, refer to "Error messages" (page 82) for messages displayed on . Memo z Refer to "Removing...
Users Manual - English
Page 25
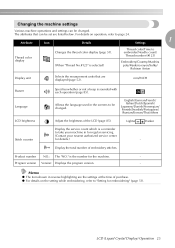
mm/INCH Buzzer Language LCD brightness Stitch counter Specifies whether or not a beep is the number for the machine. - Allows the language used in the screens to take your machine in reverse highlighting are listed below. Display the total number of the LCD (page 85). Program version Version: ...
mm/INCH Buzzer Language LCD brightness Stitch counter Specifies whether or not a beep is the number for the machine. - Allows the language used in the screens to take your machine in reverse highlighting are listed below. Display the total number of the LCD (page 85). Program version Version: ...

Users Manual - English
Page 26
... are changed are complete, press d (Back key). Example: Changing the measurement unit X The LCD comes on the operation X The setting screen appears. c Switch the screen using (Previous page key) and (Next page key). • The following screens show their default settings. GETTING READY Turn on the machine. a The highlighted display is...
... are changed are complete, press d (Back key). Example: Changing the measurement unit X The LCD comes on the operation X The setting screen appears. c Switch the screen using (Previous page key) and (Next page key). • The following screens show their default settings. GETTING READY Turn on the machine. a The highlighted display is...
Users Manual - English
Page 28
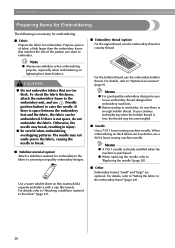
... a stabilizer material to the fabric" (page 43). ■ Embroidery thread (option) For the upper thread, use (Needle position button) to use stabilizer when embroidering projects, especially when embroidering on thin materials like organdy and fabrics with a nap like towels. ... break. ■ Stabilizer material (option) Attach a stabilizer material for embroidery machines. When embroidering on thick fabrics such as denim, use the embroidery bobbin thread. GETTING READY Preparing Items for Embroidering The following is purchased. z When replacing the needle, refer to "Optional...
... a stabilizer material to the fabric" (page 43). ■ Embroidery thread (option) For the upper thread, use (Needle position button) to use stabilizer when embroidering projects, especially when embroidering on thin materials like organdy and fabrics with a nap like towels. ... break. ■ Stabilizer material (option) Attach a stabilizer material for embroidery machines. When embroidering on thick fabrics such as denim, use the embroidery bobbin thread. GETTING READY Preparing Items for Embroidering The following is purchased. z When replacing the needle, refer to "Optional...
Users Manual - English
Page 29
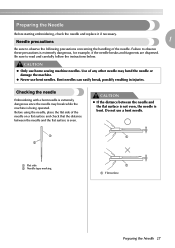
... for example, if the needle breaks and fragments are dispersed. Failure to observe the following precautions concerning the handling of the needle. Before using the needle, place the flat side of any other needle may break while the machine is even. Checking the needle Embroidering with a bent... needle is bent. Do not use bent needles. Be sure to read and carefully follow the instructions below. Use of the needle on a flat surface and check that the distance between the needle and the flat ...
... for example, if the needle breaks and fragments are dispersed. Failure to observe the following precautions concerning the handling of the needle. Before using the needle, place the flat side of any other needle may break while the machine is even. Checking the needle Embroidering with a bent... needle is bent. Do not use bent needles. Be sure to read and carefully follow the instructions below. Use of the needle on a flat surface and check that the distance between the needle and the flat ...
Users Manual - English
Page 30
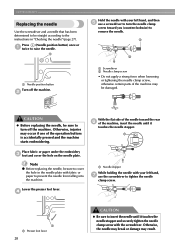
...touches the needle stopper and securely tighten the needle clamp screw with the screwdriver. a Needle stopper While holding the needle with your left hand, g use a screwdriver to turn off the machine. b a Screwdriver b Needle clamp screw • Do not apply a strong force when loosening or tightening the... the machine, insert the needle until it touches the needle stopper. a Hold the needle with your left hand, and then e use the screwdriver to tighten the needle clamp screw. Press (Needle position button) once or a twice to raise the needle. GETTING READY Replacing ...
...touches the needle stopper and securely tighten the needle clamp screw with the screwdriver. a Needle stopper While holding the needle with your left hand, g use a screwdriver to turn off the machine. b a Screwdriver b Needle clamp screw • Do not apply a strong force when loosening or tightening the... the machine, insert the needle until it touches the needle stopper. a Hold the needle with your left hand, and then e use the screwdriver to tighten the needle clamp screw. Press (Needle position button) once or a twice to raise the needle. GETTING READY Replacing ...


