
Instruction Manual
Page 199
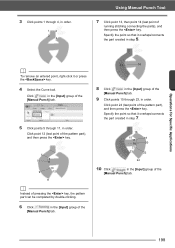
Specify the point so that it overlaps/connects the part created in step 7. 16 15 18 17 19 20 21 23 22 24 10 Click in step 5. Specify the point so that it or press the key. 4 Select the Curve tool. Click in the [Input] group of the [Manual ... of running stitching connecting the parts), and then press the key. Click point 12 (last point of the pattern part), and then press the key. 5 7 9 6 8 10 12 11 b Instead of pressing the key, the pattern part can be completed by double-clicking. 6 Click in the [Input] group of the [Manual Punch...
Specify the point so that it overlaps/connects the part created in step 7. 16 15 18 17 19 20 21 23 22 24 10 Click in step 5. Specify the point so that it or press the key. 4 Select the Curve tool. Click in the [Input] group of the [Manual ... of running stitching connecting the parts), and then press the key. Click point 12 (last point of the pattern part), and then press the key. 5 7 9 6 8 10 12 11 b Instead of pressing the key, the pattern part can be completed by double-clicking. 6 Click in the [Input] group of the [Manual Punch...
Instruction Manual
Page 280
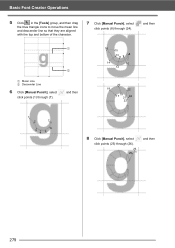
Basic Font Creator Operations 5 Click in the [Tools] group, and then drag the blue triangle icons to move the mean line and descender line so that they are aligned with the top and bottom of the character. 7 Click [Manual Punch], select click points (8) through (24). , and then 1 2 1 Mean Line 2 Descender Line 6 Click [Manual Punch], select click points (1) through (7). , and then 16 15 1311 9 8 14 10 12 20 18 22 17 19 21 24 23 1 2 7 3 4 5 6 8 Click [Manual Punch], select , and then click points (25) through (26). 26 25 279
Basic Font Creator Operations 5 Click in the [Tools] group, and then drag the blue triangle icons to move the mean line and descender line so that they are aligned with the top and bottom of the character. 7 Click [Manual Punch], select click points (8) through (24). , and then 1 2 1 Mean Line 2 Descender Line 6 Click [Manual Punch], select click points (1) through (7). , and then 16 15 1311 9 8 14 10 12 20 18 22 17 19 21 24 23 1 2 7 3 4 5 6 8 Click [Manual Punch], select , and then click points (25) through (26). 26 25 279
Instruction Manual
Page 308
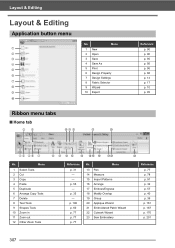
...Menu 1 New 2 Open 3 Save 4 Save As 5 Print 6 Design Property 7 Design Settings 8 Fabric Selector 9 Wizard 10 Export Ribbon menu tabs ■ Home tab 25 0A B G J Reference p. 90 p. 90 p. 95 p. 95 p. 96 p. 88 p. 14 p. 17 p. 10 p. 95 13 46 7 No. p. 55 - p. 35 - ...Menu 13 Pan 14 Measure 15 Import Patterns 16 Arrange 17 Emboss/Engrave 18 Modify Overlap 19 Group 20 Applique Wizard 21...
...Menu 1 New 2 Open 3 Save 4 Save As 5 Print 6 Design Property 7 Design Settings 8 Fabric Selector 9 Wizard 10 Export Ribbon menu tabs ■ Home tab 25 0A B G J Reference p. 90 p. 90 p. 95 p. 95 p. 96 p. 88 p. 14 p. 17 p. 10 p. 95 13 46 7 No. p. 55 - p. 35 - ...Menu 13 Pan 14 Measure 15 Import Patterns 16 Arrange 17 Emboss/Engrave 18 Modify Overlap 19 Group 20 Applique Wizard 21...
Startup : Reference Guide
Page 10
...3 Getting Started 4 Introduction 4 Package contents 4 Precautions for using the "PE-DESIGN Software Key 4 Installation 5 Please Read Before Installation 5 System Requirements 5 Installation Procedure 6 [STEP1] Installing the Software 6 [STEP2] Activating the "PE-DESIGN Software Key" (only for users upgrading from a shape 42 Drawing base... 19 Using the Startup Wizard 20 Using preset settings 20 Understanding the Layout & Editing Window 21 Displaying the [Import] pane 21 Importing Patterns 22 Importing outline shapes 22 Laying Out Patterns 23 Arranging outline shapes 23 Adding ...
...3 Getting Started 4 Introduction 4 Package contents 4 Precautions for using the "PE-DESIGN Software Key 4 Installation 5 Please Read Before Installation 5 System Requirements 5 Installation Procedure 6 [STEP1] Installing the Software 6 [STEP2] Activating the "PE-DESIGN Software Key" (only for users upgrading from a shape 42 Drawing base... 19 Using the Startup Wizard 20 Using preset settings 20 Understanding the Layout & Editing Window 21 Displaying the [Import] pane 21 Importing Patterns 22 Importing outline shapes 22 Laying Out Patterns 23 Arranging outline shapes 23 Adding ...
Startup : Reference Guide
Page 30
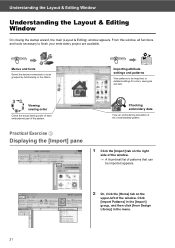
..., sew types and text. Checking embroidery data View an embroidering simulation of the pattern. Click [Import Patterns] in the [Import] group, and then click [from Design Library] in the ribbon. Understanding the Layout & Editing Window Understanding the Layout & Editing Window On closing the startup wizard, the main (Layout & Editing) window appears... side of the window. → A thumbnail list of the window. Menus and tools Select the desired commands or tools grouped by functionality in the menu. 21
..., sew types and text. Checking embroidery data View an embroidering simulation of the pattern. Click [Import Patterns] in the [Import] group, and then click [from Design Library] in the ribbon. Understanding the Layout & Editing Window Understanding the Layout & Editing Window On closing the startup wizard, the main (Layout & Editing) window appears... side of the window. → A thumbnail list of the window. Menus and tools Select the desired commands or tools grouped by functionality in the menu. 21


