Instruction Manual
Page 3
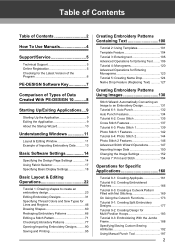
... Version of the Program 6 PE-DESIGN Software Key 7 Comparison of Types of Data Created With PE-DESIGN 10...........8 Starting Up/Exiting Applications....9 Starting Up the Application 9 Exiting the Application 9 About the Startup Wizard 10 Understanding Windows 11 Layout & ...Tutorial 8-1: Creating Appliqués 161 Tutorial 8-2: Creating Embroidered Patches 166 Tutorial 8-3: Creating a Cutwork Pattern Filled with Net Stitching 169 On Using the Cutwork Functions 173 Tutorial 9-1: Creating Split Embroidery Designs 177 Tutorial 9-2: Creating Design for Multi-Position Hoops 183 Tutorial...
... Version of the Program 6 PE-DESIGN Software Key 7 Comparison of Types of Data Created With PE-DESIGN 10...........8 Starting Up/Exiting Applications....9 Starting Up the Application 9 Exiting the Application 9 About the Startup Wizard 10 Understanding Windows 11 Layout & ...Tutorial 8-1: Creating Appliqués 161 Tutorial 8-2: Creating Embroidered Patches 166 Tutorial 8-3: Creating a Cutwork Pattern Filled with Net Stitching 169 On Using the Cutwork Functions 173 Tutorial 9-1: Creating Split Embroidery Designs 177 Tutorial 9-2: Creating Design for Multi-Position Hoops 183 Tutorial...
Instruction Manual
Page 5
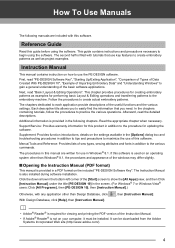
... Windows® 7 or Windows Vista® users: Click [All Programs], then [PE-DESIGN 10], then [Instruction Manual].) Otherwise, with tutorials that you to create actual embroidery patterns. First, read "PE-DESIGN Software Key", "Starting Up/Exiting Application", "Comparison of Types of Data Created With PE-DESIGN 10", "Example of Importing Embroidery Data" and "Understanding Windows" to each application provide...
... Windows® 7 or Windows Vista® users: Click [All Programs], then [PE-DESIGN 10], then [Instruction Manual].) Otherwise, with tutorials that you to create actual embroidery patterns. First, read "PE-DESIGN Software Key", "Starting Up/Exiting Application", "Comparison of Types of Data Created With PE-DESIGN 10", "Example of Importing Embroidery Data" and "Understanding Windows" to each application provide...
Instruction Manual
Page 11
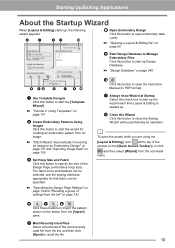
...pes). Starting Up/Exiting Applications About the Startup Wizard When [Layout & Editing] starts up . g Most Recently Used Files Select a thumbnail of settings from the list" on the button from the command menu. 10 The fabric to close the Startup Wizard without performing an operation. cc "Design...Design" on page 131 and "Importing Image Data" on page 240 d ef l k ih a Use Template Designs Click this button to start up Design Database. b a c g j h Open Embroidery Design...k Always show Wizard at the top of the Design Page (embroidery hoop size). l Close this Wizard...
...pes). Starting Up/Exiting Applications About the Startup Wizard When [Layout & Editing] starts up . g Most Recently Used Files Select a thumbnail of settings from the list" on the button from the command menu. 10 The fabric to close the Startup Wizard without performing an operation. cc "Design...Design" on page 131 and "Importing Image Data" on page 240 d ef l k ih a Use Template Designs Click this button to start up Design Database. b a c g j h Open Embroidery Design...k Always show Wizard at the top of the Design Page (embroidery hoop size). l Close this Wizard...
Instruction Manual
Page 15
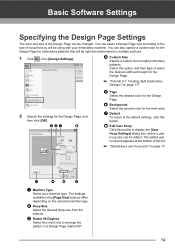
...Default To return to display the [User Hoop Settings] dialog box, where a user hoop size can select a Design Page size according to arrange the pattern in a Design Page rotated 90°. 14 cc "Specifying a user hoop size" on the selected machine type. f Background Select... on page 15 g d f e a Machine Type Select your embroidery machine. You can be using with your machine type. cc "Tutorial 9-1: Creating Split Embroidery Designs" on page 177 2 Specify the settings for embroidery patterns that you will be added. The settings available in multiple sections. 1 Click ...
...Default To return to display the [User Hoop Settings] dialog box, where a user hoop size can select a Design Page size according to arrange the pattern in a Design Page rotated 90°. 14 cc "Specifying a user hoop size" on the selected machine type. f Background Select... on page 15 g d f e a Machine Type Select your embroidery machine. You can be using with your machine type. cc "Tutorial 9-1: Creating Split Embroidery Designs" on page 177 2 Specify the settings for embroidery patterns that you will be added. The settings available in multiple sections. 1 Click ...
Instruction Manual
Page 16
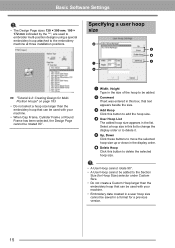
... • When Cap Frame, Cylinder Frame or Round Frame has been selected, the Design Page cannot be rotated 90°. Select a hoop size in this box, that can be used to embroider multi-position...selected hoop size. d User Hoop List The added hoop size appears in the display order. Basic Software Settings a • The Design Page sizes 130 × 300 mm, 100 × 172 mm indicated by the "*", are used with your machine. •...selected hoop size up or down in the list. Specifying a user hoop size d a b e f c cc "Tutorial 9-2: Creating Design for a previous version. 15
... • When Cap Frame, Cylinder Frame or Round Frame has been selected, the Design Page cannot be rotated 90°. Select a hoop size in this box, that can be used to embroider multi-position...selected hoop size. d User Hoop List The added hoop size appears in the display order. Basic Software Settings a • The Design Page sizes 130 × 300 mm, 100 × 172 mm indicated by the "*", are used with your machine. •...selected hoop size up or down in the list. Specifying a user hoop size d a b e f c cc "Tutorial 9-2: Creating Design for a previous version. 15
Instruction Manual
Page 24
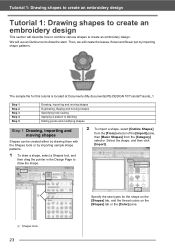
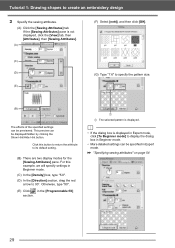
Select the shape, and then click [Import]. 1 1 Shapes tools 23 Specify the sew types for this tutorial is located at Documents (My documents)\PE-DESIGN 10\Tutorial\Tutorial_1. Then, we will create the leaves, flower and flower pot by importing sample shape patterns. 1 To draw a shape, ...select a Shapes tool, and then drag the pointer in the Design Page to draw the stem. Step 1 Step 2 Step 3 Step 4 Step...
Select the shape, and then click [Import]. 1 1 Shapes tools 23 Specify the sew types for this tutorial is located at Documents (My documents)\PE-DESIGN 10\Tutorial\Tutorial_1. Then, we will create the leaves, flower and flower pot by importing sample shape patterns. 1 To draw a shape, ...select a Shapes tool, and then drag the pointer in the Design Page to draw the stem. Step 1 Step 2 Step 3 Step 4 Step...
Instruction Manual
Page 25
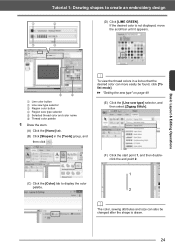
..., and then select [Zigzag Stitch]. (F) Click the start point 1, and then doubleclick the end point 2. 1 (C) Click the [Color] tab to create an embroidery design 1 2 (D) Click [LIME GREEN]. Tutorial 1: Drawing shapes to display the color palette. 2 b The color, sewing attributes and size can more easily be changed after the shape is not displayed...
..., and then select [Zigzag Stitch]. (F) Click the start point 1, and then doubleclick the end point 2. 1 (C) Click the [Color] tab to create an embroidery design 1 2 (D) Click [LIME GREEN]. Tutorial 1: Drawing shapes to display the color palette. 2 b The color, sewing attributes and size can more easily be changed after the shape is not displayed...
Instruction Manual
Page 26
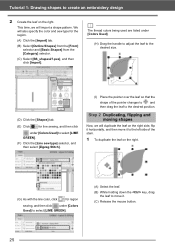
Tutorial 1: Drawing shapes to the desired position. This time, we will duplicate the leaf on the right side, flip it horizontally, and then move it to the left side of the pointer changes to , and then drag the leaf to create an embroidery design 2 Create the leaf on the ...right. (G) As with the line color, click for the region. (A) Click the [Import] tab. (B) Select [Outline Shapes] from the [From] selector and [Basic Shapes] from the [Category] selector. (C) Select [BS_shapes27.pes], and then click [Import]. ...
Tutorial 1: Drawing shapes to the desired position. This time, we will duplicate the leaf on the right side, flip it horizontally, and then move it to the left side of the pointer changes to , and then drag the leaf to create an embroidery design 2 Create the leaf on the ...right. (G) As with the line color, click for the region. (A) Click the [Import] tab. (B) Select [Outline Shapes] from the [From] selector and [Basic Shapes] from the [Category] selector. (C) Select [BS_shapes27.pes], and then click [Import]. ...
Instruction Manual
Page 27
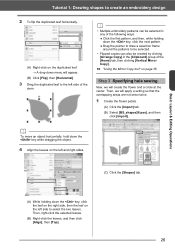
... a setting so that the overlapping areas are not sewn twice. 1 Create the flower petals. (A) Click the [Import] tab. (B) Select [BS_shapes26.pes], and then click [Import]. Tutorial 1: Drawing shapes to create an embroidery design 2 To flip the duplicated leaf horizontally. (A) Right-click on the duplicated leaf. A drop down menu will create the flower...
... a setting so that the overlapping areas are not sewn twice. 1 Create the flower petals. (A) Click the [Import] tab. (B) Select [BS_shapes26.pes], and then click [Import]. Tutorial 1: Drawing shapes to create an embroidery design 2 To flip the duplicated leaf horizontally. (A) Right-click on the duplicated leaf. A drop down menu will create the flower...
Instruction Manual
Page 28
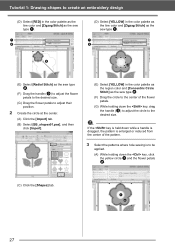
...desired size. (G) Drag the flower petals to adjust their position. 2 Create the circle at the center. (A) Click the [Import] tab. (B) Select [BS_shapes01.pes], and then click [Import]. (E) Select [YELLOW] in the color palette as the line color and [Zigzag Stitch] as the sew type b. (F) Drag ...be applied. (A) While holding down the key, click the yellow circle a and the flower petals b. (C) Click the [Shapes] tab. Tutorial 1: Drawing shapes to create an embroidery design (D) Select [RED] in the color palette as the line color and [Zigzag Stitch] as the sew type a. (D) Select [YELLOW] in...
...desired size. (G) Drag the flower petals to adjust their position. 2 Create the circle at the center. (A) Click the [Import] tab. (B) Select [BS_shapes01.pes], and then click [Import]. (E) Select [YELLOW] in the color palette as the line color and [Zigzag Stitch] as the sew type b. (F) Drag ...be applied. (A) While holding down the key, click the yellow circle a and the flower petals b. (C) Click the [Shapes] tab. Tutorial 1: Drawing shapes to create an embroidery design (D) Select [RED] in the color palette as the line color and [Zigzag Stitch] as the sew type a. (D) Select [YELLOW] in...
Instruction Manual
Page 29
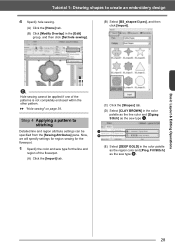
... b (E) Select [DEEP GOLD] in the [Edit] group, and then click [Set hole sewing]. (B) Select [BS_shapes13.pes], and then click [Import]. Step 4 Applying a pattern to create an embroidery design 4 Specify hole sewing. (A) Click the [Home] tab. (B) Click [Modify Overlap] in the color palette as the ...sew type a. Fill Stitch] as the sew type b. Tutorial 1: Drawing shapes to stitching Detailed line and region attribute...
... b (E) Select [DEEP GOLD] in the [Edit] group, and then click [Set hole sewing]. (B) Select [BS_shapes13.pes], and then click [Import]. Step 4 Applying a pattern to create an embroidery design 4 Specify hole sewing. (A) Click the [Home] tab. (B) Click [Modify Overlap] in the color palette as the ...sew type a. Fill Stitch] as the sew type b. Tutorial 1: Drawing shapes to stitching Detailed line and region attribute...
Instruction Manual
Page 30
If the [Sewing Attributes] pane is displayed. Tutorial 1: Drawing shapes to 90°. cc "Specifying sewing attributes" on page 54 29 This preview can be displayed/hidden by clicking the Show Hint/Hide ... example, we will specify settings in Beginner mode. (C) In the [Density] box, type "5.0". (D) In the [Direction] section, drag the red arrow to create an embroidery design 2 Specify the sewing attributes. (A) Click the [Sewing Attributes] tab.
If the [Sewing Attributes] pane is displayed. Tutorial 1: Drawing shapes to 90°. cc "Specifying sewing attributes" on page 54 29 This preview can be displayed/hidden by clicking the Show Hint/Hide ... example, we will specify settings in Beginner mode. (C) In the [Density] box, type "5.0". (D) In the [Direction] section, drag the red arrow to create an embroidery design 2 Specify the sewing attributes. (A) Click the [Sewing Attributes] tab.
Instruction Manual
Page 31
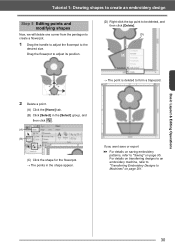
...or export cc For details on saving embroidery patterns, refer to Machines" on page 95. For details on transferring designs to an embroidery machine, refer to "Transferring Embroidery Designs to "Saving" on page 201. Drag the flowerpot to adjust its position. (D) Right-click the top point... to be deleted, and then click [Delete]. (D) (C) The point is deleted to the desired size. Tutorial 1: Drawing shapes to create an embroidery design Step 5 Editing points and modifying shapes Now, we will delete one corner from the pentagon to create a flowerpot. 1 Drag the...
...or export cc For details on saving embroidery patterns, refer to Machines" on page 95. For details on transferring designs to an embroidery machine, refer to "Transferring Embroidery Designs to "Saving" on page 201. Drag the flowerpot to adjust its position. (D) Right-click the top point... to be deleted, and then click [Delete]. (D) (C) The point is deleted to the desired size. Tutorial 1: Drawing shapes to create an embroidery design Step 5 Editing points and modifying shapes Now, we will delete one corner from the pentagon to create a flowerpot. 1 Drag the...
Instruction Manual
Page 49
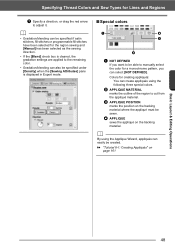
...]. d APPLIQUE sews the appliqué on page 161 Basic Layout & Editing Operations 48 b APPLIQUE MATERIAL marks the outline of the region to adjust it. cc "Tutorial 8-1: Creating Appliqués" on the backing material. Specifying Thread Colors and Sew Types for the region sewing and [Manual] has been selected as the sewing...
...]. d APPLIQUE sews the appliqué on page 161 Basic Layout & Editing Operations 48 b APPLIQUE MATERIAL marks the outline of the region to adjust it. cc "Tutorial 8-1: Creating Appliqués" on the backing material. Specifying Thread Colors and Sew Types for the region sewing and [Manual] has been selected as the sewing...
Instruction Manual
Page 102
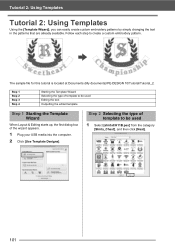
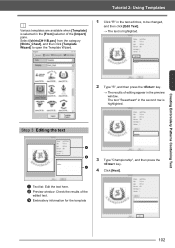
... starts up, the first dialog box of template to create a custom embroidery pattern. The sample file for this tutorial is located at Documents (My documents)\PE-DESIGN 10\Tutorial\Tutorial_2. Step 2 Selecting the type of the wizard appears. 1 Plug your USB media into the computer. 2... Click [Use Template Designs]. Tutorial 2: Using Templates Tutorial 2: Using Templates Using the [Template Wizard], you can easily create custom ...
... starts up, the first dialog box of template to create a custom embroidery pattern. The sample file for this tutorial is located at Documents (My documents)\PE-DESIGN 10\Tutorial\Tutorial_2. Step 2 Selecting the type of the wizard appears. 1 Plug your USB media into the computer. 2... Click [Use Template Designs]. Tutorial 2: Using Templates Tutorial 2: Using Templates Using the [Template Wizard], you can easily create custom ...
Instruction Manual
Page 103
Tutorial 2: Using Templates b Various templates are available when [Template] is selected in the [From] selector of the edited text. b Preview window: Check the results of the [.... Step 3 Editing the text c b 3 Type "Championship", and then press the key. a Text list: Edit the text here. c Embroidery information for the template 102 Select [shirtsCH11B.pes] from the category [Shirts_Chest], and then click [Template Wizard] to be changed, and then click [Edit Text]. The text is highlighted. a 4 Click [Next]. Creating...
Tutorial 2: Using Templates b Various templates are available when [Template] is selected in the [From] selector of the edited text. b Preview window: Check the results of the [.... Step 3 Editing the text c b 3 Type "Championship", and then press the key. a Text list: Edit the text here. c Embroidery information for the template 102 Select [shirtsCH11B.pes] from the category [Shirts_Chest], and then click [Template Wizard] to be changed, and then click [Edit Text]. The text is highlighted. a 4 Click [Next]. Creating...
Instruction Manual
Page 104
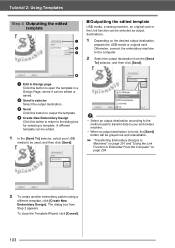
... The dialog box from the [Send To] selector, and then click [Send]. To close the Template Wizard, click [Cancel]. 103 Tutorial 2: Using Templates Step 4 Outputting the edited template ■ Outputting the edited template USB media, a sewing machine, an original card ... destination from Step 2 appears. a 1 Depending on page 204 2 To create another embroidery pattern using a different template, click [Create New Embroidery Design]. b Otherwise, connect the embroidery machine c to the method used , and then click [Send]. c Send Click this button to return to selector...
... The dialog box from the [Send To] selector, and then click [Send]. To close the Template Wizard, click [Cancel]. 103 Tutorial 2: Using Templates Step 4 Outputting the edited template ■ Outputting the edited template USB media, a sewing machine, an original card ... destination from Step 2 appears. a 1 Depending on page 204 2 To create another embroidery pattern using a different template, click [Create New Embroidery Design]. b Otherwise, connect the embroidery machine c to the method used , and then click [Send]. c Send Click this button to return to selector...
Instruction Manual
Page 105
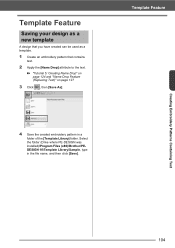
Template Feature Saving your design as a new template A design that you have created can be used as a template. 1 Create an embroidery pattern that contains text. 2 Apply the [Name Drop] attribute to the text. cc "Tutorial 5: Creating Name Drop" on page 124 and "Name Drop Feature (Replacing Text)"... on page 127 3 Click , then [Save As]. Select the folder (Drive where PE-DESIGN was installed)\Program Files (x86)\Brother\PEDESIGN 10\Template Library\Sample, type in a folder of...
Template Feature Saving your design as a new template A design that you have created can be used as a template. 1 Create an embroidery pattern that contains text. 2 Apply the [Name Drop] attribute to the text. cc "Tutorial 5: Creating Name Drop" on page 124 and "Name Drop Feature (Replacing Text)"... on page 127 3 Click , then [Save As]. Select the folder (Drive where PE-DESIGN was installed)\Program Files (x86)\Brother\PEDESIGN 10\Template Library\Sample, type in a folder of...

Instruction Manual
Page 106
...text" on other ways to edit text, refer to the section indicated below. Tutorial 3: Entering text Tutorial 3: Entering text This section describes the procedures for this tutorial is selected in the [From] selector. 105 b For details on page 107...[Import] pane. 2 Select [Text] from the [From] selector and [Transformed] from the [Category] selector. Select [TT_001.pes], and then click [Import]. b Sample built-in font patterns are available in the character table to apply them. The sample ...] pane when [Text] is located at Documents (My documents)\PE-DESIGN 10\Tutorial\Tutorial_3.
...text" on other ways to edit text, refer to the section indicated below. Tutorial 3: Entering text Tutorial 3: Entering text This section describes the procedures for this tutorial is selected in the [From] selector. 105 b For details on page 107...[Import] pane. 2 Select [Text] from the [From] selector and [Transformed] from the [Category] selector. Select [TT_001.pes], and then click [Import]. b Sample built-in font patterns are available in the character table to apply them. The sample ...] pane when [Text] is located at Documents (My documents)\PE-DESIGN 10\Tutorial\Tutorial_3.
Instruction Manual
Page 121
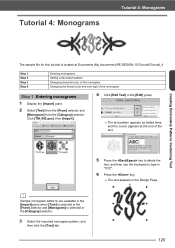
...] from the [From] selector and [Monogram] from the [Category] selector. Click [TM_002.pes], then [Import]. 4 Click [Edit Text] in the [Edit] group. The text pattern appears as dotted lines, and the cursor appears at Documents (My documents)\PE-DESIGN 10\Tutorial\Tutorial_4. Tutorial 4: Monograms Tutorial 4: Monograms Creating Embroidery Patterns Containing Text The sample file for this...
...] from the [From] selector and [Monogram] from the [Category] selector. Click [TM_002.pes], then [Import]. 4 Click [Edit Text] in the [Edit] group. The text pattern appears as dotted lines, and the cursor appears at Documents (My documents)\PE-DESIGN 10\Tutorial\Tutorial_4. Tutorial 4: Monograms Tutorial 4: Monograms Creating Embroidery Patterns Containing Text The sample file for this...


