
Instruction Manual
Page 199
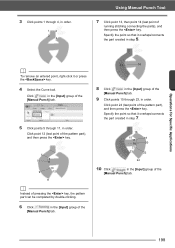
.... 198 b To remove an entered point, right-click it overlaps/connects the part created in step 7. 16 15 18 17 19 20 21 23 22 24 10 Click in the [Input] group of running stitching connecting the parts), and then press the key. Operations for Specific Applications 3 Click points ...1 through 11, in order. Click point 12 (last point of the pattern part), and then press the key. 5 7 9 6 8 10 12 11 b Instead of pressing the key, the pattern part can be completed by double-clicking. 6 Click in the [Input] group of the [Manual Punch...
.... 198 b To remove an entered point, right-click it overlaps/connects the part created in step 7. 16 15 18 17 19 20 21 23 22 24 10 Click in the [Input] group of running stitching connecting the parts), and then press the key. Operations for Specific Applications 3 Click points ...1 through 11, in order. Click point 12 (last point of the pattern part), and then press the key. 5 7 9 6 8 10 12 11 b Instead of pressing the key, the pattern part can be completed by double-clicking. 6 Click in the [Input] group of the [Manual Punch...
Instruction Manual
Page 280
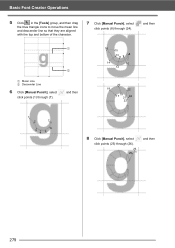
Basic Font Creator Operations 5 Click in the [Tools] group, and then drag the blue triangle icons to move the mean line and descender line so that they are aligned with the top and bottom of the character. 7 Click [Manual Punch], select click points (8) through (24). , and then 1 2 1 Mean Line 2 Descender Line 6 Click [Manual Punch], select click points (1) through (7). , and then 16 15 1311 9 8 14 10 12 20 18 22 17 19 21 24 23 1 2 7 3 4 5 6 8 Click [Manual Punch], select , and then click points (25) through (26). 26 25 279
Basic Font Creator Operations 5 Click in the [Tools] group, and then drag the blue triangle icons to move the mean line and descender line so that they are aligned with the top and bottom of the character. 7 Click [Manual Punch], select click points (8) through (24). , and then 1 2 1 Mean Line 2 Descender Line 6 Click [Manual Punch], select click points (1) through (7). , and then 16 15 1311 9 8 14 10 12 20 18 22 17 19 21 24 23 1 2 7 3 4 5 6 8 Click [Manual Punch], select , and then click points (25) through (26). 26 25 279
Instruction Manual
Page 308
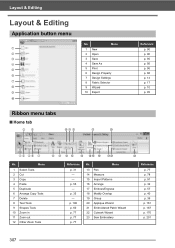
p. 55 - Menu 1 New 2 Open 3 Save 4 Save As 5 Print 6 Design Property 7 Design Settings 8 Fabric Selector 9 Wizard 10 Export Ribbon menu tabs ■ Home tab 25 0A B G J Reference p. 90 p. 90 p. 95 p. 95 p. 96 p. 88 p. 14 p. 17 p. 10 p. 95 13 46 7 No. p. 35 - Layout & Editing Layout & Editing Application ...button menu 1 2 3 4 5 6 7 8 9 0 No. Menu 13 Pan 14 Measure 15 Import Patterns 16 Arrange 17 Emboss/Engrave 18 Modify Overlap 19 Group 20 Applique Wizard 21 Embroidered Patch Wizard...
p. 55 - Menu 1 New 2 Open 3 Save 4 Save As 5 Print 6 Design Property 7 Design Settings 8 Fabric Selector 9 Wizard 10 Export Ribbon menu tabs ■ Home tab 25 0A B G J Reference p. 90 p. 90 p. 95 p. 95 p. 96 p. 88 p. 14 p. 17 p. 10 p. 95 13 46 7 No. p. 35 - Layout & Editing Layout & Editing Application ...button menu 1 2 3 4 5 6 7 8 9 0 No. Menu 13 Pan 14 Measure 15 Import Patterns 16 Arrange 17 Emboss/Engrave 18 Modify Overlap 19 Group 20 Applique Wizard 21 Embroidered Patch Wizard...
Startup : Reference Guide
Page 10
... 19 Using the Startup Wizard 20 Using preset settings 20 Understanding the Layout & Editing Window 21 Displaying the [Import] pane 21 Importing Patterns 22 Importing outline shapes 22 Laying Out Patterns 23 Arranging outline shapes 23 Adding ...3 Getting Started 4 Introduction 4 Package contents 4 Precautions for using the "PE-DESIGN Software Key 4 Installation 5 Please Read Before Installation 5 System Requirements 5 Installation Procedure 6 [STEP1] Installing the Software 6 [STEP2] Activating the "PE-DESIGN Software Key" (only for users upgrading from a shape 42 Drawing base...
... 19 Using the Startup Wizard 20 Using preset settings 20 Understanding the Layout & Editing Window 21 Displaying the [Import] pane 21 Importing Patterns 22 Importing outline shapes 22 Laying Out Patterns 23 Arranging outline shapes 23 Adding ...3 Getting Started 4 Introduction 4 Package contents 4 Precautions for using the "PE-DESIGN Software Key 4 Installation 5 Please Read Before Installation 5 System Requirements 5 Installation Procedure 6 [STEP1] Installing the Software 6 [STEP2] Activating the "PE-DESIGN Software Key" (only for users upgrading from a shape 42 Drawing base...
Startup : Reference Guide
Page 30
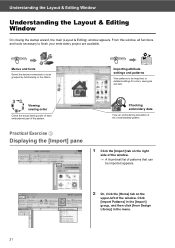
Click [Import Patterns] in the [Import] group, and then click [from Design Library] in the ribbon. Menus and tools Select the desired commands or tools grouped by functionality in the menu. 21 Practical Exercise c Displaying the [Import] pane 1 Click the [Import] tab on the upper-left of patterns that can be imported, or...
Click [Import Patterns] in the [Import] group, and then click [from Design Library] in the ribbon. Menus and tools Select the desired commands or tools grouped by functionality in the menu. 21 Practical Exercise c Displaying the [Import] pane 1 Click the [Import] tab on the upper-left of patterns that can be imported, or...


