

Accessory Catalog
Page 6
... 1/8" from the back and front and roll it into the curled part of the foot. 5. Non Stick Foot Designed for details.) www.brother.com Overlock Foot For vertical bobbin machines only. Lower the presser foot so that the foot guide is Project Book (See page 53 for ... the presser foot. 2. Continue to sew to the end of the fabric. Increase upper thread tension. 2. Sews overcast seams to create a flat narrow hem on sheer and very lightweight fabrics. 1. Attach the presser foot. 3. Brother General Sewing Accessories 09 Narrow Hemmer Foot Non Stick Foot Overlock Foot Picot Foot...
... 1/8" from the back and front and roll it into the curled part of the foot. 5. Non Stick Foot Designed for details.) www.brother.com Overlock Foot For vertical bobbin machines only. Lower the presser foot so that the foot guide is Project Book (See page 53 for ... the presser foot. 2. Continue to sew to the end of the fabric. Increase upper thread tension. 2. Sews overcast seams to create a flat narrow hem on sheer and very lightweight fabrics. 1. Attach the presser foot. 3. Brother General Sewing Accessories 09 Narrow Hemmer Foot Non Stick Foot Overlock Foot Picot Foot...

Accessory Catalog
Page 12
...are using zigzag stitch with the guideline and sew. Adjust the upper thread tension. 2. Brother Embellishment Feet 21 Fringe Foot Gathering Foot SA142 All Brother home-use sewing machines SA120 All Brother home-use sewing machines Fringe Foot Used to mark construction details by creating...upper thread tension. 3. Increase the upper thread tension. 3. For appliqué: 1. Line up the center of the presser foot on your fabric. 3. Stitch in the needle area. Create 3-D loops and fringe with a single zigzag stitch. Also used for ULT series, PC-6500, PC-8200 and PC-8500 ...
...are using zigzag stitch with the guideline and sew. Adjust the upper thread tension. 2. Brother Embellishment Feet 21 Fringe Foot Gathering Foot SA142 All Brother home-use sewing machines SA120 All Brother home-use sewing machines Fringe Foot Used to mark construction details by creating...upper thread tension. 3. Increase the upper thread tension. 3. For appliqué: 1. Line up the center of the presser foot on your fabric. 3. Stitch in the needle area. Create 3-D loops and fringe with a single zigzag stitch. Also used for ULT series, PC-6500, PC-8200 and PC-8500 ...

Accessory Catalog
Page 34
...thread developed and made for our embroidery only machines, PE750D and PE700II. Dependable thread delivery through machine tensions. For best results, use these embroidery threads especially designed for Brother® Embroidery Machines, but compatible with other sewing and embroidery machine brands. This pack gives you ...Quattro™ 6000D, Duetta™ 4500D/Innov-is 4000D, 2500D, 1500D, 1200 series, PC and ULT series machines and the PE-400D and Innov-is best suited for details.) www.brother.com Available in a 14-Pack and individual colors (sold in a fun assortment of ...
...thread developed and made for our embroidery only machines, PE750D and PE700II. Dependable thread delivery through machine tensions. For best results, use these embroidery threads especially designed for Brother® Embroidery Machines, but compatible with other sewing and embroidery machine brands. This pack gives you ...Quattro™ 6000D, Duetta™ 4500D/Innov-is 4000D, 2500D, 1500D, 1200 series, PC and ULT series machines and the PE-400D and Innov-is best suited for details.) www.brother.com Available in a 14-Pack and individual colors (sold in a fun assortment of ...

Accessory Catalog
Page 38
... 3. 2. Sew. Ideal for string of fabric together. Sew and then open the fabrics. Note: When the fabrics gather, tighten the thread tension. Can be used for edge decoration of the piping tape into the tape guide and then under the piping foot. 4. Set the machine setting...: 3 thread overlock, stitch length to pearl size, stitch width to 1.5 mm from 5 mm, and adjust the tension. 3. SA210 Party Bag SA212 Piping Foot Taping Foot Brother Serger/ Overlock Feet 74 Piping Foot Sews piping tapes with two pieces of 3 to 3 - 4mm for tape attaching, 4 - ...
... 3. 2. Sew. Ideal for string of fabric together. Sew and then open the fabrics. Note: When the fabrics gather, tighten the thread tension. Can be used for edge decoration of the piping tape into the tape guide and then under the piping foot. 4. Set the machine setting...: 3 thread overlock, stitch length to pearl size, stitch width to 1.5 mm from 5 mm, and adjust the tension. 3. SA210 Party Bag SA212 Piping Foot Taping Foot Brother Serger/ Overlock Feet 74 Piping Foot Sews piping tapes with two pieces of 3 to 3 - 4mm for tape attaching, 4 - ...

Users Manual - English
Page 4
... 44 Overcasting (using a zigzag stitch 44 Applique (using a zigzag stitch 44 Patchwork (for stitch width and stitch length 25 THREAD TENSION 27 Correct tension 27 Loosen tension by touching " " (Weak)......27 Tighten tension by using the side cutter) .....46 BLIND HEM STITCHES 48 Adjusting the needle drop position 49 BUTTONHOLE STITCHES 50 Order of...
... 44 Overcasting (using a zigzag stitch 44 Applique (using a zigzag stitch 44 Patchwork (for stitch width and stitch length 25 THREAD TENSION 27 Correct tension 27 Loosen tension by touching " " (Weak)......27 Tighten tension by using the side cutter) .....46 BLIND HEM STITCHES 48 Adjusting the needle drop position 49 BUTTONHOLE STITCHES 50 Order of...
Users Manual - English
Page 21
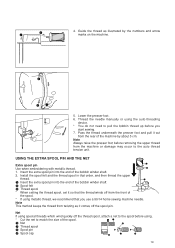
... machine or damage may occur to pull the bobbin thread up before using the auto-threading device. * You do not need to the auto thread tension unit. USING THE EXTRA SPOOL PIN AND THE NET 3 Extra spool pin Use when embroidering with metallic thread. 2 1. 1 2 4. Insert the extra spool pin into the...
... machine or damage may occur to pull the bobbin thread up before using the auto-threading device. * You do not need to the auto thread tension unit. USING THE EXTRA SPOOL PIN AND THE NET 3 Extra spool pin Use when embroidering with metallic thread. 2 1. 1 2 4. Insert the extra spool pin into the...

Users Manual - English
Page 22
... the left and the large hook will allow you . 1 Needle threader lever 2 Guide (Large hook) 3 Wire loop * Lowering the presser foot will engage the automatic tension and will catch the thread. Pull the thread towards you to check that the thread is engaged. 4. Auto-threading device 5 1 3 2 5 11 2 3 5 1. Check that the thread...
... the left and the large hook will allow you . 1 Needle threader lever 2 Guide (Large hook) 3 Wire loop * Lowering the presser foot will engage the automatic tension and will catch the thread. Pull the thread towards you to check that the thread is engaged. 4. Auto-threading device 5 1 3 2 5 11 2 3 5 1. Check that the thread...

Users Manual - English
Page 29
Loosen tension by touching " " (Weak). Touch the " " thread tension setting key. THREAD TENSION Correct tension 1 2 3 4 1 Reverse side 2 Surface 3 Upper thread 4 Bobbin thread * Thread tension is important because too much or too little tension will decrease (become weaker). 3 2 4 1 1 Bobbin thread 2 Upper thread 3 Surface 4 Locks appear on surface of fabric. 27 The thread tension value will weaken your seams or cause your fabric to the most appropriate point irrespective of the chosen fabric and thread. * Correct tension is automatically set to pucker.
Loosen tension by touching " " (Weak). Touch the " " thread tension setting key. THREAD TENSION Correct tension 1 2 3 4 1 Reverse side 2 Surface 3 Upper thread 4 Bobbin thread * Thread tension is important because too much or too little tension will decrease (become weaker). 3 2 4 1 1 Bobbin thread 2 Upper thread 3 Surface 4 Locks appear on surface of fabric. 27 The thread tension value will weaken your seams or cause your fabric to the most appropriate point irrespective of the chosen fabric and thread. * Correct tension is automatically set to pucker.

Users Manual - English
Page 30
Touch the " " thread tension setting key. Except "UTILITY STITCH" 1. Touch the "TENSION" key. 2. The thread tension value will return to the previous screen. 28 Change the upper thread tension. * If you touch the "CLOSE" key, the display will increase (become stronger). 4 3 1 2 1 Upper thread 2 Bobbin thread 3 Reverse side 4 Locks appears on reverse side of fabric. Tighten tension by touching " " (Strong).
Touch the " " thread tension setting key. Except "UTILITY STITCH" 1. Touch the "TENSION" key. 2. The thread tension value will return to the previous screen. 28 Change the upper thread tension. * If you touch the "CLOSE" key, the display will increase (become stronger). 4 3 1 2 1 Upper thread 2 Bobbin thread 3 Reverse side 4 Locks appears on reverse side of fabric. Tighten tension by touching " " (Strong).

Users Manual - English
Page 35
.... 8 Touch this key to move to the next page. 9 Touch these keys to adjust the stitch width setting. 0 Touch these keys to change the thread tension. 33 Do not pull or push the fabric too hard while sewing, otherwise injury may result. - Never use bent needles. A Touch these keys to page...
.... 8 Touch this key to move to the next page. 9 Touch these keys to adjust the stitch width setting. 0 Touch these keys to change the thread tension. 33 Do not pull or push the fabric too hard while sewing, otherwise injury may result. - Never use bent needles. A Touch these keys to page...

Users Manual - English
Page 43
... fabric will not feed at the beginning of sewing, place another piece of fabric with the same thickness at the back of stitch length and tension may be necessary. 41 Sew slowly while keeping the seams parallel with a zigzag stitch Set the stitch length short in the material, then raise the...
... fabric will not feed at the beginning of sewing, place another piece of fabric with the same thickness at the back of stitch length and tension may be necessary. 41 Sew slowly while keeping the seams parallel with a zigzag stitch Set the stitch length short in the material, then raise the...

Users Manual - English
Page 60
Pull the bobbin thread to a weak setting. Pull out the straight stitch thread. 58 Place the tape on top of the tape. 4. Select pattern " " and then sew along the top of the seam which you have just sewn and secure it with pins. 3. Attach presser foot "J", select pattern " ", set the stitch length to 4.0 mm and set the thread tension to obtain the desired amount of gather. 2. Then sew a straight stitch. TAPE ATTACHING J These stitches are used for attaching tape to thin and medium fabric. 1 Patchwork stitch 2 Elastic zigzag stitch 1 2 1.
Pull the bobbin thread to a weak setting. Pull out the straight stitch thread. 58 Place the tape on top of the tape. 4. Select pattern " " and then sew along the top of the seam which you have just sewn and secure it with pins. 3. Attach presser foot "J", select pattern " ", set the stitch length to 4.0 mm and set the thread tension to obtain the desired amount of gather. 2. Then sew a straight stitch. TAPE ATTACHING J These stitches are used for attaching tape to thin and medium fabric. 1 Patchwork stitch 2 Elastic zigzag stitch 1 2 1.

Users Manual - English
Page 69
...15/16") . 1 Seam line 2 1.0 to 1.5 cm (3/8" to weak. 2. Attach presser foot "J". Set the stitch length to 4.0 mm (3/16") and the thread tension to weak. * If you touch the "GATHERING" key after touching the " " key, the stitch length will be set automatically to 4.0 mm (3/16") and the thread... tension will be set automatically to 9/16") 3 About 5 cm (1-15/16") 4. GATHERING J Use on waists of skirts, the sleeves of shirts, etc. 1 2 ...
...15/16") . 1 Seam line 2 1.0 to 1.5 cm (3/8" to weak. 2. Attach presser foot "J". Set the stitch length to 4.0 mm (3/16") and the thread tension to weak. * If you touch the "GATHERING" key after touching the " " key, the stitch length will be set automatically to 4.0 mm (3/16") and the thread... tension will be set automatically to 9/16") 3 About 5 cm (1-15/16") 4. GATHERING J Use on waists of skirts, the sleeves of shirts, etc. 1 2 ...

Users Manual - English
Page 71
Press the "REVERSE STITCH" button to adjust the thread tension if pintucking is selected by pressing the " " key. 4. Turn the fabric and iron the folded parts only. 1 Surface 3. Select the " " stitch and then touch the " " ...
Press the "REVERSE STITCH" button to adjust the thread tension if pintucking is selected by pressing the " " key. 4. Turn the fabric and iron the folded parts only. 1 Surface 3. Select the " " stitch and then touch the " " ...

Users Manual - English
Page 78
J 4. Attach presser foot "J" and sew over the top of the straight stitches, selecting from one of 1 cm. 1 About 1 cm (3/8") 2. Select the " " stitch, set the stitch length to 4.0 mm and set the thread tension to obtain the desired amount of gather, and then smooth the gathers by ironing them. 3. SMOCKING STITCH J This stitch is used for decorative stitching on clothing. 1. Pull out the straight stitch threads. 76 Pull the bobbin threads to a weak setting. Then sew straight stitches at intervals of the two decorative stitches shown above.
J 4. Attach presser foot "J" and sew over the top of the straight stitches, selecting from one of 1 cm. 1 About 1 cm (3/8") 2. Select the " " stitch, set the stitch length to 4.0 mm and set the thread tension to obtain the desired amount of gather, and then smooth the gathers by ironing them. 3. SMOCKING STITCH J This stitch is used for decorative stitching on clothing. 1. Pull out the straight stitch threads. 76 Pull the bobbin threads to a weak setting. Then sew straight stitches at intervals of the two decorative stitches shown above.

Users Manual - English
Page 81
Attach presser foot "J", select " " and set the thread tension to use. DECORATIVE STITCHING J Select the stitch you would like to a strong setting. 2. Fold the fabric in half diagonally. * Use a thin fabric. 5 3. Decorative stitching These stitches are used for sewing crazy quilts and for decorating hems. Shell tacking 1. Drop the needle slightly to one side. 79 Open out the fabric and iron the fold down to the outside of the edge of the fabric, and then start sewing. 4.
Attach presser foot "J", select " " and set the thread tension to use. DECORATIVE STITCHING J Select the stitch you would like to a strong setting. 2. Fold the fabric in half diagonally. * Use a thin fabric. 5 3. Decorative stitching These stitches are used for sewing crazy quilts and for decorating hems. Shell tacking 1. Drop the needle slightly to one side. 79 Open out the fabric and iron the fold down to the outside of the edge of the fabric, and then start sewing. 4.
Users Manual - English
Page 86
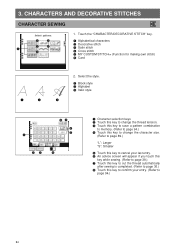
Select the style. 1 Block style 2 Alphabet 3 Italic style 1 2 3 87 6 5 1 23 4 1 Character selection keys 2 Touch this key to change the thread tension. 3 Touch this key to save a pattern combination to memory. (Refer to page 94.) 4 Touch this key to change the character size. (Refer to page 89.) "L": ...
Select the style. 1 Block style 2 Alphabet 3 Italic style 1 2 3 87 6 5 1 23 4 1 Character selection keys 2 Touch this key to change the thread tension. 3 Touch this key to save a pattern combination to memory. (Refer to page 94.) 4 Touch this key to change the character size. (Refer to page 89.) "L": ...

Users Manual - English
Page 88
Touch the " " key. The decorative stitch pattern selection screen will be displayed. 7 1 6 5 2 34 1 Pattern selection keys 2 Touch this key to change the thread tension. 3 Touch this key to select single or repeat sewing. (Refer to page 89.) 4 Touch this key to change the pattern size. (Refer to page 89.) 5 ...
Touch the " " key. The decorative stitch pattern selection screen will be displayed. 7 1 6 5 2 34 1 Pattern selection keys 2 Touch this key to change the thread tension. 3 Touch this key to select single or repeat sewing. (Refer to page 89.) 4 Touch this key to change the pattern size. (Refer to page 89.) 5 ...

Users Manual - English
Page 89
... application. 1 2 345 A 0 9 6 78 1 Pattern selection keys 2 Touch this key to adjust the stitch width and stitch length settings. 3 Touch this key to change the thread tension. 4 Touch this key to save a pattern combination to memory. (Refer to page 94.) 5 Touch this key to select single or repeat sewing. (Refer to page...
... application. 1 2 345 A 0 9 6 78 1 Pattern selection keys 2 Touch this key to adjust the stitch width and stitch length settings. 3 Touch this key to change the thread tension. 4 Touch this key to save a pattern combination to memory. (Refer to page 94.) 5 Touch this key to select single or repeat sewing. (Refer to page...

Users Manual - English
Page 90
CROSS STITCHING 1. The different types of patterns available will be displayed. 1 234 7 6 5 1 Pattern selection keys 2 Touch this key to change the thread tension. 3 Touch this key to save a pattern combination to memory. (Refer to page 94.) 4 Touch this key to select single or repeat sewing. (Refer to page ...
CROSS STITCHING 1. The different types of patterns available will be displayed. 1 234 7 6 5 1 Pattern selection keys 2 Touch this key to change the thread tension. 3 Touch this key to save a pattern combination to memory. (Refer to page 94.) 4 Touch this key to select single or repeat sewing. (Refer to page ...


