

Users Manual - English
Page 3
...cover to place the spool of the sewing machine and their functions are described below. Before using the sewing machine, carefully read these descriptions to learn the names of the upper thread. CONTENTS GETTING READY SEWING BASICS UTILITY STITCHES Names of Machine Parts and Their Functions The names ...of the various parts of thread on the spool pin. 6 Bobbin winder Use the bobbin winder when winding the bobbin. 7 Operation panel Select a stitch from those that appear...
...cover to place the spool of the sewing machine and their functions are described below. Before using the sewing machine, carefully read these descriptions to learn the names of the upper thread. CONTENTS GETTING READY SEWING BASICS UTILITY STITCHES Names of Machine Parts and Their Functions The names ...of the various parts of thread on the spool pin. 6 Bobbin winder Use the bobbin winder when winding the bobbin. 7 Operation panel Select a stitch from those that appear...
Users Manual - English
Page 4
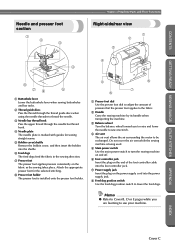
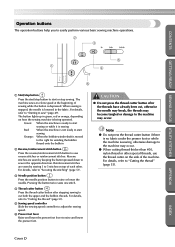
... hook. 4 Needle plate The needle plate is marked with guides for the selected stitching. 8 Presser foot holder The presser foot is being used. 5 Main power switch Use the main power switch to turn the sewing machine on and off. 6 Foot controller jack Insert the plug on the fabric as ... the fabric. 2 Handle Carry the sewing machine by its handle when transporting the machine. 3 Balance wheel Turn the balance wheel toward you are learning to use your machine. Memo ● Refer to Cover B, D or E pages while you to raise and lower the needle to sew one stitch. 4 Air vent The air vent ...
... hook. 4 Needle plate The needle plate is marked with guides for the selected stitching. 8 Presser foot holder The presser foot is being used. 5 Main power switch Use the main power switch to turn the sewing machine on and off. 6 Foot controller jack Insert the plug on the fabric as ... the fabric. 2 Handle Carry the sewing machine by its handle when transporting the machine. 3 Balance wheel Turn the balance wheel toward you are learning to use your machine. Memo ● Refer to Cover B, D or E pages while you to raise and lower the needle to sew one stitch. 4 Air vent The air vent ...
Users Manual - English
Page 5
... there is no fabric under the presser foot or while the machine is sewing, otherwise damage to sew reverse stitches or reinforcement stitches. Green: When the machine is ready to start sewing or while it is sewing Red: When the machine is not ready to 5 stitches on the side of sewing while the button is being operated. APPENDIX INDEX Cover D Reinforcement...
... there is no fabric under the presser foot or while the machine is sewing, otherwise damage to sew reverse stitches or reinforcement stitches. Green: When the machine is ready to start sewing or while it is sewing Red: When the machine is not ready to 5 stitches on the side of sewing while the button is being operated. APPENDIX INDEX Cover D Reinforcement...
Users Manual - English
Page 6
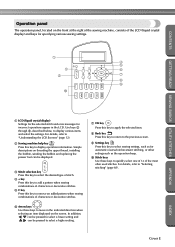
... LCD Screens" (page 12). 2 Sewing machine help key Press this key to "Selecting stitching" (page 68). Simple descriptions on the screen. In addition, can be pressed to select a lower setting and can be displayed. 3 Stitch selection key Press this key to select the desired type of stitch. 4 + key Press this key ... to display various items and select the settings. CONTENTS Operation panel The operation panel, located on the front at the right of the sewing machine, consists of characters or decorative stitches. 6 Arrow keys Use these keys to quickly select one of 12 of the most often used...
... LCD Screens" (page 12). 2 Sewing machine help key Press this key to "Selecting stitching" (page 68). Simple descriptions on the screen. In addition, can be pressed to select a lower setting and can be displayed. 3 Stitch selection key Press this key to select the desired type of stitch. 4 + key Press this key ... to display various items and select the settings. CONTENTS Operation panel The operation panel, located on the front at the right of the sewing machine, consists of characters or decorative stitches. 6 Arrow keys Use these keys to quickly select one of 12 of the most often used...
Users Manual - English
Page 7
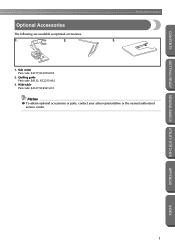
GETTING READY SEWING BASICS UTILITY STITCHES APPENDIX INDEX 1 CONTENTS Enclosed Accessories Optional Accessories The following are available as optional accessories. 1. 2. 3. 1. Quilting guide Part code: SA132, XC2215-002 3. Wide table Part code: SA537,XC4541-051 Memo ● To obtain optional accessories or parts, contact your sales representative or the nearest authorized service center. Side cutter Part code: SA177,XC3879-002 2.
GETTING READY SEWING BASICS UTILITY STITCHES APPENDIX INDEX 1 CONTENTS Enclosed Accessories Optional Accessories The following are available as optional accessories. 1. 2. 3. 1. Quilting guide Part code: SA132, XC2215-002 3. Wide table Part code: SA537,XC4541-051 Memo ● To obtain optional accessories or parts, contact your sales representative or the nearest authorized service center. Side cutter Part code: SA177,XC3879-002 2.
Users Manual - English
Page 8
... a simple operation. (page 24) 2 Automatic thread-cutting The sewing machine can be set to raise and lower the presser foot with thread. (page 18) 5 Built-in stitches You can select from the built-in stitches available, including utility stitches, character stitches and decorative stitches. CONTENTS GETTING READY SEWING BASICS UTILITY STITCHES Introduction Thank you have finished reading this manual...
... a simple operation. (page 24) 2 Automatic thread-cutting The sewing machine can be set to raise and lower the presser foot with thread. (page 18) 5 Built-in stitches You can select from the built-in stitches available, including utility stitches, character stitches and decorative stitches. CONTENTS GETTING READY SEWING BASICS UTILITY STITCHES Introduction Thank you have finished reading this manual...
Users Manual - English
Page 9
... READY SEWING BASICS UTILITY STITCHES Contents Enclosed Accessories Cover A Accessories ...Cover A Names of Machine Parts and Their Functions Cover B Front view ...Cover B Needle and presser foot section ...Cover C Right-side/rear view ...Cover C Operation buttons ...Cover D Operation panel ...Cover E Optional Accessories ...1 Introduction ...2 Sewing Machine Features ...2 Contents ...3 Important Safety Instructions 6 GETTING READY 9 Turning the Machine On/Off...
... READY SEWING BASICS UTILITY STITCHES Contents Enclosed Accessories Cover A Accessories ...Cover A Names of Machine Parts and Their Functions Cover B Front view ...Cover B Needle and presser foot section ...Cover C Right-side/rear view ...Cover C Operation buttons ...Cover D Operation panel ...Cover E Optional Accessories ...1 Introduction ...2 Sewing Machine Features ...2 Contents ...3 Important Safety Instructions 6 GETTING READY 9 Turning the Machine On/Off...
Users Manual - English
Page 10
... Sewing Tips ...62 Trial sewing ...62 Changing the sewing direction ...62 Sewing curves ...62 Sewing thick fabrics ...63 Sewing thin fabrics ...64 Sewing stretch fabrics ...64 Sewing leathers or vinyl fabrics ...64 Sewing an even seam allowance ...64 UTILITY STITCHES 67 Selecting Stitching ...68 Stitch types ...68 Selecting stitching ...68 Overcasting Stitches ...70 Sewing overcasting stitches using overcasting foot "G 70 Sewing overcasting stitches using zigzag foot "J 71 Sewing overcasting stitches...
... Sewing Tips ...62 Trial sewing ...62 Changing the sewing direction ...62 Sewing curves ...62 Sewing thick fabrics ...63 Sewing thin fabrics ...64 Sewing stretch fabrics ...64 Sewing leathers or vinyl fabrics ...64 Sewing an even seam allowance ...64 UTILITY STITCHES 67 Selecting Stitching ...68 Stitch types ...68 Selecting stitching ...68 Overcasting Stitches ...70 Sewing overcasting stitches using overcasting foot "G 70 Sewing overcasting stitches using zigzag foot "J 71 Sewing overcasting stitches...
Users Manual - English
Page 11
...SEWING BASICS UTILITY STITCHES Reinforcement Stitching 100 Triple stretch stitching ...100 Bar tack stitching ...100 Darning ...102 Eyelet Stitching ...104 Decorative Stitching ...105 Fagoting ...106 Scallop stitching ...107 Smocking ...107 Shell tuck stitching ...108 Joining ...109 Heirloom stitching ...110 Sewing the Various Built-In Decorative Patterns 113 Sewing beautiful patterns ...113 Sewing patterns ...113 Combining patterns ...114 Repeat sewing... APPENDIX ...127 Stitch Settings ...128 Utility stitches ...128 Other stitches ...133 Maintenance ...135 Cleaning the machine surface ...135...
...SEWING BASICS UTILITY STITCHES Reinforcement Stitching 100 Triple stretch stitching ...100 Bar tack stitching ...100 Darning ...102 Eyelet Stitching ...104 Decorative Stitching ...105 Fagoting ...106 Scallop stitching ...107 Smocking ...107 Shell tuck stitching ...108 Joining ...109 Heirloom stitching ...110 Sewing the Various Built-In Decorative Patterns 113 Sewing beautiful patterns ...113 Sewing patterns ...113 Combining patterns ...114 Repeat sewing... APPENDIX ...127 Stitch Settings ...128 Utility stitches ...128 Other stitches ...133 Maintenance ...135 Cleaning the machine surface ...135...

Users Manual - English
Page 12
.... 6. To disconnect, turn the main switch to the symbol "{" position when making any air openings blocked. CONTENTS GETTING READY SEWING BASICS UTILITY STITCHES Important Safety Instructions When using this machine. 18. Always unplug the machine from all instructions before cleaning. To reduce the risk of burns, fire, electric shock, or injury to the nearest...
.... 6. To disconnect, turn the main switch to the symbol "{" position when making any air openings blocked. CONTENTS GETTING READY SEWING BASICS UTILITY STITCHES Important Safety Instructions When using this machine. 18. Always unplug the machine from all instructions before cleaning. To reduce the risk of burns, fire, electric shock, or injury to the nearest...
Users Manual - English
Page 13
... cut off and an appropriate three-pin plug fitted. The wire which is colored blue must be fitted in a live socket outlet. CONTENTS GETTING READY SEWING BASICS UTILITY STITCHES FOR USERS IN THE UK, EIRE, MALTA AND CYPRUS ONLY If this machine is fitted with the letter 'L' or colored red or brown.
... cut off and an appropriate three-pin plug fitted. The wire which is colored blue must be fitted in a live socket outlet. CONTENTS GETTING READY SEWING BASICS UTILITY STITCHES FOR USERS IN THE UK, EIRE, MALTA AND CYPRUS ONLY If this machine is fitted with the letter 'L' or colored red or brown.

Users Manual - English
Page 14
... during use • Maintaining the machine • Leaving the machine unattended 3. When storing this machine, avoid direct sunlight and high humidity locations. For additional product information and updates, visit our web site at www.brother.com 8 APPENDIX INDEX Do not touch...machine near a space heater, iron, halogen lamp, or other moving parts. 2. CONTENTS GETTING READY SEWING BASICS UTILITY STITCHES CONGRATULATIONS ON CHOOSING OUR MACHINE Your machine is required, first follow the troubleshooting table in the back of the most advanced computerized household sewing machines...
... during use • Maintaining the machine • Leaving the machine unattended 3. When storing this machine, avoid direct sunlight and high humidity locations. For additional product information and updates, visit our web site at www.brother.com 8 APPENDIX INDEX Do not touch...machine near a space heater, iron, halogen lamp, or other moving parts. 2. CONTENTS GETTING READY SEWING BASICS UTILITY STITCHES CONGRATULATIONS ON CHOOSING OUR MACHINE Your machine is required, first follow the troubleshooting table in the back of the most advanced computerized household sewing machines...
Users Manual - English
Page 15
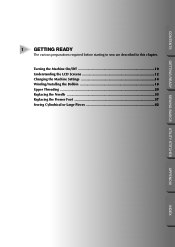
CONTENTS GETTING READY SEWING BASICS UTILITY STITCHES 1 GETTING READY The various preparations required before starting to sew are described in this chapter. Turning the Machine On/Off 10 Understanding the LCD Screens 12 Changing the Machine Settings 14 Winding/Installing the Bobbin 18 Upper Threading ...24 Replacing the Needle 33 Replacing the Presser Foot 37 Sewing Cylindrical or Large Pieces 42 APPENDIX INDEX
CONTENTS GETTING READY SEWING BASICS UTILITY STITCHES 1 GETTING READY The various preparations required before starting to sew are described in this chapter. Turning the Machine On/Off 10 Understanding the LCD Screens 12 Changing the Machine Settings 14 Winding/Installing the Bobbin 18 Upper Threading ...24 Replacing the Needle 33 Replacing the Presser Foot 37 Sewing Cylindrical or Large Pieces 42 APPENDIX INDEX
Users Manual - English
Page 16
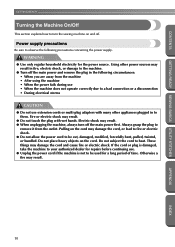
... a bad connection or a disconnection • During electrical storms CAUTION ● Do not use . ● Unplug the power cord if the machine is not to be cut, damaged, modified, forcefully bent, pulled, twisted, or bundled. These things may result. 10 APPENDIX INDEX Do not...unplugging the machine, always turn the sewing machine on and off the main power first. Pulling on the cord. If the cord or plug is damaged, take the machine to your authorized dealer for the power source. CONTENTS GETTING READY SEWING BASICS UTILITY STITCHES GETTING READY Turning the Machine On/Off...
... a bad connection or a disconnection • During electrical storms CAUTION ● Do not use . ● Unplug the power cord if the machine is not to be cut, damaged, modified, forcefully bent, pulled, twisted, or bundled. These things may result. 10 APPENDIX INDEX Do not...unplugging the machine, always turn the sewing machine on and off the main power first. Pulling on the cord. If the cord or plug is damaged, take the machine to your authorized dealer for the power source. CONTENTS GETTING READY SEWING BASICS UTILITY STITCHES GETTING READY Turning the Machine On/Off...
Users Manual - English
Page 17
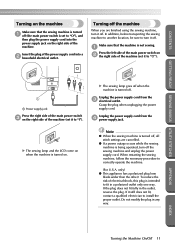
... switch is set it to "I"). When restarting the sewing machine, follow the necessary procedure to install the proper outlet. CONTENTS GETTING READY SEWING BASICS UTILITY STITCHES Turning on the machine Make sure that the machine is not sewing. 1 Press the left side of the main power...household electrical outlet. Note ● When the sewing machine is turned off, all stitch settings are finished using the sewing machine, turn off . Turning off the machine When you are cancelled. ● If a power outage occurs while the sewing machine is turned off . Do not modify the plug...
... switch is set it to "I"). When restarting the sewing machine, follow the necessary procedure to install the proper outlet. CONTENTS GETTING READY SEWING BASICS UTILITY STITCHES Turning on the machine Make sure that the machine is not sewing. 1 Press the left side of the main power...household electrical outlet. Note ● When the sewing machine is turned off, all stitch settings are finished using the sewing machine, turn off . Turning off the machine When you are cancelled. ● If a power outage occurs while the sewing machine is turned off . Do not modify the plug...
Users Manual - English
Page 18
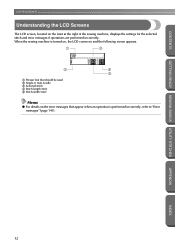
..." (page 141). APPENDIX INDEX 12 When the sewing machine is turned on, the LCD comes on and the following screen appears. 1 3 2 4 5 1 Presser foot that should be used 2 Single or twin needle 3 Selected stitch 4 Stitch length (mm) 5 Stitch width (mm) Memo ● For details on... the front at the right of the sewing machine, displays the settings for the selected stitch and error messages if operations are performed incorrectly.
..." (page 141). APPENDIX INDEX 12 When the sewing machine is turned on, the LCD comes on and the following screen appears. 1 3 2 4 5 1 Presser foot that should be used 2 Single or twin needle 3 Selected stitch 4 Stitch length (mm) 5 Stitch width (mm) Memo ● For details on... the front at the right of the sewing machine, displays the settings for the selected stitch and error messages if operations are performed incorrectly.
Users Manual - English
Page 19
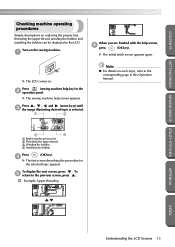
...next screen, press . Press (sewing machine help screen, 6 press (OK key). Turn on the sewing machine. 1 When you are finished with the help key) in the 2 operation panel. CONTENTS GETTING READY SEWING BASICS UTILITY STITCHES Checking machine operating procedures Simple descriptions on replacing...the bobbin 4 Installing the bobbin Press (OK key). 4 X The first screen describing the procedure for the selected topic appears. X The sewing machine help screen appears. To 5 return to the corresponding page in the LCD. Press , , and (arrow keys) until 3 the image ...
...next screen, press . Press (sewing machine help screen, 6 press (OK key). Turn on the sewing machine. 1 When you are finished with the help key) in the 2 operation panel. CONTENTS GETTING READY SEWING BASICS UTILITY STITCHES Checking machine operating procedures Simple descriptions on replacing...the bobbin 4 Installing the bobbin Press (OK key). 4 X The first screen describing the procedure for the selected topic appears. X The sewing machine help screen appears. To 5 return to the corresponding page in the LCD. Press , , and (arrow keys) until 3 the image ...

Users Manual - English
Page 58
...with reverse stitching, pressing (reverse/reinforcement stitch button) sews reinforcement stitches, 3 to 5 reverse stitches have been sewn, 7 release (reverse/reinforcement stitch button). After sewing to "Stitch Settings" (page 128). 5 4 6 2 1 Beginning of stitching 2 End of the stitching, the 9 sewing machine stops. Release the start /stop button or foot controller. 1 3 1 2 ■ Sewing reinforcement stitches When sewing stitches other . 1 2 1 Reverse stitching 2 Reinforcement stitching Memo ● Whether reverse stitches or reinforcement stitches are sewn...
...with reverse stitching, pressing (reverse/reinforcement stitch button) sews reinforcement stitches, 3 to 5 reverse stitches have been sewn, 7 release (reverse/reinforcement stitch button). After sewing to "Stitch Settings" (page 128). 5 4 6 2 1 Beginning of stitching 2 End of the stitching, the 9 sewing machine stops. Release the start /stop button or foot controller. 1 3 1 2 ■ Sewing reinforcement stitches When sewing stitches other . 1 2 1 Reverse stitching 2 Reinforcement stitching Memo ● Whether reverse stitches or reinforcement stitches are sewn...
Users Manual - English
Page 84
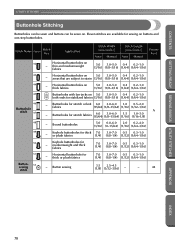
... (1/4) 3.0-7.0 0.5 0.3-1.0 (1/8-1/4) (1/32) (1/64-1/16) 50 Keyhole buttonholes for stabilized fabrics (3/16) (1/8-3/16) (1/64) (1/64-1/16) 46 Buttonhole stitch 47 - Horizontal buttonholes on 5.0 3.0-5.0 0.4 0.2-1.0 areas that are available for thick or plush fabrics 7.0 3.0-7.0 0.5 0.3-1.0 (1/4) (1/8-1/4) (1/32) (1/64-1/16) Button- 55 sewing stitch - Horizontal buttonholes on thick fabrics 5.0 3.0-5.0 0.4 0.2-1.0 (3/16) (1/8-3/16) (1/64) (1/64-1/16) 45 Buttonholes with bar tacks on...
... (1/4) 3.0-7.0 0.5 0.3-1.0 (1/8-1/4) (1/32) (1/64-1/16) 50 Keyhole buttonholes for stabilized fabrics (3/16) (1/8-3/16) (1/64) (1/64-1/16) 46 Buttonhole stitch 47 - Horizontal buttonholes on 5.0 3.0-5.0 0.4 0.2-1.0 areas that are available for thick or plush fabrics 7.0 3.0-7.0 0.5 0.3-1.0 (1/4) (1/8-1/4) (1/32) (1/64-1/16) Button- 55 sewing stitch - Horizontal buttonholes on thick fabrics 5.0 3.0-5.0 0.4 0.2-1.0 (3/16) (1/8-3/16) (1/64) (1/64-1/16) 45 Buttonholes with bar tacks on...
Users Manual - English
Page 129
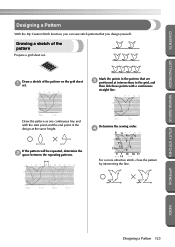
... point of the pattern on the grid sheet 1 set . Mark the points in the pattern that you can sew stitch patterns that are 3 positioned at the same height. Draw the pattern as one continuous line and with a continuous straight line. ...Determine the sewing order. 4 98 6 5 10 4 7 11 13 12 3 2 0 1 15 16 17 14 For a more attractive stitch, close the pattern by intersecting the line. APPENDIX INDEX Designing a Pattern 123 CONTENTS GETTING READY SEWING BASICS UTILITY STITCHES Designing a Pattern With the My Custom Stitch function, you design ...
... point of the pattern on the grid sheet 1 set . Mark the points in the pattern that you can sew stitch patterns that are 3 positioned at the same height. Draw the pattern as one continuous line and with a continuous straight line. ...Determine the sewing order. 4 98 6 5 10 4 7 11 13 12 3 2 0 1 15 16 17 14 For a more attractive stitch, close the pattern by intersecting the line. APPENDIX INDEX Designing a Pattern 123 CONTENTS GETTING READY SEWING BASICS UTILITY STITCHES Designing a Pattern With the My Custom Stitch function, you design ...


