
Brother International PC 420 Support Question
Brother International PC 420 Support Question
Find answers below for this question about Brother International PC 420 - PRW Limited Edition Project Runway Sewing Machine.Need a Brother International PC 420 manual? We have 1 online manual for this item!
Question posted by rochelle0099 on July 29th, 2012
Sewing Without Pedal- Brother Pc 430 Prw
I hit a wrong dial, now I can't sew/ I get a message to
"change speed control mode to off" but instructions manual does not explain to change it.
I checked out Brothers-usa but it does not explain how to change it.
Current Answers
Related Brother International PC 420 Manual Pages
Users Manual - English - Page 3

... panel. (page Cover E)
8 Sewing speed controller Use the sewing speed controller to adjust the sewing speed.
9 Knee lifter mounting slot Plug the knee lifter into the knee lifter mounting slot.
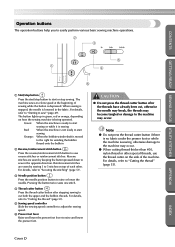
0 Operation buttons Use the operation buttons to start the sewing machine and automatically cut them.
CONTENTS
GETTING READY SEWING BASICS UTILITY STITCHES
Names of Machine Parts and Their Functions...
Users Manual - English - Page 5
... 53).
5 Sewing speed controller Slide the sewing speed controller to adjust the sewing speed.
6 Presser foot lever Raise and lower the presser foot lever to raise or lower the needle. CAUTION
● Do not press the thread cutter button after stopping sewing to cut , otherwise the needle may break, the threads may become tangled or damage to the machine may...
Users Manual - English - Page 9
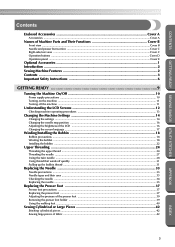
... ...1 Introduction ...2 Sewing Machine Features ...2 Contents ...3 Important Safety Instructions 6
GETTING READY 9
Turning the Machine On/Off 10
Power supply precautions ...10 Turning on the machine ...11 Turning off the machine ...11
Understanding the LCD Screens 12
Checking machine operating procedures ...13
Changing the Machine Settings 14
Changing the settings ...14 Changing the needle...
Users Manual - English - Page 10
... stitch settings ...60 Hands-free raising and lifting of the presser foot 61
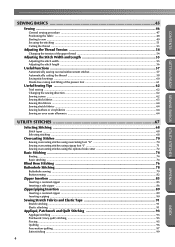
Useful Sewing Tips ...62
Trial sewing ...62 Changing the sewing direction ...62 Sewing curves ...62 Sewing thick fabrics ...63 Sewing thin fabrics ...64 Sewing stretch fabrics ...64 Sewing leathers or vinyl fabrics ...64 Sewing an even seam allowance ...64
UTILITY STITCHES 67
Selecting Stitching ...68
Stitch types...
Users Manual - English - Page 11
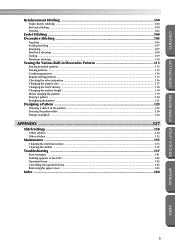
...Sewing the Various Built-In Decorative Patterns 113
Sewing beautiful patterns ...113 Sewing patterns ...113 Combining patterns ...114 Repeat sewing patterns ...115 Checking the selected pattern ...116 Changing the pattern size ...117 Changing the stitch density ...118 Changing...135
Cleaning the machine surface ...135 Cleaning the shuttle ...135
Troubleshooting ...137
Error messages ...141 Nothing ...
Users Manual - English - Page 12

...sewing machine is used as threading needle, changing needle, threading bobbin, or changing presser foot, and the like. 15.
Close attention is necessary when the machine is not intended for household use by pulling on cord. Do not use as contained in the instruction manual... do not play with any adjustments in this machine. 18. The wrong plate can cause the needle to the nearest ...
Users Manual - English - Page 14

... on the foot controller. 4. Always consult the operation manual when replacing or installing any other hot objects. 2. up lever, needle, or other parts to assure correct installation. Do not store anything on the needle while sewing.
For a longer service life 1. CONTENTS
GETTING READY SEWING BASICS UTILITY STITCHES
CONGRATULATIONS ON CHOOSING OUR MACHINE
Your machine is one...
Users Manual - English - Page 18
... (mm) 5 Stitch width (mm)
Memo
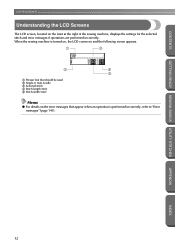
● For details on the front at the right of the sewing machine, displays the settings for the selected stitch and error messages if operations are performed incorrectly.
APPENDIX
INDEX
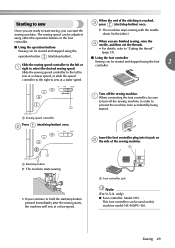
12 When the sewing machine is turned on, the LCD comes on and the following screen appears.
1
3
2
4
5
1 Presser foot that...
Users Manual - English - Page 21
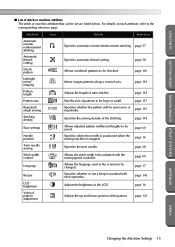
... once or repeatedly. page 58
Check pattern
Allows combined patterns to be checked.
page 118
Save settings
Allows adjusted pattern widths and lengths to be saved. Adjusts the brightness of satin stitches.
page 60
Needle position
Specifies where the needle is positioned when the sewing machine is sounded with the sewing speed controller.
page 143 page 16...
Users Manual - English - Page 27
... and the thread is turned after winding the thread around the bobbin. Memo
● When the sewing machine is started or the balance wheel is
wound around the bobbin, the machine will be incorrect. Slide the sewing speed controller to run out. Use scissors to the left. Slide the bobbin winder shaft to cut the thread...
Users Manual - English - Page 40
.../11 needle is already installed when the sewing machine is bent. If the combination of the fabric being operated.
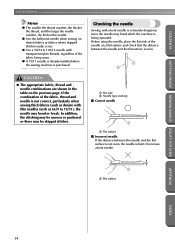
Do not use a bent needle.
1
1 Flat surface
APPENDIX
INDEX
34 Before using the needle, place the flat side of the needle on the previous page. Checking the needle
Sewing with thin needles (such as denim...
Users Manual - English - Page 47

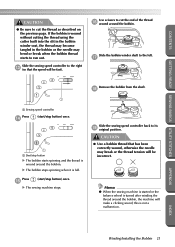
... the walking foot, sew at a speed between slow and medium.
■ Removing the walking foot
Press
(needle position button) once or
1 twice to "Stitch Settings" (page 128). For details on the stitches, refer to raise the needle.
Turn off the sewing machine. 2
Attach the presser foot holder. 5 • For details, refer to "Removing the...
Users Manual - English - Page 55
..., refer to select the desired sewing speed. only)
● Foot controller: Model N5V This foot controller can start /stop button) once.
Insert the foot controller plug into its jack on this machine model NX-400/PC-420. The sewing speed can be started . operation button
(start the sewing machine. Slide the sewing speed controller to the left or
controller.
1 right to "Cutting the...
Users Manual - English - Page 56

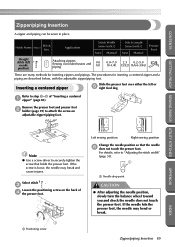
... sewing speed controller to the left or 4 right to "Cutting the thread" (page 53). Once you are ready to start sewing, slowly 5 press down on the foot controller, otherwise damage to the machine or injuries may occur.
● If the machine is stopped, refer to "Changing the needle stop position" (page 16). releasing the pressure on the foot controller...
Users Manual - English - Page 61

... Width and Length 55 For details, refer to "Saving stitch settings" (page 60).
● The sewing machine can be adjusted with the sewing speed controller.
Memo
● To reset the stitch width to its standard setting, select the same stitch again or change the setting to the left needle position or triple stretch stitch) was selected...
Users Manual - English - Page 95
...
1
1 Positioning screw
Left sewing position
Right sewing position
Change the needle position so that ...wheel toward you and check the needle does not ...hits the presser foot, the needle may break and cause injures. If the screw is loose, the needle may bend or break. Stitch Name
Pattern
Stitch Key
Application
Stitch Width [mm (inch.)]
Auto Manual
Stitch Length [mm (inch.)]
Auto Manual...
Users Manual - English - Page 102

... the walking foot and the quilting guide.
Note
● When sewing with the walking foot, sew at a speed between the top and bottom layers of fabric is called "quilting".
APPENDIX
INDEX
96 GETTING READY SEWING BASICS UTILITY STITCHES
UTILITY STITCHES
CONTENTS
Memo
● To change the width of the presser 4 foot, and then evenly stretch...
Users Manual - English - Page 105

... the stitch width can be adjusted using the sewing speed controller, the stitch width can be sewn by changing the stitch width of the thread being used, for specifying that the stitch width can be controlled with the sewing speed controller. Memo
● Although the stitching result differs depending on the sewing machine, and then press 3 (settings key) in the...
Users Manual - English - Page 147
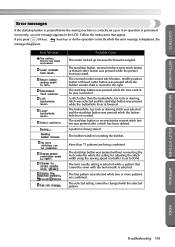
... the stitch width using the sewing speed controller is set up because the thread is displayed, the
message disappears. A pattern is being combined.
A stitch other than 71 patterns are combined.
More than the buttonhole, bar tack or darning stitch was selected and the start /stop button is pressed before the sewing machine is correctly set to...
Users Manual - English - Page 151
... 13 operation beep 142
operation buttons Cover B, Cover D
operation manual Cover A
operation panel Cover B, Cover E
optional accessories 1... fabric 48
presser foot Cover C, 37 presser foot dial Cover C, 39 presser foot holder Cover C, 39...
settings key Cover E, 14 sewing machine help key Cover E, 13
sewing machine needles 33 sewing speed 49
sewing speed controller Cover B, Cover D, 99
...
Similar Questions


Whats The Resale Value Of The Brother 2300 Prw Limited Edition Project Runway?
(Posted by Anonymous-139615 9 years ago)


How To Thread The Brother Limited Edition Project Runway Sewing Machine
ls2300prw manual
ls2300prw manual
(Posted by jjmaf0 10 years ago)
Brother Pc-420 Prw Limited Edition Project Runway Sewing Machine Will Not
thread needle
thread needle
(Posted by graphevaru 10 years ago)