

Users Manual - English
Page 24
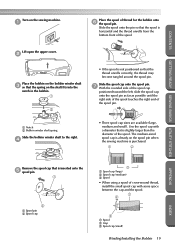
... sure to prepare the bobbin thread. 1 APPENDIX 1 Bobbin winder Memo ● The order that the machine should be threaded for winding the bobbin is indicated by a broken line on the sewing machine. CAUTION ● Only use the bobbin (part code: SA156, XA5539-151) designed specifically for this sewing machine. Actual size 11.5 mm (7/16 inch) This model Older model Winding...
... sure to prepare the bobbin thread. 1 APPENDIX 1 Bobbin winder Memo ● The order that the machine should be threaded for winding the bobbin is indicated by a broken line on the sewing machine. CAUTION ● Only use the bobbin (part code: SA156, XA5539-151) designed specifically for this sewing machine. Actual size 11.5 mm (7/16 inch) This model Older model Winding...
Users Manual - English
Page 25
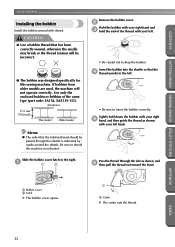
... from the bottom front of the spool pin. 1 Notch 2 Bobbin winder shaft spring Slide the bobbin winder shaft to the right. 4 • Three spool cap sizes are available (large, medium and small). The medium-sized spool cap is already on the spool pin when the sewing machine is purchased. 1 2 APPENDIX Remove the spool cap that is...
... from the bottom front of the spool pin. 1 Notch 2 Bobbin winder shaft spring Slide the bobbin winder shaft to the right. 4 • Three spool cap sizes are available (large, medium and small). The medium-sized spool cap is already on the spool pin when the sewing machine is purchased. 1 2 APPENDIX Remove the spool cap that is...
Users Manual - English
Page 26
...cover to the front. 1 1 Thread guide for bobbin winding While using your left hand to hold the end of a the thread that best fits the size of the thread clockwise around the spool pin or ...break. Pull the thread to the right and pass it counterclockwise between the discs. 1 1 GETTING READY SEWING BASICS UTILITY STITCHES While holding the spool with your right hand to wind the free end of spool ... the spool or the spool cap is not positioned correctly, the thread may become tangled around the bobbin four or five times. 1 Thread guide cover Pass the thread under the 0 hook on the thread...
...cover to the front. 1 1 Thread guide for bobbin winding While using your left hand to hold the end of a the thread that best fits the size of the thread clockwise around the spool pin or ...break. Pull the thread to the right and pass it counterclockwise between the discs. 1 1 GETTING READY SEWING BASICS UTILITY STITCHES While holding the spool with your right hand to wind the free end of spool ... the spool or the spool cap is not positioned correctly, the thread may become tangled around the bobbin four or five times. 1 Thread guide cover Pass the thread under the 0 hook on the thread...
Users Manual - English
Page 28
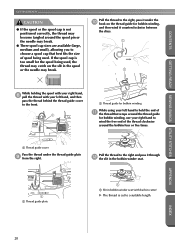
.... GETTING READY SEWING BASICS UTILITY STITCHES GETTING READY CONTENTS Installing the bobbin Install the bobbin wound with your left hand. Actual size 11.5 mm (7/16 inch) This model Older model Remove the bobbin cover. 2 Hold the bobbin with your right hand and 3 hold down the bobbin with your left . • Be sure to thread the machine as indicated.
.... GETTING READY SEWING BASICS UTILITY STITCHES GETTING READY CONTENTS Installing the bobbin Install the bobbin wound with your left hand. Actual size 11.5 mm (7/16 inch) This model Older model Remove the bobbin cover. 2 Hold the bobbin with your right hand and 3 hold down the bobbin with your left . • Be sure to thread the machine as indicated.
Users Manual - English
Page 37
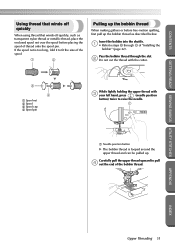
... net over the spool before free-motion quilting, first pull up . CONTENTS GETTING READY SEWING BASICS UTILITY STITCHES Using thread that winds off quickly When using thread that winds off quickly, such as described below. Insert the bobbin into the shuttle. 1 • Refer to steps 1 through the slot. 2 Do not cut ... 3 4 1 Spool net 2 Spool 3 Spool cap 4 Spool pin While lightly holding the upper thread with 3 your left hand, press (needle position button) twice to fit the size of the spool. 1 2 Pulling up the bobbin thread When making gathers or before placing the spool of the...
... net over the spool before free-motion quilting, first pull up . CONTENTS GETTING READY SEWING BASICS UTILITY STITCHES Using thread that winds off quickly When using thread that winds off quickly, such as described below. Insert the bobbin into the shuttle. 1 • Refer to steps 1 through the slot. 2 Do not cut ... 3 4 1 Spool net 2 Spool 3 Spool cap 4 Spool pin While lightly holding the upper thread with 3 your left hand, press (needle position button) twice to fit the size of the spool. 1 2 Pulling up the bobbin thread When making gathers or before placing the spool of the...
Users Manual - English
Page 151
... key Cover E, 13 sewing machine needles 33 sewing speed 49 sewing speed controller Cover B, Cover D, 99 shell tuck stitch 108 shutter 26 shuttle 22, 135 shuttle hook 136 side cutter 1, 72 side view Cover C size 117 sleeves 100 smocking 107 spool cap Cover A, 19, 25 spool net Cover A, 31 spool pin Cover... B, 53 thread cutter button Cover D, 53 thread guide cover Cover B, 20, 26 thread guide discs Cover C, 27 thread guide for bobbin winding Cover B, 20 thread guide plate Cover B, 20, 26 thread tension 54 thread tension dial Cover B, 54 thread that quickly unwinds 31 trial...
... key Cover E, 13 sewing machine needles 33 sewing speed 49 sewing speed controller Cover B, Cover D, 99 shell tuck stitch 108 shutter 26 shuttle 22, 135 shuttle hook 136 side cutter 1, 72 side view Cover C size 117 sleeves 100 smocking 107 spool cap Cover A, 19, 25 spool net Cover A, 31 spool pin Cover... B, 53 thread cutter button Cover D, 53 thread guide cover Cover B, 20, 26 thread guide discs Cover C, 27 thread guide for bobbin winding Cover B, 20 thread guide plate Cover B, 20, 26 thread tension 54 thread tension dial Cover B, 54 thread that quickly unwinds 31 trial...


