Users Manual - English
Page 7
... What is the length of the Warranty Periods: „ Machines: one year from the original purchase date. „ Accompanying Consumable and Accessory Items: 90 days from use of non Brother®-brand parts and Consumable and Accessory Items); 4 Consumable and Accessory Items that expired... use, misuse, neglect or accident (including but not limited to transporting this Product without authorization from Brother and/or alteration/removal of the serial number). Brother® One Year Limited Warranty and Replacement Service (USA only) Who is covered: „ This limited warranty ...
... What is the length of the Warranty Periods: „ Machines: one year from the original purchase date. „ Accompanying Consumable and Accessory Items: 90 days from use of non Brother®-brand parts and Consumable and Accessory Items); 4 Consumable and Accessory Items that expired... use, misuse, neglect or accident (including but not limited to transporting this Product without authorization from Brother and/or alteration/removal of the serial number). Brother® One Year Limited Warranty and Replacement Service (USA only) Who is covered: „ This limited warranty ...
Users Manual - English
Page 8
...limitation may not be charged for new product/parts. Brother will be liable for you to pick up to the cost of Brother. Except for that you . The repaired or...of purchase information, together with a replacement Machine after receiving one from state to state. „ This Limited Warranty (and Brother's obligation to you) may not apply to replace. If... to make that may vary from Brother. Brother reserves the right to this Product and your original Product is authorized by this Product. © 2003, 2006 Brother International Corporation vi You will , after ...
...limitation may not be charged for new product/parts. Brother will be liable for you to pick up to the cost of Brother. Except for that you . The repaired or...of purchase information, together with a replacement Machine after receiving one from state to state. „ This Limited Warranty (and Brother's obligation to you) may not apply to replace. If... to make that may vary from Brother. Brother reserves the right to this Product and your original Product is authorized by this Product. © 2003, 2006 Brother International Corporation vi You will , after ...
Users Manual - English
Page 9
...Service Centers, will VOID the Warranty. (Refer to your nearest Authorized Service Center call 1-877-BROTHER. Internet support: support@brother.ca or browse Brother's Web Site: www.brother.com Brother International Corporation (Canada) Ltd. 1 Rue Hôtel de Ville Dollard-Des-Ormeaux, QC H9B...WARRANTY (Canada only) Pursuant to this limited warranty of 1 year from the date of purchase for labour and parts, Brother International Corporation (Canada) Ltd. ("Brother"), or its Authorized Service Centers, Distributors, Dealers, Agents or employees, shall create another warranty or modify this...
...Service Centers, will VOID the Warranty. (Refer to your nearest Authorized Service Center call 1-877-BROTHER. Internet support: support@brother.ca or browse Brother's Web Site: www.brother.com Brother International Corporation (Canada) Ltd. 1 Rue Hôtel de Ville Dollard-Des-Ormeaux, QC H9B...WARRANTY (Canada only) Pursuant to this limited warranty of 1 year from the date of purchase for labour and parts, Brother International Corporation (Canada) Ltd. ("Brother"), or its Authorized Service Centers, Distributors, Dealers, Agents or employees, shall create another warranty or modify this...

Users Manual - English
Page 86
...Press a or b to choose the Group you want to change. b Enter 03. e Press Black Start or Color Start. Chapter 8 Deleting a number from several long distance carriers when you must wait for another dial tone or ...b to choose Fax. d Enter 02. Press OK. h Press Stop/Exit. You can substitute part of long-distance carriers and credit card numbers as separate Speed-Dial numbers in any point in the dialing sequence, ...create a pause in one Speed-Dial location, you will dial '555-7000'. You will be asked which number you...
...Press a or b to choose the Group you want to change. b Enter 03. e Press Black Start or Color Start. Chapter 8 Deleting a number from several long distance carriers when you must wait for another dial tone or ...b to choose Fax. d Enter 02. Press OK. h Press Stop/Exit. You can substitute part of long-distance carriers and credit card numbers as separate Speed-Dial numbers in any point in the dialing sequence, ...create a pause in one Speed-Dial location, you will dial '555-7000'. You will be asked which number you...
Users Manual - English
Page 124
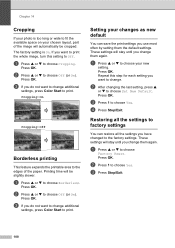
...feature expands the printable area to choose Cropping. c If you use most often by setting them again. a Press a or b to choose your chosen layout, part of the paper. a Press a or b to choose Off (or On). If you want to print the whole image, turn this step for each setting ... to factory settings 14 You can save the print settings you do not want to change additional settings, press Color Start to choose Yes. c If you want to change additional settings, press Color Start to the factory settings. Press OK. Press OK. Chapter 14 Cropping 14 If your photo is On...
...feature expands the printable area to choose Cropping. c If you use most often by setting them again. a Press a or b to choose your chosen layout, part of the paper. a Press a or b to choose Off (or On). If you want to print the whole image, turn this step for each setting ... to factory settings 14 You can save the print settings you do not want to change additional settings, press Color Start to choose Yes. c If you want to change additional settings, press Color Start to the factory settings. Press OK. Press OK. Chapter 14 Cropping 14 If your photo is On...

Users Manual - English
Page 139
...label. Refer all products plugged into this product yourself because opening or removing covers may touch dangerous voltage points or short out parts resulting in installation unless proper ventilation is used with this machine. 10 Do not allow anything to dangerous voltage points and other.... 3 Follow all warnings and instructions marked on the product. 4 Unplug this product, make sure that the total of all servicing to a Brother Authorized Service Center. Safety and Legal Important safety instructions A 1 Read all of these openings must not be placed near water. 6 Do not...
...label. Refer all products plugged into this product yourself because opening or removing covers may touch dangerous voltage points or short out parts resulting in installation unless proper ventilation is used with this machine. 10 Do not allow anything to dangerous voltage points and other.... 3 Follow all warnings and instructions marked on the product. 4 Unplug this product, make sure that the total of all servicing to a Brother Authorized Service Center. Safety and Legal Important safety instructions A 1 Read all of these openings must not be placed near water. 6 Do not...
Users Manual - English
Page 141
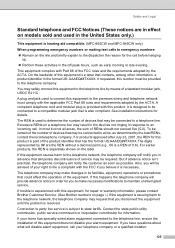
... equipment, call your right to the dispatcher the reason for repair or warranty information, please contact Brother Customer Service. (See Brother numbers on page i.) If the equipment is causing harm to the telephone company. Contact the state... public utility commission, public service commission or corporation commission for details. This equipment complies with Part 68 of 0.6). On the backside of RENs should not exceed five (5.0). You may safely connect this product is part...
... equipment, call your right to the dispatcher the reason for repair or warranty information, please contact Brother Customer Service. (See Brother numbers on page i.) If the equipment is causing harm to the telephone company. Contact the state... public utility commission, public service commission or corporation commission for details. This equipment complies with Part 68 of 0.6). On the backside of RENs should not exceed five (5.0). You may safely connect this product is part...

Users Manual - English
Page 142
... to the following measures: 126 These limits are designed to provide reasonable protection against the risk of Conformity (USA only) A Responsible Brother International Party: Corporation 100 Somerset Corporate Boulevard Bridgewater, NJ 08807-0911 USA TEL: (908) 704-1700 declares, that interference will not occur...See Brother numbers on , the user is no warranties extended or granted by this device must accept any financial or other responsibilities that may be determined by one or more of the FCC Rules. This equipment has been tested and found to comply with Part 15...
... to the following measures: 126 These limits are designed to provide reasonable protection against the risk of Conformity (USA only) A Responsible Brother International Party: Corporation 100 Somerset Corporate Boulevard Bridgewater, NJ 08807-0911 USA TEL: (908) 704-1700 declares, that interference will not occur...See Brother numbers on , the user is no warranties extended or granted by this device must accept any financial or other responsibilities that may be determined by one or more of the FCC Rules. This equipment has been tested and found to comply with Part 15...

Users Manual - English
Page 170
... you could void your machine. Machine Information B Checking the serial number B You can see the machine's serial number on page 143.) c Install the yellow protective part, lift each lock release lever and push it until it to choose Serial No.. b Press a or b to 'park' the print head after a print job. CAUTION...
... you could void your machine. Machine Information B Checking the serial number B You can see the machine's serial number on page 143.) c Install the yellow protective part, lift each lock release lever and push it until it to choose Serial No.. b Press a or b to 'park' the print head after a print job. CAUTION...
Users Manual - English
Page 171
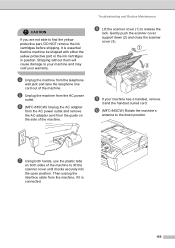
.... j (MFC-845CW) Rotate the machine's antenna to lift the scanner cover until it is essential that the machine be shipped with either the yellow protective part or the ink cartridges in position. It is connected. 155 f (MFC-845CW) Unplug the AC adapter from the AC power outlet and remove the AC.... e Unplug the machine from the machine, if it locks securely into the open position. CAUTION If you are not able to find the yellow protective part, DO NOT remove the ink cartridges before shipping.
.... j (MFC-845CW) Rotate the machine's antenna to lift the scanner cover until it is essential that the machine be shipped with either the yellow protective part or the ink cartridges in position. It is connected. 155 f (MFC-845CW) Unplug the AC adapter from the AC power outlet and remove the AC.... e Unplug the machine from the machine, if it locks securely into the open position. CAUTION If you are not able to find the yellow protective part, DO NOT remove the ink cartridges before shipping.

Users Manual - English
Page 172
Note If you are returning your 'Exchange' machine. 156 Do not pack the used ink cartridges in the original carton as part of the Exchange Service, pack only the machine. Keep all separate parts and printed materials to use with the original packing material. k Wrap the machine in the bag and put it in the original carton with your machine to Brother as shown below. MFC-440CN l Pack the printed materials in the carton.
Note If you are returning your 'Exchange' machine. 156 Do not pack the used ink cartridges in the original carton as part of the Exchange Service, pack only the machine. Keep all separate parts and printed materials to use with the original packing material. k Wrap the machine in the bag and put it in the original carton with your machine to Brother as shown below. MFC-440CN l Pack the printed materials in the carton.
Quick Setup Guide - English
Page 3
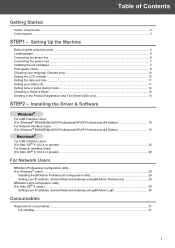
Setting Up the Machine Removing the protective parts ...4 Loading paper ...4 Connecting the phone line ...6 Connecting the power cord ...7 Installing the ink cartridges...7 Print quality check ...9 Choosing your language (Canada only)...10 Setting the ...
Setting Up the Machine Removing the protective parts ...4 Loading paper ...4 Connecting the phone line ...6 Connecting the power cord ...7 Installing the ink cartridges...7 Print quality check ...9 Choosing your language (Canada only)...10 Setting the ...
Quick Setup Guide - English
Page 6
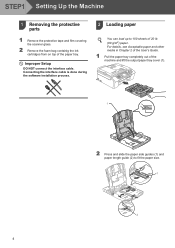
... Chapter 2 of the User's Guide. 1 Pull the paper tray completely out of 20 lb (80 g/m2) paper. STEP1 Setting Up the Machine 1 1 Removing the protective parts 1 Remove the protective tape and film covering the scanner glass. 2 Remove the foam bag containig the ink cartridges from on top of the paper tray.
... Chapter 2 of the User's Guide. 1 Pull the paper tray completely out of 20 lb (80 g/m2) paper. STEP1 Setting Up the Machine 1 1 Removing the protective parts 1 Remove the protective tape and film covering the scanner glass. 2 Remove the foam bag containig the ink cartridges from on top of the paper tray.

Quick Setup Guide - English
Page 9
Setting Up the Machine 4 Connecting the power cord 1 Connect the power cord. 3 Pull all the lock release levers down and remove the yellow protective part (1). 5 Installing the ink cartridges Warning If ink gets in your eyes, wash them out with water at once, and if irritation occurs consult a doctor. 1 Make ... protective yellow cap (1). 1 7 The LCD shows: No Cartridge Black Yellow Cyan Magenta 2 Open the ink cartridge cover (1). 1 Note Do not throw away the yellow protective part.
Setting Up the Machine 4 Connecting the power cord 1 Connect the power cord. 3 Pull all the lock release levers down and remove the yellow protective part (1). 5 Installing the ink cartridges Warning If ink gets in your eyes, wash them out with water at once, and if irritation occurs consult a doctor. 1 Make ... protective yellow cap (1). 1 7 The LCD shows: No Cartridge Black Yellow Cyan Magenta 2 Open the ink cartridge cover (1). 1 Note Do not throw away the yellow protective part.


