Basic Users Guide
Page 12
... the Touchscreen LCD 5 Access Brother Utilities (Windows 6 Uninstall the Brother Software and Drivers (Windows 6 Initial Setup...7 Set the Date and Time 7 Adjust the Machine's Volume 7 2 Paper Handling ...8 Load Paper ...8 Load Paper in the Paper Tray 8 Load Paper in the Multi‑purpose Tray (MP Tray 10 Change the Check Paper Size Setting 11 Change the Paper Size and Paper Type 12 Recommended Print...
... the Touchscreen LCD 5 Access Brother Utilities (Windows 6 Uninstall the Brother Software and Drivers (Windows 6 Initial Setup...7 Set the Date and Time 7 Adjust the Machine's Volume 7 2 Paper Handling ...8 Load Paper ...8 Load Paper in the Paper Tray 8 Load Paper in the Multi‑purpose Tray (MP Tray 10 Change the Check Paper Size Setting 11 Change the Paper Size and Paper Type 12 Recommended Print...

Basic Users Guide
Page 21
... the green release levers to slide the paper guides. 3 Fan the stack of the paper tray. (Legal and Folio size paper are not available in some regions.) For trays with a release button: 1 For trays with a release lever: 2 2 Press and slide the paper guides to fit the paper. 2 Paper Handling Load Paper Load Paper in the Paper Tray • If the Check Size setting...
... the green release levers to slide the paper guides. 3 Fan the stack of the paper tray. (Legal and Folio size paper are not available in some regions.) For trays with a release button: 1 For trays with a release lever: 2 2 Press and slide the paper guides to fit the paper. 2 Paper Handling Load Paper Load Paper in the Paper Tray • If the Check Size setting...
Basic Users Guide
Page 22
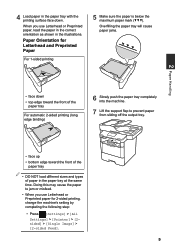
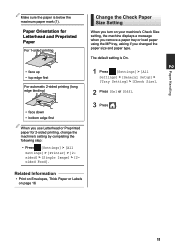
... Settings] > [Printer] > [2sided] > [Single Image] > [2-sided Feed]. 9 When you use Letterhead or Preprinted paper, load the paper in the correct orientation as shown in the paper tray at the same time. Doing this may cause the paper to prevent paper from sliding off the output tray. • face up • bottom edge toward the front of the...
... Settings] > [Printer] > [2sided] > [Single Image] > [2-sided Feed]. 9 When you use Letterhead or Preprinted paper, load the paper in the correct orientation as shown in the paper tray at the same time. Doing this may cause the paper to prevent paper from sliding off the output tray. • face up • bottom edge toward the front of the...
Basic Users Guide
Page 24
... on your machine's Check Size setting, the machine displays a message when you remove a paper tray or load paper using the MP tray, asking if you changed the paper size and paper type. The default setting is below the maximum paper mark (1). 2 Paper Handling Make sure the paper is On. • face up • top edge first For automatic 2-sided...
... on your machine's Check Size setting, the machine displays a message when you remove a paper tray or load paper using the MP tray, asking if you changed the paper size and paper type. The default setting is below the maximum paper mark (1). 2 Paper Handling Make sure the paper is On. • face up • top edge first For automatic 2-sided...

Basic Users Guide
Page 25
...#5160 No specific brand recommended 5 Swipe up or down or press a or b to display the [Paper Size] option, and then press [Paper Size]. 6 Swipe up or down or press a or b to display the paper tray options, and then press the option you want. 7 Swipe up or down or press a or b...quality, we recommend using the paper listed in the tray, you must change the Paper Size and Paper Type settings on the LCD at the same time. 1 Press [Settings] > [All Settings] > [General Setup] > [Tray Setting] > [Paper Type]. 2 Swipe up or down or press a or b to display the paper tray options, and then press ...
...#5160 No specific brand recommended 5 Swipe up or down or press a or b to display the [Paper Size] option, and then press [Paper Size]. 6 Swipe up or down or press a or b to display the paper tray options, and then press the option you want. 7 Swipe up or down or press a or b...quality, we recommend using the paper listed in the tray, you must change the Paper Size and Paper Type settings on the LCD at the same time. 1 Press [Settings] > [All Settings] > [General Setup] > [Tray Setting] > [Paper Type]. 2 Swipe up or down or press a or b to display the paper tray options, and then press ...

Basic Users Guide
Page 31
... settings, if needed. • (Number of copies) Enter the number of copies in one of the following : • Place the document face up in the paper tray. 2 Do one of the following ways: • Press or on the LCD. • Press the numbers on the control panel. • [Options] Press... to access the preset copy settings. 18 4 Copy Copy a Document 1 Make sure you have loaded the correct size paper in the ADF. (If you can save them by pressing the [Save as Shortcut] button. • [Quick Copy] Press to change the copy settings for...
... settings, if needed. • (Number of copies) Enter the number of copies in one of the following : • Place the document face up in the paper tray. 2 Do one of the following ways: • Press or on the LCD. • Press the numbers on the control panel. • [Options] Press... to access the preset copy settings. 18 4 Copy Copy a Document 1 Make sure you have loaded the correct size paper in the ADF. (If you can save them by pressing the [Save as Shortcut] button. • [Quick Copy] Press to change the copy settings for...

Basic Users Guide
Page 34
4 Copy Menu selections Page Layout Options Make N in 1 or 2 in 1 ID copies. 4 in1 2-sided Copy Select to copy on both sides of the paper. 1-sided → 2-sided 1 1 2 2 2-sided → 2-sided 1 1 2 2 The available options will vary depending on your model. 2-sided Copy Page Layout Select long edge binding or short edge binding. (available only for certain settings) Tray Use Select a paper tray for the next copy. Save as Shortcut Add the current settings as a shortcut. 21
4 Copy Menu selections Page Layout Options Make N in 1 or 2 in 1 ID copies. 4 in1 2-sided Copy Select to copy on both sides of the paper. 1-sided → 2-sided 1 1 2 2 2-sided → 2-sided 1 1 2 2 The available options will vary depending on your model. 2-sided Copy Page Layout Select long edge binding or short edge binding. (available only for certain settings) Tray Use Select a paper tray for the next copy. Save as Shortcut Add the current settings as a shortcut. 21

Basic Users Guide
Page 35
...document face down on the scanner glass. 3 Press [Copy]. 4 Enter the number of the following: • Place the document face up in the paper tray. 2 Do one of copies. 5 Press [Options] > [2-sided Copy]. 6 To change the layout options, press [Layout]. Copy Multiple Pages on Both Sides of ...the Paper • You must choose a layout option before you are copying multiple pages, we recommend using the 2‑sided copy option. Press the layout option...
...document face down on the scanner glass. 3 Press [Copy]. 4 Enter the number of the following: • Place the document face up in the paper tray. 2 Do one of copies. 5 Press [Options] > [2-sided Copy]. 6 To change the layout options, press [Layout]. Copy Multiple Pages on Both Sides of ...the Paper • You must choose a layout option before you are copying multiple pages, we recommend using the 2‑sided copy option. Press the layout option...

Basic Users Guide
Page 36
... ADF, the machine feeds and scans the pages and starts printing. Copy a 2-sided Document Using the ADF Related Models: DCP-L5650DN/MFC-L5850DW/MFC-L5900DW/ MFC-L6700DW/MFC-L6800DW When you use the ADF to the next step. 10 After the machine scans the page, press the [Continue] or [Finish... document, you can make 2-sided copies automatically. • Select Letter, Legal, or Folio size paper when using the 2‑sided copy option. 1 Make sure you have loaded the correct size paper in the paper tray. 2 Place the document face up in to scan the page. The machine feeds and scans the...
... ADF, the machine feeds and scans the pages and starts printing. Copy a 2-sided Document Using the ADF Related Models: DCP-L5650DN/MFC-L5850DW/MFC-L5900DW/ MFC-L6700DW/MFC-L6800DW When you use the ADF to the next step. 10 After the machine scans the page, press the [Continue] or [Finish... document, you can make 2-sided copies automatically. • Select Letter, Legal, or Folio size paper when using the 2‑sided copy option. 1 Make sure you have loaded the correct size paper in the paper tray. 2 Place the document face up in to scan the page. The machine feeds and scans the...

Basic Users Guide
Page 37
The machine scans one page, keeping the original card size. 1 Make sure you have loaded the correct size paper in the paper tray. 2 Place your document face down on the scanner glass. 3 Press [Copy]. 4 Enter the number of copies. 5 Press [Quick Copy] > [2sided(2⇒2)]. 6 Press ..., or Folio size paper when using the scanner glass, you must turn over the page along the long edge. • You may copy an identification card only to scan the other side. Copy a 2-sided Document Using the Scanner Glass Related Models: DCP-L5500DN/DCP-L5600DN/MFC-L5700DW/ MFC-L5800DW • To copy...
The machine scans one page, keeping the original card size. 1 Make sure you have loaded the correct size paper in the paper tray. 2 Place your document face down on the scanner glass. 3 Press [Copy]. 4 Enter the number of copies. 5 Press [Quick Copy] > [2sided(2⇒2)]. 6 Press ..., or Folio size paper when using the scanner glass, you must turn over the page along the long edge. • You may copy an identification card only to scan the other side. Copy a 2-sided Document Using the Scanner Glass Related Models: DCP-L5500DN/DCP-L5600DN/MFC-L5700DW/ MFC-L5800DW • To copy...

Basic Users Guide
Page 56
...point (for wireless network), router, or hub is turned on and its link indicator is blinking. • Paper is offline. • Double-click the icon in Brother Status Monitor on Startup check box, the Status Monitor will launch automatically each time you can correct most problems yourself... indicates a warning. • A red icon indicates an error has occurred. • A gray icon indicates the machine is inserted correctly in the paper tray. • The interface cables are securely connected to the machine and the computer. • Check the LCD or the machine's status in the task...
...point (for wireless network), router, or hub is turned on and its link indicator is blinking. • Paper is offline. • Double-click the icon in Brother Status Monitor on Startup check box, the Status Monitor will launch automatically each time you can correct most problems yourself... indicates a warning. • A red icon indicates an error has occurred. • A gray icon indicates the machine is inserted correctly in the paper tray. • The interface cables are securely connected to the machine and the computer. • Check the LCD or the machine's status in the task...
Basic Users Guide
Page 59
...; Do not overfill the paper tray. menu. Do one of paper, or paper is not loaded correctly in the paper tray. • Refill paper in the indicated paper tray. Do not overfill the paper tray. 46 Make sure the paper guides are set to the correct size. Error Message Cause Action Jam Tray 1 Jam Tray 2 Jam Tray 3 The paper is jammed in the paper tray. No Drum Unit...
...; Do not overfill the paper tray. menu. Do one of paper, or paper is not loaded correctly in the paper tray. • Refill paper in the indicated paper tray. Do not overfill the paper tray. 46 Make sure the paper guides are set to the correct size. Error Message Cause Action Jam Tray 1 Jam Tray 2 Jam Tray 3 The paper is jammed in the paper tray. No Drum Unit...
Basic Users Guide
Page 60
...type. • Clear faxes from the memory. Reinstall the toner cartridge and drum unit assembly back in the paper tray indicated on the LCD. in process Do one . Remove printed paper from the drum unit, and reinstall the toner cartridge back in the drum unit. Press and delete the ...the toner cartridge with a new one of Memory Output Tray Full Paper Low Paper Low T1 Paper Low T2 Paper Low T3 Print Data Full Cause Action The toner cartridge or the toner cartridge and drum unit assembly is nearly empty. The paper tray is not installed correctly. Remove the toner cartridge and ...
...type. • Clear faxes from the memory. Reinstall the toner cartridge and drum unit assembly back in the paper tray indicated on the LCD. in process Do one . Remove printed paper from the drum unit, and reinstall the toner cartridge back in the drum unit. Press and delete the ...the toner cartridge with a new one of Memory Output Tray Full Paper Low Paper Low T1 Paper Low T2 Paper Low T3 Print Data Full Cause Action The toner cartridge or the toner cartridge and drum unit assembly is nearly empty. The paper tray is not installed correctly. Remove the toner cartridge and ...

Basic Users Guide
Page 62
...available for automatic 2-sided printing. Supplies Prepare New Toner Cartridge. was installed. A Troubleshooting 49 Size Error 2-sided The paper size specified Press in the paper tray. If the LCD displays this message, you can still print. Order a new toner cartridge now so a replacement toner ... drum unit. Size Error The paper size defined in the tray indicated on the LCD and set the tray for the tray. Wrong Paper Size MP Wrong Paper Size T1 Wrong Paper Size T2 Wrong Paper Size T3 The specified tray ran out of paper for that paper size. The fuser unit is ...
...available for automatic 2-sided printing. Supplies Prepare New Toner Cartridge. was installed. A Troubleshooting 49 Size Error 2-sided The paper size specified Press in the paper tray. If the LCD displays this message, you can still print. Order a new toner cartridge now so a replacement toner ... drum unit. Size Error The paper size defined in the tray indicated on the LCD and set the tray for the tray. Wrong Paper Size MP Wrong Paper Size T1 Wrong Paper Size T2 Wrong Paper Size T3 The specified tray ran out of paper for that paper size. The fuser unit is ...
Basic Users Guide
Page 69
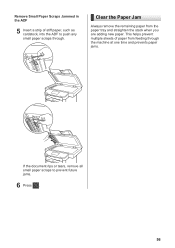
This helps prevent multiple sheets of stiff paper, such as cardstock, into the ADF to push any small paper scraps through the machine at one time and prevents paper jams. If the document rips or tears, remove all small paper scraps to prevent future jams. 6 Press . 56 Remove Small Paper Scraps Jammed in the ADF 5 Insert a strip of paper from the paper tray and straighten the stack when you are adding new paper. Clear the Paper Jam Always remove the remaining paper from feeding through .
This helps prevent multiple sheets of stiff paper, such as cardstock, into the ADF to push any small paper scraps through the machine at one time and prevents paper jams. If the document rips or tears, remove all small paper scraps to prevent future jams. 6 Press . 56 Remove Small Paper Scraps Jammed in the ADF 5 Insert a strip of paper from the paper tray and straighten the stack when you are adding new paper. Clear the Paper Jam Always remove the remaining paper from feeding through .
Basic Users Guide
Page 70
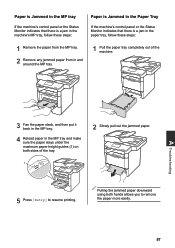
... machine's control panel or the Status Monitor indicates that there is a jam in the paper tray, follow these steps: 1 Remove the paper from the MP tray. 2 Remove any jammed paper from in the MP tray and make sure the paper stays under the maximum paper height guides (1) on both hands allows you to resume printing. A Troubleshooting 3 Fan the...
... machine's control panel or the Status Monitor indicates that there is a jam in the paper tray, follow these steps: 1 Remove the paper from the MP tray. 2 Remove any jammed paper from in the MP tray and make sure the paper stays under the maximum paper height guides (1) on both hands allows you to resume printing. A Troubleshooting 3 Fan the...

Basic Users Guide
Page 71
...of the machine, follow these steps: 4 Make sure the paper is below the maximum paper mark (b b b). 1 Leave the machine turned on for 10 minutes for the internal fan to cool the extremely hot parts inside the machine. 2 Open the back cover. 5 Put the paper tray firmly back in the machine. 3 Pull the green levers ...at the left and right sides toward you to fit the paper size. Paper is Jammed in the Back of...
...of the machine, follow these steps: 4 Make sure the paper is below the maximum paper mark (b b b). 1 Leave the machine turned on for 10 minutes for the internal fan to cool the extremely hot parts inside the machine. 2 Open the back cover. 5 Put the paper tray firmly back in the machine. 3 Pull the green levers ...at the left and right sides toward you to fit the paper size. Paper is Jammed in the Back of...
Basic Users Guide
Page 74
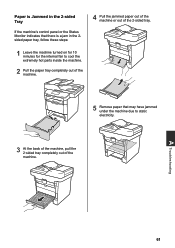
... that there is a jam in the 2sided paper tray, follow these steps: 1 Leave the machine turned on for 10 minutes for the internal fan to cool the extremely hot parts inside the machine. 2 Pull the paper tray completely out of the machine. 4 Pull the jammed paper out of the machine or out of the ...2‑sided tray. 5 Remove paper that may have jammed under the machine due to...
... that there is a jam in the 2sided paper tray, follow these steps: 1 Leave the machine turned on for 10 minutes for the internal fan to cool the extremely hot parts inside the machine. 2 Pull the paper tray completely out of the machine. 4 Pull the jammed paper out of the machine or out of the ...2‑sided tray. 5 Remove paper that may have jammed under the machine due to...
Basic Users Guide
Page 75
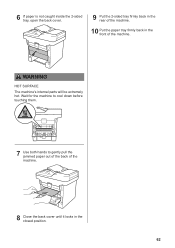
WARNING HOT SURFACE The machine's internal parts will be extremely hot. Wait for the machine to cool down before touching them. 7 Use both hands to gently pull the jammed paper out of the back of the machine. 8 Close the back cover until it locks in the front of the machine. 10 Put the paper tray firmly back in the closed position. 62 6 If paper is not caught inside the 2-sided tray, open the back cover. 9 Put the 2-sided tray firmly back in the rear of the machine.
WARNING HOT SURFACE The machine's internal parts will be extremely hot. Wait for the machine to cool down before touching them. 7 Use both hands to gently pull the jammed paper out of the back of the machine. 8 Close the back cover until it locks in the front of the machine. 10 Put the paper tray firmly back in the closed position. 62 6 If paper is not caught inside the 2-sided tray, open the back cover. 9 Put the 2-sided tray firmly back in the rear of the machine.
Quick Setup Guide
Page 1
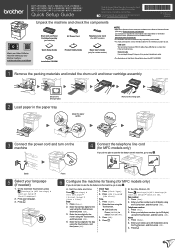
...MFC‑L5800DW / MFC‑L5850DW / MFC‑L5900DW / MFC‑L6700DW / MFC‑L6800DW Quick Setup Guide Read the Product Safety Guide first, then read this Quick Setup Guide show the MFC‑L6800DW. 1 Remove the packing materials and install the drum unit and toner cartridge assembly Discard the silica gel pack. 2 Load paper in the paper tray... the machine and check the components Watch our Video FAQs for this model are available at the Brother Solutions Center: solutions.brother.com/manuals. USB cable We recommend using the Touchscreen. „„ 12h Clock only Press ...
...MFC‑L5800DW / MFC‑L5850DW / MFC‑L5900DW / MFC‑L6700DW / MFC‑L6800DW Quick Setup Guide Read the Product Safety Guide first, then read this Quick Setup Guide show the MFC‑L6800DW. 1 Remove the packing materials and install the drum unit and toner cartridge assembly Discard the silica gel pack. 2 Load paper in the paper tray... the machine and check the components Watch our Video FAQs for this model are available at the Brother Solutions Center: solutions.brother.com/manuals. USB cable We recommend using the Touchscreen. „„ 12h Clock only Press ...


