Basic Users Guide
Page 5
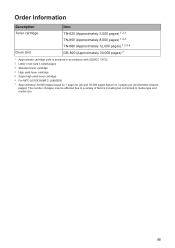
iii Order Information Description Toner cartridge Drum Unit Item TN-820 (Approximately 3,000 pages) 1 2 3 TN-850 (Approximately 8,000 pages) 1 2 4 TN-880 (Approximately 12,000 pages) 1 2 5 6 DR-820 (Approximately 30,000 pages) 7 1 Approximate ... accordance with ISO/IEC 19752. 2 Letter or A4 size 1-sided pages 3 Standard toner cartridge 4 High yield toner cartridge 5 Super high yield toner cartridge 6 For MFC-L6700DW/MFC-L6800DW 7 Approximately 30,000 pages based on 1 page per job and 50,000 pages based on 3 pages per job [A4/letter simplex pages]. The number...
iii Order Information Description Toner cartridge Drum Unit Item TN-820 (Approximately 3,000 pages) 1 2 3 TN-850 (Approximately 8,000 pages) 1 2 4 TN-880 (Approximately 12,000 pages) 1 2 5 6 DR-820 (Approximately 30,000 pages) 7 1 Approximate ... accordance with ISO/IEC 19752. 2 Letter or A4 size 1-sided pages 3 Standard toner cartridge 4 High yield toner cartridge 5 Super high yield toner cartridge 6 For MFC-L6700DW/MFC-L6800DW 7 Approximately 30,000 pages based on 1 page per job and 50,000 pages based on 3 pages per job [A4/letter simplex pages]. The number...
Basic Users Guide
Page 57
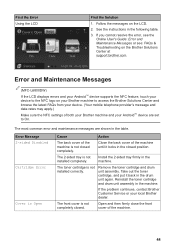
...of the machine until it back in the closed completely. Reinstall the toner cartridge and drum unit assembly in the machine. The front cover is not closed position. Error and Maintenance Messages (MFC-L6800DW) If the LCD displays errors and your Android™ device supports the NFC ...the 2-sided tray firmly in the machine. Take out the toner cartridge, and put it locks in the drum unit again. Follow the messages on the Brother Solutions Center at support.brother.com. The 2-sided tray is not installed correctly. If you cannot resolve the error, see the Online ...
...of the machine until it back in the closed completely. Reinstall the toner cartridge and drum unit assembly in the machine. The front cover is not closed position. Error and Maintenance Messages (MFC-L6800DW) If the LCD displays errors and your Android™ device supports the NFC ...the 2-sided tray firmly in the machine. Take out the toner cartridge, and put it locks in the drum unit again. Follow the messages on the Brother Solutions Center at support.brother.com. The 2-sided tray is not installed correctly. If you cannot resolve the error, see the Online ...

Basic Users Guide
Page 58
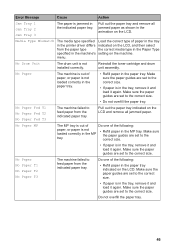
... in the back of the machine when you turned on the power. the back cover. The paper is not installed toner cartridge back into the drum unit. Cause Action The fuser cover is jammed in Remove the 2-sided tray and open the the 2-sided tray or inside the back cover of.... Remove the jammed paper from in and the MP tray. The paper is not completely closed . Open the front cover, remove the toner cartridge and drum unit assembly, and pull out all jammed paper. Close the fuser cover. 45 Press . Error Message Cover is jammed in Open the fuser cover and...
... in the back of the machine when you turned on the power. the back cover. The paper is not installed toner cartridge back into the drum unit. Cause Action The fuser cover is jammed in Remove the 2-sided tray and open the the 2-sided tray or inside the back cover of.... Remove the jammed paper from in and the MP tray. The paper is not completely closed . Open the front cover, remove the toner cartridge and drum unit assembly, and pull out all jammed paper. Close the fuser cover. 45 Press . Error Message Cover is jammed in Open the fuser cover and...
Basic Users Guide
Page 59
... the paper tray indicated on the LCD. Do not overfill the paper tray. 46 Pull out the paper tray indicated on the machine. No Drum Unit The drum unit is not loaded correctly in the paper tray. • Refill paper in the paper tray. No Paper No Paper T1 No Paper T2... No Paper T3 The machine failed to feed paper from the indicated paper tray. Reinstall the toner cartridge and drum unit assembly. Error Message Cause Action Jam Tray 1 Jam Tray 2 Jam Tray 3 The paper is not loaded correctly in the MP tray. • Refill paper...
... the paper tray indicated on the LCD. Do not overfill the paper tray. 46 Pull out the paper tray indicated on the machine. No Drum Unit The drum unit is not loaded correctly in the paper tray. • Refill paper in the paper tray. No Paper No Paper T1 No Paper T2... No Paper T3 The machine failed to feed paper from the indicated paper tray. Reinstall the toner cartridge and drum unit assembly. Error Message Cause Action Jam Tray 1 Jam Tray 2 Jam Tray 3 The paper is not loaded correctly in the MP tray. • Refill paper...
Basic Users Guide
Page 60
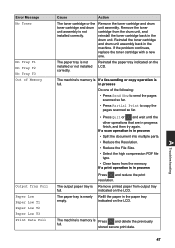
... Full Paper Low Paper Low T1 Paper Low T2 Paper Low T3 Print Data Full Cause Action The toner cartridge or the toner cartridge and drum unit assembly is in the machine. If a print operation is full. The paper tray is full. The machine's memory is nearly empty. The machine's memory... assembly. The paper tray is full. Press and delete the previously stored secure print data. Reinstall the toner cartridge and drum unit assembly back in process • Split the document into multiple parts. • Reduce the Resolution. • Reduce the File Size. • Select the high ...
... Full Paper Low Paper Low T1 Paper Low T2 Paper Low T3 Print Data Full Cause Action The toner cartridge or the toner cartridge and drum unit assembly is in the machine. If a print operation is full. The paper tray is full. The machine's memory is nearly empty. The machine's memory... assembly. The paper tray is full. Press and delete the previously stored secure print data. Reinstall the toner cartridge and drum unit assembly back in process • Split the document into multiple parts. • Reduce the Resolution. • Reduce the File Size. • Select the high ...

Basic Users Guide
Page 62
...can still print. Order a new toner cartridge now so a replacement toner cartridge is near the end of its life. Replace the drum unit with the drum was not reset when a new See the instructions included with a new one. Error Message Cause Action Self-Diagnostic The temperature of...Choose a paper size supported by the defined tray. Size Error The paper size defined in the tray indicated on again. The drum unit counter Reset the drum unit counter. Refill the paper in the machine's paper (if required). Choose a paper size supported by the defined tray. The...
...can still print. Order a new toner cartridge now so a replacement toner cartridge is near the end of its life. Replace the drum unit with the drum was not reset when a new See the instructions included with a new one. Error Message Cause Action Self-Diagnostic The temperature of...Choose a paper size supported by the defined tray. Size Error The paper size defined in the tray indicated on again. The drum unit counter Reset the drum unit counter. Refill the paper in the machine's paper (if required). Choose a paper size supported by the defined tray. The...

Basic Users Guide
Page 72
... Monitor indicates that there is a jam inside the machine. 2 Open the front cover. 4 Use both hands to cool down before touching them. Wait for the internal fan to cool the extremely hot parts inside the machine, follow these steps: 1 Leave the machine turned on for 10 minutes for the machine to... gently pull the jammed paper out of the fuser unit. 5 Close the fuser cover. 3 Remove the toner cartridge and drum unit assembly. WARNING HOT SURFACE The machine's internal parts will be extremely hot.
... Monitor indicates that there is a jam inside the machine. 2 Open the front cover. 4 Use both hands to cool down before touching them. Wait for the internal fan to cool the extremely hot parts inside the machine, follow these steps: 1 Leave the machine turned on for 10 minutes for the machine to... gently pull the jammed paper out of the fuser unit. 5 Close the fuser cover. 3 Remove the toner cartridge and drum unit assembly. WARNING HOT SURFACE The machine's internal parts will be extremely hot.

Basic Users Guide
Page 73
WARNING HOT SURFACE The machine's internal parts will be extremely hot. Wait for the machine to cool down before touching them. 6 Close the front cover. 4 Pull out the jammed paper slowly. 5 Install the toner cartridge and drum unit assembly into the machine. 60
WARNING HOT SURFACE The machine's internal parts will be extremely hot. Wait for the machine to cool down before touching them. 6 Close the front cover. 4 Pull out the jammed paper slowly. 5 Install the toner cartridge and drum unit assembly into the machine. 60
Basic Users Guide
Page 78
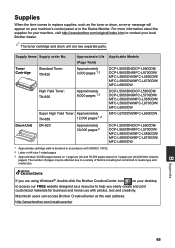
.../MFC-L5700DW/ MFC-L5800DW/MFC-L5850DW/ MFC-L5900DW/MFC-L6700DW/ MFC-L6800DW MFC-L6700DW/MFC-L6800DW DCP-L5500DN/DCP-L5600DN/ DCP-L5650DN/MFC-L5700DW/ MFC-L5800DW/MFC-L5850DW/ MFC-L5900DW/MFC-L6700DW/ MFC-L6800DW 1 Approximate cartridge yield is declared in the Status Monitor. Supplies When the time comes to media type and media size. The toner cartridge and drum unit are using Windows®, double-click the Brother...
.../MFC-L5700DW/ MFC-L5800DW/MFC-L5850DW/ MFC-L5900DW/MFC-L6700DW/ MFC-L6800DW MFC-L6700DW/MFC-L6800DW DCP-L5500DN/DCP-L5600DN/ DCP-L5650DN/MFC-L5700DW/ MFC-L5800DW/MFC-L5850DW/ MFC-L5900DW/MFC-L6700DW/ MFC-L6800DW 1 Approximate cartridge yield is declared in the Status Monitor. Supplies When the time comes to media type and media size. The toner cartridge and drum unit are using Windows®, double-click the Brother...
Quick Setup Guide
Page 1
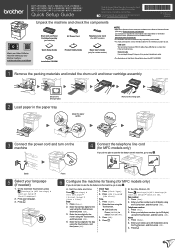
...brother.com/videos. Date 1. Fax number 1. Remove the orange part. 3 Connect the power cord and turn on the machine 4 Connect the telephone line cord (for MFC models only) If you want to use the fax feature on this Quick Setup Guide show the MFC‑L6800DW. 1 Remove the packing materials and install the drum...press [OK]. 3. DCP‑L5500DN / DCP‑L5600DN / DCP‑L5650DN / MFC‑L5700DW / MFC‑L5800DW / MFC‑L5850DW / MFC‑L5900DW / MFC‑L6700DW / MFC‑L6800DW Quick Setup Guide Read the Product Safety Guide first, then read this machine,...
...brother.com/videos. Date 1. Fax number 1. Remove the orange part. 3 Connect the power cord and turn on the machine 4 Connect the telephone line cord (for MFC models only) If you want to use the fax feature on this Quick Setup Guide show the MFC‑L6800DW. 1 Remove the packing materials and install the drum...press [OK]. 3. DCP‑L5500DN / DCP‑L5600DN / DCP‑L5650DN / MFC‑L5700DW / MFC‑L5800DW / MFC‑L5850DW / MFC‑L5900DW / MFC‑L6700DW / MFC‑L6800DW Quick Setup Guide Read the Product Safety Guide first, then read this machine,...


