
Basic Users Guide
Page 6
Order Information Description Toner cartridge Drum Unit Telephone Line Cord Basic User's Guide Quick Setup Guide Item TN-630 (Approximately 1,200 pages) 1 2 3 TN-660 (Approximately 2,600 pages) 1 2 4 DR-630 (Approximately 12,... size single-sided pages. 2 Approximate cartridge yield is declared in accordance with ISO/IEC 19752. 3 Standard toner cartridge 4 High yield toner cartridge 5 1 page per job 6 Drum life is approximate and may vary by type of use. iv
Order Information Description Toner cartridge Drum Unit Telephone Line Cord Basic User's Guide Quick Setup Guide Item TN-630 (Approximately 1,200 pages) 1 2 3 TN-660 (Approximately 2,600 pages) 1 2 4 DR-630 (Approximately 12,... size single-sided pages. 2 Approximate cartridge yield is declared in accordance with ISO/IEC 19752. 3 Standard toner cartridge 4 High yield toner cartridge 5 1 page per job 6 Drum life is approximate and may vary by type of use. iv
Basic Users Guide
Page 60
... cover of the machine until it back in the closed position. The fuser cover is not installed correctly. Remove the toner cartridge and drum unit assembly. Action Close the back cover of the machine is Open. If the error message remains, press, . The toner cartridge... is not completely closed or paper was jammed in the table. Follow the messages on the Brother Solutions Center at http://support.brother.com Scan A Troubleshooting Shortcuts Settings Error and Maintenance Messages The most common error and maintenance messages are shown in the ...
... cover of the machine until it back in the closed position. The fuser cover is not installed correctly. Remove the toner cartridge and drum unit assembly. Action Close the back cover of the machine is Open. If the error message remains, press, . The toner cartridge... is not completely closed or paper was jammed in the table. Follow the messages on the Brother Solutions Center at http://support.brother.com Scan A Troubleshooting Shortcuts Settings Error and Maintenance Messages The most common error and maintenance messages are shown in the ...
Basic Users Guide
Page 61
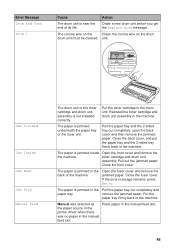
... feed slot. 46 Manual was no paper in the manual feed slot. Reinstall the toner cartridge and drum unit assembly in the Pull the paper tray out completely and paper tray. toner cartridge and drum unit assembly. The paper is jammed in the machine. If the error message remains, press Retry....paper is jammed underneath the paper tray or the fuser unit. Jam 2-sided Jam Inside Jam Rear Jam Tray Manual Feed The drum unit or the toner cartridge and drum unit assembly is near the end of the machine. Close the fuser cover. Pull the paper tray and the 2‑sided ...
... feed slot. 46 Manual was no paper in the manual feed slot. Reinstall the toner cartridge and drum unit assembly in the Pull the paper tray out completely and paper tray. toner cartridge and drum unit assembly. The paper is jammed in the machine. If the error message remains, press Retry....paper is jammed underneath the paper tray or the fuser unit. Jam 2-sided Jam Inside Jam Rear Jam Tray Manual Feed The drum unit or the toner cartridge and drum unit assembly is near the end of the machine. Close the fuser cover. Pull the paper tray and the 2‑sided ...
Basic Users Guide
Page 62
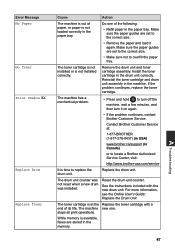
... a few minutes, and then turn it again. Remove the drum unit and toner cartridge assembly. Install the toner cartridge in the machine. Contact Brother Customer Service at the Replace the toner cartridge with the new drum unit. See the instructions included with a end of paper, or... Brother Authorized Service Center, visit: http://www.brother-usa.com/service It is at : 1-877-BROTHER (1-877-276-8437) (in USA) www.brother.ca/support (in the paper tray. Replace the drum unit. stops all print operations. The drum unit counter was not reset when a new drum was installed. Reset the drum ...
... a few minutes, and then turn it again. Remove the drum unit and toner cartridge assembly. Install the toner cartridge in the machine. Contact Brother Customer Service at the Replace the toner cartridge with the new drum unit. See the instructions included with a end of paper, or... Brother Authorized Service Center, visit: http://www.brother-usa.com/service It is at : 1-877-BROTHER (1-877-276-8437) (in USA) www.brother.ca/support (in the paper tray. Replace the drum unit. stops all print operations. The drum unit counter was not reset when a new drum was installed. Reset the drum ...

Basic Users Guide
Page 73
Paper is Jammed inside the Machine If the machine's control panel or the Status Monitor indicates that there is a jam inside the machine. 2 Open the front cover. 6 Close the back cover until it locks in the closed position. 3 Remove the toner cartridge and drum unit assembly. 58 This allows the internal fan to cool the extremely hot parts inside the machine, complete the following: 1 Leave the machine turned on for 10 minutes. 5 Close the fuser cover. Make sure the blue tabs at the left and right sides lock into place.
Paper is Jammed inside the Machine If the machine's control panel or the Status Monitor indicates that there is a jam inside the machine. 2 Open the front cover. 6 Close the back cover until it locks in the closed position. 3 Remove the toner cartridge and drum unit assembly. 58 This allows the internal fan to cool the extremely hot parts inside the machine, complete the following: 1 Leave the machine turned on for 10 minutes. 5 Close the fuser cover. Make sure the blue tabs at the left and right sides lock into place.

Basic Users Guide
Page 74
WARNING HOT SURFACE The machine's internal parts will be extremely hot. Wait for the machine to cool down before touching them. 4 Pull out the jammed paper slowly. 5 Install the toner cartridge and drum unit assembly into the machine. 6 Close the front cover. 59 A Troubleshooting
WARNING HOT SURFACE The machine's internal parts will be extremely hot. Wait for the machine to cool down before touching them. 4 Pull out the jammed paper slowly. 5 Install the toner cartridge and drum unit assembly into the machine. 6 Close the front cover. 59 A Troubleshooting

Basic Users Guide
Page 78
... you are two separate parts. The toner cartridge and drum unit are using Windows®, double-click the Brother CreativeCenter icon on your local Brother reseller. Mac users can access Brother CreativeCenter at this web address: http://www.brother.com/creativecenter B Appendix 63 Toner Cartridge Standard Toner:... TN-630 High Yield Toner: TN-660 Drum Unit DR-630 If you easily create and print customized materials for your machine, visit http://www.brother.com/original/index.html or contact your machine's control panel or in the...
... you are two separate parts. The toner cartridge and drum unit are using Windows®, double-click the Brother CreativeCenter icon on your local Brother reseller. Mac users can access Brother CreativeCenter at this web address: http://www.brother.com/creativecenter B Appendix 63 Toner Cartridge Standard Toner:... TN-630 High Yield Toner: TN-660 Drum Unit DR-630 If you easily create and print customized materials for your machine, visit http://www.brother.com/original/index.html or contact your machine's control panel or in the...
Quick Setup Guide
Page 1
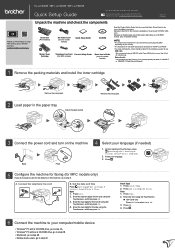
HL‑L2380DW / MFC‑L2720DW / MFC‑L2740DW Quick Setup Guide Not all countries. A. Connect the telephone line ... Adjust the paper guides. 3 Connect the power cord and turn on this machine, go to step 6. Press your Brother machine: solutions.brother.com/videos. Press OK. 4. On the machine's Touchscreen, press (Settings) > All Settings > Initial Setup > ... the year using the Touchscreen, and then press OK. Unpack the machine and check the components A Drum Unit (Pre‑installed) AC Power Cord (only for certain models) Quick Setup Guide CD‑ROM...
HL‑L2380DW / MFC‑L2720DW / MFC‑L2740DW Quick Setup Guide Not all countries. A. Connect the telephone line ... Adjust the paper guides. 3 Connect the power cord and turn on this machine, go to step 6. Press your Brother machine: solutions.brother.com/videos. Press OK. 4. On the machine's Touchscreen, press (Settings) > All Settings > Initial Setup > ... the year using the Touchscreen, and then press OK. Unpack the machine and check the components A Drum Unit (Pre‑installed) AC Power Cord (only for certain models) Quick Setup Guide CD‑ROM...


