
Network Glossary - English
Page 20
If there is the IP address of a Brother print server using the SET IP ADDRESS command) or factory reset the print server (which case, you will not need to use the ARP command again to change the IP address again, use a Web Based Management (... use the ARP command again). 16 Appendix A Using ARP to configure the IP address A If you are unable to use the BRAdmin application and your Brother print server can also use BOOTP or other methods described in this . The print server will then allow you to use the arp -s command.
If there is the IP address of a Brother print server using the SET IP ADDRESS command) or factory reset the print server (which case, you will not need to use the ARP command again to change the IP address again, use a Web Based Management (... use the ARP command again). 16 Appendix A Using ARP to configure the IP address A If you are unable to use the BRAdmin application and your Brother print server can also use BOOTP or other methods described in this . The print server will then allow you to use the arp -s command.

Network Users Manual - English
Page 16
...access point is set to temporarily use a USB cable (not included) during configuration. • You must reset the LAN settings before you proceed with this installation. To reset the LAN settings, see Restoring the network settings to factory default uu page 38. • If you ... Temporarily use of the first WEP key only. 12 c Choose Wireless Network Connection, and then click Next. Once you are using the Brother installer application found on -screen instructions to enable network connection and continue with the installation. (Recommended) and click Next. If you are ...
...access point is set to temporarily use a USB cable (not included) during configuration. • You must reset the LAN settings before you proceed with this installation. To reset the LAN settings, see Restoring the network settings to factory default uu page 38. • If you ... Temporarily use of the first WEP key only. 12 c Choose Wireless Network Connection, and then click Next. Once you are using the Brother installer application found on -screen instructions to enable network connection and continue with the installation. (Recommended) and click Next. If you are ...

Network Users Manual - English
Page 18
...before you write down the SSID and Network Key (if required) for a wireless network Wireless configuration temporarily using an Ethernet cable (For MFC-J825DW/J835DW and DCP-J925DW) 3 If there is an Ethernet Hub or Router in a network environment using a firewall function of the first... the use an Ethernet cable (not included) during configuration. • You must reset the LAN settings before you are using the Brother installer application found on your wireless network. To reset the LAN settings, see Restoring the network settings to temporarily use of anti-spyware ...
...before you write down the SSID and Network Key (if required) for a wireless network Wireless configuration temporarily using an Ethernet cable (For MFC-J825DW/J835DW and DCP-J925DW) 3 If there is an Ethernet Hub or Router in a network environment using a firewall function of the first... the use an Ethernet cable (not included) during configuration. • You must reset the LAN settings before you are using the Brother installer application found on your wireless network. To reset the LAN settings, see Restoring the network settings to temporarily use of anti-spyware ...
Network Users Manual - English
Page 21
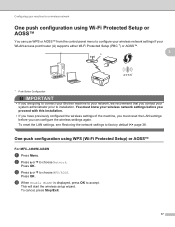
...If you have previously configured the wireless settings of the machine, you must reset the LAN settings before you contact your network, we recommend that you can configure the ...wireless settings again. Press OK. Press OK. To reset the LAN settings, see Restoring the network settings to choose Network. is displayed, press ...AOSS™. 3 A 1 Push Button Configuration IMPORTANT • If you are going to connect your Brother machine to your system administrator prior to installation. Configuring your machine for a wireless network One push configuration ...
...If you have previously configured the wireless settings of the machine, you must reset the LAN settings before you contact your network, we recommend that you can configure the ...wireless settings again. Press OK. Press OK. To reset the LAN settings, see Restoring the network settings to choose Network. is displayed, press ...AOSS™. 3 A 1 Push Button Configuration IMPORTANT • If you are going to connect your Brother machine to your system administrator prior to installation. Configuring your machine for a wireless network One push configuration ...
Network Users Manual - English
Page 27
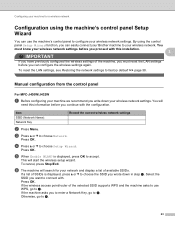
Manual configuration from the control panel 3 For MFC-J430W/J432W 3 a Before configuring your machine we recommend ...use the machine's control panel to configure your wireless network settings. Otherwise, go to connect with. To reset the LAN settings, see Restoring the network settings to accept. is displayed, press a or b to h.... will search for a wireless network Configuration using the control panel Setup Wizard function, you can easily connect your Brother machine to your wireless network settings before you to enter a Network Key, go to g. Configuring your machine ...
Manual configuration from the control panel 3 For MFC-J430W/J432W 3 a Before configuring your machine we recommend ...use the machine's control panel to configure your wireless network settings. Otherwise, go to connect with. To reset the LAN settings, see Restoring the network settings to accept. is displayed, press a or b to h.... will search for a wireless network Configuration using the control panel Setup Wizard function, you can easily connect your Brother machine to your wireless network settings before you to enter a Network Key, go to g. Configuring your machine ...
Network Users Manual - English
Page 42
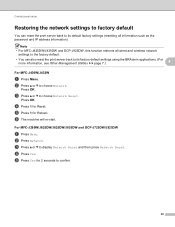
Press OK. Press OK. d Press 1 for Reboot. For MFC-J280W/J625DW/J825DW/J835DW and DCP-J725DW/J925DW 4 a Press Menu. c Press a or b to confirm. 38 e Press Yes for 2 seconds to display Network Reset and then press Network Reset. f The machine will re-start. c Press a or b to .... (For more information, see Other Management Utilities uu page 7.) 4 For MFC-J430W/J432W 4 a Press Menu. b Press a or b to choose Network Reset. e Press 1 for Reset. d Press Yes. Note • For MFC-J825DW/J835DW and DCP-J925DW, this function restores all information such as the password ...
Press OK. Press OK. d Press 1 for Reboot. For MFC-J280W/J625DW/J825DW/J835DW and DCP-J725DW/J925DW 4 a Press Menu. c Press a or b to confirm. 38 e Press Yes for 2 seconds to display Network Reset and then press Network Reset. f The machine will re-start. c Press a or b to .... (For more information, see Other Management Utilities uu page 7.) 4 For MFC-J430W/J432W 4 a Press Menu. b Press a or b to choose Network Reset. e Press 1 for Reset. d Press Yes. Note • For MFC-J825DW/J835DW and DCP-J925DW, this function restores all information such as the password ...
Network Users Manual - English
Page 48
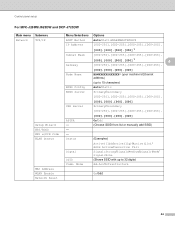
...-255].[000-255].[000-255].[000-255]. Mode (Shows SSID with up to 32 digits) Ad-hoc/Infrastructure On/Off 44 Control panel setup For MFC-J280W/J625DW and DCP-J725DW 4 Main menu Submenu Network TCP/IP Setup Wizard WPS/AOSS WPS w/PIN Code WLAN Status MAC Address WLAN Enable Network... Reset Menu Selections Options BOOT Method Auto/Static/RARP/BOOTP/DHCP IP Address [000-255].[000-255].[000-255].[000-255]. [000].[000].[000].[000] 1 Subnet ...
...-255].[000-255].[000-255].[000-255]. Mode (Shows SSID with up to 32 digits) Ad-hoc/Infrastructure On/Off 44 Control panel setup For MFC-J280W/J625DW and DCP-J725DW 4 Main menu Submenu Network TCP/IP Setup Wizard WPS/AOSS WPS w/PIN Code WLAN Status MAC Address WLAN Enable Network... Reset Menu Selections Options BOOT Method Auto/Static/RARP/BOOTP/DHCP IP Address [000-255].[000-255].[000-255].[000-255]. [000].[000].[000].[000] 1 Subnet ...
Network Users Manual - English
Page 49
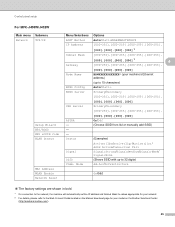
...:Medium/Signal:Weak/ Signal:None SSID Comm. Control panel setup For MFC-J430W/J432W Main menu Submenu Network TCP/IP Setup Wizard WPS/AOSS WPS w/PIN Code WLAN Status ...MAC Address WLAN Enable Network Reset 4 Menu Selections Options BOOT Method Auto/Static/RARP/BOOTP/DHCP IP Address [000-255].[... up to the Web Connect Guide located on the Manual download page for your model on the Brother Solutions Center (http://solutions.brother.com/). 45 Gateway [000].[000].[000].[000] 1 4 [000-255].[000-255].[000-255].[...
...:Medium/Signal:Weak/ Signal:None SSID Comm. Control panel setup For MFC-J430W/J432W Main menu Submenu Network TCP/IP Setup Wizard WPS/AOSS WPS w/PIN Code WLAN Status ...MAC Address WLAN Enable Network Reset 4 Menu Selections Options BOOT Method Auto/Static/RARP/BOOTP/DHCP IP Address [000-255].[... up to the Web Connect Guide located on the Manual download page for your model on the Brother Solutions Center (http://solutions.brother.com/). 45 Gateway [000].[000].[000].[000] 1 4 [000-255].[000-255].[000-255].[...

Network Users Manual - English
Page 55
...Based Management Other features 5 You can set up the following features in Secure Function Lock 2.0: All Counter Reset You can reset the page counter by clicking All Counter Reset. Export to CSV file You can export the current page counter including ID Number/Name information as a ...CSV file. Last Counter Record The machine retains the page count after the counter has been reset. Counter Auto Reset You can automatically reset the page counters by configuring the time interval based on Daily, Weekly or 5 Monthly settings, during the period the...
...Based Management Other features 5 You can set up the following features in Secure Function Lock 2.0: All Counter Reset You can reset the page counter by clicking All Counter Reset. Export to CSV file You can export the current page counter including ID Number/Name information as a ...CSV file. Last Counter Record The machine retains the page count after the counter has been reset. Counter Auto Reset You can automatically reset the page counters by configuring the time interval based on Daily, Weekly or 5 Monthly settings, during the period the...
Software Users Manual - English
Page 207
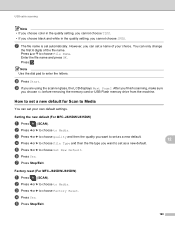
...or USB Flash memory drive from the machine. Enter the file name and press OK. Note Use the dial pad to choose File Name. Factory reset (For MFC-J825DW/J835DW) a Press (SCAN). d Press Yes. c Press d or c to Media. After you finish scanning, make sure you cannot choose JPEG.... b Press d or c to choose to choose Factory Reset. i If you want to Media You can set automatically. You can only change the first 6 digits ...
...or USB Flash memory drive from the machine. Enter the file name and press OK. Note Use the dial pad to choose File Name. Factory reset (For MFC-J825DW/J835DW) a Press (SCAN). d Press Yes. c Press d or c to Media. After you finish scanning, make sure you cannot choose JPEG.... b Press d or c to choose to choose Factory Reset. i If you want to Media You can set automatically. You can only change the first 6 digits ...
Software Users Manual - English
Page 208
... (SCAN). c Press a or b to choose Quality and then the quality you want to set as a new default. f Press Yes. Factory reset (For MFC-J625DW) a Press (SCAN). Press Options. e Press a or b to choose Factory Reset. d Press Yes. c Press a or b to choose Set New Default. e Press Stop/Exit. 12 12 12 199 b Press a or b to...
... (SCAN). c Press a or b to choose Quality and then the quality you want to set as a new default. f Press Yes. Factory reset (For MFC-J625DW) a Press (SCAN). Press Options. e Press a or b to choose Factory Reset. d Press Yes. c Press a or b to choose Set New Default. e Press Stop/Exit. 12 12 12 199 b Press a or b to...
Quick Setup Guide - English
Page 11
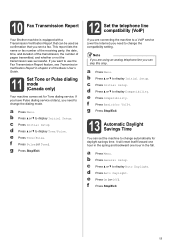
... 13 Automatic Daylight Savings Time You can be used as confirmation that can set for VoIP). f Press Pulse (or Tone). It will reset itself forward one hour in the spring and backward one hour in chapter 4 of pages transmitted, and whether or not the transmission was ...(over the Internet) you need to change the dialing mode. f Press Basic(for Tone dialing service. a Press Menu. 10 Fax Transmission Report Your Brother machine is equipped with a Transmission Verification Report that you sent a fax. e Press Compatibility. b Press General Setup. If you can skip this step....
... 13 Automatic Daylight Savings Time You can be used as confirmation that can set for VoIP). f Press Pulse (or Tone). It will reset itself forward one hour in the spring and backward one hour in chapter 4 of pages transmitted, and whether or not the transmission was ...(over the Internet) you need to change the dialing mode. f Press Basic(for Tone dialing service. a Press Menu. 10 Fax Transmission Report Your Brother machine is equipped with a Transmission Verification Report that you sent a fax. e Press Compatibility. b Press General Setup. If you can skip this step....
Quick Setup Guide - English
Page 27
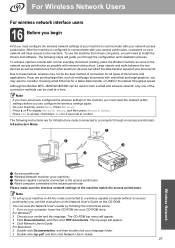
... top.pdf, and then click Network User's Guide. 27 Wireless Network The following the instructions below. 1 Turn on the CD-ROM. Although the Brother MFC-J825DW/J835DW can be used in Ad-hoc mode (connected to the machine. Press a or b to a computer through the configuration and installation process. ...guide you through an access point/router). For Wireless Network Users For wireless network interface users 16 Before you begin First you must reset the network (LAN) settings before you can configure the wireless settings again. If you are for the fastest throughput speed. Press ...
... top.pdf, and then click Network User's Guide. 27 Wireless Network The following the instructions below. 1 Turn on the CD-ROM. Although the Brother MFC-J825DW/J835DW can be used in Ad-hoc mode (connected to the machine. Press a or b to a computer through the configuration and installation process. ...guide you through an access point/router). For Wireless Network Users For wireless network interface users 16 Before you begin First you must reset the network (LAN) settings before you can configure the wireless settings again. If you are for the fastest throughput speed. Press ...
Quick Setup Guide - English
Page 43
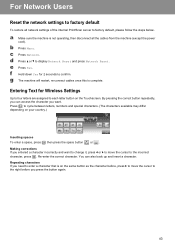
For Network Users Reset the network settings to factory default To restore all the cables from the machine (except the power cord). d Press a or b to the incorrect character, press . ... steps below. b Press Menu. e Press Yes. g The machine will restart, re-connect cables once this is not operating, then disconnect all network settings of the internal Print/Scan server to confirm. Press to cycle between letters, numbers and special characters. (The characters available may differ depending on the same button as...
For Network Users Reset the network settings to factory default To restore all the cables from the machine (except the power cord). d Press a or b to the incorrect character, press . ... steps below. b Press Menu. e Press Yes. g The machine will restart, re-connect cables once this is not operating, then disconnect all network settings of the internal Print/Scan server to confirm. Press to cycle between letters, numbers and special characters. (The characters available may differ depending on the same button as...

Advanced Users Manual - English
Page 5
... the factory settings 54 Scan to a memory card or USB Flash memory drive 55 Auto Crop ...55 How to set a new default 56 How to reset to the factory settings 56 9 Printing photos from a camera 57 Printing photos directly from a PictBridge camera 57 PictBridge requirements 57 Setting your digital camera 58...
... the factory settings 54 Scan to a memory card or USB Flash memory drive 55 Auto Crop ...55 How to set a new default 56 How to reset to the factory settings 56 9 Printing photos from a camera 57 Printing photos directly from a PictBridge camera 57 PictBridge requirements 57 Setting your digital camera 58...

Advanced Users Manual - English
Page 9
... display General Setup. b Press a or b to choose the length of time the machine is idle before it goes into Sleep Mode. Make sure you will reset itself forward one hour in the Spring and backward one hour in the Date&Time setting.
... display General Setup. b Press a or b to choose the length of time the machine is idle before it goes into Sleep Mode. Make sure you will reset itself forward one hour in the Spring and backward one hour in the Date&Time setting.

Advanced Users Manual - English
Page 13
.... • You can also choose: Call History, Speed Dial, Broadcasting, Delayed Fax, Batch TX, Polled TX, Polling RX, Overseas Mode, Set New Default, and Factory Reset. d Repeat steps b to c to change more settings. It automatically chooses the suitable contrast for your document is displayed, press it. d Press Auto, Light or Dark...
.... • You can also choose: Call History, Speed Dial, Broadcasting, Delayed Fax, Batch TX, Polled TX, Polling RX, Overseas Mode, Set New Default, and Factory Reset. d Repeat steps b to c to change more settings. It automatically chooses the suitable contrast for your document is displayed, press it. d Press Auto, Light or Dark...
Advanced Users Manual - English
Page 14
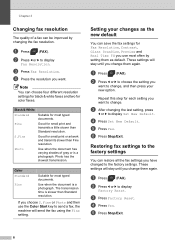
... Repeat this step for color faxes. e Press Stop/Exit. 8 a Press (FAX). c Press Fax Resolution. Use when the document is a photograph. c Press Factory Reset. Chapter 3 Changing fax resolution 3 The quality of gray or is a photograph. Good for most typed documents. a Press (FAX). Photo has the slowest transmission. e Press... Fax Resolution. Restoring fax settings to the factory settings. Note You can restore all the fax settings you want to display Factory Reset. b Press d or c to display Set New Default. b Press d or c to change .
... Repeat this step for color faxes. e Press Stop/Exit. 8 a Press (FAX). c Press Fax Resolution. Use when the document is a photograph. c Press Factory Reset. Chapter 3 Changing fax resolution 3 The quality of gray or is a photograph. Good for most typed documents. a Press (FAX). Photo has the slowest transmission. e Press... Fax Resolution. Restoring fax settings to the factory settings. Note You can restore all the fax settings you want to display Factory Reset. b Press d or c to display Set New Default. b Press d or c to change .

Advanced Users Manual - English
Page 60
... Borderless and Print Date, that you have the date information, you change . If the data doesn't have changed, to change additional settings, press . c Press Factory Reset. a Press Print Settings. These settings will be turned off to the factory settings 8 You can print the date if it is already in the data... setting on your new setting. e If you want to the factory settings. Chapter 8 Borderless printing 8 This feature expands the printable area to display Factory Reset. b Press a or b to the edges of the paper. a Press Print Settings. e Press Stop/Exit.
... Borderless and Print Date, that you have the date information, you change . If the data doesn't have changed, to change additional settings, press . c Press Factory Reset. a Press Print Settings. These settings will be turned off to the factory settings 8 You can print the date if it is already in the data... setting on your new setting. e If you want to the factory settings. Chapter 8 Borderless printing 8 This feature expands the printable area to display Factory Reset. b Press a or b to the edges of the paper. a Press Print Settings. e Press Stop/Exit.
Advanced Users Manual - English
Page 62
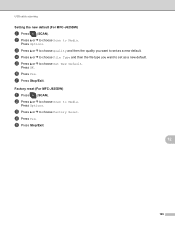
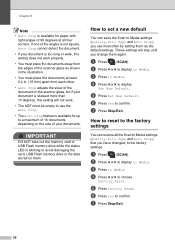
...Media settings (Quality, File Type and Auto Crop), that you change them again. d Press d or c to confirm. f Press Yes to choose Factory Reset. g Press Stop/Exit. 56 f Press Yes to Media. b Press d or c to display to confirm. These settings will not work properly. •...from the edges of the scanner glass as the default settings. a Press (SCAN). b Press d or c to display to display Set New Default. e Press Factory Reset. d Press d or c to Media. c Press to Media. c Press to Media. How to set a new default 8 You can restore all four corners....
...Media settings (Quality, File Type and Auto Crop), that you change them again. d Press d or c to confirm. f Press Yes to choose Factory Reset. g Press Stop/Exit. 56 f Press Yes to Media. b Press d or c to display to confirm. These settings will not work properly. •...from the edges of the scanner glass as the default settings. a Press (SCAN). b Press d or c to display to display Set New Default. e Press Factory Reset. d Press d or c to Media. c Press to Media. c Press to Media. How to set a new default 8 You can restore all four corners....


