Mobile Print/Scan Guide - English
Page 3
...™ Devices 1 Introduction 2 Overview...2 Hardware requirement ...3 Supported operating systems...3 Network settings ...3 Downloading Brother iPrint&Scan from the Android™ Market 5 2 Printing 6 Printing from the mobile device's memory card 6 Printing photos...6 Printing PDF files...8 Printing from other applications ...10 Printing photos...10 Printing PDF files...11 Printing text files ...12 Print Settings ...14 3 Scanning 15 Scanning documents ...15 Scanning directly to your mobile...
...™ Devices 1 Introduction 2 Overview...2 Hardware requirement ...3 Supported operating systems...3 Network settings ...3 Downloading Brother iPrint&Scan from the Android™ Market 5 2 Printing 6 Printing from the mobile device's memory card 6 Printing photos...6 Printing PDF files...8 Printing from other applications ...10 Printing photos...10 Printing PDF files...11 Printing text files ...12 Print Settings ...14 3 Scanning 15 Scanning documents ...15 Scanning directly to your mobile...
Mobile Print/Scan Guide - English
Page 10
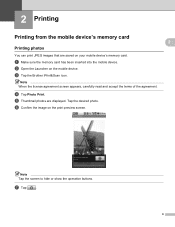
...appears, carefully read and accept the terms of the agreement. 2 Printing 2 Printing from the mobile device's memory card Printing photos You can print JPEG images that are displayed. Tap the desired photo. a Make sure the memory card has been inserted into the... mobile device. f Confirm the image on the print preview screen. 2 2 2 Note Tap the screen to hide or show the operation buttons. c Tap the Brother iPrint&Scan icon. d Tap Photo Print...
...appears, carefully read and accept the terms of the agreement. 2 Printing 2 Printing from the mobile device's memory card Printing photos You can print JPEG images that are displayed. Tap the desired photo. a Make sure the memory card has been inserted into the... mobile device. f Confirm the image on the print preview screen. 2 2 2 Note Tap the screen to hide or show the operation buttons. c Tap the Brother iPrint&Scan icon. d Tap Photo Print...

Software Users Manual - English
Page 3
... Ink Save Mode...17 Use Watermark...18 Watermark Settings ...18 Header-Footer Print...20 Other Print Options...21 Print Profiles tab ...27 Add Profile ...28 Delete Profile ...28 Support ...29 Trial Photo Print ...30 Using FaceFilter Studio for photo printing by REALLUSION 31 Starting FaceFilter Studio with your Brother machine turned On 32 Starting FaceFilter Studio when your...
... Ink Save Mode...17 Use Watermark...18 Watermark Settings ...18 Header-Footer Print...20 Other Print Options...21 Print Profiles tab ...27 Add Profile ...28 Delete Profile ...28 Support ...29 Trial Photo Print ...30 Using FaceFilter Studio for photo printing by REALLUSION 31 Starting FaceFilter Studio with your Brother machine turned On 32 Starting FaceFilter Studio when your...
Software Users Manual - English
Page 39
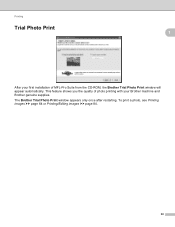
Printing Trial Photo Print 1 1 After your first installation of photo printing with your Brother machine and Brother genuine supplies. The Brother Trial Photo Print window appears only once after restarting. To print a photo, see Printing images uu page 64 or Printing/Editing images uu page 84. 30 This feature shows you the quality of MFL-Pro Suite from the CD-ROM, the Brother Trial Photo Print window will appear automatically.
Printing Trial Photo Print 1 1 After your first installation of photo printing with your Brother machine and Brother genuine supplies. The Brother Trial Photo Print window appears only once after restarting. To print a photo, see Printing images uu page 64 or Printing/Editing images uu page 84. 30 This feature shows you the quality of MFL-Pro Suite from the CD-ROM, the Brother Trial Photo Print window will appear automatically.
Software Users Manual - English
Page 40
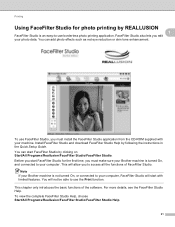
...software. You will not be able to -use the Print function. Printing Using FaceFilter Studio for the first time, you must make sure your Brother machine is an easy-to use borderless photo printing application. Note If your Brother machine is not turned On, or connected to your computer.../All Programs/Reallusion/FaceFilter Studio/FaceFilter Studio. You can start FaceFilter Studio for photo printing by REALLUSION 1 1 FaceFilter Studio is turned On, and connected to your photo data. You can add photo effects such as red eye reduction or skin tone enhancement. This chapter only ...
...software. You will not be able to -use the Print function. Printing Using FaceFilter Studio for the first time, you must make sure your Brother machine is an easy-to use borderless photo printing application. Note If your Brother machine is not turned On, or connected to your computer.../All Programs/Reallusion/FaceFilter Studio/FaceFilter Studio. You can start FaceFilter Studio for photo printing by REALLUSION 1 1 FaceFilter Studio is turned On, and connected to your photo data. You can add photo effects such as red eye reduction or skin tone enhancement. This chapter only ...

Software Users Manual - English
Page 73
...3 The Desktop button lets you open the folder tree from the desktop to choose images you want to print, edit, attach to an E-mail or open with various functions. The print setting window will appear. Click OK. Editing images 3 The (Edit) button lets you edit images with... number of copies you want to print (1 to 99). Note To print your images at the same quality as the Trial Photo Print (uuQuick Setup Guide), configure the settings as follows: Paper Size: 4 x 6 in Media Type: Brother BP71 Photo Paper Layout: 1 in 1 Borderless e Click (Start Printing). c Edit the images with Trimming...
...3 The Desktop button lets you open the folder tree from the desktop to choose images you want to print, edit, attach to an E-mail or open with various functions. The print setting window will appear. Click OK. Editing images 3 The (Edit) button lets you edit images with... number of copies you want to print (1 to 99). Note To print your images at the same quality as the Trial Photo Print (uuQuick Setup Guide), configure the settings as follows: Paper Size: 4 x 6 in Media Type: Brother BP71 Photo Paper Layout: 1 in 1 Borderless e Click (Start Printing). c Edit the images with Trimming...

Software Users Manual - English
Page 93
... from PCC and Copy to Application button Printing/Editing images 3 The (Photo Print) button lets you print or edit images. This section briefly introduces the functions. ControlCenter4 Photo tab (For MFC-J625DW/J825DW/J835DW) 3 There are four functions: Photo Print, Open PCC Folder, Copy from PCC button 4 Copy to Application. c Click (Print), then the Photo Print window appears. For more details of...
... from PCC and Copy to Application button Printing/Editing images 3 The (Photo Print) button lets you print or edit images. This section briefly introduces the functions. ControlCenter4 Photo tab (For MFC-J625DW/J825DW/J835DW) 3 There are four functions: Photo Print, Open PCC Folder, Copy from PCC button 4 Copy to Application. c Click (Print), then the Photo Print window appears. For more details of...

Software Users Manual - English
Page 94
... your images at the same quality as the Trial Photo Print (uuQuick Setup Guide), configure the settings as follows: Paper Size: 4 x 6 in Media Type: Brother BP71 Photo Paper Layout: 1 in 1 Borderless 3 f Click (Start Printing). d Edit the images with Trimming, Image Correction and Image ... a memory card or USB Flash memory drive connected to your hard disk and starts a specific application to your Brother machine. Editing images 3 a Click (Photo Print). Opening PCC folder (PCC: PhotoCapture Center™) 3 The (Open PCC Folder) button starts Windows® Explorer...
... your images at the same quality as the Trial Photo Print (uuQuick Setup Guide), configure the settings as follows: Paper Size: 4 x 6 in Media Type: Brother BP71 Photo Paper Layout: 1 in 1 Borderless 3 f Click (Start Printing). d Edit the images with Trimming, Image Correction and Image ... a memory card or USB Flash memory drive connected to your hard disk and starts a specific application to your Brother machine. Editing images 3 a Click (Photo Print). Opening PCC folder (PCC: PhotoCapture Center™) 3 The (Open PCC Folder) button starts Windows® Explorer...
Quick Setup Guide - English
Page 16
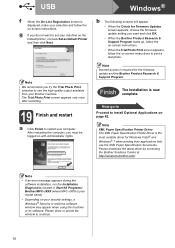
g If you try the Trial Photo Print selection to print a test photo. Note We recommend you do not want and click OK. • When the Brother Product Research & Support Program starts up, follow the on-screen instructions. • When the Trial Photo Print screen appears, follow the on -screen instructions to... Note • If an error message appears during the software installation, run the Installation Diagnostics located in Start/All Programs/ Brother/MFC-JXXX (where MFC-JXXX is your model name). • Depending on page 42. USB Windows® f When the On-Line Registration screen...
g If you try the Trial Photo Print selection to print a test photo. Note We recommend you do not want and click OK. • When the Brother Product Research & Support Program starts up, follow the on-screen instructions. • When the Trial Photo Print screen appears, follow the on -screen instructions to... Note • If an error message appears during the software installation, run the Installation Diagnostics located in Start/All Programs/ Brother/MFC-JXXX (where MFC-JXXX is your model name). • Depending on page 42. USB Windows® f When the On-Line Registration screen...

Quick Setup Guide - English
Page 22
...the network, the machine will not appear if there is displayed, make your selection and follow the on -screen instructions. 22 The Trial Photo Print screen appears only once after another. It may appear. Note • If there is more than one after restarting. • If your...) and click Next. Confirm your settings by following screen will automatically start. IMPORTANT DO NOT cancel any of the Brother drivers will appear. g If you try the Trial Photo Print selection to see the high quality output available from the list, and then click Next. e The installation of the...
...the network, the machine will not appear if there is displayed, make your selection and follow the on -screen instructions. 22 The Trial Photo Print screen appears only once after another. It may appear. Note • If there is more than one after restarting. • If your...) and click Next. Confirm your settings by following screen will automatically start. IMPORTANT DO NOT cancel any of the Brother drivers will appear. g If you try the Trial Photo Print selection to see the high quality output available from the list, and then click Next. e The installation of the...
Quick Setup Guide - English
Page 23
... MFL-Pro Suite including ScanSoft™ PaperPort™12SE on up , follow the on-screen instructions. • When the Trial Photo Print screen appears, follow the on each computer. Note XML Paper Specification Printer Driver The XML Paper Specification Printer Driver is the most ... Note • If an error message appears during the software installation, run the Installation Diagnostics located in Start/All Programs/ Brother/MFC-JXXX (where MFC-JXXX is now complete. Note Internet access is a multiple PC license agreement pack for Firmware Updates screen appears, choose the ...
... MFL-Pro Suite including ScanSoft™ PaperPort™12SE on up , follow the on-screen instructions. • When the Trial Photo Print screen appears, follow the on each computer. Note XML Paper Specification Printer Driver The XML Paper Specification Printer Driver is the most ... Note • If an error message appears during the software installation, run the Installation Diagnostics located in Start/All Programs/ Brother/MFC-JXXX (where MFC-JXXX is now complete. Note Internet access is a multiple PC license agreement pack for Firmware Updates screen appears, choose the ...
Quick Setup Guide - English
Page 38
... quality output available from the list, and then click Next. e Choose your machine from your machine is case sensitive. The Trial Photo Print screen appears only once after another. If you are using a firewall other than Windows® Firewall or the Windows® Firewall ...are using WEP and the LCD displayed Connected but your Brother machine. The installation screens appear one after restarting. 38 f The installation of the screens during the installation. Note We recommend you try the Trial Photo Print selection to set your selection and follow the on the...
... quality output available from the list, and then click Next. e Choose your machine from your machine is case sensitive. The Trial Photo Print screen appears only once after another. If you are using a firewall other than Windows® Firewall or the Windows® Firewall ...are using WEP and the LCD displayed Connected but your Brother machine. The installation screens appear one after restarting. 38 f The installation of the screens during the installation. Note We recommend you try the Trial Photo Print selection to set your selection and follow the on the...
Quick Setup Guide - English
Page 39
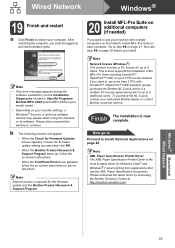
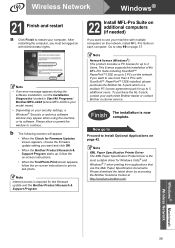
...XML Paper Specification Printer Driver is the most suitable driver for up , follow the on-screen instructions. • When the Trial Photo Print screen appears, follow the on each computer. After restarting the computer, you want to use your machine with multiple computers on the... appears during the software installation, run the Installation Diagnostics located in Start/All Programs/ Brother/MFC-JXXX (where MFC-JXXX is a multiple PC license agreement pack for the firmware update and the Brother Product Research & Support Program. 22 Install MFL-Pro Suite on additional computers (if ...
...XML Paper Specification Printer Driver is the most suitable driver for up , follow the on-screen instructions. • When the Trial Photo Print screen appears, follow the on each computer. After restarting the computer, you want to use your machine with multiple computers on the... appears during the software installation, run the Installation Diagnostics located in Start/All Programs/ Brother/MFC-JXXX (where MFC-JXXX is a multiple PC license agreement pack for the firmware update and the Brother Product Research & Support Program. 22 Install MFL-Pro Suite on additional computers (if ...
Quick Setup Guide - English
Page 42
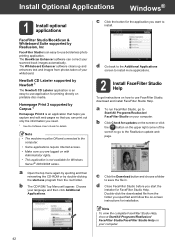
... only the information you are logged on with Administrator rights. • This application is an easy-to-use borderless photo printing application. Note • The machine must be ON and connected to the computer. • Some applications require Internet access. • Make sure you... FaceFilter Studio is an easy-to-use application for printing directly on printable disc media. Homepage Print 2 supported by Corpus 1 Homepage Print 2 is an application that helps you capture and edit web pages so that you start .exe program from photos taken of the screen to go to use FaceFilter ...
... only the information you are logged on with Administrator rights. • This application is an easy-to-use borderless photo printing application. Note • The machine must be ON and connected to the computer. • Some applications require Internet access. • Make sure you... FaceFilter Studio is an easy-to-use application for printing directly on printable disc media. Homepage Print 2 supported by Corpus 1 Homepage Print 2 is an application that helps you capture and edit web pages so that you start .exe program from photos taken of the screen to go to use FaceFilter ...

Users Manual - English
Page 28
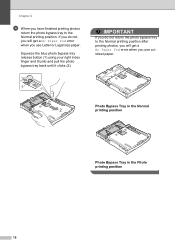
...paper tray cover, to take out the paper that is in the illustration. When you use the photo bypass tray, you do not have problems printing on envelopes with the flap on Photo (4" 6") and Photo L (3.5" 5") size paper. Chapter 2 b Put envelopes or postcards in the paper... in your right index finger and thumb and push the photo bypass tray forward until it clicks into the photo printing position (2). 1 2 Photo Bypass Tray 14 Use the photo bypass tray, which is called the photo paper tray. c Select Reverse Print in the printer driver's dialog box, and then adjust...
...paper tray cover, to take out the paper that is in the illustration. When you use the photo bypass tray, you do not have problems printing on envelopes with the flap on Photo (4" 6") and Photo L (3.5" 5") size paper. Chapter 2 b Put envelopes or postcards in the paper... in your right index finger and thumb and push the photo bypass tray forward until it clicks into the photo printing position (2). 1 2 Photo Bypass Tray 14 Use the photo bypass tray, which is called the photo paper tray. c Select Reverse Print in the printer driver's dialog box, and then adjust...

Users Manual - English
Page 29
The A4/LTR indicator confirms that the photo bypass tray is in the Photo printing 2 position. b Press and slide the paper side guides (1) and paper length guide (2) to fit the paper size. 2 Loading paper Note • Always make sure that the paper is not curled or wrinkled. • The Photo indicator confirms that the photo bypass tray is in the Normal printing position. 1 c Put the photo paper into the photo bypass tray and gently adjust the paper side guides to the paper. Check that the paper is flat in the tray. 15 Make sure the paper side guides touch the sides of the paper.
The A4/LTR indicator confirms that the photo bypass tray is in the Photo printing 2 position. b Press and slide the paper side guides (1) and paper length guide (2) to fit the paper size. 2 Loading paper Note • Always make sure that the paper is not curled or wrinkled. • The Photo indicator confirms that the photo bypass tray is in the Normal printing position. 1 c Put the photo paper into the photo bypass tray and gently adjust the paper side guides to the paper. Check that the paper is flat in the tray. 15 Make sure the paper side guides touch the sides of the paper.
Users Manual - English
Page 30
...finger and thumb and pull the photo bypass tray back until it clicks (2). IMPORTANT If you do not, you will get a No Paper Fed error when you have finished printing photos return the photo bypass tray to the Normal printing position after printing photos, you will get a No ...Paper Fed error when you use cut sheet paper. 1 Photo Bypass Tray in the Normal 2 printing position Photo Bypass Tray in the Photo printing position 16 If you do...
...finger and thumb and pull the photo bypass tray back until it clicks (2). IMPORTANT If you do not, you will get a No Paper Fed error when you have finished printing photos return the photo bypass tray to the Normal printing position after printing photos, you will get a No ...Paper Fed error when you use cut sheet paper. 1 Photo Bypass Tray in the Normal 2 printing position Photo Bypass Tray in the Photo printing position 16 If you do...

Users Manual - English
Page 86
.... Remove the paper and load it again, and then press Black Start or Color Start. (See Loading paper and other print media uu page 10.) The paper is in the Photo printing position. To gain extra memory, you dialed does not answer or is busy. Clean the paper pick-up rollers. (uuAdvanced... paper feed rollers may be stained with ink. You tried to access a Speed Dial number that the Photo Bypass Tray is in the Normal printing position. (See step d and the Important note in Printer jam or paper jam uu page 77. Remove the jammed paper by following : Clear the ...
.... Remove the paper and load it again, and then press Black Start or Color Start. (See Loading paper and other print media uu page 10.) The paper is in the Photo printing position. To gain extra memory, you dialed does not answer or is busy. Clean the paper pick-up rollers. (uuAdvanced... paper feed rollers may be stained with ink. You tried to access a Speed Dial number that the Photo Bypass Tray is in the Normal printing position. (See step d and the Important note in Printer jam or paper jam uu page 77. Remove the jammed paper by following : Clear the ...

Users Manual - English
Page 135
Options - - - C 121 Page See . Disc Level1 Disc Menu and features C Level2 Level3 Copy from card - Print from disc - Copy from photo - See Software User's Guide. The factory settings are shown in Bold with an asterisk. Descriptions You can print on printable media, including CD-R/RW, DVD-R/RW and Blu-ray Disc™.
Options - - - C 121 Page See . Disc Level1 Disc Menu and features C Level2 Level3 Copy from card - Print from disc - Copy from photo - See Software User's Guide. The factory settings are shown in Bold with an asterisk. Descriptions You can print on printable media, including CD-R/RW, DVD-R/RW and Blu-ray Disc™.

Users Manual - English
Page 142
...with Adapter USB Flash memory drive 2 SDXC (48GB - 64GB) Up to 1200 2400 dpi DPOF (ver. 1.0, ver. 1.1), Exif DCF (up to ver. 2.1) Photo Print: JPEG 3, AVI 4, MOV 4 Scan to Media: JPEG, PDF (Color) TIFF, PDF (Black & White) True2Life™ Auto Correct, Enhance Skin, Enhance Scenery, Trimming,...the memory card or USB Flash memory drive. PhotoCapture Center™ D Compatible Media 1 Resolution File Extension (Media Format) (Image Format) Color Enhancement Photo Enhance Number of Files Folder Borderless Memory Stick™ (16 MB - 128 MB) Memory Stick PRO™ (256 MB - 32 GB) (Not...
...with Adapter USB Flash memory drive 2 SDXC (48GB - 64GB) Up to 1200 2400 dpi DPOF (ver. 1.0, ver. 1.1), Exif DCF (up to ver. 2.1) Photo Print: JPEG 3, AVI 4, MOV 4 Scan to Media: JPEG, PDF (Color) TIFF, PDF (Black & White) True2Life™ Auto Correct, Enhance Skin, Enhance Scenery, Trimming,...the memory card or USB Flash memory drive. PhotoCapture Center™ D Compatible Media 1 Resolution File Extension (Media Format) (Image Format) Color Enhancement Photo Enhance Number of Files Folder Borderless Memory Stick™ (16 MB - 128 MB) Memory Stick PRO™ (256 MB - 32 GB) (Not...


