Network Users Manual - English
Page 1
... Glossary. Version 0 ENG You can also find basic information about special printing solutions from the Brother Solutions Center. Multi-Protocol On-board Ethernet Multi-function Print Server and Wireless Ethernet Multi-function Print Server NETWORK USER'S GUIDE This Network User's Guide provides useful information of your Brother machine. To download the latest manual, please visit the...
... Glossary. Version 0 ENG You can also find basic information about special printing solutions from the Brother Solutions Center. Multi-Protocol On-board Ethernet Multi-function Print Server and Wireless Ethernet Multi-function Print Server NETWORK USER'S GUIDE This Network User's Guide provides useful information of your Brother machine. To download the latest manual, please visit the...
Network Users Manual - English
Page 2
...2008 and Windows Server® 2008 R2. Not all countries. Do not use in damage to the publication. ©2010 Brother Industries, Ltd. Notes tell you how you should respond to a situation that country. Windows® XP in this document ...and published, covering the latest product's descriptions and specifications. Compilation and publication notice Under the supervision of Brother Industries, Ltd., this product are available in this User's Guide: IMPORTANT Note IMPORTANT indicate a potentially hazardous situation which, if not avoided, may arise or give ...
...2008 and Windows Server® 2008 R2. Not all countries. Do not use in damage to the publication. ©2010 Brother Industries, Ltd. Notes tell you how you should respond to a situation that country. Windows® XP in this document ...and published, covering the latest product's descriptions and specifications. Compilation and publication notice Under the supervision of Brother Industries, Ltd., this product are available in this User's Guide: IMPORTANT Note IMPORTANT indicate a potentially hazardous situation which, if not avoided, may arise or give ...
Network Users Manual - English
Page 7
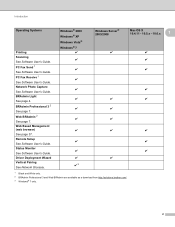
...® 2003/2008 Mac OS X 10.4.11 - 10.5.x - 10.6.x 1 r r r r r r r r r r r r r r 1 Black and White only. 2 BRAdmin Professional 3 and Web BRAdmin are available as a download from http://solutions.brother.com/. 3 Windows® 7 only. 2 BRAdmin Professional 3 2 See page 7. PC Fax Receive 1 See Software User's Guide. Web BRAdmin 2 See page 7. BRAdmin Light See page 4. Status Monitor See Software...
...® 2003/2008 Mac OS X 10.4.11 - 10.5.x - 10.6.x 1 r r r r r r r r r r r r r r 1 Black and White only. 2 BRAdmin Professional 3 and Web BRAdmin are available as a download from http://solutions.brother.com/. 3 Windows® 7 only. 2 BRAdmin Professional 3 2 See page 7. PC Fax Receive 1 See Software User's Guide. Web BRAdmin 2 See page 7. BRAdmin Light See page 4. Status Monitor See Software...

Network Users Manual - English
Page 8
Security 1 Your Brother machine employs some of the latest network security and encryption protocols available. (See Security features on page 53.) Secure Function Lock 2.0 1 Secure Function Lock 2.0 increases ... function, you to send and receive fax documents using the Internet as the transport mechanism. (See Internet fax on page 45.) In order to the user's guide for Internet fax on page 40.) 3 For details, please refer to use of functions. (See Secure Function Lock 2.0 on the web site listed above. Before...
Security 1 Your Brother machine employs some of the latest network security and encryption protocols available. (See Security features on page 53.) Secure Function Lock 2.0 1 Secure Function Lock 2.0 increases ... function, you to send and receive fax documents using the Internet as the transport mechanism. (See Internet fax on page 45.) In order to the user's guide for Internet fax on page 40.) 3 For details, please refer to use of functions. (See Secure Function Lock 2.0 on the web site listed above. Before...

Network Users Manual - English
Page 23
... your machine for a wireless network 3 For installation, see Wireless configuration using the Brother installer application on how to access the Wi-Fi Protected Setup mode. By inputting a PIN which is displayed, press OK to choose WLAN. See the User's Guide for up to choose WPS w/PIN Code. To cancel, press Stop/Exit. This...
... your machine for a wireless network 3 For installation, see Wireless configuration using the Brother installer application on how to access the Wi-Fi Protected Setup mode. By inputting a PIN which is displayed, press OK to choose WLAN. See the User's Guide for up to choose WPS w/PIN Code. To cancel, press Stop/Exit. This...
Network Users Manual - English
Page 43
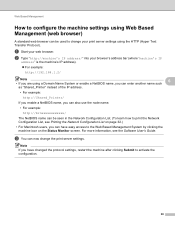
... on the Status Monitor screen. For more information, see Printing the Network Configuration List on page 32.) • For Macintosh users, you can have changed the protocol settings, restart the machine after clicking Submit to activate the configuration. 38 Web Based Management... A standard web browser can be seen in the Network Configuration List. (To learn how to print the Network Configuration List, see the Software User's Guide. a Start your print server settings using a Domain Name System or enable a NetBIOS name, you can enter another name such 6 as "Shared_Printer...
... on the Status Monitor screen. For more information, see Printing the Network Configuration List on page 32.) • For Macintosh users, you can have changed the protocol settings, restart the machine after clicking Submit to activate the configuration. 38 Web Based Management... A standard web browser can be seen in the Network Configuration List. (To learn how to print the Network Configuration List, see the Software User's Guide. a Start your print server settings using a Domain Name System or enable a NetBIOS name, you can enter another name such 6 as "Shared_Printer...
Network Users Manual - English
Page 48
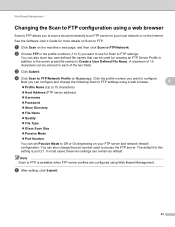
... file names that can be entered in Create a User Defined File Name. Now you can set Passive Mode to the seven preset file names in each of 15 characters can remain as default. You ... more details on Scan to FTP/Network Profile on the Internet. Note Scan to access the FTP server. d Click Scan to FTP. See the Software User's Guide for creating an FTP Server Profile in the profile numbers (1 to 5) you want to FTP/Network. c Click Submit. The default for Scan to an FTP...
... file names that can be entered in Create a User Defined File Name. Now you can set Passive Mode to the seven preset file names in each of 15 characters can remain as default. You ... more details on Scan to FTP/Network Profile on the Internet. Note Scan to access the FTP server. d Click Scan to FTP. See the Software User's Guide for creating an FTP Server Profile in the profile numbers (1 to 5) you want to FTP/Network. c Click Submit. The default for Scan to an FTP...
Network Users Manual - English
Page 49
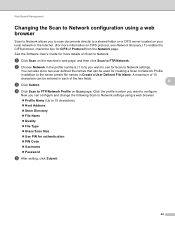
...shared folder on a CIFS server located on your local network or the Internet. (For more details on Scan to Network settings. See the Software User's Guide for more information on the machine's web page, and then click Scan to configure. b Choose Network in each of Protocol from the Network page...Click Scan on CIFS protocol, see Network Glossary.) To enable the CIFS protocol, check the box for creating a Scan to Network Profile in Create a User Defined File Name. Click the profile number you can be used for CIFS of the two fields. 6 c Click Submit. d Click Scan to 15 ...
...shared folder on a CIFS server located on your local network or the Internet. (For more details on Scan to Network settings. See the Software User's Guide for more information on the machine's web page, and then click Scan to configure. b Choose Network in each of Protocol from the Network page...Click Scan on CIFS protocol, see Network Glossary.) To enable the CIFS protocol, check the box for creating a Scan to Network Profile in Create a User Defined File Name. Click the profile number you can be used for CIFS of the two fields. 6 c Click Submit. d Click Scan to 15 ...
Network Users Manual - English
Page 52
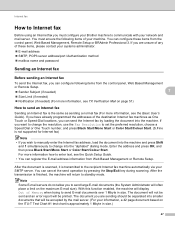
...If you have already programmed the addresses of the destination Internet fax machines as sending a normal fax (For more information, see the Quick Setup Guide. • You can cancel the send operation by loading the document into smaller documents that will be printed. After the document is scanned, it...items of your network and mail server. For more information, see TX Verification Mail on page 51) How to enter text, see the Basic User's Guide). If you wish to manually enter the Internet fax address, load the document into the "alphabet" dialing mode. Enter the address and press ...
...If you have already programmed the addresses of the destination Internet fax machines as sending a normal fax (For more information, see the Quick Setup Guide. • You can cancel the send operation by loading the document into smaller documents that will be printed. After the document is scanned, it...items of your network and mail server. For more information, see TX Verification Mail on page 51) How to enter text, see the Basic User's Guide). If you wish to manually enter the Internet fax address, load the document into the "alphabet" dialing mode. Enter the address and press ...
Network Users Manual - English
Page 54
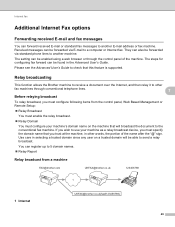
... trust at the machine, in other fax machines through the control panel of the name after the "@" sign. Please see the Advanced User's Guide to use your machine's domain name on the machine that will be found in selecting a trusted domain since any... supported. Relay broadcasting 7 This function allows the Brother machine to receive a document over the Internet, and then relay it to the conventional fax machine. You can also be forwarded via standard phone lines to another machine. Use care in the Advanced User's Guide. Received messages can be able to a computer ...
... trust at the machine, in other fax machines through the control panel of the name after the "@" sign. Please see the Advanced User's Guide to use your machine's domain name on the machine that will be found in selecting a trusted domain since any... supported. Relay broadcasting 7 This function allows the Brother machine to receive a document over the Internet, and then relay it to the conventional fax machine. You can also be forwarded via standard phone lines to another machine. Use care in the Advanced User's Guide. Received messages can be able to a computer ...
Quick Setup Guide - English
Page 1
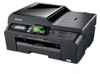
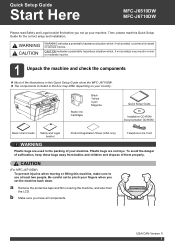
...User's Guide Safety and Legal booklet Product Registration Sheet (USA only) Telephone Line Cord WARNING Plastic bags are not toys. a Remove the protective tape and film covering the machine, and also from babies and children and dispose of your machine. b Make sure you set up your machine. Quick Setup Guide Start Here MFC-J6510DW MFC...-J6710DW Please read this Quick Setup Guide show the MFC-J6710DW. The components included in the box may result in minor or ...
...User's Guide Safety and Legal booklet Product Registration Sheet (USA only) Telephone Line Cord WARNING Plastic bags are not toys. a Remove the protective tape and film covering the machine, and also from babies and children and dispose of your machine. b Make sure you set up your machine. Quick Setup Guide Start Here MFC-J6510DW MFC...-J6710DW Please read this Quick Setup Guide show the MFC-J6710DW. The components included in the box may result in minor or ...
Quick Setup Guide - English
Page 2
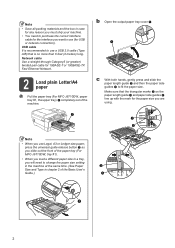
... for 10BASE-T or 100BASE-TX Fast Ethernet Network. 2 Load plain Letter/A4 paper a Pull the paper tray (For MFC-J6710DW, paper tray #1, the upper tray) a completely out of the Basic User's Guide.) 2 3 L Photo 2L 4×6in EXE LTR LGL LGR 10×15cm B5JIS A4 B4JIS 1 2 Make sure... that is recommended to use a USB 2.0 cable (Type A/B) that the triangular marks c on the paper length guide a and paper side guides b line up with the mark ...
... for 10BASE-T or 100BASE-TX Fast Ethernet Network. 2 Load plain Letter/A4 paper a Pull the paper tray (For MFC-J6710DW, paper tray #1, the upper tray) a completely out of the Basic User's Guide.) 2 3 L Photo 2L 4×6in EXE LTR LGL LGR 10×15cm B5JIS A4 B4JIS 1 2 Make sure... that is recommended to use a USB 2.0 cable (Type A/B) that the triangular marks c on the paper length guide a and paper side guides b line up with the mark ...
Quick Setup Guide - English
Page 3
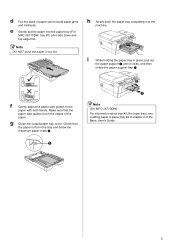
...to the paper with both hands. h Slowly push the paper tray completely into the paper tray (For MFC-J6710DW, tray #1) print side down and top edge first. f Gently adjust the paper side guides to avoid paper jams and misfeeds. i While holding the paper tray in too far. Note DO ... in the tray and below the maximum paper mark a. 1 2 1 Note (For MFC-J6710DW) For information about tray #2 (the lower tray), see Loading paper in paper tray #2 in chapter 2 of the paper. Check that the paper side guides touch the edges of the Basic User's Guide. 3 g Close the output paper tray cover.
...to the paper with both hands. h Slowly push the paper tray completely into the paper tray (For MFC-J6710DW, tray #1) print side down and top edge first. f Gently adjust the paper side guides to avoid paper jams and misfeeds. i While holding the paper tray in too far. Note DO ... in the tray and below the maximum paper mark a. 1 2 1 Note (For MFC-J6710DW) For information about tray #2 (the lower tray), see Loading paper in paper tray #2 in chapter 2 of the paper. Check that the paper side guides touch the edges of the Basic User's Guide. 3 g Close the output paper tray cover.
Quick Setup Guide - English
Page 4
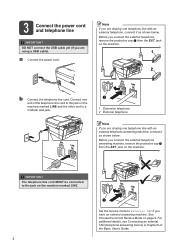
... the receive mode to a modular wall jack. 1 1 Extension telephone 2 External telephone Note If you have an external answering machine. Connect one end of the Basic User's Guide. 3 Connect the power cord and telephone line IMPORTANT DO NOT connect the USB cable yet (if you are sharing one telephone line with an external...
... the receive mode to a modular wall jack. 1 1 Extension telephone 2 External telephone Note If you have an external answering machine. Connect one end of the Basic User's Guide. 3 Connect the power cord and telephone line IMPORTANT DO NOT connect the USB cable yet (if you are sharing one telephone line with an external...
Quick Setup Guide - English
Page 7
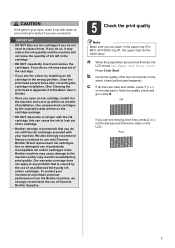
... go to any problem that you do so, ink may result in the paper tray (For MFC-J6710DW, tray #1, the upper tray) for the initial setup. If you do not need to... if you do not refill the ink cartridges provided with your investment and obtain premium performance from the Brother machine, we strongly recommend the use of the four color blocks on the sheet. (black/yellow/cyan...Cleaning the print head in Appendix A of the Basic User's Guide.) • Once you open an ink cartridge, install it in the machine and use of Genuine Brother Supplies. 5 Check the print quality Note Make sure ...
... go to any problem that you do so, ink may result in the paper tray (For MFC-J6710DW, tray #1, the upper tray) for the initial setup. If you do not need to... if you do not refill the ink cartridges provided with your investment and obtain premium performance from the Brother machine, we strongly recommend the use of the four color blocks on the sheet. (black/yellow/cyan...Cleaning the print head in Appendix A of the Basic User's Guide.) • Once you open an ink cartridge, install it in the machine and use of Genuine Brother Supplies. 5 Check the print quality Note Make sure ...
Quick Setup Guide - English
Page 8
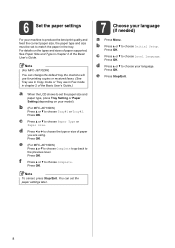
... paper supported, See Paper Size and Type in chapter 2 of the Basic User's Guide.) a When the LCD shows to set the paper size and paper type, press Tray Setting or Paper Setting (depending on your language (if needed) a Press Menu. b (For MFC-J6710DW) Press a or b to the previous level. Press OK. e ... paper size, the paper type and size must be set the paper settings later. 7 Choose your model). Note (For MFC-J6710DW) You can set to choose the type or size of the Basic User's Guide. Press OK. Press OK. Press OK. c Press a or b to choose Initial Setup. d Press d or c to match ...
... paper supported, See Paper Size and Type in chapter 2 of the Basic User's Guide.) a When the LCD shows to set the paper size and paper type, press Tray Setting or Paper Setting (depending on your language (if needed) a Press Menu. b (For MFC-J6710DW) Press a or b to the previous level. Press OK. e ... paper size, the paper type and size must be set the paper settings later. 7 Choose your model). Note (For MFC-J6710DW) You can set to choose the type or size of the Basic User's Guide. Press OK. Press OK. Press OK. c Press a or b to choose Initial Setup. d Press d or c to match ...
Quick Setup Guide - English
Page 9
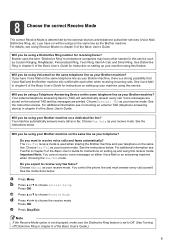
...as your receive mode. The Fax/Tel receive mode is used when sharing the Brother machine and your receive mode. For additional information see Fax/Tel in chapter 6 of the Basic User's Guide. Choose Manual as your Brother machine? Press OK. c Press a or b to choose Initial Setup. .... See the instructions below . See Distinctive Ring in chapter 5 of the Basic User's Guide for receiving faxes? See the instructions below . b Press a or b to choose Receive Mode. Will you be using your Brother machine on the same line as a fax. Will you be using ) on ...
...as your receive mode. The Fax/Tel receive mode is used when sharing the Brother machine and your receive mode. For additional information see Fax/Tel in chapter 6 of the Basic User's Guide. Choose Manual as your Brother machine? Press OK. c Press a or b to choose Initial Setup. .... See the instructions below . See Distinctive Ring in chapter 5 of the Basic User's Guide for receiving faxes? See the instructions below . b Press a or b to choose Receive Mode. Will you be using your Brother machine on the same line as a fax. Will you be using ) on ...
Quick Setup Guide - English
Page 10
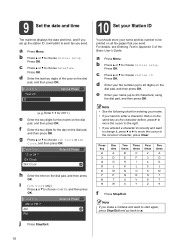
... should store your fax number (up to choose 12h Clock or 24h Clock, and then press OK. d Enter the last two digits of the Basic User's Guide. b Press a or b to be printed on the dial pad, and then press OK. Press OK. g Press a or b to 20 digits) on all fax pages that...
... should store your fax number (up to choose 12h Clock or 24h Clock, and then press OK. d Enter the last two digits of the Basic User's Guide. b Press a or b to be printed on the dial pad, and then press OK. Press OK. g Press a or b to 20 digits) on all fax pages that...
Quick Setup Guide - English
Page 11
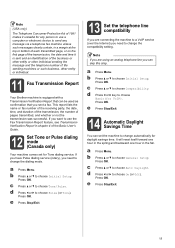
... and time it unlawful for any person to use the Fax Transmission Report feature, see Transmission Verification Report in chapter 4 of the Basic User's Guide. 12 Set Tone or Pulse dialing mode (Canada only) Your machine comes set the machine to change the compatibility setting. e Press Stop... sending the message and the telephone number of the sending machines or such business, other entity or individual. 11 Fax Transmission Report Your Brother machine is equipped with a Transmission Verification Report that can be used as confirmation that you can set for Tone dialing service. a Press...
... and time it unlawful for any person to use the Fax Transmission Report feature, see Transmission Verification Report in chapter 4 of the Basic User's Guide. 12 Set Tone or Pulse dialing mode (Canada only) Your machine comes set the machine to change the compatibility setting. e Press Stop... sending the message and the telephone number of the sending machines or such business, other entity or individual. 11 Fax Transmission Report Your Brother machine is equipped with a Transmission Verification Report that can be used as confirmation that you can set for Tone dialing service. a Press...

Quick Setup Guide - English
Page 12
... that only one sheet can also register your product online using the On-Line Registration link from the installation CD-ROM or visit http://www.brother.com/registration/. 15 Send in the Product Registration Sheet (USA only) You can be used at a time.) Use the manual feed slot to print or... the sheet face up in Blue. d Enter the toll-free fax number: 1-877-268-9575. 12 Note You will receive a confirmation fax of the Basic User's Guide.
... that only one sheet can also register your product online using the On-Line Registration link from the installation CD-ROM or visit http://www.brother.com/registration/. 15 Send in the Product Registration Sheet (USA only) You can be used at a time.) Use the manual feed slot to print or... the sheet face up in Blue. d Enter the toll-free fax number: 1-877-268-9575. 12 Note You will receive a confirmation fax of the Basic User's Guide.


