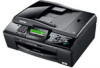

Software Users Manual - English
Page 192
Setting the new default a Press (SCAN). f Press Stop/Exit. Factory reset a Press (SCAN). b Press a or b to choose Scan to choose Factory Reset. c Press a or b to Media. USB cable scanning How to set a new default for each setting you want to change. c Press and choose your own default ...
Setting the new default a Press (SCAN). f Press Stop/Exit. Factory reset a Press (SCAN). b Press a or b to choose Scan to choose Factory Reset. c Press a or b to Media. USB cable scanning How to set a new default for each setting you want to change. c Press and choose your own default ...

Network Users Manual - English
Page 34
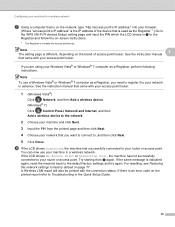
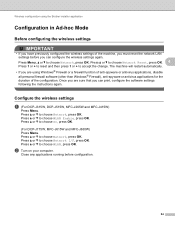
...to choose WLAN. d For DCP-J715W, MFC-J615W and MFC-J630W Press a or b to the steps below for further information. Configuring your machine for a wireless network Configuring your machine for a wireless network 3 IMPORTANT • If you are going to connect your Brother machine to your network, we recommend you ...recommend that you can configure your router uses WEP encryption, enter the key used as the first WEP key. Press OK. 27 Press 1 or + to reset and then press 1 or + to choose Setup Wizard. Press OK. e Press a or b to accept the change. Item Network name: (SSID/ESSID)...
...to choose WLAN. d For DCP-J715W, MFC-J615W and MFC-J630W Press a or b to the steps below for further information. Configuring your machine for a wireless network Configuring your machine for a wireless network 3 IMPORTANT • If you are going to connect your Brother machine to your network, we recommend you ...recommend that you can configure your router uses WEP encryption, enter the key used as the first WEP key. Press OK. 27 Press 1 or + to reset and then press 1 or + to choose Setup Wizard. Press OK. e Press a or b to accept the change. Item Network name: (SSID/ESSID)...
Network Users Manual - English
Page 40
...detected. You can also manually configure the wireless settings following the steps starting from step d again. If the same message reappears, reset the machine back to the instruction manual that only one router or access point has the Wi-Fi Protected Setup mode or AOSS™ ... Setup mode or AOSS™ mode enabled. Session overlap has been detected. If the same message is indicated again, reset the machine back to the default factory settings and try again. (For resetting, see Restoring the network settings to your access point/router and try starting from d again.
...detected. You can also manually configure the wireless settings following the steps starting from step d again. If the same message reappears, reset the machine back to the instruction manual that only one router or access point has the Wi-Fi Protected Setup mode or AOSS™ ... Setup mode or AOSS™ mode enabled. Session overlap has been detected. If the same message is indicated again, reset the machine back to the default factory settings and try again. (For resetting, see Restoring the network settings to your access point/router and try starting from d again.
Network Users Manual - English
Page 42
... device to the network. 2 Choose your machine and click Next. 3 Input the PIN from d again. For resetting, see Restoring the network settings to , and then click Next. 5 Click Close. If there is indicated again, reset the machine back to the default factory settings and try again. If you are using your router...
... device to the network. 2 Choose your machine and click Next. 3 Input the PIN from d again. For resetting, see Restoring the network settings to , and then click Next. 5 Click Close. If there is indicated again, reset the machine back to the default factory settings and try again. If you are using your router...

Network Users Manual - English
Page 44
...; The following the instructions again. • You need this information before you continue with this installation. If you are going to connect your Brother machine to accept the change. Press 1 or + to reset and then press 1 or + to your network, we recommend that you can find instructions in a network environment using the...
...; The following the instructions again. • You need this information before you continue with this installation. If you are going to connect your Brother machine to accept the change. Press 1 or + to reset and then press 1 or + to your network, we recommend that you can find instructions in a network environment using the...

Network Users Manual - English
Page 55
... press OK. (For DCP-J715W, MFC-J615W and MFC-J630W) Press Menu. Press a or b to choose Network, press OK. Press a or b to choose WLAN Enable, press OK. Press a or b to choose Network, press OK. Wireless configuration using the Brother installer application Configuration using WPS or AOSS...to accept the change. Configure the wireless settings 4 a (For DCP-J315W, DCP-J515W, MFC-J265W and MFC-J415W) Press Menu. Press 1 or + to reset and then press 1 or + to choose Network Reset, press OK. Close any applications running before you can print, configure the software settings following...
... press OK. (For DCP-J715W, MFC-J615W and MFC-J630W) Press Menu. Press a or b to choose Network, press OK. Press a or b to choose WLAN Enable, press OK. Press a or b to choose Network, press OK. Wireless configuration using the Brother installer application Configuration using WPS or AOSS...to accept the change. Configure the wireless settings 4 a (For DCP-J315W, DCP-J515W, MFC-J265W and MFC-J415W) Press Menu. Press 1 or + to reset and then press 1 or + to choose Network Reset, press OK. Close any applications running before you can print, configure the software settings following...

Network Users Manual - English
Page 59
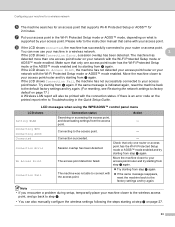
Make sure that only one access point/router on page 77.) LCD messages when using the Brother installer application i If the LCD shows Connected, the machine has successfully connected to the access point. - Connecting to your router or access point. The ...; mode enabled. The machine was not able to your access point/router and try starting from step f again. If the same message reappears, reset the machine back to your machine in a wireless network. Move the machine closer to factory default on your network with the access point. - Try starting...
Make sure that only one access point/router on page 77.) LCD messages when using the Brother installer application i If the LCD shows Connected, the machine has successfully connected to the access point. - Connecting to your router or access point. The ...; mode enabled. The machine was not able to your access point/router and try starting from step f again. If the same message reappears, reset the machine back to your machine in a wireless network. Move the machine closer to factory default on your network with the access point. - Try starting...
Network Users Manual - English
Page 61
... and MFC-J415W) Press Menu. Press a or b to choose Network, press OK. Press a or b to choose Network I/F, press OK. Close any applications running before you can print, configure the software settings following the instructions again. Once you are using the Brother installer application Configuration in... OK. Press a or b to choose On, press OK. (For DCP-J715W, MFC-J615W and MFC-J630W) Press Menu. Press a or b to choose WLAN, press OK. Press a or b to choose Network Reset, press OK. 4 Press 1 or + to reset and then press 1 or + to choose Network, press OK. b Turn on your...
... and MFC-J415W) Press Menu. Press a or b to choose Network, press OK. Press a or b to choose Network I/F, press OK. Close any applications running before you can print, configure the software settings following the instructions again. Once you are using the Brother installer application Configuration in... OK. Press a or b to choose On, press OK. (For DCP-J715W, MFC-J615W and MFC-J630W) Press Menu. Press a or b to choose WLAN, press OK. Press a or b to choose Network Reset, press OK. 4 Press 1 or + to reset and then press 1 or + to choose Network, press OK. b Turn on your...

Network Users Manual - English
Page 82
...print server has been reset (default is a unique number assigned for the machine's network interface. Press OK. b Press a or b to choose MAC Address. Press OK. a Press Menu. d Press a or b to choose Network. Control panel setup Ethernet (DCP-J715W, MFC-J615W and MFC-J630W only) 5 Ethernet... link mode. c Press a or b to choose WLAN, and press OK. Press OK. c For DCP-J715W, MFC-J615W and MFC-J630W (For Wired) Press a or b to choose Wired LAN, and press...
...print server has been reset (default is a unique number assigned for the machine's network interface. Press OK. b Press a or b to choose MAC Address. Press OK. a Press Menu. d Press a or b to choose Network. Control panel setup Ethernet (DCP-J715W, MFC-J615W and MFC-J630W only) 5 Ethernet... link mode. c Press a or b to choose WLAN, and press OK. Press OK. c For DCP-J715W, MFC-J615W and MFC-J630W (For Wired) Press a or b to choose Wired LAN, and press...
Network Users Manual - English
Page 84
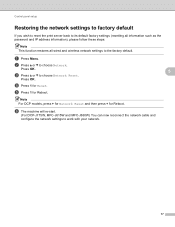
... or b to choose Network. a Press Menu. e Press 1 for Reboot. b Press a or b to choose Network Reset. Press OK. f The machine will re-start. (For DCP-J715W, MFC-J615W and MFC-J630W) You can now reconnect the network cable and configure the network settings to the factory default. Note For DCP models,... press + for Network Reset and then press + for Reboot. Control panel setup Restoring ...
... or b to choose Network. a Press Menu. e Press 1 for Reboot. b Press a or b to choose Network Reset. Press OK. f The machine will re-start. (For DCP-J715W, MFC-J615W and MFC-J630W) You can now reconnect the network cable and configure the network settings to the factory default. Note For DCP models,... press + for Network Reset and then press + for Reboot. Control panel setup Restoring ...
Network Users Manual - English
Page 110
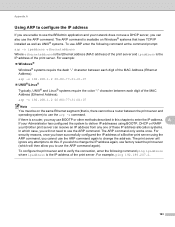
... Windows® systems that is, there cannot be on the same Ethernet segment (that have successfully configured the IP address of a Brother print server using BOOTP, DHCP or RARP your Brother print server can also use the ARP command. To configure the print server and to verify the connection, enter the following...:80:77:31:01:07 Note You must be a router between the print server and operating system) to change the IP address again, use factory reset the print server (which case, you may use the arp -s command.
... Windows® systems that is, there cannot be on the same Ethernet segment (that have successfully configured the IP address of a Brother print server using BOOTP, DHCP or RARP your Brother print server can also use the ARP command. To configure the print server and to verify the connection, enter the following...:80:77:31:01:07 Note You must be a router between the print server and operating system) to change the IP address again, use factory reset the print server (which case, you may use the arp -s command.
Network Users Manual - English
Page 116
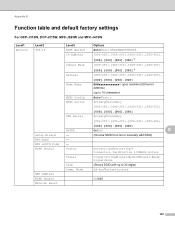
Status Signal SSID Comm. Appendix B Function table and default factory settings B For DCP-J315W, DCP-J515W, MFC-J265W and MFC-J415W B Level1 Network Level2 TCP/IP Level3 BOOT Method IP Address Subnet Mask Gateway Node Name WINS Config WINS Server DNS Server Setup Wizard WPS/...AOSS WPS w/PIN Code WLAN Status MAC Address WLAN Enable Network Reset APIPA - - - Mode Options Auto/Static/RARP/BOOTP/DHCP [000-255].[000-255].[000...
Status Signal SSID Comm. Appendix B Function table and default factory settings B For DCP-J315W, DCP-J515W, MFC-J265W and MFC-J415W B Level1 Network Level2 TCP/IP Level3 BOOT Method IP Address Subnet Mask Gateway Node Name WINS Config WINS Server DNS Server Setup Wizard WPS/...AOSS WPS w/PIN Code WLAN Status MAC Address WLAN Enable Network Reset APIPA - - - Mode Options Auto/Static/RARP/BOOTP/DHCP [000-255].[000-255].[000...

Network Users Manual - English
Page 118
... Network WLAN (Continued) (Continued) Level3 TCP/IP (Continued) Options1 Node Name WINS Config WINS Server Options2 BRWXXXXXXXXXXXX= (your network. 111 Mode MAC Address Network I/F Network Reset The factory settings are shown in bold. [000].[000].[000].[000] On/Off (Choose SSID from list or manually add SSID) Active(11b)/Active...
... Network WLAN (Continued) (Continued) Level3 TCP/IP (Continued) Options1 Node Name WINS Config WINS Server Options2 BRWXXXXXXXXXXXX= (your network. 111 Mode MAC Address Network I/F Network Reset The factory settings are shown in bold. [000].[000].[000].[000] On/Off (Choose SSID from list or manually add SSID) Active(11b)/Active...

Quick Setup Guide - English
Page 11
...a Press Menu. b Press a or b to choose Auto Daylight. e Press Stop/Exit. 12 Set the phone line compatibility If you can skip this step. It will reset itself forward one hour in the spring and backward one hour in the Product Registration Sheet (USA only) You can set for daylight savings time... product online using an analog telephone line you are using the On-Line Registration link from the installation CD-ROM or visit http://www.brother.com/registration/ a Fill out the Product Registration Sheet. 11 b Press a or b to change the compatibility setting. Press OK. Press OK...
...a Press Menu. b Press a or b to choose Auto Daylight. e Press Stop/Exit. 12 Set the phone line compatibility If you can skip this step. It will reset itself forward one hour in the spring and backward one hour in the Product Registration Sheet (USA only) You can set for daylight savings time... product online using an analog telephone line you are using the On-Line Registration link from the installation CD-ROM or visit http://www.brother.com/registration/ a Fill out the Product Registration Sheet. 11 b Press a or b to change the compatibility setting. Press OK. Press OK...
Quick Setup Guide - English
Page 26
...have access to the machine. Press a or b to accept the change. IMPORTANT If you are for all types of the machine you must reset the network (LAN) settings before you can configure the wireless settings again. Press 1 twice for the fastest throughput speed. For Macintosh: 2 ... with your documents. To achieve optimum results with minimal obstructions. For Windows®: 2 Choose your CD-ROM drive. Although the Brother MFC-J615W and MFC-J630W can be used in both a wired and wireless network, only one of the connection methods can affect the data transfer speed...
...have access to the machine. Press a or b to accept the change. IMPORTANT If you are for all types of the machine you must reset the network (LAN) settings before you can configure the wireless settings again. Press 1 twice for the fastest throughput speed. For Macintosh: 2 ... with your documents. To achieve optimum results with minimal obstructions. For Windows®: 2 Choose your CD-ROM drive. Although the Brother MFC-J615W and MFC-J630W can be used in both a wired and wireless network, only one of the connection methods can affect the data transfer speed...

Quick Setup Guide - English
Page 39
... will restart, re-connect cables once this is not operating, then disconnect all network settings of the internal Print/Scan server to move the cursor right before you want. b Press Menu. e Press 1 to choose Network Reset. The keys for 0, # and l do not have three or four letters printed on the same key...
... will restart, re-connect cables once this is not operating, then disconnect all network settings of the internal Print/Scan server to move the cursor right before you want. b Press Menu. e Press 1 to choose Network Reset. The keys for 0, # and l do not have three or four letters printed on the same key...

Advanced Users Manual - English
Page 5
... the factory settings 53 Scan to a memory card or USB Flash memory drive 53 Auto Crop ...53 How to set a new default 54 How to reset to the factory settings 54 iv
... the factory settings 53 Scan to a memory card or USB Flash memory drive 53 Auto Crop ...53 How to set a new default 54 How to reset to the factory settings 54 iv

Advanced Users Manual - English
Page 7
... choose Ring. d Press a or b to choose Volume. You may have chosen using the Menu key because they are stored permanently. Press OK. b Press a or b to reset the date and time. Press OK. 1 General setup 1 Memory storage 1 Even if there is idle, press d or c to choose Low, Med, High or Off. The...
... choose Ring. d Press a or b to choose Volume. You may have chosen using the Menu key because they are stored permanently. Press OK. b Press a or b to reset the date and time. Press OK. 1 General setup 1 Memory storage 1 Even if there is idle, press d or c to choose Low, Med, High or Off. The...

Advanced Users Manual - English
Page 9
... factory setting is carried out on Automatic Daylight Saving Time as follows. c Press a or b to turn on the machine. e Press Stop/Exit. The timer will reset itself forward one hour in the Spring and backward one hour in the Date&Time setting. e Press Stop/Exit. 3 c Press a or b to choose 1Min, 2Mins...
... factory setting is carried out on Automatic Daylight Saving Time as follows. c Press a or b to turn on the machine. e Press Stop/Exit. The timer will reset itself forward one hour in the Spring and backward one hour in the Date&Time setting. e Press Stop/Exit. 3 c Press a or b to choose 1Min, 2Mins...

Advanced Users Manual - English
Page 15
.... a Press (FAX). c Press 1 to choose Fax Resolution. a Press (FAX). Good for most typed documents. Repeat this step for most typed documents. d Press 1 to choose Factory Reset. b Press a or b to choose Yes. c Press d or c to choose Set New Default. Use when the document has varying shades of a fax can be improved by...
.... a Press (FAX). c Press 1 to choose Fax Resolution. a Press (FAX). Good for most typed documents. Repeat this step for most typed documents. d Press 1 to choose Factory Reset. b Press a or b to choose Yes. c Press d or c to choose Set New Default. Use when the document has varying shades of a fax can be improved by...


