
Advanced Users Guide
Page 16
...fax options you use the ADF. These settings will stay until you change . d Press Black Start or Color Start. If you are using the scanner glass, press 1 to press the Start or Send key before you have changed back to choose Yes. Then press a or b to send the fax. ...fax manually 3 Manual transmission lets you hear the fax tones, press Black Start or Color Start. c To listen for each setting you are using the scanner glass, press 1 to choose your document. e When you hear the dialing, ringing and fax-receiving tones while sending a fax. c Press (FAX).
...fax options you use the ADF. These settings will stay until you change . d Press Black Start or Color Start. If you are using the scanner glass, press 1 to press the Start or Send key before you have changed back to choose Yes. Then press a or b to send the fax. ...fax manually 3 Manual transmission lets you hear the fax tones, press Black Start or Color Start. c To listen for each setting you are using the scanner glass, press 1 to choose your document. e When you hear the dialing, ringing and fax-receiving tones while sending a fax. c Press (FAX).

Advanced Users Guide
Page 18
... Dual Access. • If the Out of jobs in progress 3 a Press Menu. b Press a or b to choose Remaining Jobs. The LCD will vary depending on the scanner glass. The LCD will ask you will ask you Next Page?, do one page, press 1 and place the next page on the types of Memory... to the maximum number available, you the following question: Cancel Job? c Press a or b to choose Fax. f Press OK. d Press OK. Press OK. Faxing from the scanner glass When the LCD asks you the following question: Cancel Job? The LCD will not be able to send the pages scanned so far. Faxing...
... Dual Access. • If the Out of jobs in progress 3 a Press Menu. b Press a or b to choose Remaining Jobs. The LCD will vary depending on the scanner glass. The LCD will ask you will ask you Next Page?, do one page, press 1 and place the next page on the types of Memory... to the maximum number available, you the following question: Cancel Job? c Press a or b to choose Fax. f Press OK. d Press OK. Press OK. Faxing from the scanner glass When the LCD asks you the following question: Cancel Job? The LCD will not be able to send the pages scanned so far. Faxing...

Advanced Users Guide
Page 19
... the telephone line is set to possible interference on the telephone line, we recommend that you send a fax using the scanner glass. b Press (FAX). d Press a or b to choose Advanced Settings. Sending a fax (MFC models) Real Time Transmission 3 When you are using this by turning on Overseas Mode. c Press a or b to choose On...
... the telephone line is set to possible interference on the telephone line, we recommend that you send a fax using the scanner glass. b Press (FAX). d Press a or b to choose Advanced Settings. Sending a fax (MFC models) Real Time Transmission 3 When you are using this by turning on Overseas Mode. c Press a or b to choose On...

Advanced Users Guide
Page 36
..., press OK. 198% 4"x6"iA4 186% 4"x6"iLTR 104% EXEiLTR 100% 97% LTRiA4 93% A4iLTR 85% LTRiEXE 83% (DCP model) 83% LGLiA4 (MFC models) 78% (DCP model) 78% LGLiLTR (MFC models) 46% LTRi4"x6" Fit to Page Custom(25-400%) g If you chose Enlarge or Reduce, press OK and press a or b to... Page does not work correctly when the document on the scanner glass. • Fit to Page is not available when using the ADF 1. •...
..., press OK. 198% 4"x6"iA4 186% 4"x6"iLTR 104% EXEiLTR 100% 97% LTRiA4 93% A4iLTR 85% LTRiEXE 83% (DCP model) 83% LGLiA4 (MFC models) 78% (DCP model) 78% LGLiLTR (MFC models) 46% LTRi4"x6" Fit to Page Custom(25-400%) g If you chose Enlarge or Reduce, press OK and press a or b to... Page does not work correctly when the document on the scanner glass. • Fit to Page is not available when using the ADF 1. •...

Advanced Users Guide
Page 37
.... 1 For information about 2 in 1 (ID), see 2 in the ADF 1 or are making a poster, the machine scans the pages and starts printing. 1 MFC models only If you are using transparencies. • (P) means Portrait and (L) means Landscape. 31 d Press a or b to scan the next page. If you ...are using the scanner glass, go to step g. g After the machine has scanned the page, press 1 or + to choose Page Layout. e Press a or b to scan the...
.... 1 For information about 2 in 1 (ID), see 2 in the ADF 1 or are making a poster, the machine scans the pages and starts printing. 1 MFC models only If you are using transparencies. • (P) means Portrait and (L) means Landscape. 31 d Press a or b to scan the next page. If you ...are using the scanner glass, go to step g. g After the machine has scanned the page, press 1 or + to choose Page Layout. e Press a or b to scan the...

Advanced Users Guide
Page 39
... number of copies you want . NOTE You can sort multiple copies. For 2-sided documents and books, use the scanner glass. 1 MFC models only a Load your identification card face down near the left corner of the scanner glass as shown in the illustration. 1 1 4 3 1 1 2 1 0.12 in. (3 mm) or greater (...top, left) 2 8.5 in. (216 mm) 3 5.5 in. (140 mm) 4 scannable area b (MFC models) Press (COPY). Make sure the paper size is...
... number of copies you want . NOTE You can sort multiple copies. For 2-sided documents and books, use the scanner glass. 1 MFC models only a Load your identification card face down near the left corner of the scanner glass as shown in the illustration. 1 1 4 3 1 1 2 1 0.12 in. (3 mm) or greater (...top, left) 2 8.5 in. (216 mm) 3 5.5 in. (140 mm) 4 scannable area b (MFC models) Press (COPY). Make sure the paper size is...

Advanced Users Guide
Page 40
.... 34 NOTE This function is automatically removed for use only when making color copies. b (MFC models) Press (COPY). Chapter 7 f If you want. Repeat steps g and h until all black & white copies. i Press 2 or - f If you are using the scanner glass, go to change additional settings, press Black Start or Color Start. The background...
.... 34 NOTE This function is automatically removed for use only when making color copies. b (MFC models) Press (COPY). Chapter 7 f If you want. Repeat steps g and h until all black & white copies. i Press 2 or - f If you are using the scanner glass, go to change additional settings, press Black Start or Color Start. The background...

Advanced Users Guide
Page 41
... Stack/Sort. Press OK. Press OK. k After the machine scans the page, press 1 to choose 2-sided Copy. For 2-sided documents and books, use the scanner glass. (Long edge flip) Portrait 1 2 Landscape 1 2 2 2 11 1 2 (Short edge flip) Portrait 1 1 2 Landscape 1 2 11 2 NOTE... • 2in1(ID), Poster and Fit to Page are using the scanner glass, go to choose 2-sided Copy. 7 Press OK. b (MFC models) Press (COPY). g Press a or b to scan the next page. 35 i Review your document. If you placed the document in...
... Stack/Sort. Press OK. Press OK. k After the machine scans the page, press 1 to choose 2-sided Copy. For 2-sided documents and books, use the scanner glass. (Long edge flip) Portrait 1 2 Landscape 1 2 2 2 11 1 2 (Short edge flip) Portrait 1 1 2 Landscape 1 2 11 2 NOTE... • 2in1(ID), Poster and Fit to Page are using the scanner glass, go to choose 2-sided Copy. 7 Press OK. b (MFC models) Press (COPY). g Press a or b to scan the next page. 35 i Review your document. If you placed the document in...
Advanced Users Guide
Page 42
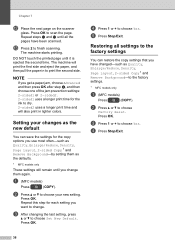
... machine starts printing. Press OK. m Press 2 to choose Yes. Press OK. The machine will also print in to the factory settings. 1 MFC models only a (MFC models) Press (COPY). a (MFC models) Press (COPY). d Press 1 or + to finish scanning. e Press Stop/Exit. b Press a or b to choose Set New .... c After changing the last setting, press a or b to choose Factory Reset. Chapter 7 l Place the next page on the scanner glass. Restoring all the pages have changed-such as the defaults. 1 MFC models only These settings will remain until it is ejected the second time.
... machine starts printing. Press OK. m Press 2 to choose Yes. Press OK. The machine will also print in to the factory settings. 1 MFC models only a (MFC models) Press (COPY). a (MFC models) Press (COPY). d Press 1 or + to finish scanning. e Press Stop/Exit. b Press a or b to choose Set New .... c After changing the last setting, press a or b to choose Factory Reset. Chapter 7 l Place the next page on the scanner glass. Restoring all the pages have changed-such as the defaults. 1 MFC models only These settings will remain until it is ejected the second time.

Advanced Users Guide
Page 44
... to avoid an electrical shock. 2 a Place both hands under the plastic tabs on both sides of the paper tray with a dry, soft lint-free cloth. (MFC models) e Close the output paper tray cover and 1 put the paper tray firmly back in the machine. Doing this may cause damage to lift the... scanner cover into the open position. d Wipe the inside and outside of the machine to the machine. 38 b Clean the machine's printer platen (1) and the area ...
... to avoid an electrical shock. 2 a Place both hands under the plastic tabs on both sides of the paper tray with a dry, soft lint-free cloth. (MFC models) e Close the output paper tray cover and 1 put the paper tray firmly back in the machine. Doing this may cause damage to lift the... scanner cover into the open position. d Wipe the inside and outside of the machine to the machine. 38 b Clean the machine's printer platen (1) and the area ...

Advanced Users Guide
Page 45
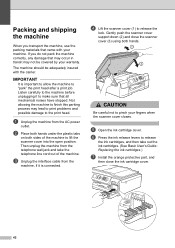
Routine maintenance b (MFC models) Clean the front side of the machine. Pull the paper tray (1) completely out of the Paper Feed Rollers (1) with a soft lint-free cloth moistened ... with a dry, soft lint-free cloth to remove all moisture. 1 1 NOTE If the paper support flap is open, close the scanner cover using a side-to -side motion. Gently push the scanner cover support down and close it may cause paper feed problems. a Unplug the machine from the AC power outlet. c Lift the...
Routine maintenance b (MFC models) Clean the front side of the machine. Pull the paper tray (1) completely out of the Paper Feed Rollers (1) with a soft lint-free cloth moistened ... with a dry, soft lint-free cloth to remove all moisture. 1 1 NOTE If the paper support flap is open, close the scanner cover using a side-to -side motion. Gently push the scanner cover support down and close it may cause paper feed problems. a Unplug the machine from the AC power outlet. c Lift the...
Advanced Users Guide
Page 48
...f Press the ink release levers to release the ink cartridges, and then take the telephone line cord out of the machine to lift the scanner cover into the open position. Not allowing the machine to finish this parking process may not be adequately insured with your warranty. a Unplug... and take out the ink cartridges. (See Basic User's Guide: Replacing the ink cartridges.) g Install the orange protective part, and then close the scanner cover (3) using both sides of the machine. c Unplug the interface cable from the machine, if it to make sure that came with the carrier....
...f Press the ink release levers to release the ink cartridges, and then take the telephone line cord out of the machine to lift the scanner cover into the open position. Not allowing the machine to finish this parking process may not be adequately insured with your warranty. a Unplug... and take out the ink cartridges. (See Basic User's Guide: Replacing the ink cartridges.) g Install the orange protective part, and then close the scanner cover (3) using both sides of the machine. c Unplug the interface cable from the machine, if it to make sure that came with the carrier....

Software and Network Users Guide
Page 8
Only carry the machine by placing your hands and may result in the illustration. Doing this may cause the machine to slip out of the machine. DO NOT carry the machine by cutting them on the edge of your hands under the entire machine. Do not remove the serial number and instruction labels that are affixed to your fingers by holding the scanner cover, the Jam Clear Cover, or the control panel. Doing this may cause injury to the machine. 8 DO NOT touch the area shaded in injury.
Only carry the machine by placing your hands and may result in the illustration. Doing this may cause the machine to slip out of the machine. DO NOT carry the machine by cutting them on the edge of your hands under the entire machine. Do not remove the serial number and instruction labels that are affixed to your fingers by holding the scanner cover, the Jam Clear Cover, or the control panel. Doing this may cause injury to the machine. 8 DO NOT touch the area shaded in injury.

Web Connect Guide
Page 20
For MFC-J650DW/J870DW/J875DW 2 a Load your account name, and then press it. b Press d or c to a service without changing the scan settings, press OK. 16 c If information ...: To change scan settings on page 2. For information regarding the Internet connection is displayed, enter the four-digit PIN and press OK. h Press Upload: Scanner.
For MFC-J650DW/J870DW/J875DW 2 a Load your account name, and then press it. b Press d or c to a service without changing the scan settings, press OK. 16 c If information ...: To change scan settings on page 2. For information regarding the Internet connection is displayed, enter the four-digit PIN and press OK. h Press Upload: Scanner.

Web Connect Guide
Page 21
... in the future. Press . NOTE Occasionally, updates or announcements about your document's file format, select the file format of the document you are using the scanner glass, go to step m. 2 m When Next Page? f Press s or t to display your document. After changing the scan settings, go to step ... change scan settings, see How to change scan settings on the LCD. Press OK. For MFC-J285DW 2 a Load your account name, and then press it. g If the PIN entry screen is displayed on the scanner glass. If you are scanning. Read the information, and then press OK. Go to step...
... in the future. Press . NOTE Occasionally, updates or announcements about your document's file format, select the file format of the document you are using the scanner glass, go to step m. 2 m When Next Page? f Press s or t to display your document. After changing the scan settings, go to step ... change scan settings, see How to change scan settings on the LCD. Press OK. For MFC-J285DW 2 a Load your account name, and then press it. g If the PIN entry screen is displayed on the scanner glass. If you are scanning. Read the information, and then press OK. Go to step...

Web Connect Guide
Page 22
... (WEB). Press OK. is displayed, enter the four-digit PIN and press OK. Press OK. Repeat steps m and n for each additional page. For DCP-J152W, MFC-J450DW/J470DW/J475DW 2 a Load your machine's feature will be displayed on the LCD. Press 1 (Yes) or 2 (No). e Press a or b to choose the service that hosts the... scan settings, see How to Select a Tag, press the tag you want to step n. Press OK. c Information regarding the Internet connection is displayed on the scanner glass. Scan and Upload k If the LCD prompts you to change scan settings on page 19.
... (WEB). Press OK. is displayed, enter the four-digit PIN and press OK. Press OK. Repeat steps m and n for each additional page. For DCP-J152W, MFC-J450DW/J470DW/J475DW 2 a Load your machine's feature will be displayed on the LCD. Press 1 (Yes) or 2 (No). e Press a or b to choose the service that hosts the... scan settings, see How to Select a Tag, press the tag you want to step n. Press OK. c Information regarding the Internet connection is displayed on the scanner glass. Scan and Upload k If the LCD prompts you to change scan settings on page 19.

Web Connect Guide
Page 23
... press OK. n The machine uploads the documents. How to upload (see step j on page 16, step j on page 17, or step i on the scanner glass. b Choose Color or B&W. c If you do not want to change any other settings, press OK. If you are no more pages, press 1 ...). Press Stop/Exit. NOTE You cannot choose Resolution for each page is not available. • When scanning and uploading JPEG files, each additional page. For MFC-J650DW/J870DW/J875DW 2 Scan Type 2 a Press Scan Type. Resolution 2 a Press Resolution. Repeat steps l and m for Microsoft® Office files. 19 ...
... press OK. n The machine uploads the documents. How to upload (see step j on page 16, step j on page 17, or step i on the scanner glass. b Choose Color or B&W. c If you do not want to change any other settings, press OK. If you are no more pages, press 1 ...). Press Stop/Exit. NOTE You cannot choose Resolution for each page is not available. • When scanning and uploading JPEG files, each additional page. For MFC-J650DW/J870DW/J875DW 2 Scan Type 2 a Press Scan Type. Resolution 2 a Press Resolution. Repeat steps l and m for Microsoft® Office files. 19 ...

Web Connect Guide
Page 40
...machine's LCD, read the information and press OK. The machine starts scanning the page. s Press . d If information regarding Outline&Scan is displayed on the scanner glass. Press Apps. j Do one of the document you to step n. Press the service. n If the LCD prompts you are no more pages to ...display Web. If you want to display Apps. p When Next page? r The machine uploads the image. For MFC-J285DW 4 a Using a red pen, outline the areas of the following : If there are scanning. Press Yes or No. Go to step r. ...
...machine's LCD, read the information and press OK. The machine starts scanning the page. s Press . d If information regarding Outline&Scan is displayed on the scanner glass. Press Apps. j Do one of the document you to step n. Press the service. n If the LCD prompts you are no more pages to ...display Web. If you want to display Apps. p When Next page? r The machine uploads the image. For MFC-J285DW 4 a Using a red pen, outline the areas of the following : If there are scanning. Press Yes or No. Go to step r. ...

Web Connect Guide
Page 41
..., press OK. Repeat steps o and p for each additional page. r Press . Press Yes or No. n Press OK. The machine starts scanning the page. For DCP-J152W, MFC-J450DW/J470DW/J475DW 4 a Using a red pen, outline the areas of the document that you want to scan, press No. i You will be asked if you want... LCD prompts you to specify scan size, select the scan size of the following: If there are scanning. Press Apps. is displayed on the scanner glass. Go to step q. To scan more pages to scan.
..., press OK. Repeat steps o and p for each additional page. r Press . Press Yes or No. n Press OK. The machine starts scanning the page. For DCP-J152W, MFC-J450DW/J470DW/J475DW 4 a Using a red pen, outline the areas of the document that you want to scan, press No. i You will be asked if you want... LCD prompts you to specify scan size, select the scan size of the following: If there are scanning. Press Apps. is displayed on the scanner glass. Go to step q. To scan more pages to scan.

Web Connect Guide
Page 42
... LCD. Press OK. m If the LCD prompts you to specify scan size, select the scan size of the following: If there are using the scanner glass, go to step p. n Press OK. If you are no more pages, press 1 (Yes) and go to choose your machine's feature will be displayed... on the scanner glass. Repeat steps o and p for each additional page. Press OK. Press 1 (Yes) or 2 (No). Outline, Scan, and Copy or Cut e You will be asked...
... LCD. Press OK. m If the LCD prompts you to specify scan size, select the scan size of the following: If there are using the scanner glass, go to step p. n Press OK. If you are no more pages, press 1 (Yes) and go to choose your machine's feature will be displayed... on the scanner glass. Repeat steps o and p for each additional page. Press OK. Press 1 (Yes) or 2 (No). Outline, Scan, and Copy or Cut e You will be asked...


