Software Users Manual - English
Page 8
... Network User's Guide for details.) This feature is available for your PC is available for Network Standard models only. (Not available for MFC-J265W, MFC-J270W, MFC-J410W and MFC-J415W) Wireless LAN ...did not install from Windows® XP. Using the Brother printer driver 1 A printer driver translates the data from the Brother Solutions Center at up to 1200 6000 dpi... connected on page 110 to configure your PC. You can be understood by following the Quick Setup Guide. Ethernet (For Network models) The Ethernet interface lets your machine communicate with other features....
... Network User's Guide for details.) This feature is available for your PC is available for Network Standard models only. (Not available for MFC-J265W, MFC-J270W, MFC-J410W and MFC-J415W) Wireless LAN ...did not install from Windows® XP. Using the Brother printer driver 1 A printer driver translates the data from the Brother Solutions Center at up to 1200 6000 dpi... connected on page 110 to configure your PC. You can be understood by following the Quick Setup Guide. Ethernet (For Network models) The Ethernet interface lets your machine communicate with other features....
Software Users Manual - English
Page 33
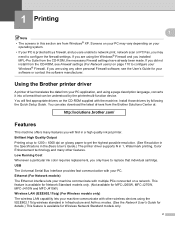
FaceFilter Studio also lets you edit your machine. Note If your Brother machine is not turned On, or connected to your computer, FaceFilter Studio will not be able to use...Start, point to All Programs/Reallusion/FaceFilter Studio and click FaceFilter Studio Help on page 73.) Before you must make sure your Brother machine is an easy-to your PC. 27 You can also start FaceFilter Studio for photo printing by REALLUSION 1 1 FaceFilter Studio... features. Install FaceFilter Studio and download FaceFilter Studio Help by clicking the FaceFilter Studio button in the Quick Setup Guide.
FaceFilter Studio also lets you edit your machine. Note If your Brother machine is not turned On, or connected to your computer, FaceFilter Studio will not be able to use...Start, point to All Programs/Reallusion/FaceFilter Studio and click FaceFilter Studio Help on page 73.) Before you must make sure your Brother machine is an easy-to your PC. 27 You can also start FaceFilter Studio for photo printing by REALLUSION 1 1 FaceFilter Studio... features. Install FaceFilter Studio and download FaceFilter Studio Help by clicking the FaceFilter Studio button in the Quick Setup Guide.

Software Users Manual - English
Page 82
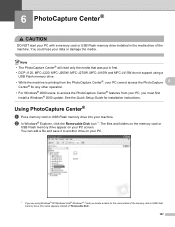
.... Note To use the FaceFilter Studio button, you an easy-to-use borderless photo printing function. To install FaceFilter Studio follow the steps in the Quick Setup Guide.
.... Note To use the FaceFilter Studio button, you an easy-to-use borderless photo printing function. To install FaceFilter Studio follow the steps in the Quick Setup Guide.
Software Users Manual - English
Page 111
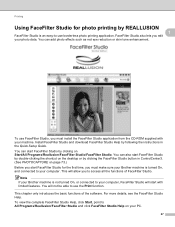
... method. 5 Specify your machine by name Enter the machine node name in Node Name, or click the Browse button and choose the correct Brother machine you are using a different machine than the one that will appear on the display of the machine. Specify your machine by address Enter...specify the PC name that was registered to your PC during the installation of MFL-Pro Suite. (See the Quick Setup Guide.) If you want to use from the list. Brother PC-FAX Software (MFC models only) Configuring the Network PC-FAX Receiving Settings 5 The settings to send received faxes to your computer...
... method. 5 Specify your machine by name Enter the machine node name in Node Name, or click the Browse button and choose the correct Brother machine you are using a different machine than the one that will appear on the display of the machine. Specify your machine by address Enter...specify the PC name that was registered to your PC during the installation of MFL-Pro Suite. (See the Quick Setup Guide.) If you want to use from the list. Brother PC-FAX Software (MFC models only) Configuring the Network PC-FAX Receiving Settings 5 The settings to send received faxes to your computer...
Software Users Manual - English
Page 113
... or USB Flash memory drive installed in first. • DCP-J125, MFC-J220, MFC-J265W, MFC-J270W, MFC-J410W and MFC-J415W do not support using Windows® XP/Windows Vista®/ Windows® 7 and you must first install a Windows® 2000 update. See the Quick Setup Guide for the volume label of the memory card or USB Flash...
... or USB Flash memory drive installed in first. • DCP-J125, MFC-J220, MFC-J265W, MFC-J270W, MFC-J410W and MFC-J415W do not support using Windows® XP/Windows Vista®/ Windows® 7 and you must first install a Windows® 2000 update. See the Quick Setup Guide for the volume label of the memory card or USB Flash...
Software Users Manual - English
Page 180
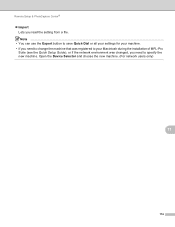
Open the Device Selector and choose the new machine. (For network users only) 11 174 Remote Setup & PhotoCapture Center® Import Lets you need to your Macintosh during the installation of MFL-Pro Suite (see the Quick Setup Guide), or if the network environment was changed, you read the setting from a file. Note • You can use the Export button to save Quick-Dial or all your settings for your machine. • If you need to change the machine that was registered to specify the new machine.
Open the Device Selector and choose the new machine. (For network users only) 11 174 Remote Setup & PhotoCapture Center® Import Lets you need to your Macintosh during the installation of MFL-Pro Suite (see the Quick Setup Guide), or if the network environment was changed, you read the setting from a file. Note • You can use the Export button to save Quick-Dial or all your settings for your machine. • If you need to change the machine that was registered to specify the new machine.
Software Users Manual - English
Page 193
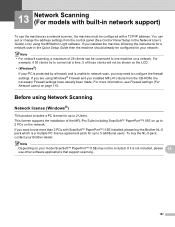
... This product includes a PC license for your PC is unable to network scan, you may not be configured with built-in the Quick Setup Guide then the machine should already be connected to configure the firewall settings. This license supports the installation of 25 clients can set or ...8482;11SE installed, please buy the NL-5 pack, contact your model ScanSoft™ PaperPort™11SE may need to one machine on your Brother dealer. If you installed the machine following the instructions for a network user in network support) 13 To use other software applications that ...
... This product includes a PC license for your PC is unable to network scan, you may not be configured with built-in the Quick Setup Guide then the machine should already be connected to configure the firewall settings. This license supports the installation of 25 clients can set or ...8482;11SE installed, please buy the NL-5 pack, contact your model ScanSoft™ PaperPort™11SE may need to one machine on your Brother dealer. If you installed the machine following the instructions for a network user in network support) 13 To use other software applications that ...
Software Users Manual - English
Page 194
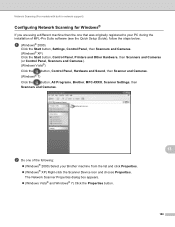
... button, Control Panel, Hardware and Sound, then Scanner and Cameras. (Windows® 7) Click the button, All Programs, Brother, MFC-XXXX, Scanner Settings, then Scanners and Cameras. 13 b Do one that was originally registered to your Brother machine from the list and click Properties. (Windows® XP) Right-click the Scanner Device icon... a different machine than the one of the following: (Windows® 2000) Select your PC during the installation of MFL-Pro Suite software (see the Quick Setup Guide), follow the steps below.
... button, Control Panel, Hardware and Sound, then Scanner and Cameras. (Windows® 7) Click the button, All Programs, Brother, MFC-XXXX, Scanner Settings, then Scanners and Cameras. 13 b Do one that was originally registered to your Brother machine from the list and click Properties. (Windows® XP) Right-click the Scanner Device icon... a different machine than the one of the following: (Windows® 2000) Select your PC during the installation of MFL-Pro Suite software (see the Quick Setup Guide), follow the steps below.
Software Users Manual - English
Page 198
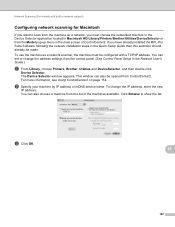
... scanner, the machine must be configured with built-in the Quick Setup Guide then this selection should already be opened from the list of ControlCenter2. To change the address settings from the Model pop-up menu in the Network User's Guide.) a From Library, choose Printers, Brother, Utilities and DeviceSelector, and then double-click Device Selector...
... scanner, the machine must be configured with built-in the Quick Setup Guide then this selection should already be opened from the list of ControlCenter2. To change the address settings from the Model pop-up menu in the Network User's Guide.) a From Library, choose Printers, Brother, Utilities and DeviceSelector, and then double-click Device Selector...
Advanced Users Manual - English
Page 2
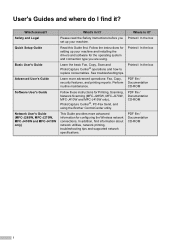
...: Fax, Copy, security features, and printing reports. Please read the Safety Instructions before you are using the Brother ControlCenter utility. Safety and Legal Quick Setup Guide Basic User's Guide Advanced User's Guide Software User's Guide Network User's Guide (MFC-J265W, MFC-J270W, MFC-J410W and MFC-J415W only) What's in it ? Printed / In the box Printed / In the box Printed / In the box...
...: Fax, Copy, security features, and printing reports. Please read the Safety Instructions before you are using the Brother ControlCenter utility. Safety and Legal Quick Setup Guide Basic User's Guide Advanced User's Guide Software User's Guide Network User's Guide (MFC-J265W, MFC-J270W, MFC-J410W and MFC-J415W only) What's in it ? Printed / In the box Printed / In the box Printed / In the box...
Advanced Users Manual - English
Page 58
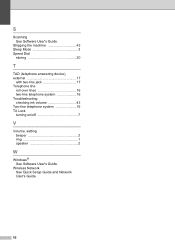
Wireless Network See Quick Setup Guide and Network User's Guide. 52 S Scanning See Software User's Guide. Shipping the machine 43 Sleep Mode 3 Speed Dial storing 20 T TAD (telephone answering device), external 17 with two-line jack 17 Telephone line roll over lines 16 two-line telephone system 16 Troubleshooting checking ink volume 43 Two-line telephone system 16 TX Lock turning on/off 7 V Volume, setting beeper 2 ring 1 speaker 2 W Windows® See Software User's Guide.
Wireless Network See Quick Setup Guide and Network User's Guide. 52 S Scanning See Software User's Guide. Shipping the machine 43 Sleep Mode 3 Speed Dial storing 20 T TAD (telephone answering device), external 17 with two-line jack 17 Telephone line roll over lines 16 two-line telephone system 16 Troubleshooting checking ink volume 43 Two-line telephone system 16 TX Lock turning on/off 7 V Volume, setting beeper 2 ring 1 speaker 2 W Windows® See Software User's Guide.
Quick Setup Guide - English
Page 1
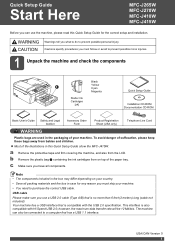
USB cable Please make sure you use the machine, please read this Quick Setup Guide show the MFC-J415W. To avoid danger of the illustrations in case for the correct setup and installation. WARNING Warnings tell you what to do to a computer that is no more than 6 feet (2 meters) long (cable not ...plastic bag a containing the ink cartridges from on your machine. Note • The components included in the packaging of the paper tray. Quick Setup Guide Start Here MFC-J265W MFC-J270W MFC-J410W MFC-J415W Before you can also be 12 Mbits/s. USA/CAN Version 0 1
USB cable Please make sure you use the machine, please read this Quick Setup Guide show the MFC-J415W. To avoid danger of the illustrations in case for the correct setup and installation. WARNING Warnings tell you what to do to a computer that is no more than 6 feet (2 meters) long (cable not ...plastic bag a containing the ink cartridges from on your machine. Note • The components included in the packaging of the paper tray. Quick Setup Guide Start Here MFC-J265W MFC-J270W MFC-J410W MFC-J415W Before you can also be 12 Mbits/s. USA/CAN Version 0 1
Network Users Manual - English
Page 16
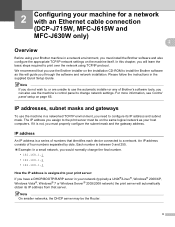
2 Configuring your machine for a network with an Ethernet cable connection (DCP-J715W, MFC-J615W and MFC-J630W only) 2 2 Overview 2 Before using TCP/IP protocol. In this will guide you can also use the machine's control panel to change the final number. • 192.168.1.1 • 192.168.1.2 &#... network environment, you do not wish to, or are unable to use the Brother installer on the same logical network as this chapter, you assign to print over the network using your Brother machine in the supplied Quick Setup Guide. An IP address consists of four numbers separated by dots.
2 Configuring your machine for a network with an Ethernet cable connection (DCP-J715W, MFC-J615W and MFC-J630W only) 2 2 Overview 2 Before using TCP/IP protocol. In this will guide you can also use the machine's control panel to change the final number. • 192.168.1.1 • 192.168.1.2 &#... network environment, you do not wish to, or are unable to use the Brother installer on the same logical network as this chapter, you assign to print over the network using your Brother machine in the supplied Quick Setup Guide. An IP address consists of four numbers separated by dots.
Network Users Manual - English
Page 25
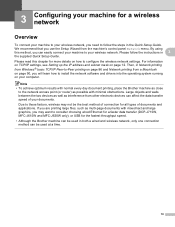
... normal every day document printing, place the Brother machine as close to consider choosing wired Ethernet for a faster data transfer (DCP-J715W, MFC-J615W and MFC-J630W only), or USB for the fastest throughput speed. • Although the Brother machine can be used at a time. ...can be the best method of connection for all types of your documents. Due to follow the instructions in the Quick Setup Guide. Please follow the steps in 3 the supplied Quick Setup Guide. 3 Configuring your machine for a wireless network 3 Overview 3 To connect your machine to your wireless network, you...
... normal every day document printing, place the Brother machine as close to consider choosing wired Ethernet for a faster data transfer (DCP-J715W, MFC-J615W and MFC-J630W only), or USB for the fastest throughput speed. • Although the Brother machine can be used at a time. ...can be the best method of connection for all types of your documents. Due to follow the instructions in the Quick Setup Guide. Please follow the steps in 3 the supplied Quick Setup Guide. 3 Configuring your machine for a wireless network 3 Overview 3 To connect your machine to your wireless network, you...
Network Users Manual - English
Page 28
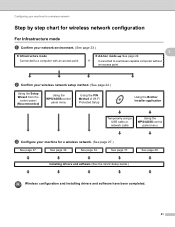
See page 34. Installing drivers and software (See the Quick Setup Guide.) See page 48. See page 37. Configuring your network environment. (See page 23.) 3 Infrastructure mode Ad-hoc mode See page 22. Connected to a ... from the control panel (Recommended) Using the WPS/AOSS control panel menu Using the PIN Method of Wi-Fi Protected Setup Using the Brother installer application Temporarily using a USB cable or network cable Using the WPS/AOSS control panel menu c Configure your machine for wireless network configuration 3 For Infrastructure ...
See page 34. Installing drivers and software (See the Quick Setup Guide.) See page 48. See page 37. Configuring your network environment. (See page 23.) 3 Infrastructure mode Ad-hoc mode See page 22. Connected to a ... from the control panel (Recommended) Using the WPS/AOSS control panel menu Using the PIN Method of Wi-Fi Protected Setup Using the Brother installer application Temporarily using a USB cable or network cable Using the WPS/AOSS control panel menu c Configure your machine for wireless network configuration 3 For Infrastructure ...

Network Users Manual - English
Page 29
... (See the Quick Setup Guide.) Wireless configuration and installing drivers and software have been completed. 22 Connected to a wireless capable computer without or an access point Connected to a computer with an access point 3 3 b Confirm your wireless network setup method. (See page 24.) Using the Setup Wizard from the control panel (Recommended) Using the Brother installer application...
... (See the Quick Setup Guide.) Wireless configuration and installing drivers and software have been completed. 22 Connected to a wireless capable computer without or an access point Connected to a computer with an access point 3 3 b Confirm your wireless network setup method. (See page 24.) Using the Setup Wizard from the control panel (Recommended) Using the Brother installer application...
Network Users Manual - English
Page 35
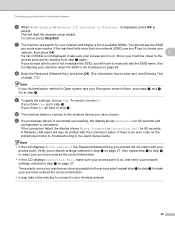
... the LCD displays Wrong Password, the Password (Network Key) you chose Yes, go back to enter text, see the SSID you will start the wireless setup wizard. or Network I/F switched to step j. h Enter the Password (Network Key) and press OK. (For information how to step g. Move your ... step b to step i to step j. To cancel, choose No. Verify your Encryption mode is Open system and your network settings collected in the Quick Setup Guide. This will have entered the correct information. • If the LCD displays Connection Fail, make sure you chose No, go to make sure your ...
... the LCD displays Wrong Password, the Password (Network Key) you chose Yes, go back to enter text, see the SSID you will start the wireless setup wizard. or Network I/F switched to step j. h Enter the Password (Network Key) and press OK. (For information how to step g. Move your ... step b to step i to step j. To cancel, choose No. Verify your Encryption mode is Open system and your network settings collected in the Quick Setup Guide. This will have entered the correct information. • If the LCD displays Connection Fail, make sure you chose No, go to make sure your ...

Network Users Manual - English
Page 38
...for operating your device, please choose Install MFL-Pro Suite from the installation CD-ROM menu. (Macintosh) You have completed the wireless network setup. A Wireless LAN report will also be printed with your wireless device is connected successfully, the display shows Connected for 60 seconds and ... connection failed, the display shows Connection Fail or Wrong Password for 60 seconds. If you would like to Troubleshooting in the Quick Setup Guide. 3 Note • If the LCD displays Wrong Password, the Password (Network Key) you entered did not match with the connection status.
...for operating your device, please choose Install MFL-Pro Suite from the installation CD-ROM menu. (Macintosh) You have completed the wireless network setup. A Wireless LAN report will also be printed with your wireless device is connected successfully, the display shows Connected for 60 seconds and ... connection failed, the display shows Connection Fail or Wrong Password for 60 seconds. If you would like to Troubleshooting in the Quick Setup Guide. 3 Note • If the LCD displays Wrong Password, the Password (Network Key) you entered did not match with the connection status.
Network Users Manual - English
Page 40
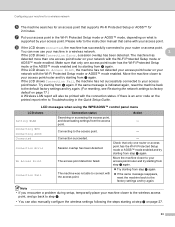
...point, and downloading settings from d again. Action - Note • If you encounter a problem during setup, temporarily place your access point/router. g Put your access point in the Quick Setup Guide. Please refer to your access point. h If the LCD shows Connected, the machine has successfully connected ...to the instruction manual that only one access point/router has the Wi-Fi Protected Setup mode or the AOSS™ mode...
...point, and downloading settings from d again. Action - Note • If you encounter a problem during setup, temporarily place your access point/router. g Put your access point in the Quick Setup Guide. Please refer to your access point. h If the LCD shows Connected, the machine has successfully connected ...to the instruction manual that only one access point/router has the Wi-Fi Protected Setup mode or the AOSS™ mode...
Network Users Manual - English
Page 42
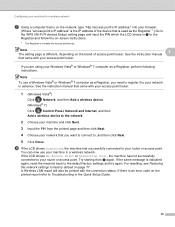
... instructions. 1 The Registrar is different, depending on the brand of the device that is used as a Registrar, you are using your network in the Quick Setup Guide. 35 A Wireless LAN report will also be printed with your access point/router. 1 (Windows Vista®) Click , Network, and then Add a ...your machine and click Next. 3 Input the PIN from d again. For resetting, see Restoring the network settings to the WPS (Wi-Fi Protected Setup) setting page and input the PIN which the LCD shows in a wireless network. Try starting from the printed page and then click Next. 4 ...
... instructions. 1 The Registrar is different, depending on the brand of the device that is used as a Registrar, you are using your network in the Quick Setup Guide. 35 A Wireless LAN report will also be printed with your access point/router. 1 (Windows Vista®) Click , Network, and then Add a ...your machine and click Next. 3 Input the PIN from d again. For resetting, see Restoring the network settings to the WPS (Wi-Fi Protected Setup) setting page and input the PIN which the LCD shows in a wireless network. Try starting from the printed page and then click Next. 4 ...


