Software Users Manual - English
Page 2
... Mode ...9 Page Layout ...10 Orientation ...10 Copies ...11 Advanced tab...12 Color/Grayscale ...13 Color Settings ...13 Ink Save Mode (For MFC-J615W and MFC-J630W 15 Use Watermark...15 Watermark Settings ...16 Other Print Options...18 Support ...25 Using FaceFilter Studio for photo printing by REALLUSION 27 Starting FaceFilter Studio with your Brother machine turned...
... Mode ...9 Page Layout ...10 Orientation ...10 Copies ...11 Advanced tab...12 Color/Grayscale ...13 Color Settings ...13 Ink Save Mode (For MFC-J615W and MFC-J630W 15 Use Watermark...15 Watermark Settings ...16 Other Print Options...18 Support ...25 Using FaceFilter Studio for photo printing by REALLUSION 27 Starting FaceFilter Studio with your Brother machine turned...
Software Users Manual - English
Page 5
...Choosing the right type of paper...120 Simultaneous printing, scanning and faxing 120 Clearing data from the memory ...120 Status Monitor ...121 Using the Brother Ink driver ...122 Choosing page setup options ...122 Choosing printing options ...123 Basic settings...124 Media Type...124... Quality ...125 Color Mode ...126 Advanced settings ...127 Color/Grayscale ...127 Other Settings...129 Other Print Options...130 Support ...131 Sending a fax (MFC models ...
...Choosing the right type of paper...120 Simultaneous printing, scanning and faxing 120 Clearing data from the memory ...120 Status Monitor ...121 Using the Brother Ink driver ...122 Choosing page setup options ...122 Choosing printing options ...123 Basic settings...124 Media Type...124... Quality ...125 Color Mode ...126 Advanced settings ...127 Color/Grayscale ...127 Other Settings...129 Other Print Options...130 Support ...131 Sending a fax (MFC models ...
Software Users Manual - English
Page 8
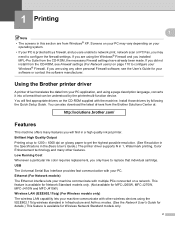
...using any other personal Firewall software, see Firewall settings (For Network users) on page 110 to configure your Windows® Firewall. You will find appropriate drivers on glossy paper to network print, network scan or PC Fax, you will find in a high quality ink jet..., MFC-J270W, MFC-J410W and MFC-J415W) Wireless LAN (IEEE802.11b/g) (For Wireless models only) The wireless LAN capability lets your software or contact the software manufacturer. Low Running Cost Whenever a particular ink color requires replacement, you did not install from the Brother Solutions Center at up to ...
...using any other personal Firewall software, see Firewall settings (For Network users) on page 110 to configure your Windows® Firewall. You will find appropriate drivers on glossy paper to network print, network scan or PC Fax, you will find in a high quality ink jet..., MFC-J270W, MFC-J410W and MFC-J415W) Wireless LAN (IEEE802.11b/g) (For Wireless models only) The wireless LAN capability lets your software or contact the software manufacturer. Low Running Cost Whenever a particular ink color requires replacement, you did not install from the Brother Solutions Center at up to ...
Software Users Manual - English
Page 12
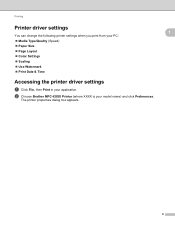
b Choose Brother MFC-XXXX Printer (where XXXX is your application. The printer properties dialog box appears. 1 1 1 6 Printing Printer driver settings You can change the following printer settings when you print from your PC: Media Type/Quality (Speed) Paper Size Page Layout Color Settings Scaling Use Watermark Print Date & Time Accessing the printer driver settings a Click File, then Print in your model name) and click Preferences.
b Choose Brother MFC-XXXX Printer (where XXXX is your application. The printer properties dialog box appears. 1 1 1 6 Printing Printer driver settings You can change the following printer settings when you print from your PC: Media Type/Quality (Speed) Paper Size Page Layout Color Settings Scaling Use Watermark Print Date & Time Accessing the printer driver settings a Click File, then Print in your model name) and click Preferences.
Software Users Manual - English
Page 13
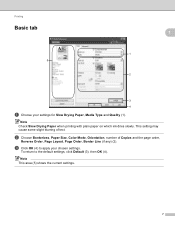
This setting may cause some slight blurring of Copies and the page order, Reverse Order, Page Layout, Page Order, Border Line (if any) (2). To return to apply your settings for Slow Drying Paper, Media Type and Quality (1). c Click OK (4) to the default settings, click Default (3), then OK (4). Note This area (5) shows the current settings. 7 Printing Basic tab 5 1 1 1 2 3 4 a Choose your chosen settings. b Choose Borderless, Paper Size, Color Mode, Orientation, number of text. Note Check Slow Drying Paper when printing with plain paper on which ink dries slowly.
This setting may cause some slight blurring of Copies and the page order, Reverse Order, Page Layout, Page Order, Border Line (if any) (2). To return to apply your settings for Slow Drying Paper, Media Type and Quality (1). c Click OK (4) to the default settings, click Default (3), then OK (4). Note This area (5) shows the current settings. 7 Printing Basic tab 5 1 1 1 2 3 4 a Choose your chosen settings. b Choose Borderless, Paper Size, Color Mode, Orientation, number of text. Note Check Slow Drying Paper when printing with plain paper on which ink dries slowly.
Software Users Manual - English
Page 16
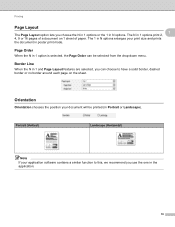
... software contains a similar function to have a solid border, dashed border or no border around each page on 1 sheet of paper. Printing Page Layout 1 The Page Layout option lets you use the one in 1 option is selected, the Page Order can be printed (in N options. Portrait (Vertical) Landscape (Horizontal) Note If your document will be selected from...
... software contains a similar function to have a solid border, dashed border or no border around each page on 1 sheet of paper. Printing Page Layout 1 The Page Layout option lets you use the one in 1 option is selected, the Page Order can be printed (in N options. Portrait (Vertical) Landscape (Horizontal) Note If your document will be selected from...
Software Users Manual - English
Page 17
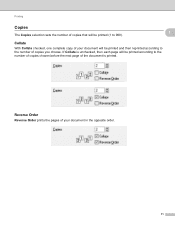
Printing Copies The Copies selection sets the number of copies that will be printed (1 to 999). 1 1 Collate 1 With Collate checked, one complete copy of your document in the opposite order. 11 If Collate is unchecked, then each page will be printed according to the number of the document is printed. Reverse Order 1 Reverse Order prints the pages of your document will be printed and then reprinted according to the number of copies chosen before the next page of copies you choose.
Printing Copies The Copies selection sets the number of copies that will be printed (1 to 999). 1 1 Collate 1 With Collate checked, one complete copy of your document in the opposite order. 11 If Collate is unchecked, then each page will be printed according to the number of the document is printed. Reverse Order 1 Reverse Order prints the pages of your document will be printed and then reprinted according to the number of copies chosen before the next page of copies you choose.
Software Users Manual - English
Page 22
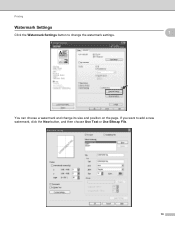
If you want to change the watermark settings. 1 1 You can choose a watermark and change its size and position on the page. Printing Watermark Settings Click the Watermark Settings button to add a new watermark, click the New button, and then choose Use Text or Use Bitmap File. 16
If you want to change the watermark settings. 1 1 You can choose a watermark and change its size and position on the page. Printing Watermark Settings Click the Watermark Settings button to add a new watermark, click the New button, and then choose Use Text or Use Bitmap File. 16
Software Users Manual - English
Page 23
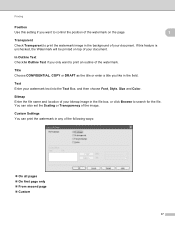
...Enter the file name and location of your bitmap image in the field. You can print the watermark in any of the following ways: On all pages On first page only From second page Custom 17 Custom Settings 1 You can also set the Scaling or Transparency...on top of your document. If this setting if you want to print an outline of the watermark. Printing Position Use this feature is unchecked, the Watermark will be printed on the page. 1 1 Transparent 1 Check Transparent to print the watermark image in the background of your document. In Outline Text...
...Enter the file name and location of your bitmap image in the field. You can print the watermark in any of the following ways: On all pages On first page only From second page Custom 17 Custom Settings 1 You can also set the Scaling or Transparency...on top of your document. If this setting if you want to print an outline of the watermark. Printing Position Use this feature is unchecked, the Watermark will be printed on the page. 1 1 Transparent 1 Check Transparent to print the watermark image in the background of your document. In Outline Text...

Software Users Manual - English
Page 29
If the Print Odd Pages and Print Even Pages settings are grayed out, go back to Print All Pages, Print Odd Pages or Print Even Pages. 1 1 Print All Pages Lets you print all pages. Print Odd Pages Lets you print the odd-numbered pages only. Print Even Pages Lets you print the even-numbered pages only. Note • The print speed of copies you may see a printing error message on your computer...
If the Print Odd Pages and Print Even Pages settings are grayed out, go back to Print All Pages, Print Odd Pages or Print Even Pages. 1 1 Print All Pages Lets you print all pages. Print Odd Pages Lets you print the odd-numbered pages only. Print Even Pages Lets you print the even-numbered pages only. Note • The print speed of copies you may see a printing error message on your computer...
Software Users Manual - English
Page 30
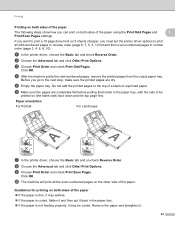
...Advanced tab and click Other Print Options. b Choose the Advanced tab and click Other Print Options. c Choose Print Order and check Print Odd Pages. Do not add the printed pages to the top of a stack of paper, you go to the next step, make sure the printed pages are completely flat before putting...of the paper. a In the printer driver, choose the Basic tab and check Reverse Order. d After the machine prints the odd-numbered pages, remove the printed pages from the output paper tray. Paper orientation For Portrait For Landscape g In the printer driver, choose the Basic tab ...
...Advanced tab and click Other Print Options. b Choose the Advanced tab and click Other Print Options. c Choose Print Order and check Print Odd Pages. Do not add the printed pages to the top of a stack of paper, you go to the next step, make sure the printed pages are completely flat before putting...of the paper. a In the printer driver, choose the Basic tab and check Reverse Order. d After the machine prints the odd-numbered pages, remove the printed pages from the output paper tray. Paper orientation For Portrait For Landscape g In the printer driver, choose the Basic tab ...
Software Users Manual - English
Page 33
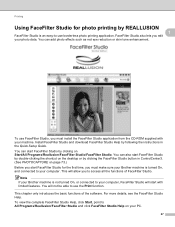
... FaceFilter Studio Help by clicking the FaceFilter Studio button in the Quick Setup Guide. Note If your Brother machine is an easy-to-use borderless photo printing application. Printing Using FaceFilter Studio for the first time, you must install the FaceFilter Studio application from the CD-...complete FaceFilter Studio Help, click Start, point to All Programs/Reallusion/FaceFilter Studio and click FaceFilter Studio Help on page 73.) Before you must make sure your Brother machine is turned On, and connected to your computer. You can also start with your photo data. This ...
... FaceFilter Studio Help by clicking the FaceFilter Studio button in the Quick Setup Guide. Note If your Brother machine is an easy-to-use borderless photo printing application. Printing Using FaceFilter Studio for the first time, you must install the FaceFilter Studio application from the CD-...complete FaceFilter Studio Help, click Start, point to All Programs/Reallusion/FaceFilter Studio and click FaceFilter Studio Help on page 73.) Before you must make sure your Brother machine is turned On, and connected to your computer. You can also start with your photo data. This ...

Software Users Manual - English
Page 36
Printing an image 1 a Click the Open icon to use the Print function. 1 Note • When FaceFilter Studio starts with limited functionality, the image file will be saved with a watermark. • To start with your Brother machine turned On on page 28. The Print icon on the top menu will be grayed out and you click the check mark in step d, FaceFilter Studio will start FaceFilter Studio with full functionality, see Starting FaceFilter Studio with limited functionality. Printing e After you will not be able to choose the image file. 30
Printing an image 1 a Click the Open icon to use the Print function. 1 Note • When FaceFilter Studio starts with limited functionality, the image file will be saved with a watermark. • To start with your Brother machine turned On on page 28. The Print icon on the top menu will be grayed out and you click the check mark in step d, FaceFilter Studio will start FaceFilter Studio with full functionality, see Starting FaceFilter Studio with limited functionality. Printing e After you will not be able to choose the image file. 30

Software Users Manual - English
Page 37
d Choose Paper Size, Paper Source, Orientation, number of Copies, Scaling and Printing Area. Printing b Click the Print icon in Paper Size. 31 Note If you want to print a borderless photo, choose Full Page Photo in Scaling and borderless paper in the top menu bar to move to the print screen. 1 c Click the Print icon on the left to open the print settings dialog box.
d Choose Paper Size, Paper Source, Orientation, number of Copies, Scaling and Printing Area. Printing b Click the Print icon in Paper Size. 31 Note If you want to print a borderless photo, choose Full Page Photo in Scaling and borderless paper in the top menu bar to move to the print screen. 1 c Click the Print icon on the left to open the print settings dialog box.
Advanced Users Manual - English
Page 33
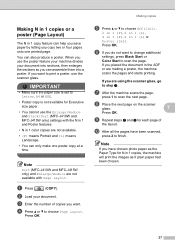
...and (L) means Landscape. • You can only make one printed page. g After the machine scans the page, press 1 to finish. j After all the pages have chosen photo paper as if plain paper had been chosen. 27 Note Sort (MFC-J410W and MFC-J415W only) and Enlarge/Reduce are not available with the N in ...1 and Poster features. • N in 1 color copies are making a poster, the machine scans the pages and starts printing. Press OK. f If you can assemble them ...
...and (L) means Landscape. • You can only make one printed page. g After the machine scans the page, press 1 to finish. j After all the pages have chosen photo paper as if plain paper had been chosen. 27 Note Sort (MFC-J410W and MFC-J415W only) and Enlarge/Reduce are not available with the N in ...1 and Poster features. • N in 1 color copies are making a poster, the machine scans the pages and starts printing. Press OK. f If you can assemble them ...
Advanced Users Manual - English
Page 47
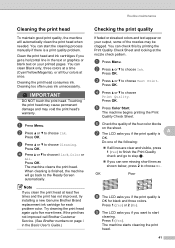
... text appear on the sheet. If the print has not improved call Brother Customer Service. (See Brother numbers on page i in the text or graphics or blank text on your output, some of the four color blocks on your printed pages. Routine maintenance Cleaning the print head A To maintain good print quality, the machine will go to step...
... text appear on the sheet. If the print has not improved call Brother Customer Service. (See Brother numbers on page i in the text or graphics or blank text on your output, some of the four color blocks on your printed pages. Routine maintenance Cleaning the print head A To maintain good print quality, the machine will go to step...
Network Users Manual - English
Page 42
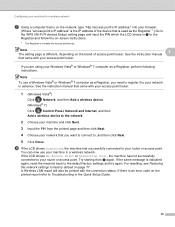
... refer to , and then click Next. 5 Click Close. Note To use your machine in advance. Try starting from the printed page and then click Next. 4 Choose your network that came with your access point/router. 1 (Windows Vista®) Click , Network, and ...174; or Windows® 7 computer as a Registrar, perform following instructions. A Wireless LAN report will also be printed with your access point/router. Note The setting page is different, depending on page 77. Configuring your machine for a wireless network g Using a computer that is on the network, type "http://access...
... refer to , and then click Next. 5 Click Close. Note To use your machine in advance. Try starting from the printed page and then click Next. 4 Choose your network that came with your access point/router. 1 (Windows Vista®) Click , Network, and ...174; or Windows® 7 computer as a Registrar, perform following instructions. A Wireless LAN report will also be printed with your access point/router. Note The setting page is different, depending on page 77. Configuring your machine for a wireless network g Using a computer that is on the network, type "http://access...
Users Manual - English
Page 78
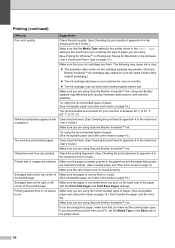
...;C to 33 C). Check the printing alignment. (See Checking the print alignment in appendix A in text or graphics. Try using Genuine Brother Innobella™ Ink. Smudged stain at the right or left corner of the paper with the Print Odd Pages and Print Even Pages settings. Make sure you are using Genuine Brother Innobella™ Ink. The following...
...;C to 33 C). Check the printing alignment. (See Checking the print alignment in appendix A in text or graphics. Try using Genuine Brother Innobella™ Ink. Smudged stain at the right or left corner of the paper with the Print Odd Pages and Print Even Pages settings. Make sure you are using Genuine Brother Innobella™ Ink. The following...

Users Manual - English
Page 79
...will not work. The highest resolution needs longer data processing, sending and printing time. Borderless printing is slower than two types of paper are using Genuine Brother Innobella™ Ink. Photo paper does not feed properly. Printed pages are the same. Do not extend the paper tray when you load ...A5 or smaller size paper. (See Printer jam or paper jam on page 61.) Make sure you print on Brother Photo paper, load one time. the page. If the image data is ...
...will not work. The highest resolution needs longer data processing, sending and printing time. Borderless printing is slower than two types of paper are using Genuine Brother Innobella™ Ink. Photo paper does not feed properly. Printed pages are the same. Do not extend the paper tray when you load ...A5 or smaller size paper. (See Printer jam or paper jam on page 61.) Make sure you print on Brother Photo paper, load one time. the page. If the image data is ...

Users Manual - English
Page 108
Print media D Paper Input Paper Output Paper Tray Paper Type: Plain Paper, Inkjet Paper (coated paper), Glossy Paper 1, Transparency 1 2 and Envelopes Paper Size: Letter, ... 20 lb (80 g/m2) plain paper Up to 50 sheets of 20 lb (80 g/m2) plain paper (face up print delivery to the output paper tray) 1 1 For glossy paper or transparencies, remove printed pages from the output paper tray immediately after they exit the machine to avoid smudging. 2 Use only transparencies recommended for...
Print media D Paper Input Paper Output Paper Tray Paper Type: Plain Paper, Inkjet Paper (coated paper), Glossy Paper 1, Transparency 1 2 and Envelopes Paper Size: Letter, ... 20 lb (80 g/m2) plain paper Up to 50 sheets of 20 lb (80 g/m2) plain paper (face up print delivery to the output paper tray) 1 1 For glossy paper or transparencies, remove printed pages from the output paper tray immediately after they exit the machine to avoid smudging. 2 Use only transparencies recommended for...


