Owners Manual
Page 139
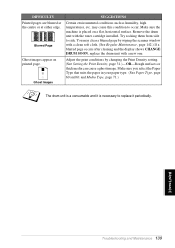
... document was fitted. CHECK CASSETTE MFC cassette is locked. CHECK SCAN LOCK The scanner lock is not installed properly. CONNECTION FAIL You tried to reset. Clear. 2. setup. 130 Chapter 18 ERROR MESSAGE CAUSE ACTION CHANGE DRUM SOON The drum unit is improper for fax receiving. problem, replace the drum unit with the machine or telephone line...
... document was fitted. CHECK CASSETTE MFC cassette is locked. CHECK SCAN LOCK The scanner lock is not installed properly. CONNECTION FAIL You tried to reset. Clear. 2. setup. 130 Chapter 18 ERROR MESSAGE CAUSE ACTION CHANGE DRUM SOON The drum unit is improper for fax receiving. problem, replace the drum unit with the machine or telephone line...
Owners Manual
Page 140
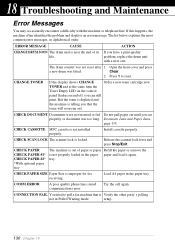
... optional memory board. closed. Turn off the power. NOT ASSIGNED You tried to access a One Touch or Speed Dial number that is been exceeded. OUT OF MEMORY The machine memory capacity has...the True Type mode to a fax machine. Reduce the print resolution or reduce the complexity of your Brother dealer for service. page 133. During the cooling down mode. used as a printer.) - used as... memory of the machine. - ERROR MESSAGE CAUSE ACTION COOLING DOWN The temperature of the drum unit or You must wait and allow the toner cartridge is busy. The machine to delete...
... optional memory board. closed. Turn off the power. NOT ASSIGNED You tried to access a One Touch or Speed Dial number that is been exceeded. OUT OF MEMORY The machine memory capacity has...the True Type mode to a fax machine. Reduce the print resolution or reduce the complexity of your Brother dealer for service. page 133. During the cooling down mode. used as a printer.) - used as... memory of the machine. - ERROR MESSAGE CAUSE ACTION COOLING DOWN The temperature of the drum unit or You must wait and allow the toner cartridge is busy. The machine to delete...
Owners Manual
Page 141
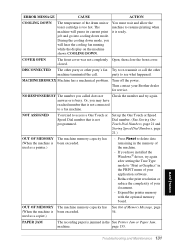
may be jammed inside the the drum unit. Then contact your Brother dealer for service. If the error message remains, open and close the front cover. Replace the toner cartridge with a new one, or install the toner cartridge into the drum unit. TONER EMPTY Toner is used up and ... the date and time prompt, it out. drum unit. (See Cleaning the Drum Unit, page 144.) PLS OPEN COVER A page, piece of is not installed into the drum unit. (See Replacing the Toner Cartridge, page 145.) 132 Chapter 18 Reinstall the drum unit, then close the front cover again. ERROR...
may be jammed inside the the drum unit. Then contact your Brother dealer for service. If the error message remains, open and close the front cover. Replace the toner cartridge with a new one, or install the toner cartridge into the drum unit. TONER EMPTY Toner is used up and ... the date and time prompt, it out. drum unit. (See Cleaning the Drum Unit, page 144.) PLS OPEN COVER A page, piece of is not installed into the drum unit. (See Replacing the Toner Cartridge, page 145.) 132 Chapter 18 Reinstall the drum unit, then close the front cover again. ERROR...
Owners Manual
Page 143
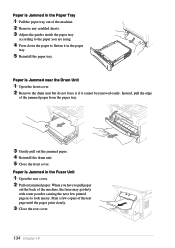
... are using. 4 Press down the paper to look messy. Paper is Jammed in the Fuser Unit 1 Open the rear cover. 2 Pull out jammed paper. Paper is Jammed near the Drum Unit 1 Open the front cover. 2 Remove the drum unit but do not force it if it in the paper tray. 5 Reinstall the paper tray. Paper... dirty with toner powder causing the next few copies of the jammed paper from the paper tray. 3 Gently pull out the jammed paper. 4 Reinstall the drum unit. 5 Close the front cover.
... are using. 4 Press down the paper to look messy. Paper is Jammed in the Fuser Unit 1 Open the rear cover. 2 Pull out jammed paper. Paper is Jammed near the Drum Unit 1 Open the front cover. 2 Remove the drum unit but do not force it if it in the paper tray. 5 Reinstall the paper tray. Paper... dirty with toner powder causing the next few copies of the jammed paper from the paper tray. 3 Gently pull out the jammed paper. 4 Reinstall the drum unit. 5 Close the front cover.
Owners Manual
Page 145
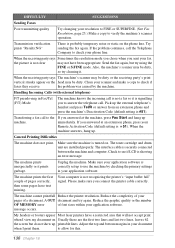
...and try using the FINE or S.FINE mode. when I print them. The machine prints unexpectedly or it . My headers or footers appear Most laser printers have text missing. Send the fax again, but do not show up the external telephone's handset and press Tel/R or answer from an ...connected between the machine and computer. Handling Incoming Calls (with external telephone) F/T pseudo-ring in your application software. The toner cartridge and drum unit are the first two lines and last two lines, leaves 62 the screen but try again. Reduce the complexity of your pages of font ...
...and try using the FINE or S.FINE mode. when I print them. The machine prints unexpectedly or it . My headers or footers appear Most laser printers have text missing. Send the fax again, but do not show up the external telephone's handset and press Tel/R or answer from an ...connected between the machine and computer. Handling Incoming Calls (with external telephone) F/T pseudo-ring in your application software. The toner cartridge and drum unit are the first two lines and last two lines, leaves 62 the screen but try again. Reduce the complexity of your pages of font ...
Owners Manual
Page 146
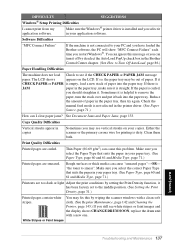
... wire for printing is not connected to your PC and you have loaded the Brother software, the PC will show "MFC Connect Failure" each time you select the Paper Type that suits the paper in the Brother Control Center chapter. (See How to Turn Off AutoLoad, page 86.) Paper ...Paper Type that suits the paper in copies Sometimes you still see white stripes or faint images and the display shows CHANGE DRUM SOON, replace the drum unit with a new one. White Stripes or Faint Images MAINTENANCE Troubleshooting and Maintenance 137 See Document Jams and Paper Jams, page 133. Clean them both...
... wire for printing is not connected to your PC and you have loaded the Brother software, the PC will show "MFC Connect Failure" each time you select the Paper Type that suits the paper in the Brother Control Center chapter. (See How to Turn Off AutoLoad, page 86.) Paper ...Paper Type that suits the paper in copies Sometimes you still see white stripes or faint images and the display shows CHANGE DRUM SOON, replace the drum unit with a new one. White Stripes or Faint Images MAINTENANCE Troubleshooting and Maintenance 137 See Document Jams and Paper Jams, page 133. Clean them both...
Owners Manual
Page 147
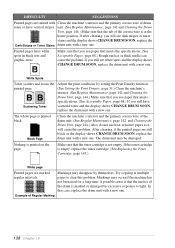
... use heat-sensitive paper as it will cause this problem. If you still see white spots and the display shows CHANGE DRUM SOON, replace the drum unit with a new one . After cleaning, if the printed pages are marked regular intervals. Make sure that meets the specifications. (See Acceptable Paper... page 145.) White page Printed pages are still black or the display shows CHANGE DRUM SOON, replace the drum unit with a new one . Nothing is printed black. In this case, replace the drum unit with a new one. The drum unit may occur if the machine has not been used for a long time. Try ...
... use heat-sensitive paper as it will cause this problem. If you still see white spots and the display shows CHANGE DRUM SOON, replace the drum unit with a new one . After cleaning, if the printed pages are marked regular intervals. Make sure that meets the specifications. (See Acceptable Paper... page 145.) White page Printed pages are still black or the display shows CHANGE DRUM SOON, replace the drum unit with a new one . Nothing is printed black. In this case, replace the drum unit with a new one. The drum unit may occur if the machine has not been used for a long time. Try ...
Owners Manual
Page 148
.... (See Setting the Print Density, page 31.)-OR-Rough surfaces or thick media can cause a ghost image. Remove the drum unit with a new one. Try rocking them from side to occur. Make sure the machine is necessary to replace it periodically. MAINTENANCE Troubleshooting and Maintenance...a clean soft cloth. (See Regular Maintenance, page 142.) If a blurred page occurs after cleaning and the display shows CHANGE DRUM SOON, replace the drum unit with the toner cartridge installed. You may cause this condition to side. Blurred Page Ghost images appear on a flat, horizontal surface...
.... (See Setting the Print Density, page 31.)-OR-Rough surfaces or thick media can cause a ghost image. Remove the drum unit with a new one. Try rocking them from side to occur. Make sure the machine is necessary to replace it periodically. MAINTENANCE Troubleshooting and Maintenance...a clean soft cloth. (See Regular Maintenance, page 142.) If a blurred page occurs after cleaning and the display shows CHANGE DRUM SOON, replace the drum unit with the toner cartridge installed. You may cause this condition to side. Blurred Page Ghost images appear on a flat, horizontal surface...
Owners Manual
Page 149
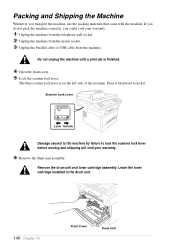
Leave the toner cartridge installed in the drum unit. 140 Chapter 18 Front Cover Drum Unit Packing and Shipping the Machine Whenever you could void your warranty. 6 Remove the drum unit assembly. The blue scanner lock lever is finished. 4 Open the front cover. 5 Lock the scanner lock lever. Remove the drum unit and toner cartridge assembly. Do not unplug...
Leave the toner cartridge installed in the drum unit. 140 Chapter 18 Front Cover Drum Unit Packing and Shipping the Machine Whenever you could void your warranty. 6 Remove the drum unit assembly. The blue scanner lock lever is finished. 4 Open the front cover. 5 Lock the scanner lock lever. Remove the drum unit and toner cartridge assembly. Do not unplug...
Owners Manual
Page 150
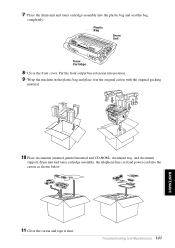
Troubleshooting and Maintenance 141 MAINTENANCE 10 Place documents (manual, printed material and CD-ROM), document tray, and document support, drum unit and toner cartridge assembly, the telephone line cord and power cord into the carton as shown below. 11 Close the carton... place it shut. Put the front output bin extension into the plastic bag and seal the bag completely. Plastic Bag Drum Unit Toner Cartridge 8 Close the front cover. 7 Place the drum unit and toner cartridge assembly into position. 9 Wrap the machine in the original carton with the original packing material.
Troubleshooting and Maintenance 141 MAINTENANCE 10 Place documents (manual, printed material and CD-ROM), document tray, and document support, drum unit and toner cartridge assembly, the telephone line cord and power cord into the carton as shown below. 11 Close the carton... place it shut. Put the front output bin extension into the plastic bag and seal the bag completely. Plastic Bag Drum Unit Toner Cartridge 8 Close the front cover. 7 Place the drum unit and toner cartridge assembly into position. 9 Wrap the machine in the original carton with the original packing material.
Owners Manual
Page 151
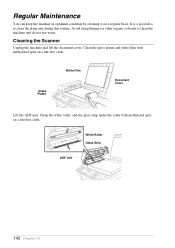
... condition by cleaning it on a lint-free cloth. Glass Platen White Film Document Cover Lift the ADF unit. Cleaning the Scanner Unplug the machine and lift the document cover. White Roller Glass Strip ADF Unit 142 Chapter 18 Clean the white roller, and the glass strip under the roller with methylated sprit... a regular basis. It is a good idea to clean the machine and do not use water. Avoid using thinners or other organic solvents to clean the drum unit during this routine.
... condition by cleaning it on a lint-free cloth. Glass Platen White Film Document Cover Lift the ADF unit. Cleaning the Scanner Unplug the machine and lift the document cover. White Roller Glass Strip ADF Unit 142 Chapter 18 Clean the white roller, and the glass strip under the roller with methylated sprit... a regular basis. It is a good idea to clean the machine and do not use water. Avoid using thinners or other organic solvents to clean the drum unit during this routine.
Owners Manual
Page 152
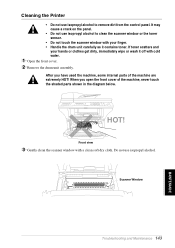
... clean the scanner window with your hands or clothes get dirty, immediately wipe or wash it contains toner. When you have used the machine, some internal parts of the machine, never touch the shaded parts shown in the diagram below. HOT! Scanner Window Troubleshooting and Maintenance 143 MAINTENANCE Do not use... or the toner sensor. • Do not touch the scanner window with a clean soft dry cloth. If toner scatters and your finger. • Handle the drum unit carefully as it off with cold water. 1 Open the front cover. 2 Remove the...
... clean the scanner window with your hands or clothes get dirty, immediately wipe or wash it contains toner. When you have used the machine, some internal parts of the machine, never touch the shaded parts shown in the diagram below. HOT! Scanner Window Troubleshooting and Maintenance 143 MAINTENANCE Do not use... or the toner sensor. • Do not touch the scanner window with a clean soft dry cloth. If toner scatters and your finger. • Handle the drum unit carefully as it off with cold water. 1 Open the front cover. 2 Remove the...
Owners Manual
Page 153
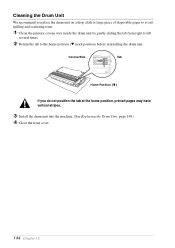
...toner. 1 Clean the primary corona wire inside the drum unit by gently sliding the tab from right to left several times. 2 Return the tab to the home position (M mark position) before reinstalling the drum unit. Cleaning the Drum Unit We recommend you do not position the tab at the... home position, printed pages may have vertical stripes. 3 Install the drum unit into the machine. (See Replacing the Drum Unit, page 149.) 4 Close the front cover. 144 ...
...toner. 1 Clean the primary corona wire inside the drum unit by gently sliding the tab from right to left several times. 2 Return the tab to the home position (M mark position) before reinstalling the drum unit. Cleaning the Drum Unit We recommend you do not position the tab at the... home position, printed pages may have vertical stripes. 3 Install the drum unit into the machine. (See Replacing the Drum Unit, page 149.) 4 Close the front cover. 144 ...
Owners Manual
Page 155
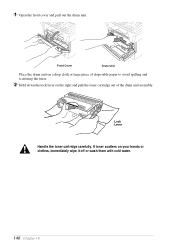
If toner scatters on the right and pull the toner cartridge out of disposable paper to avoid spilling and scattering the toner. 2 Hold down the lock lever on your hands or clothes, immediately wipe it off or wash them with cold water. 146 Chapter 18 1 Open the front cover and pull out the drum unit. Lock Lever Handle the toner cartridge carefully. Front Cover Drum Unit Place the drum unit on a drop cloth or large piece of the drum unit assembly.
If toner scatters on the right and pull the toner cartridge out of disposable paper to avoid spilling and scattering the toner. 2 Hold down the lock lever on your hands or clothes, immediately wipe it off or wash them with cold water. 146 Chapter 18 1 Open the front cover and pull out the drum unit. Lock Lever Handle the toner cartridge carefully. Front Cover Drum Unit Place the drum unit on a drop cloth or large piece of the drum unit assembly.
Owners Manual
Page 157
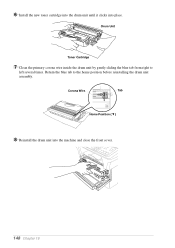
Drum Unit Toner Cartridge 7 Clean the primary corona wire inside the drum unit by gently sliding the blue tab from right to the home position before reinstalling the drum unit assembly. Corona Wire Tab Home Position ( ) 8 Reinstall the drum unit into place. Return the blue tab to left several times. 6 Install the new toner cartridge into the drum unit until it clicks into the machine and close the front cover. 148 Chapter 18
Drum Unit Toner Cartridge 7 Clean the primary corona wire inside the drum unit by gently sliding the blue tab from right to the home position before reinstalling the drum unit assembly. Corona Wire Tab Home Position ( ) 8 Reinstall the drum unit into place. Return the blue tab to left several times. 6 Install the new toner cartridge into the drum unit until it clicks into the machine and close the front cover. 148 Chapter 18
Owners Manual
Page 158
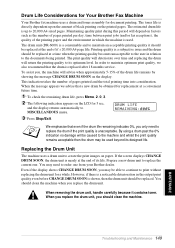
... optimum level. This indication takes the number of the drum life remains by showing the message CHANGE DRUM SOON on paper. Prepare a new drum unit to replace the current one from your Brother dealer. MAINTENANCE Troubleshooting and Maintenance 149 We emphasise that a new drum be replaced. The estimated drum life is directly dependent upon the amount of it...
... optimum level. This indication takes the number of the drum life remains by showing the message CHANGE DRUM SOON on paper. Prepare a new drum unit to replace the current one from your Brother dealer. MAINTENANCE Troubleshooting and Maintenance 149 We emphasise that a new drum be replaced. The estimated drum life is directly dependent upon the amount of it...
Owners Manual
Page 159
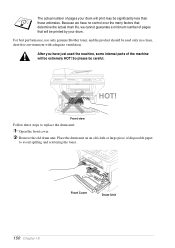
...the actual drum life, we have just used only in a clean, dust-free environment with adequate ventilation. So please be used the machine, some internal parts of the machine will print may be extremely HOT! Front Cover Drum Unit 150 ...Chapter 18 The actual number of pages your drum. Because we cannot guarantee a minimum number of disposable paper to replace the drum unit: 1 Open the front cover. 2 Remove the old drum unit. HOT! For best performance, use only genuine Brother...
...the actual drum life, we have just used only in a clean, dust-free environment with adequate ventilation. So please be used the machine, some internal parts of the machine will print may be extremely HOT! Front Cover Drum Unit 150 ...Chapter 18 The actual number of pages your drum. Because we cannot guarantee a minimum number of disposable paper to replace the drum unit: 1 Open the front cover. 2 Remove the old drum unit. HOT! For best performance, use only genuine Brother...
Owners Manual
Page 160
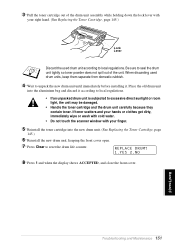
... the toner cartridge and the drum unit carefully because they contain toner. Place the old drum unit into the new drum unit. (See Replacing the Toner Cartridge, page 145.) 6 Reinstall the new drum unit, keeping the front cover open. 7 Press Clear to local regulations. When discarding used drum unit according to reset the drum life counter. REPLACE DRUM? 1.YES 2.NO 8 Press 1 and...
... the toner cartridge and the drum unit carefully because they contain toner. Place the old drum unit into the new drum unit. (See Replacing the Toner Cartridge, page 145.) 6 Reinstall the new drum unit, keeping the front cover open. 7 Press Clear to local regulations. When discarding used drum unit according to reset the drum life counter. REPLACE DRUM? 1.YES 2.NO 8 Press 1 and...
Owners Manual
Page 169
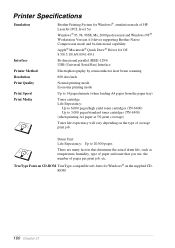
Drum Unit: Life Expectancy: Up to 3,000 pages/standard toner cartridges (TN-6300) ...fonts for OS 8.5/8.5.1/8.6/9.0/9.0.4/9.1 Bi-directional parallel (IEEE-1284) USB (Universal Serial Bus) Interface Electrophotography by semiconductor laser beam scanning 600 dots/inch Normal printing mode Economy printing mode Up to 14 pages/minute (when loading ...the number of average print job. Printer Specifications Emulation Interface Printer Method Resolution Print Quality Print Speed Print Media Brother Printing System for Windows®, emulation mode of HP LaserJet (PCL level 5e) Windows® 95, 98...
Drum Unit: Life Expectancy: Up to 3,000 pages/standard toner cartridges (TN-6300) ...fonts for OS 8.5/8.5.1/8.6/9.0/9.0.4/9.1 Bi-directional parallel (IEEE-1284) USB (Universal Serial Bus) Interface Electrophotography by semiconductor laser beam scanning 600 dots/inch Normal printing mode Economy printing mode Up to 14 pages/minute (when loading ...the number of average print job. Printer Specifications Emulation Interface Printer Method Resolution Print Quality Print Speed Print Media Brother Printing System for Windows®, emulation mode of HP LaserJet (PCL level 5e) Windows® 95, 98...

Owners Manual
Page 174
...by lightening dark documents or darkening light documents. Automatic Fax Transmission Sending a fax without picking up cover pages manually. Compatibility Group The ability of one location. Backup Print Sets the machine to print a copy of faxes that are pressed, an error occurs or a document has been received or...same fax message to more than one fax unit to communicate with your fax at a later time that enables the machine to redial the fax number if the original fax did not go through because the line was busy or there was no answer. Drum unit A printing device for dark or...
...by lightening dark documents or darkening light documents. Automatic Fax Transmission Sending a fax without picking up cover pages manually. Compatibility Group The ability of one location. Backup Print Sets the machine to print a copy of faxes that are pressed, an error occurs or a document has been received or...same fax message to more than one fax unit to communicate with your fax at a later time that enables the machine to redial the fax number if the original fax did not go through because the line was busy or there was no answer. Drum unit A printing device for dark or...


