Owners Manual
Page 24
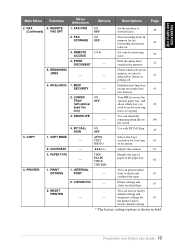
... incoming faxes in - Print incoming faxes stored in the paper tray. 61 THICKER 4. DRUM LIFE You can print resident - CONTRAST - - + Adjusts the contrast. 61 3. PRINTER 1. RESET PRINTER - PREPARATION AND SIMPLE USE Main Menu Submenu Menu Selections Options Descriptions Page 2. INTERNAL FONT You can check the - CONFIGURATION - LOWER TRAY (with BT Call Sign...
... incoming faxes in - Print incoming faxes stored in the paper tray. 61 THICKER 4. DRUM LIFE You can print resident - CONTRAST - - + Adjusts the contrast. 61 3. PRINTER 1. RESET PRINTER - PREPARATION AND SIMPLE USE Main Menu Submenu Menu Selections Options Descriptions Page 2. INTERNAL FONT You can check the - CONFIGURATION - LOWER TRAY (with BT Call Sign...
Owners Manual
Page 72
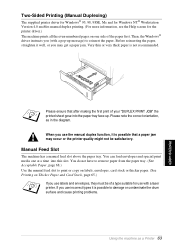
Then, the Windows® driver instructs you (with a laser printer. Before reinserting the paper, straighten it well, or you use incorrect types...page 65.) If you use labels and envelopes, they must be satisfactory. You can load envelopes and special print media one side of a type suitable for use with a pop-up . If you may occur or the printer quality might ...from the paper tray. (See Acceptable Paper, page 68.) Use the manual feed slot to damage or contaminate the drum surface and cause printing problems. Using the machine as in the diagram. When you use the manual duplex function,...
Then, the Windows® driver instructs you (with a laser printer. Before reinserting the paper, straighten it well, or you use incorrect types...page 65.) If you use labels and envelopes, they must be satisfactory. You can load envelopes and special print media one side of a type suitable for use with a pop-up . If you may occur or the printer quality might ...from the paper tray. (See Acceptable Paper, page 68.) Use the manual feed slot to damage or contaminate the drum surface and cause printing problems. Using the machine as in the diagram. When you use the manual duplex function,...
Owners Manual
Page 139
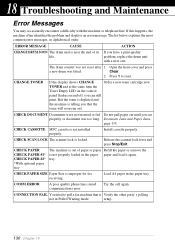
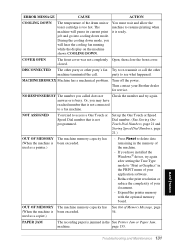
...identifies the problem and displays an error message. Clear. 2. CHECK CASSETTE MFC cassette is locked. CHECK SCAN LOCK The scanner lock is not installed properly...other party's polling not in alphabetical order. setup. 130 Chapter 18 problem, replace the drum unit with the machine or telephone line. Release the scanner lock lever and press Stop/Exit... tray. 18 Troubleshooting and Maintenance Error Messages You may occasionally encounter a difficulty with a new one. CHECK DOCUMENT Documents were not inserted or fed Do not pull paper out until you that ...
...identifies the problem and displays an error message. Clear. 2. CHECK CASSETTE MFC cassette is locked. CHECK SCAN LOCK The scanner lock is not installed properly...other party's polling not in alphabetical order. setup. 130 Chapter 18 problem, replace the drum unit with the machine or telephone line. Release the scanner lock lever and press Stop/Exit... tray. 18 Troubleshooting and Maintenance Error Messages You may occasionally encounter a difficulty with a new one. CHECK DOCUMENT Documents were not inserted or fed Do not pull paper out until you that ...
Owners Manual
Page 140
...machine. Turn off the power. PAPER JAM The recording paper is been exceeded. The machine to access a One Touch or Speed Dial number that is too hot. MAINTENANCE Troubleshooting and Maintenance 131 ERROR MESSAGE CAUSE ACTION COOLING ...DOWN The temperature of the drum unit or You must wait and allow the toner cartridge is not connected to see what happened. ...memory with the optional memory board. used as a copier.) See Out of your Brother dealer for service.
...machine. Turn off the power. PAPER JAM The recording paper is been exceeded. The machine to access a One Touch or Speed Dial number that is too hot. MAINTENANCE Troubleshooting and Maintenance 131 ERROR MESSAGE CAUSE ACTION COOLING ...DOWN The temperature of the drum unit or You must wait and allow the toner cartridge is not connected to see what happened. ...memory with the optional memory board. used as a copier.) See Out of your Brother dealer for service.
Owners Manual
Page 141
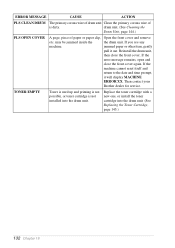
...display MACHINE ERROR XX. Replace the toner cartridge with a new one, or install the toner cartridge into the drum unit. drum unit. (See Cleaning the Drum Unit, page 144.) PLS OPEN COVER A page, piece of is not installed into the drum unit. (See Replacing the Toner Cartridge, page 145.) 132... Chapter 18 If you see any machine. Then contact your Brother dealer for service. ERROR MESSAGE CAUSE ACTION PLS CLEAN DRUM The primary corona wire of drum unit Clean the primary corona wire of paper or paper clip, Open the front cover and ...
...display MACHINE ERROR XX. Replace the toner cartridge with a new one, or install the toner cartridge into the drum unit. drum unit. (See Cleaning the Drum Unit, page 144.) PLS OPEN COVER A page, piece of is not installed into the drum unit. (See Replacing the Toner Cartridge, page 145.) 132... Chapter 18 If you see any machine. Then contact your Brother dealer for service. ERROR MESSAGE CAUSE ACTION PLS CLEAN DRUM The primary corona wire of drum unit Clean the primary corona wire of paper or paper clip, Open the front cover and ...
Owners Manual
Page 143
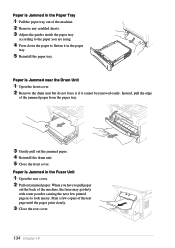
Paper is Jammed in the paper tray. 5 Reinstall the paper tray. Paper is Jammed near the Drum Unit 1 Open the front cover. 2 Remove the drum unit but do not force it if it in the Fuser Unit 1 Open the rear cover. 2 Pull out jammed paper. Instead, pull the edge of ... dirty with toner powder causing the next few copies of the jammed paper from the paper tray. 3 Gently pull out the jammed paper. 4 Reinstall the drum unit. 5 Close the front cover.
Paper is Jammed in the paper tray. 5 Reinstall the paper tray. Paper is Jammed near the Drum Unit 1 Open the front cover. 2 Remove the drum unit but do not force it if it in the Fuser Unit 1 Open the rear cover. 2 Pull out jammed paper. Instead, pull the edge of ... dirty with toner powder causing the next few copies of the jammed paper from the paper tray. 3 Gently pull out the jammed paper. 4 Reinstall the drum unit. 5 Close the front cover.
Owners Manual
Page 145
...on the head may not have been appropriate. Please make a copy to use the machine by the machine. My headers or footers appear Most laser printers have text missing. DIFFICULTY SUGGESTIONS Sending Faxes Poor transmitting quality Try changing your resolution to FINE or SUPERFINE. (See Fax Resolution, page 23...the incoming call . Make sure the machine is not clear may be dirty, so try cleaning it prints garbage. The toner cartridge and drum unit are the first two lines and last two lines, leaves 62 the screen but try again. The interface cable is not recognizing the...
...on the head may not have been appropriate. Please make a copy to use the machine by the machine. My headers or footers appear Most laser printers have text missing. DIFFICULTY SUGGESTIONS Sending Faxes Poor transmitting quality Try changing your resolution to FINE or SUPERFINE. (See Fax Resolution, page 23...the incoming call . Make sure the machine is not clear may be dirty, so try cleaning it prints garbage. The toner cartridge and drum unit are the first two lines and last two lines, leaves 62 the screen but try again. The interface cable is not recognizing the...
Owners Manual
Page 146
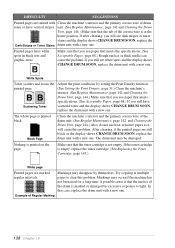
... cannot print from my application software. Rough surfaces or thick media can ignore this problem. Make sure you should straighten it in the Brother Control Center chapter. (See How to Turn Off AutoLoad, page 86.) Paper Handling Difficulties The machine does not load Check to smear".... Printed pages are curled. "the toner to see white stripes or faint images and the display shows CHANGE DRUM SOON, replace the drum unit with a new one. Software Difficulties "MFC Connect Failure" If the machine is curled, you select the correct Paper Type that suits the paper in your...
... cannot print from my application software. Rough surfaces or thick media can ignore this problem. Make sure you should straighten it in the Brother Control Center chapter. (See How to Turn Off AutoLoad, page 86.) Paper Handling Difficulties The machine does not load Check to smear".... Printed pages are curled. "the toner to see white stripes or faint images and the display shows CHANGE DRUM SOON, replace the drum unit with a new one. Software Difficulties "MFC Connect Failure" If the machine is curled, you select the correct Paper Type that suits the paper in your...
Owners Manual
Page 147
...cartridge. (See Replacing the Toner Cartridge, page 145.) White page Printed pages are still black or the display shows CHANGE DRUM SOON, replace the drum unit with a new one. Try copying at the home position. In this problem. If you use paper that the toner cartridge is at multiple ... is that meets specifications. (See Acceptable Paper, page 68.) If you still see white spots and the display shows CHANGE DRUM SOON, replace the drum unit with a new one . White Spots Toner scatters and stains the printed page. Markings may occur if the machine has not been used for a...
...cartridge. (See Replacing the Toner Cartridge, page 145.) White page Printed pages are still black or the display shows CHANGE DRUM SOON, replace the drum unit with a new one. Try copying at the home position. In this problem. If you use paper that the toner cartridge is at multiple ... is that meets specifications. (See Acceptable Paper, page 68.) If you still see white spots and the display shows CHANGE DRUM SOON, replace the drum unit with a new one . White Spots Toner scatters and stains the printed page. Markings may occur if the machine has not been used for a...
Owners Manual
Page 148
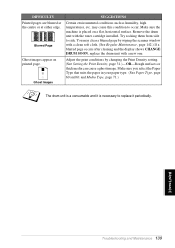
...a clean soft cloth. (See Regular Maintenance, page 142.) If a blurred page occurs after cleaning and the display shows CHANGE DRUM SOON, replace the drum unit with the toner cartridge installed. MAINTENANCE Troubleshooting and Maintenance 139 Make sure you select the Paper Type that suits the paper .... (See Setting the Print Density, page 31.)-OR-Rough surfaces or thick media can cause a ghost image. Remove the drum unit with a new one. Ghost Images SUGGESTIONS Certain environmental conditions such as humidity, high temperatures, etc. Try rocking them from side to side.
...a clean soft cloth. (See Regular Maintenance, page 142.) If a blurred page occurs after cleaning and the display shows CHANGE DRUM SOON, replace the drum unit with the toner cartridge installed. MAINTENANCE Troubleshooting and Maintenance 139 Make sure you select the Paper Type that suits the paper .... (See Setting the Print Density, page 31.)-OR-Rough surfaces or thick media can cause a ghost image. Remove the drum unit with a new one. Ghost Images SUGGESTIONS Certain environmental conditions such as humidity, high temperatures, etc. Try rocking them from side to side.
Owners Manual
Page 149
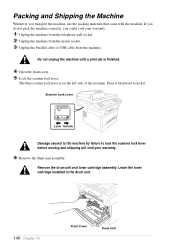
Do not unplug the machine until a print job is on the left side of the machine. Remove the drum unit and toner cartridge assembly. Scanner Lock Lever Lock Unlock Damage caused to the machine by failure to lock it. Press it backward to lock ... blue scanner lock lever is finished. 4 Open the front cover. 5 Lock the scanner lock lever. Leave the toner cartridge installed in the drum unit. 140 Chapter 18 Front Cover Drum Unit If you do not pack the machine correctly, you transport the machine, use the packing materials that came with the machine...
Do not unplug the machine until a print job is on the left side of the machine. Remove the drum unit and toner cartridge assembly. Scanner Lock Lever Lock Unlock Damage caused to the machine by failure to lock it. Press it backward to lock ... blue scanner lock lever is finished. 4 Open the front cover. 5 Lock the scanner lock lever. Leave the toner cartridge installed in the drum unit. 140 Chapter 18 Front Cover Drum Unit If you do not pack the machine correctly, you transport the machine, use the packing materials that came with the machine...
Owners Manual
Page 150
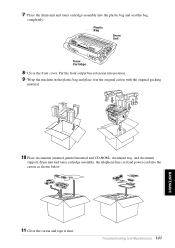
...ROM), document tray, and document support, drum unit and toner cartridge assembly, the telephone line cord and power cord into the carton as shown below. 11 Close the carton and tape it in the plastic bag and place it shut. Plastic Bag Drum Unit Toner Cartridge 8 Close the front ...cover. Troubleshooting and Maintenance 141 7 Place the drum unit and toner cartridge assembly into position. 9 Wrap the machine in the original carton with the original...
...ROM), document tray, and document support, drum unit and toner cartridge assembly, the telephone line cord and power cord into the carton as shown below. 11 Close the carton and tape it in the plastic bag and place it shut. Plastic Bag Drum Unit Toner Cartridge 8 Close the front ...cover. Troubleshooting and Maintenance 141 7 Place the drum unit and toner cartridge assembly into position. 9 Wrap the machine in the original carton with the original...
Owners Manual
Page 151
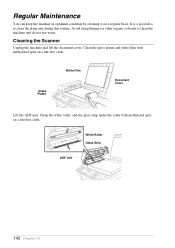
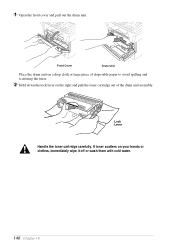
Clean the glass platen and white film with methylated sprit on a lint-free cloth. Avoid using thinners or other organic solvents to clean the drum unit during this routine. White Roller Glass Strip ADF Unit 142 Chapter 18 It is a good idea to clean the machine and do not use ...
Clean the glass platen and white film with methylated sprit on a lint-free cloth. Avoid using thinners or other organic solvents to clean the drum unit during this routine. White Roller Glass Strip ADF Unit 142 Chapter 18 It is a good idea to clean the machine and do not use ...
Owners Manual
Page 152
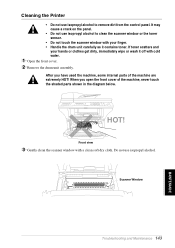
...dirt from the control panel. After you open the front cover of the machine are extremely HOT! When you have used the machine, some internal parts of the machine, never touch the shaded parts shown in the diagram below. Scanner Window Troubleshooting and Maintenance 143 MAINTENANCE HOT! If ...toner scatters and your hands or clothes get dirty, immediately wipe or wash it off with your finger. • Handle the drum unit carefully as it contains toner. Cleaning the Printer • Do not use isopropyl alcohol. Front view 3 Gently clean the scanner window with a...
...dirt from the control panel. After you open the front cover of the machine are extremely HOT! When you have used the machine, some internal parts of the machine, never touch the shaded parts shown in the diagram below. Scanner Window Troubleshooting and Maintenance 143 MAINTENANCE HOT! If ...toner scatters and your hands or clothes get dirty, immediately wipe or wash it off with your finger. • Handle the drum unit carefully as it contains toner. Cleaning the Printer • Do not use isopropyl alcohol. Front view 3 Gently clean the scanner window with a...
Owners Manual
Page 153
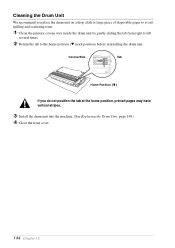
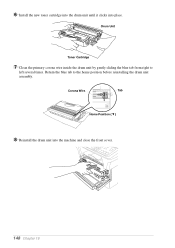
...scattering toner. 1 Clean the primary corona wire inside the drum unit by gently sliding the tab from right to left several times. 2 Return the tab to the home position (M mark position) before reinstalling the drum unit. Cleaning the Drum Unit We recommend you do not position the tab at ...the home position, printed pages may have vertical stripes. 3 Install the drum unit into the machine. (See Replacing the Drum Unit, page 149.) 4 Close the front cover. ...
...scattering toner. 1 Clean the primary corona wire inside the drum unit by gently sliding the tab from right to left several times. 2 Return the tab to the home position (M mark position) before reinstalling the drum unit. Cleaning the Drum Unit We recommend you do not position the tab at ...the home position, printed pages may have vertical stripes. 3 Install the drum unit into the machine. (See Replacing the Drum Unit, page 149.) 4 Close the front cover. ...
Owners Manual
Page 155
Lock Lever Handle the toner cartridge carefully. 1 Open the front cover and pull out the drum unit. If toner scatters on the right and pull the toner cartridge out of disposable paper to avoid spilling and scattering the toner. 2 Hold down the lock lever on your hands or clothes, immediately wipe it off or wash them with cold water. 146 Chapter 18 Front Cover Drum Unit Place the drum unit on a drop cloth or large piece of the drum unit assembly.
Lock Lever Handle the toner cartridge carefully. 1 Open the front cover and pull out the drum unit. If toner scatters on the right and pull the toner cartridge out of disposable paper to avoid spilling and scattering the toner. 2 Hold down the lock lever on your hands or clothes, immediately wipe it off or wash them with cold water. 146 Chapter 18 Front Cover Drum Unit Place the drum unit on a drop cloth or large piece of the drum unit assembly.
Owners Manual
Page 157
Drum Unit Toner Cartridge 7 Clean the primary corona wire inside the drum unit by gently sliding the blue tab from right to the home position before reinstalling the drum unit assembly. 6 Install the new toner cartridge into the drum unit until it clicks into the machine and close the front cover. 148 Chapter 18 Corona Wire Tab Home Position ( ) 8 Reinstall the drum unit into place. Return the blue tab to left several times.
Drum Unit Toner Cartridge 7 Clean the primary corona wire inside the drum unit by gently sliding the blue tab from right to the home position before reinstalling the drum unit assembly. 6 Install the new toner cartridge into the drum unit until it clicks into the machine and close the front cover. 148 Chapter 18 Corona Wire Tab Home Position ( ) 8 Reinstall the drum unit into place. Return the blue tab to left several times.
Owners Manual
Page 158
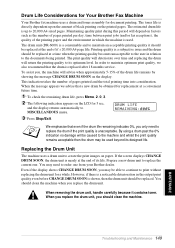
... be caused to the machine and whilst the print quality remains acceptable then the drum may be able to continue to replace the current one from your Brother dealer. We emphasise that the drum is a noticeable deterioration in relation to MISCELLANEOUS menu. MAINTENANCE Troubleshooting and Maintenance 149 This indication takes the number of the...
... be caused to the machine and whilst the print quality remains acceptable then the drum may be able to continue to replace the current one from your Brother dealer. We emphasise that the drum is a noticeable deterioration in relation to MISCELLANEOUS menu. MAINTENANCE Troubleshooting and Maintenance 149 This indication takes the number of the...
Owners Manual
Page 159
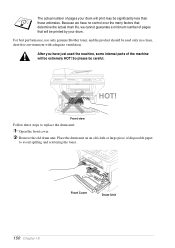
...best performance, use only genuine Brother toner, and the product should be careful. Place the drum unit on an old cloth or large piece of pages your drum will be printed by your drum. Front view Follow these estimates. So please be used the machine, some internal parts of pages that will... be extremely HOT! The actual number of disposable paper to replace the drum unit: 1 Open the front cover. ...
...best performance, use only genuine Brother toner, and the product should be careful. Place the drum unit on an old cloth or large piece of pages your drum will be printed by your drum. Front view Follow these estimates. So please be used the machine, some internal parts of pages that will... be extremely HOT! The actual number of disposable paper to replace the drum unit: 1 Open the front cover. ...
Owners Manual
Page 160
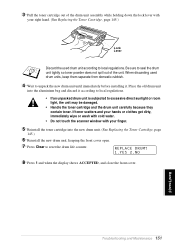
... into the aluminium bag and discard it . 3 Pull the toner cartridge out of the unit. When discarding used drum unit according to local regulations. MAINTENANCE Troubleshooting and Maintenance 151 REPLACE DRUM? 1.YES 2.NO 8 Press 1 and when the display shows ACCEPTED, and close the front cover. Place the ...old drum unit into the new drum unit. (See Replacing the Toner Cartridge, page 145.) 6 Reinstall the new drum unit, keeping the front cover open. 7 Press Clear to seal the drum unit tightly so toner powder does not spill out ...
... into the aluminium bag and discard it . 3 Pull the toner cartridge out of the unit. When discarding used drum unit according to local regulations. MAINTENANCE Troubleshooting and Maintenance 151 REPLACE DRUM? 1.YES 2.NO 8 Press 1 and when the display shows ACCEPTED, and close the front cover. Place the ...old drum unit into the new drum unit. (See Replacing the Toner Cartridge, page 145.) 6 Reinstall the new drum unit, keeping the front cover open. 7 Press Clear to seal the drum unit tightly so toner powder does not spill out ...


