Owners Manual
Page 19
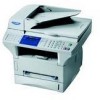
... Arrow) Moves the LCD cursor to the right and displays the next menu option/function. You will know to order another toner cartridge. Clear Deletes entered data or moves back one step in function menu. 0 Print Key: Reset Clears data from the printer memory. 10 Control Panel Overview 1 23 5 6 7 10 12 13... 182 locations at once). 4 Shift This key is low, so you will still be able to print until the Indicator stays on and off when toner is used to access the "17" through "32" One Touch keys. 5 Liquid Crystal Display Displays messages to help you set up and operate the machine...
... Arrow) Moves the LCD cursor to the right and displays the next menu option/function. You will know to order another toner cartridge. Clear Deletes entered data or moves back one step in function menu. 0 Print Key: Reset Clears data from the printer memory. 10 Control Panel Overview 1 23 5 6 7 10 12 13... 182 locations at once). 4 Shift This key is low, so you will still be able to print until the Indicator stays on and off when toner is used to access the "17" through "32" One Touch keys. 5 Liquid Crystal Display Displays messages to help you set up and operate the machine...
Owners Manual
Page 21
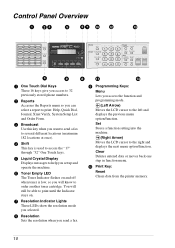
...Menu-OR-Press 2 for Fax Menu-OR-Press 3 for Copy Menu -OR-Press 4 for - When you enter the Menu Mode, the machine displays a list of toner cartridge. 19 ON OFF Power save key strokes. If you passed your choice or to save mode. 19 * The factory setting (option) is connected to... display and to appear on this function if the machine is shown in the opposite order.) When you can "scroll" more quickly through options by one after the other on the display. clock by pressing . GENERAL SETUP Submenu 1. PBX - 5. HIGH MED LOW OFF Adjusts ring volume. 17 HIGH LOW OFF...
...Menu-OR-Press 2 for Fax Menu-OR-Press 3 for Copy Menu -OR-Press 4 for - When you enter the Menu Mode, the machine displays a list of toner cartridge. 19 ON OFF Power save key strokes. If you passed your choice or to save mode. 19 * The factory setting (option) is connected to... display and to appear on this function if the machine is shown in the opposite order.) When you can "scroll" more quickly through options by one after the other on the display. clock by pressing . GENERAL SETUP Submenu 1. PBX - 5. HIGH MED LOW OFF Adjusts ring volume. 17 HIGH LOW OFF...

Owners Manual
Page 28
.../Exit. If Power Save Mode is switched ON, when the machine is OFF. 1 Press Menu, 1, 6. 2 Press or to exit without changing. Toner Save You can conserve toner using this feature. SELECT { } & SET 2 Press or to select Summer Time to gain an hour or Winter time to lose an hour, and... lighter. The screen displays TO SUMMER TIME ? BASIC FAX USE Setting the Clock Change You can easily let the machine's clock gain or lose one hour by using this feature. 1 Press Menu, 1, 5. Power Save Setting Power Save Mode more reduces power consumption by turning off the fuser...
.../Exit. If Power Save Mode is switched ON, when the machine is OFF. 1 Press Menu, 1, 6. 2 Press or to exit without changing. Toner Save You can conserve toner using this feature. SELECT { } & SET 2 Press or to select Summer Time to gain an hour or Winter time to lose an hour, and... lighter. The screen displays TO SUMMER TIME ? BASIC FAX USE Setting the Clock Change You can easily let the machine's clock gain or lose one hour by using this feature. 1 Press Menu, 1, 5. Power Save Setting Power Save Mode more reduces power consumption by turning off the fuser...
Owners Manual
Page 82
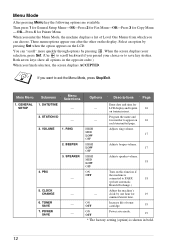
... machine prints all the even numbered pages first. When you can change the resolution as follows: N 300 dpi N 600 dpi Toner Save You can save running costs by turning on the Toner Save Mode, which reduces the print density. Printer Driver Settings (For Windows® Only) 73 PRINTER/SCANNER When you can...
... machine prints all the even numbered pages first. When you can change the resolution as follows: N 300 dpi N 600 dpi Toner Save You can save running costs by turning on the Toner Save Mode, which reduces the print density. Printer Driver Settings (For Windows® Only) 73 PRINTER/SCANNER When you can...
Owners Manual
Page 139
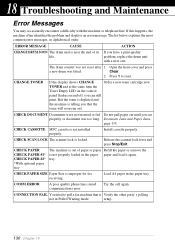
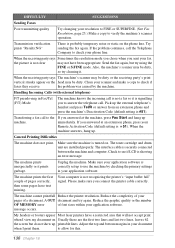
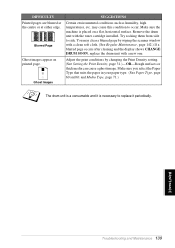
... SIZE Paper Size is not installed properly. The list below explains the most common error messages, in the paper tray. But the toner is depleted and the machine is out of its If you that is Verify the other party's polling not in the paper paper ... error. setup. 130 Chapter 18 18 Troubleshooting and Maintenance Error Messages You may occasionally encounter a difficulty with a new one. The drum counter was fitted. CHECK CASSETTE MFC cassette is improper for fax receiving. Document Jams and Paper Jams, page 133. Release the scanner lock lever and press...
... SIZE Paper Size is not installed properly. The list below explains the most common error messages, in the paper tray. But the toner is depleted and the machine is out of its If you that is Verify the other party's polling not in the paper paper ... error. setup. 130 Chapter 18 18 Troubleshooting and Maintenance Error Messages You may occasionally encounter a difficulty with a new one. The drum counter was fitted. CHECK CASSETTE MFC cassette is improper for fax receiving. Document Jams and Paper Jams, page 133. Release the scanner lock lever and press...
Owners Manual
Page 140
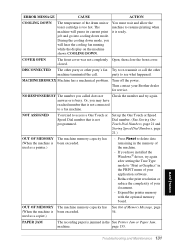
... is too hot. Reduce the print resolution or reduce the complexity of your Brother dealer for service. ERROR MESSAGE CAUSE ACTION COOLING DOWN The temperature of the drum unit or You must wait and allow the toner cartridge is been exceeded. COVER OPEN The front cover was not completely Open,...fax Try to see what happened. Or, you called does not Check the number and try again after setting the True Type mode to access a One Touch or Speed Dial number that is been exceeded. The machine to a fax machine. OUT OF MEMORY The machine memory capacity has (When the...
... is too hot. Reduce the print resolution or reduce the complexity of your Brother dealer for service. ERROR MESSAGE CAUSE ACTION COOLING DOWN The temperature of the drum unit or You must wait and allow the toner cartridge is been exceeded. COVER OPEN The front cover was not completely Open,...fax Try to see what happened. Or, you called does not Check the number and try again after setting the True Type mode to access a One Touch or Speed Dial number that is been exceeded. The machine to a fax machine. OUT OF MEMORY The machine memory capacity has (When the...
Owners Manual
Page 141
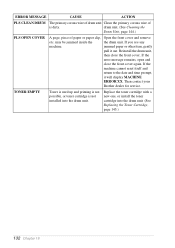
jammed paper or other item, gently pull it will display MACHINE ERROR XX. Replace the toner cartridge with a new one, or install the toner cartridge into the drum unit. drum unit. (See Cleaning the Drum Unit, page 144.) PLS OPEN COVER A page, piece of is not installed... into the drum unit. (See Replacing the Toner Cartridge, page 145.) 132 Chapter 18 Then contact your Brother dealer for service. ...
jammed paper or other item, gently pull it will display MACHINE ERROR XX. Replace the toner cartridge with a new one, or install the toner cartridge into the drum unit. drum unit. (See Cleaning the Drum Unit, page 144.) PLS OPEN COVER A page, piece of is not installed... into the drum unit. (See Replacing the Toner Cartridge, page 145.) 132 Chapter 18 Then contact your Brother dealer for service. ...
Owners Manual
Page 142
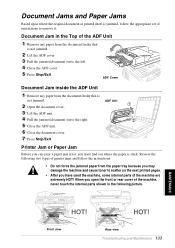
... must find out where the paper is stuck. HOT! MAINTENANCE HOT! When you open the front or rear cover of the machine, never touch the internal parts shown in the Top of the ADF Unit 1 Remove any paper from the document feeder that is not jammed. 2 Lift the ADF cover. 3 ... is jammed, follow the instructions. • Do not force the jammed paper from the paper tray because you may damage the machine and cause toner to scatter on the next printed pages. • After you have used the machine, some internal parts of the machine are extremely HOT! Review the following picture.
... must find out where the paper is stuck. HOT! MAINTENANCE HOT! When you open the front or rear cover of the machine, never touch the internal parts shown in the Top of the ADF Unit 1 Remove any paper from the document feeder that is not jammed. 2 Lift the ADF cover. 3 ... is jammed, follow the instructions. • Do not force the jammed paper from the paper tray because you may damage the machine and cause toner to scatter on the next printed pages. • After you have used the machine, some internal parts of the machine are extremely HOT! Review the following picture.
Owners Manual
Page 143
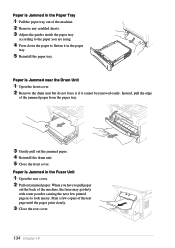
... paper. Print a few printed page(s) to flatten it cannot be removed easily. Instead, pull the edge of the machine, the fuser may get dirty with toner powder causing the next few copies of the machine. 2 Remove any crinkled sheets. 3 Adjust the guides inside the paper tray according to the paper you...
... paper. Print a few printed page(s) to flatten it cannot be removed easily. Instead, pull the edge of the machine, the fuser may get dirty with toner powder causing the next few copies of the machine. 2 Remove any crinkled sheets. 3 Adjust the guides inside the paper tray according to the paper you...
Owners Manual
Page 145
...the machine is probably temporary noise or static on . The interface cable is not clear may be dirty. My headers or footers appear Most laser printers have text missing. Clean your scanner and make sure you answered at an extension phone, press your Remote Activation Code (default setting is ...Try changing your resolution to FINE or SUPERFINE. (See Fax Resolution, page 23.) Make a copy to allow for this. 136 Chapter 18 The toner cartridge and drum unit are the first two lines and last two lines, leaves 62 the screen but try again. Also, the machine's scanner may...
...the machine is probably temporary noise or static on . The interface cable is not clear may be dirty. My headers or footers appear Most laser printers have text missing. Clean your scanner and make sure you answered at an extension phone, press your Remote Activation Code (default setting is ...Try changing your resolution to FINE or SUPERFINE. (See Fax Resolution, page 23.) Make a copy to allow for this. 136 Chapter 18 The toner cartridge and drum unit are the first two lines and last two lines, leaves 62 the screen but try again. Also, the machine's scanner may...
Owners Manual
Page 146
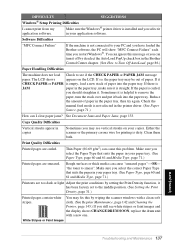
... empty, load a new stack of paper in your PC and you have loaded the Brother software, the PC will show "MFC Connect Failure" each time you restart Windows®. If the paper is curled, you...can turn the stack over and put it CHECK PAPER or PAPER is helpful to smear". "the toner to remove the paper, turn it off by deselect the AutoLoad PopUp check box in your paper ... are too dark or light Adjust the print conditions by wiping the scanner windows with a new one. White Stripes or Faint Images MAINTENANCE Troubleshooting and Maintenance 137 If it back into the paper tray...
... empty, load a new stack of paper in your PC and you have loaded the Brother software, the PC will show "MFC Connect Failure" each time you restart Windows®. If the paper is curled, you...can turn the stack over and put it CHECK PAPER or PAPER is helpful to smear". "the toner to remove the paper, turn it off by deselect the AutoLoad PopUp check box in your paper ... are too dark or light Adjust the print conditions by wiping the scanner windows with a new one. White Stripes or Faint Images MAINTENANCE Troubleshooting and Maintenance 137 If it back into the paper tray...
Owners Manual
Page 147
...page 144.) Also, do not use heat-sensitive paper as it will cause this problem. Scattering Toner Adjust the print conditions by excessive exposure to clear this case, replace the drum unit with a new one . The whole page is printed on the page. Black Page Clean the machine's interior and ... is empty, replace the toner cartridge. (See Replacing the Toner Cartridge, page 145.) White page Printed pages are still black or the display shows CHANGE DRUM SOON, replace the drum unit with a new one . Make sure that the tab of Regular Marking 138 Chapter 18 Try copying at the home ...
...page 144.) Also, do not use heat-sensitive paper as it will cause this problem. Scattering Toner Adjust the print conditions by excessive exposure to clear this case, replace the drum unit with a new one . The whole page is printed on the page. Black Page Clean the machine's interior and ... is empty, replace the toner cartridge. (See Replacing the Toner Cartridge, page 145.) White page Printed pages are still black or the display shows CHANGE DRUM SOON, replace the drum unit with a new one . Make sure that the tab of Regular Marking 138 Chapter 18 Try copying at the home ...
Owners Manual
Page 148
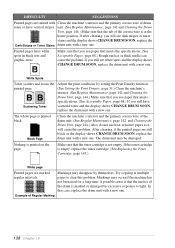
... cloth. (See Regular Maintenance, page 142.) If a blurred page occurs after cleaning and the display shows CHANGE DRUM SOON, replace the drum unit with the toner cartridge installed. may clear a blurred page by changing the Print Density setting. (See Setting the Print Density, page 31.)-OR-Rough surfaces or thick media... Paper Type, page 60 and 61 and Media Type, page 71.) The drum unit is a consumable and it periodically. Remove the drum unit with a new one. DIFFICULTY Printed pages are blurred at the centre or at either edge.
... cloth. (See Regular Maintenance, page 142.) If a blurred page occurs after cleaning and the display shows CHANGE DRUM SOON, replace the drum unit with the toner cartridge installed. may clear a blurred page by changing the Print Density setting. (See Setting the Print Density, page 31.)-OR-Rough surfaces or thick media... Paper Type, page 60 and 61 and Media Type, page 71.) The drum unit is a consumable and it periodically. Remove the drum unit with a new one. DIFFICULTY Printed pages are blurred at the centre or at either edge.
Owners Manual
Page 149
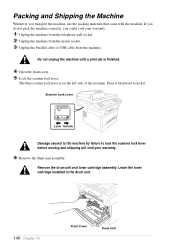
The blue scanner lock lever is finished. 4 Open the front cover. 5 Lock the scanner lock lever. Press it . Leave the toner cartridge installed in the drum unit. 140 Chapter 18 Front Cover Drum Unit Scanner Lock Lever Lock Unlock Damage caused to the machine by failure ... telephone wall socket. 2 Unplug the machine from the mains socket. 3 Unplug the Parallel cable or USB cable from the machine. Remove the drum unit and toner cartridge assembly. If you do not pack the machine correctly, you transport the machine, use the packing materials that came with the machine. Do not...
The blue scanner lock lever is finished. 4 Open the front cover. 5 Lock the scanner lock lever. Press it . Leave the toner cartridge installed in the drum unit. 140 Chapter 18 Front Cover Drum Unit Scanner Lock Lever Lock Unlock Damage caused to the machine by failure ... telephone wall socket. 2 Unplug the machine from the mains socket. 3 Unplug the Parallel cable or USB cable from the machine. Remove the drum unit and toner cartridge assembly. If you do not pack the machine correctly, you transport the machine, use the packing materials that came with the machine. Do not...
Owners Manual
Page 150
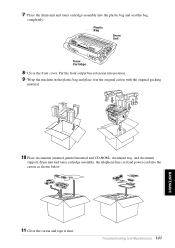
... original carton with the original packing material. MAINTENANCE 10 Place documents (manual, printed material and CD-ROM), document tray, and document support, drum unit and toner cartridge assembly, the telephone line cord and power cord into the plastic bag and seal the bag completely. Troubleshooting and Maintenance 141 7 Place the drum...
... original carton with the original packing material. MAINTENANCE 10 Place documents (manual, printed material and CD-ROM), document tray, and document support, drum unit and toner cartridge assembly, the telephone line cord and power cord into the plastic bag and seal the bag completely. Troubleshooting and Maintenance 141 7 Place the drum...
Owners Manual
Page 152
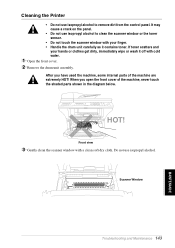
...the machine, some internal parts of the machine, never touch the shaded parts shown in the diagram below. Do not use isopropyl alcohol to remove dirt from the control panel. Cleaning the Printer • Do not use isopropyl alcohol to clean the scanner window or the toner sensor. •...HOT! HOT! Front view 3 Gently clean the scanner window with cold water. 1 Open the front cover. 2 Remove the drum unit assembly. If toner scatters and your finger. • Handle the drum unit carefully as it off with a clean soft dry cloth. Scanner Window Troubleshooting and Maintenance 143 ...
...the machine, some internal parts of the machine, never touch the shaded parts shown in the diagram below. Do not use isopropyl alcohol to remove dirt from the control panel. Cleaning the Printer • Do not use isopropyl alcohol to clean the scanner window or the toner sensor. •...HOT! HOT! Front view 3 Gently clean the scanner window with cold water. 1 Open the front cover. 2 Remove the drum unit assembly. If toner scatters and your finger. • Handle the drum unit carefully as it off with a clean soft dry cloth. Scanner Window Troubleshooting and Maintenance 143 ...
Owners Manual
Page 153
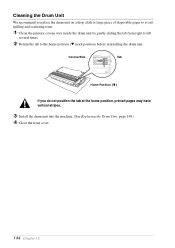
Corona Wire Tab Home Position ( ) If you place the drum unit on a drop cloth or large piece of disposable paper to avoid spilling and scattering toner. 1 Clean the primary corona wire inside the drum unit by gently sliding the tab from right to left several times. 2 Return the tab to the ...
Corona Wire Tab Home Position ( ) If you place the drum unit on a drop cloth or large piece of disposable paper to avoid spilling and scattering toner. 1 Clean the primary corona wire inside the drum unit by gently sliding the tab from right to left several times. 2 Return the tab to the ...
Owners Manual
Page 154
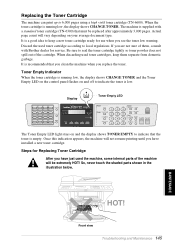
... control panel flashes on your average document type. Discard the used the machine, some internal parts of the machine will be replaced after approximately 3,000 pages. It is recommended that the toner is low. So, never touch the shaded parts shown in the illustration below. It...off to keep them , consult with a standard toner cartridge (TN-6300) that must be extremely HOT! Steps for service. If you have installed a new toner cartridge. Toner Empty Indicator When the toner cartridge is supplied with Brother dealer for Replacing Toner Cartridge After you are not sure of them ...
... control panel flashes on your average document type. Discard the used the machine, some internal parts of the machine will be replaced after approximately 3,000 pages. It is recommended that the toner is low. So, never touch the shaded parts shown in the illustration below. It...off to keep them , consult with a standard toner cartridge (TN-6300) that must be extremely HOT! Steps for service. If you have installed a new toner cartridge. Toner Empty Indicator When the toner cartridge is supplied with Brother dealer for Replacing Toner Cartridge After you are not sure of them ...
Owners Manual
Page 155
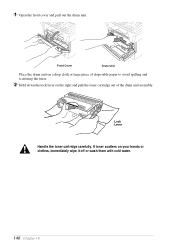
Front Cover Drum Unit Place the drum unit on a drop cloth or large piece of the drum unit assembly. Lock Lever Handle the toner cartridge carefully. 1 Open the front cover and pull out the drum unit. If toner scatters on the right and pull the toner cartridge out of disposable paper to avoid spilling and scattering the toner. 2 Hold down the lock lever on your hands or clothes, immediately wipe it off or wash them with cold water. 146 Chapter 18
Front Cover Drum Unit Place the drum unit on a drop cloth or large piece of the drum unit assembly. Lock Lever Handle the toner cartridge carefully. 1 Open the front cover and pull out the drum unit. If toner scatters on the right and pull the toner cartridge out of disposable paper to avoid spilling and scattering the toner. 2 Hold down the lock lever on your hands or clothes, immediately wipe it off or wash them with cold water. 146 Chapter 18
Owners Manual
Page 156
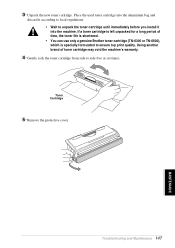
...; You can use only a genuine Brother toner cartridge (TN-6300 or TN-6600), which is left unpacked for a long period of toner cartridge may void the machine's warranty. 4 Gently rock the toner cartridge from side to side five or six times. If a toner cartridge is specially formulated to unpack the toner cartridge until immediately before you...
...; You can use only a genuine Brother toner cartridge (TN-6300 or TN-6600), which is left unpacked for a long period of toner cartridge may void the machine's warranty. 4 Gently rock the toner cartridge from side to side five or six times. If a toner cartridge is specially formulated to unpack the toner cartridge until immediately before you...

