Software Users Manual - English
Page 14
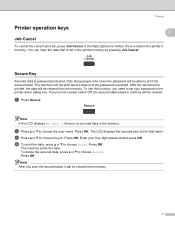
..., the data will be able to choose Print. To use this function, you print the secured data, it will not print secure data until the password is data in the memory. c Press a or b to choose Delete. The machine prints the data. Printing Printer operation keys 1 1 Job Cancel 1 To cancel the ...job, press Job Cancel. Secure Key 1 Secured data is no secured data in the printer's memory. Note If the LCD displays No Data !, there is password protected. To delete the secured data, press a or b to choose the job. The machine will be cleared. If the Data LED turns Yellow, there is...
..., the data will be able to choose Print. To use this function, you print the secured data, it will not print secure data until the password is data in the memory. c Press a or b to choose Delete. The machine prints the data. Printing Printer operation keys 1 1 Job Cancel 1 To cancel the ...job, press Job Cancel. Secure Key 1 Secured data is no secured data in the printer's memory. Note If the LCD displays No Data !, there is password protected. To delete the secured data, press a or b to choose the job. The machine will be cleared. If the Data LED turns Yellow, there is...
Software Users Manual - English
Page 34
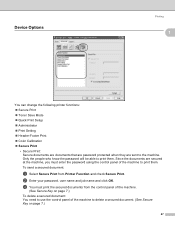
... „ Print Setting „ Header-Footer Print „ Color Calibration „ Secure Print • Secure Print: Secure documents are documents that are password protected when they are secured at the machine, you must print the secured documents from Printer Function and check Secure Print. b Enter your... password, user name and job name and click OK. Since the documents are sent to print them . To send a secured document: a Select ...
... „ Print Setting „ Header-Footer Print „ Color Calibration „ Secure Print • Secure Print: Secure documents are documents that are password protected when they are secured at the machine, you must print the secured documents from Printer Function and check Secure Print. b Enter your... password, user name and job name and click OK. Since the documents are sent to print them . To send a secured document: a Select ...

Software Users Manual - English
Page 36
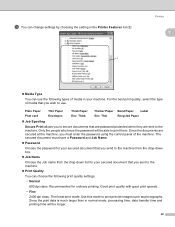
Printing „ Administrator Administrators have the authority to limit access to functions such as scaling and watermark. 1 • Password Enter the password into this box. • Set Password Click here to change the password. • Copies Lock Lock the copy pages selection to prevent multiple copy printing. • Multiple Page & Scaling Lock Lock the scaling...
Printing „ Administrator Administrators have the authority to limit access to functions such as scaling and watermark. 1 • Password Enter the password into this box. • Set Password Click here to change the password. • Copies Lock Lock the copy pages selection to prevent multiple copy printing. • Multiple Page & Scaling Lock Lock the scaling...
Software Users Manual - English
Page 43
...Thick Paper Env. Good print quality with good print speeds. • Fine 2400 dpi class. Recommended for your secured document that are password protected when they are sent to the machine. The finest print mode. Since the documents are secured at the machine, you to ... Thick Thicker Paper Bond Paper Label Env. Thin Recycled Paper „ Job Spooling Secure Print allows you must have a Password and Job Name. „ Password Choose the password for your secured document that you sent to use the following print quality settings. • Normal 600 dpi class. Only ...
...Thick Paper Env. Good print quality with good print speeds. • Fine 2400 dpi class. Recommended for your secured document that are password protected when they are sent to the machine. The finest print mode. Since the documents are secured at the machine, you to ... Thick Thicker Paper Bond Paper Label Env. Thin Recycled Paper „ Job Spooling Secure Print allows you must have a Password and Job Name. „ Password Choose the password for your secured document that you sent to use the following print quality settings. • Normal 600 dpi class. Only ...

Software Users Manual - English
Page 59
Scanning 2 • For users who have administrator rights: Enter the administrator password and click OK. 52 Note For Windows Vista™ the User Account Control screen appears, do the following. • For users who do not have administrator rights: Click Allow.
Scanning 2 • For users who have administrator rights: Enter the administrator password and click OK. 52 Note For Windows Vista™ the User Account Control screen appears, do the following. • For users who do not have administrator rights: Click Allow.

Software Users Manual - English
Page 100
... following . • For users who have administrator rights: Click Continue. • For users who do not have administrator rights: Enter the administrator password and click OK. 93 Note For Windows Vista™ the User Account Control screen appears, do the following : „ For Windows 2000 and ...Windows Vista™, select your Brother machine from the list and click the properties button. „ For Windows XP, right-click the Scanner Device icon and choose Properties. The ...
... following . • For users who have administrator rights: Click Continue. • For users who do not have administrator rights: Enter the administrator password and click OK. 93 Note For Windows Vista™ the User Account Control screen appears, do the following : „ For Windows 2000 and ...Windows Vista™, select your Brother machine from the list and click the properties button. „ For Windows XP, right-click the Scanner Device icon and choose Properties. The ...

Software Users Manual - English
Page 109
... profile of the flatbed/ADF scanner counter plus the last 6 digits of the FTP server. d Enter the Password for example 192.23.56.189). You can be displayed on the FTP server (for example 4 /brother/abc/) (up to 15 characters. h Choose the file type for the document from the drop-down list...
... profile of the flatbed/ADF scanner counter plus the last 6 digits of the FTP server. d Enter the Password for example 192.23.56.189). You can be displayed on the FTP server (for example 4 /brother/abc/) (up to 15 characters. h Choose the file type for the document from the drop-down list...

Software Users Manual - English
Page 111
... 600 dpi. b Press (Scan). l Press a or b to choose a file name you want to change the file name, go to Step d. If your machine is an MFC-9840CDW or DCP-9045CDN, go to Step l. Press OK and go to Step i. Press OK. Note If you want to use and press OK. d Press a or... scanner glass. f Choose one of the FTP server profiles listed. j Use the dial pad to enter the username. i Use the dial pad to enter the password. c Press a or b to choose Scan to choose PDF or JPEG. Press OK to begin the scanning process. 4 4 Note If you want to Step e. Press Black...
... 600 dpi. b Press (Scan). l Press a or b to choose a file name you want to change the file name, go to Step d. If your machine is an MFC-9840CDW or DCP-9045CDN, go to Step l. Press OK and go to Step i. Press OK. Note If you want to use and press OK. d Press a or... scanner glass. f Choose one of the FTP server profiles listed. j Use the dial pad to enter the username. i Use the dial pad to enter the password. c Press a or b to choose Scan to choose PDF or JPEG. Press OK to begin the scanning process. 4 4 Note If you want to Step e. Press Black...

Software Users Manual - English
Page 113
Press OK, and go to enter the password. l Use the dial pad to Step l. Press Black Start or Color Start and go to enter the username. Note If you want to choose . Enter ...
Press OK, and go to enter the password. l Use the dial pad to Step l. Press Black Start or Color Start and go to enter the username. Note If you want to choose . Enter ...

Software Users Manual - English
Page 114
... password is displayed, enter the correct data again and then click OK. „ Cancel Lets you exit the Remote Setup application without exiting the Remote Setup application. 107 Click the Start button, All Programs, Brother, MFC-XXXX (or MFC-...XXXX LAN), and Remote Setup. When you start uploading data to the machine and exit the Remote Setup application. You can upload them directly to the machine. If an error message is "access". 5 Remote Setup (MFC-9440CN and MFC-9840CDW only) 5 Remote Setup 5 The Remote Setup program lets you start this password...
... password is displayed, enter the correct data again and then click OK. „ Cancel Lets you exit the Remote Setup application without exiting the Remote Setup application. 107 Click the Start button, All Programs, Brother, MFC-XXXX (or MFC-...XXXX LAN), and Remote Setup. When you start uploading data to the machine and exit the Remote Setup application. You can upload them directly to the machine. If an error message is "access". 5 Remote Setup (MFC-9440CN and MFC-9840CDW only) 5 Remote Setup 5 The Remote Setup program lets you start this password...

Software Users Manual - English
Page 135
d Click the Exceptions tab. 128 b When the User Account Control screen appears, do the following. „ Users who have administrator rights: Click Continue. „ For users who do not have administrator rights: Enter the administrator password and click OK. 7 c Make sure that Windows Firewall on the General tab is set to On. Firewall settings (For Network users) For Windows Vista™ users 7 a Click the Start button, Control Panel, Network and Internet, Windows Firewall and click Change settings.
d Click the Exceptions tab. 128 b When the User Account Control screen appears, do the following. „ Users who have administrator rights: Click Continue. „ For users who do not have administrator rights: Enter the administrator password and click OK. 7 c Make sure that Windows Firewall on the General tab is set to On. Firewall settings (For Network users) For Windows Vista™ users 7 a Click the Start button, Control Panel, Network and Internet, Windows Firewall and click Change settings.
Software Users Manual - English
Page 138
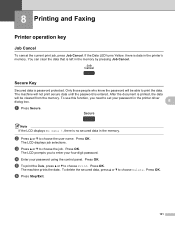
...b to choose the user name. The machine prints the data. Press OK. b Press a or b to choose the job. Press OK. d Enter your password in the printer's memory. Press OK. 8 Printing and Faxing 8 Printer operation key 8 Job Cancel 8 To cancel the current print job, press Job Cancel. ...OK. To use this function, you to set your password using the control panel. The LCD prompts you need to enter your four-digit password. f Press Stop/Exit. 131 The machine will not print secure data until the password is password protected. Press OK. To delete the secured data,...
...b to choose the user name. The machine prints the data. Press OK. b Press a or b to choose the job. Press OK. d Enter your password in the printer's memory. Press OK. 8 Printing and Faxing 8 Printer operation key 8 Job Cancel 8 To cancel the current print job, press Job Cancel. ...OK. To use this function, you to set your password using the control panel. The LCD prompts you need to enter your four-digit password. f Press Stop/Exit. 131 The machine will not print secure data until the password is password protected. Press OK. To delete the secured data,...

Software Users Manual - English
Page 150
... be able to print them . Choose Odd numbered pages and print, and then choose Even numbered pages and print. c You must enter the password using the control panel of the machine to delete a secured document. (See Secure Key on page 131.) To delete a secured document: You need to ...use the control panel of the machine to print them . Secure Print 8 8 „ Secure Print: Secure documents are documents that are password protected when they are secured at the machine, you must print the secured document from the control panel of the machine. (See Secure Key on...
... be able to print them . Choose Odd numbered pages and print, and then choose Even numbered pages and print. c You must enter the password using the control panel of the machine to delete a secured document. (See Secure Key on page 131.) To delete a secured document: You need to ...use the control panel of the machine to print them . Secure Print 8 8 „ Secure Print: Secure documents are documents that are password protected when they are secured at the machine, you must print the secured document from the control panel of the machine. (See Secure Key on...
Software Users Manual - English
Page 161
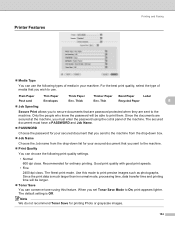
...drop-down box. „ Job Name Choose the Job name from the drop-down list for your machine. Only the people who know the password will be able to the machine. „ Print Quality You can choose the following types of media in your secured document that you set Toner... Thicker Paper Bond Paper Label Post card Envelopes Env. Since the documents are sent to On, print appears lighter. The secured document must enter the password using this mode to use the following print quality settings. • Normal 600 dpi class. Good print quality with good print speeds. • ...
...drop-down box. „ Job Name Choose the Job name from the drop-down list for your machine. Only the people who know the password will be able to the machine. „ Print Quality You can choose the following types of media in your secured document that you set Toner... Thicker Paper Bond Paper Label Post card Envelopes Env. Since the documents are sent to On, print appears lighter. The secured document must enter the password using this mode to use the following print quality settings. • Normal 600 dpi class. Good print quality with good print speeds. • ...
Software Users Manual - English
Page 209
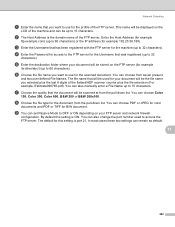
... FTP server. You can set Passive Mode to 32 characters). i You can choose PDF or JPEG for color documents and PDF or TIFF for example /brother/abc/) (up to OFF or ON depending on the FTP server (for B/W document. e Enter the destination folder where your FTP server and network firewall configuration... that the document will be stored on your document will be used to 15 characters. You can choose from the pull-down list. d Enter the Password for access to 60 characters).
... FTP server. You can set Passive Mode to 32 characters). i You can choose PDF or JPEG for color documents and PDF or TIFF for example /brother/abc/) (up to OFF or ON depending on the FTP server (for B/W document. e Enter the destination folder where your FTP server and network firewall configuration... that the document will be stored on your document will be used to 15 characters. You can choose from the pull-down list. d Enter the Password for access to 60 characters).

Software Users Manual - English
Page 211
Press OK. Press OK and go to Step d. Press OK. If your machine is not complete, for instance, the login account name and password are missing or the quality or file type are not chosen, you want to use and press OK. Press OK to enter the username. Press ... using the duplex scanning feature, you want to change the file name manually, go to Step k. „ If the Scan to FTP profile is an MFC-9840CDW or DCP-9045CDN, go to g. „ Press a or b to choose B&W 200 dpi or B&W 200x100 dpi. b Press (Scan). c Press a or b to choose Scan to choose PDF...
Press OK. Press OK and go to Step d. Press OK. If your machine is not complete, for instance, the login account name and password are missing or the quality or file type are not chosen, you want to use and press OK. Press OK to enter the username. Press ... using the duplex scanning feature, you want to change the file name manually, go to Step k. „ If the Scan to FTP profile is an MFC-9840CDW or DCP-9045CDN, go to g. „ Press a or b to choose B&W 200 dpi or B&W 200x100 dpi. b Press (Scan). c Press a or b to choose Scan to choose PDF...

Software Users Manual - English
Page 213
... one of the options below. „ Press a or b to choose Color 150 dpi, Color 300 dpi or Color 600 dpi. j Press a or b to enter the password. Press OK. n Do one of the following: „ If you want to start scanning, press Black Start or Color Start and go to Step q. „...
... one of the options below. „ Press a or b to choose Color 150 dpi, Color 300 dpi or Color 600 dpi. j Press a or b to enter the password. Press OK. n Do one of the following: „ If you want to start scanning, press Black Start or Color Start and go to Step q. „...
Quick Setup Guide - English
Page 23
In Name: Enter any description, for example "Brother Scanner". 2. In Name: Enter any description, for example "Brother PC-Fax". 2. Then, click OK. 9 Make sure that Windows Firewall on the General tab is set to On. 4 Click the Exceptions tab. 1 2 3 7 Click the Add ... click change settings. 2 When the User Account Control screen appears, do the following. „ For Users who do not have administrator rights: Enter the administrator password and click OK. 3 Make sure that the new setting is added and is checked, and then click OK. 10 If you still have administrator rights...
In Name: Enter any description, for example "Brother Scanner". 2. In Name: Enter any description, for example "Brother PC-Fax". 2. Then, click OK. 9 Make sure that Windows Firewall on the General tab is set to On. 4 Click the Exceptions tab. 1 2 3 7 Click the Add ... click change settings. 2 When the User Account Control screen appears, do the following. „ For Users who do not have administrator rights: Enter the administrator password and click OK. 3 Make sure that the new setting is added and is checked, and then click OK. 10 If you still have administrator rights...

Quick Setup Guide - English
Page 29
... a, press the 2 key on your dial pad seven times. To enter the number 3, press the 3 key on the dial pad once. Enter the WPA-PSK Password you wrote down in step 1 using the information you have entered. You can use one key, but they will automatically acquire the correct TCP/IP... choose 1.Yes and press OK to apply your personal firewall software. 27 Go to step 12. 11 Enter the user and press OK. Enter the password and press OK, and then choose 1.Yes and press OK to apply your router or access point. Note The supplied CD-ROM includes the ScanSoft...
... a, press the 2 key on your dial pad seven times. To enter the number 3, press the 3 key on the dial pad once. Enter the WPA-PSK Password you wrote down in step 1 using the information you have entered. You can use one key, but they will automatically acquire the correct TCP/IP... choose 1.Yes and press OK to apply your personal firewall software. 27 Go to step 12. 11 Enter the user and press OK. Enter the password and press OK, and then choose 1.Yes and press OK to apply your router or access point. Note The supplied CD-ROM includes the ScanSoft...

Quick Setup Guide - English
Page 33
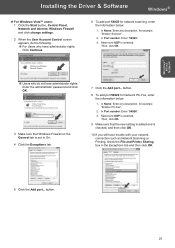
...Port number: Enter "54925". 3. Then, click OK. „ Users who have administrator rights: Click Continue. 6 To add port 54925 for example "Brother Scanner". 2. In Name: Enter any description, for network scanning, enter the information below : 1. Windows® Wireless Network Installing the Driver & Software ...2 When the User Account Control screen appears, do the following. „ For Users who do not have administrator rights: Enter the administrator password and click OK. 3 Make sure that the new setting is added and is selected. In Port number: Enter "54926". 3. Then, ...
...Port number: Enter "54925". 3. Then, click OK. „ Users who have administrator rights: Click Continue. 6 To add port 54925 for example "Brother Scanner". 2. In Name: Enter any description, for network scanning, enter the information below : 1. Windows® Wireless Network Installing the Driver & Software ...2 When the User Account Control screen appears, do the following. „ For Users who do not have administrator rights: Enter the administrator password and click OK. 3 Make sure that the new setting is added and is selected. In Port number: Enter "54926". 3. Then, ...


