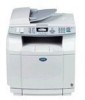
Users Manual - English
Page 4
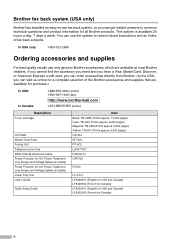
... available for purchase.) In USA: In Canada: 1-888-879-3232 (voice) 1-800-947-1445 (fax) http://www.brothermall.com 1-877-BROTHER (voice) Description Toner Cartridge OPC Belt Waste Toner Pack Fusing Unit Telephone Line Cord IEEE-1284 Bi-directional Cable Power Protector for A/C Power Telephone Line Surges and Voltage Spikes (2 outlets) Power Protector...
... available for purchase.) In USA: In Canada: 1-888-879-3232 (voice) 1-800-947-1445 (fax) http://www.brothermall.com 1-877-BROTHER (voice) Description Toner Cartridge OPC Belt Waste Toner Pack Fusing Unit Telephone Line Cord IEEE-1284 Bi-directional Cable Power Protector for A/C Power Telephone Line Surges and Voltage Spikes (2 outlets) Power Protector...
Users Manual - English
Page 15
For your safety A-3 Disconnect device A-3 LAN connection A-3 Laser safety A-3 FDA regulations A-4 Important safety instructions A-4 Choosing a location A-6 To use the machine safely A-7 Trademarks...A-10 B Menu and Features On-screen programming B-1 Menu table...C-21 Cleaning the scanner glass C-22 Cleaning to prevent paper jams C-22 Cleaning the laser glass C-24 Replacing the consumable items C-26 Toner cartridges C-28 Waste toner pack C-31 OPC belt cartridge C-33 Fusing unit C-35 Replacing the transfer belt cleaner C-37 Replacing the transfer roller C-39 Machine Information ...
For your safety A-3 Disconnect device A-3 LAN connection A-3 Laser safety A-3 FDA regulations A-4 Important safety instructions A-4 Choosing a location A-6 To use the machine safely A-7 Trademarks...A-10 B Menu and Features On-screen programming B-1 Menu table...C-21 Cleaning the scanner glass C-22 Cleaning to prevent paper jams C-22 Cleaning the laser glass C-24 Replacing the consumable items C-26 Toner cartridges C-28 Waste toner pack C-31 OPC belt cartridge C-33 Fusing unit C-35 Replacing the transfer belt cleaner C-37 Replacing the transfer roller C-39 Machine Information ...
Users Manual - English
Page 30
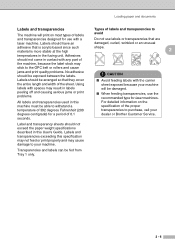
...jams or print problems. All labels and transparencies used in the fusing unit. Labels should have an adhesive that are damaged, curled, wrinkled or an unusual shape. 2 CAUTION ■ Avoid feeding labels with a laser machine. Label and transparency sheets should not come in this machine...the proper transparencies to avoid Do not use the recommended type for laser machines. Transparencies and labels can be fed from Tray 1 only. Types of labels and transparencies to purchase, call your dealer or Brother Customer Service. 2 - 6 Loading paper and documents Labels and ...
...jams or print problems. All labels and transparencies used in the fusing unit. Labels should have an adhesive that are damaged, curled, wrinkled or an unusual shape. 2 CAUTION ■ Avoid feeding labels with a laser machine. Label and transparency sheets should not come in this machine...the proper transparencies to avoid Do not use the recommended type for laser machines. Transparencies and labels can be fed from Tray 1 only. Types of labels and transparencies to purchase, call your dealer or Brother Customer Service. 2 - 6 Loading paper and documents Labels and ...
Users Manual - English
Page 107
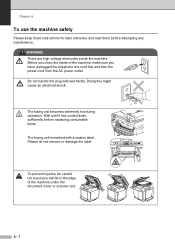
Doing this might cause an electrical shock. The fusing unit becomes extremely hot during operation. Do not handle the plug with a caution label. WARNING There are high voltage electrodes inside of the machine under the document cover or scanner unit. Please do not remove or damage the label. To prevent injuries, be careful not... before attempting any maintenance. Chapter A To use the machine safely Please keep these instructions for later reference and read them before replacing consumable items. The fusing unit is marked with wet hands.
Doing this might cause an electrical shock. The fusing unit becomes extremely hot during operation. Do not handle the plug with a caution label. WARNING There are high voltage electrodes inside of the machine under the document cover or scanner unit. Please do not remove or damage the label. To prevent injuries, be careful not... before attempting any maintenance. Chapter A To use the machine safely Please keep these instructions for later reference and read them before replacing consumable items. The fusing unit is marked with wet hands.
Users Manual - English
Page 127
... tray, and then press Black Start or Color Start. -OR- See Using the ADF (automatic document feeder) on page 7-8. Near Waste Toner The waste toner pack is not installed properly. machine stopped the call. Please install one. (See Fusing unit on page C-39 and follow the steps ... paper tray. Replace the waste toner pack. (See Replacing the waste toner pack on page 7-4.) C - 2 Set up the One-Touch or Speed Dial number. (See Storing One-Touch Dial numbers on page 7-3 and Storing Speed-Dial numbers on page C-32.) No Fusing Unit The fusing unit was too long.
... tray, and then press Black Start or Color Start. -OR- See Using the ADF (automatic document feeder) on page 7-8. Near Waste Toner The waste toner pack is not installed properly. machine stopped the call. Please install one. (See Fusing unit on page C-39 and follow the steps ... paper tray. Replace the waste toner pack. (See Replacing the waste toner pack on page 7-4.) C - 2 Set up the One-Touch or Speed Dial number. (See Storing One-Touch Dial numbers on page 7-3 and Storing Speed-Dial numbers on page C-32.) No Fusing Unit The fusing unit was too long.
Users Manual - English
Page 128
...fusing unit. (See Replacing the fusing unit on page C-35.) Replace OPC Belt It is time to replace the PF kit2. Replace the OPC belt cartridge. (See Replace OPC belt cartridge message on page C-7.) Paper Jam C Replace 120K Kit It is not possible. Toner Empty X The toner is used toner cartridge with a new one... now. Toner Low X The indicated color toner is full. ACTION (Fax sending or copy operation in progress) Press Black Start or Color Start to replace the PF kit2. Call Brother Customer Service to replace the fusing unit. Clear the faxes from the output tray...
...fusing unit. (See Replacing the fusing unit on page C-35.) Replace OPC Belt It is time to replace the PF kit2. Replace the OPC belt cartridge. (See Replace OPC belt cartridge message on page C-7.) Paper Jam C Replace 120K Kit It is not possible. Toner Empty X The toner is used toner cartridge with a new one... now. Toner Low X The indicated color toner is full. ACTION (Fax sending or copy operation in progress) Press Black Start or Color Start to replace the PF kit2. Call Brother Customer Service to replace the fusing unit. Clear the faxes from the output tray...

Users Manual - English
Page 132
... have followed the instructions, the machine will stop. If the error message still appears on the next few pages to find the jammed paper. C C - 7 One of the machine. C B A1 A2 Troubleshooting and routine maintenance WARNING The fusing unit and the parts around it are hot! Paper may be more paper jammed somewhere else.
... have followed the instructions, the machine will stop. If the error message still appears on the next few pages to find the jammed paper. C C - 7 One of the machine. C B A1 A2 Troubleshooting and routine maintenance WARNING The fusing unit and the parts around it are hot! Paper may be more paper jammed somewhere else.
Users Manual - English
Page 134
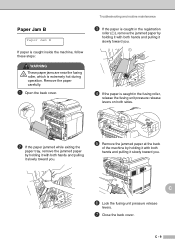
... Jam B Paper Jam B If paper is caught inside the machine, follow these steps: WARNING These paper jams are near the fusing roller, which is caught in the fusing roller, release the fusing unit pressure release levers on both sides. 2 If the paper jammed while exiting the paper tray, remove the jammed paper by holding...
... Jam B Paper Jam B If paper is caught inside the machine, follow these steps: WARNING These paper jams are near the fusing roller, which is caught in the fusing roller, release the fusing unit pressure release levers on both sides. 2 If the paper jammed while exiting the paper tray, remove the jammed paper by holding...
Users Manual - English
Page 135
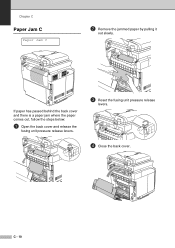
If paper has passed behind the back cover and there is a paper jam where the paper comes out, follow the steps below: 1 Open the back cover and release the fusing unit pressure release levers. 3 Reset the fusing unit pressure release levers. 4 Close the back cover. C - 10 Chapter C Paper Jam C Paper Jam C 2 Remove the jammed paper by pulling it out slowly.
If paper has passed behind the back cover and there is a paper jam where the paper comes out, follow the steps below: 1 Open the back cover and release the fusing unit pressure release levers. 3 Reset the fusing unit pressure release levers. 4 Close the back cover. C - 10 Chapter C Paper Jam C Paper Jam C 2 Remove the jammed paper by pulling it out slowly.

Users Manual - English
Page 143
... the cleaning roller is installed properly. ■ Check that the back cover is closed properly. ■ Check that the fusing unit is installed properly. ■ Replace the OPC belt cartridge. (See Replacing the OPC belt cartridge (OP-4CL) on page... across the page ABCDEFGHIJKLMNOPQRSTUVWXYZ. 0123456789. ABCDEFGHIJKLMNOPQRSTUVWXYZ. 0123456789. ABCDEFGHIJKLMNOPQRSTUVWXYZ. 0123456789. ABCDEFGHIJKLMNOPQRSTUVWXYZ. 0123456789. Colors the machine can print and colors you expected All one color Shade on page C-29.) ■ Perform the calibration. (Menu/Set, 4, 4) ■ Adjust the...
... the cleaning roller is installed properly. ■ Check that the back cover is closed properly. ■ Check that the fusing unit is installed properly. ■ Replace the OPC belt cartridge. (See Replacing the OPC belt cartridge (OP-4CL) on page... across the page ABCDEFGHIJKLMNOPQRSTUVWXYZ. 0123456789. ABCDEFGHIJKLMNOPQRSTUVWXYZ. 0123456789. ABCDEFGHIJKLMNOPQRSTUVWXYZ. 0123456789. ABCDEFGHIJKLMNOPQRSTUVWXYZ. 0123456789. Colors the machine can print and colors you expected All one color Shade on page C-29.) ■ Perform the calibration. (Menu/Set, 4, 4) ■ Adjust the...
Users Manual - English
Page 144
... cartridges are installed properly. ■ Check that the recommended paper is set properly. ■ Replace the fusing unit. (See Replacing the fusing unit on page C-35.) C Poor fixing when printed on thick paper Set the machine to a recommended type ... the media type mode is selected properly. ■ Check that the fusing unit is installed properly. ■ Replace the toner cartridges. (See Replacing a toner cartridge on page C-35.) Mixed color image ABCDEFGHIJKLMNOPQRSTUVWXYZ. 0123456789. abcdefghijklmnopqrstuvwxyz. abcdefghijklmnopqrstuvwxyz. ■ Check that the recommended...
... cartridges are installed properly. ■ Check that the recommended paper is set properly. ■ Replace the fusing unit. (See Replacing the fusing unit on page C-35.) C Poor fixing when printed on thick paper Set the machine to a recommended type ... the media type mode is selected properly. ■ Check that the fusing unit is installed properly. ■ Replace the toner cartridges. (See Replacing a toner cartridge on page C-35.) Mixed color image ABCDEFGHIJKLMNOPQRSTUVWXYZ. 0123456789. abcdefghijklmnopqrstuvwxyz. abcdefghijklmnopqrstuvwxyz. ■ Check that the recommended...

Users Manual - English
Page 147
... the scanner glass strip under it with isopropyl alcohol on a soft lint-free cloth. Document Cover White Plastic Cleaning to the following: WARNING ■ The fusing unit and the parts around it are smeared with toner, wipe off the toner with a dry cloth. White Plastic Bar Glass Strip ■ Be careful not...
... the scanner glass strip under it with isopropyl alcohol on a soft lint-free cloth. Document Cover White Plastic Cleaning to the following: WARNING ■ The fusing unit and the parts around it are smeared with toner, wipe off the toner with a dry cloth. White Plastic Bar Glass Strip ■ Be careful not...

Users Manual - English
Page 152
... Fuser Fusing unit 60,000 pages2 See C-35. FP-4CL Replace 120K Kit Replace PF Kit2 Transfer belt cleaner Transfer roller Paper pick-up roller 120,000 pages2 Separator pad Transfer belt Paper feeding kit 2. (Paper pick-up roller Separator pad) Call Brother Customer Service...paper feeding kit 2. 1 Definition of pages: actual output page number. Call Brother Customer Service to replace the 120K kit. Definition of images: If the image on a page contains only one color of life has been reached. Troubleshooting and routine maintenance The following are maintenance ...
... Fuser Fusing unit 60,000 pages2 See C-35. FP-4CL Replace 120K Kit Replace PF Kit2 Transfer belt cleaner Transfer roller Paper pick-up roller 120,000 pages2 Separator pad Transfer belt Paper feeding kit 2. (Paper pick-up roller Separator pad) Call Brother Customer Service...paper feeding kit 2. 1 Definition of pages: actual output page number. Call Brother Customer Service to replace the 120K kit. Definition of images: If the image on a page contains only one color of life has been reached. Troubleshooting and routine maintenance The following are maintenance ...
Users Manual - English
Page 160
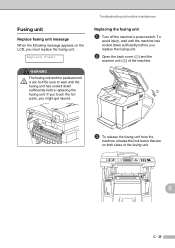
... touch the hot parts, you replace the fusing unit. 2 Open the back cover (1) and the scanner unit (2) of the fusing unit. Replacing the fusing unit 1 Turn off the machine's power switch. To avoid injury, wait until the fusing unit has cooled down sufficiently before replacing the fusing unit. C C - 35 Troubleshooting and routine maintenance Fusing unit Replace fusing unit message When the following message appears on...
... touch the hot parts, you replace the fusing unit. 2 Open the back cover (1) and the scanner unit (2) of the fusing unit. Replacing the fusing unit 1 Turn off the machine's power switch. To avoid injury, wait until the fusing unit has cooled down sufficiently before replacing the fusing unit. C C - 35 Troubleshooting and routine maintenance Fusing unit Replace fusing unit message When the following message appears on...

Users Manual - English
Page 161
C - 36 8 Close the scanner unit and the back cover. 9 Turn the machine's power switch back on both sides of the fusing unit. 5 Put the new fusing unit into the machine. 7 Move the fusing unit pressure release levers to insert the fusing unit completely into the machine. Chapter C 4 Hold the handles on both sides as you take the fusing unit out of the machine. 6 Secure the fusing unit with the two lock levers that are on . Be sure to the Set position.
C - 36 8 Close the scanner unit and the back cover. 9 Turn the machine's power switch back on both sides of the fusing unit. 5 Put the new fusing unit into the machine. 7 Move the fusing unit pressure release levers to insert the fusing unit completely into the machine. Chapter C 4 Hold the handles on both sides as you take the fusing unit out of the machine. 6 Secure the fusing unit with the two lock levers that are on . Be sure to the Set position.

Users Manual - English
Page 162
... the inside cover of metal bearings that it should go in easily. If it does not, make sure the fusing unit connector is free to the power supply. C C - 37 Reset the Fusing Unit life counter 1 Press Menu/Set, 7, 4. 2 Press ▲ or ▼ to reset the life counter...apply force! The confirmation message appears on the fusing unit; Fusing Unit 1.Reset 2.Exit 3 Press 1 to select Fusing Unit and press Menu/Set. Be sure to check how to cancel. These must be careful when replacing the fusing unit. It could damage both the fusing unit and the machine. Do not put pressure on...
... the inside cover of metal bearings that it should go in easily. If it does not, make sure the fusing unit connector is free to the power supply. C C - 37 Reset the Fusing Unit life counter 1 Press Menu/Set, 7, 4. 2 Press ▲ or ▼ to reset the life counter...apply force! The confirmation message appears on the fusing unit; Fusing Unit 1.Reset 2.Exit 3 Press 1 to select Fusing Unit and press Menu/Set. Be sure to check how to cancel. These must be careful when replacing the fusing unit. It could damage both the fusing unit and the machine. Do not put pressure on...
Users Manual - English
Page 181
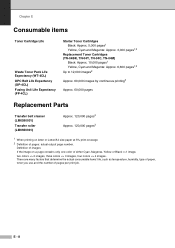
... number of pages per print job. Chapter E Consumable items Toner Cartridge Life Waste Toner Pack Life Expectancy (WT-4CL) OPC Belt Life Expectancy (OP-4CL) Fusing Unit Life Expectancy (FP-4CL) Starter Toner Cartridges Black: Approx. 5,000 pages1 Yellow, Cyan and Magenta: Approx. 3,000 pages1,2 Replacement Toner Cartridges (TN-04BK, TN-04Y...,000 pages Replacement Parts Transfer belt cleaner (LM0590001) Transfer roller (LM0660001) Approx. 120,000 pages2 Approx. 120,000 pages2 1 When printing on a page contains only one color of either Cyan, Magenta, Yellow or Black =>1 image, two...
... number of pages per print job. Chapter E Consumable items Toner Cartridge Life Waste Toner Pack Life Expectancy (WT-4CL) OPC Belt Life Expectancy (OP-4CL) Fusing Unit Life Expectancy (FP-4CL) Starter Toner Cartridges Black: Approx. 5,000 pages1 Yellow, Cyan and Magenta: Approx. 3,000 pages1,2 Replacement Toner Cartridges (TN-04BK, TN-04Y...,000 pages Replacement Parts Transfer belt cleaner (LM0590001) Transfer roller (LM0660001) Approx. 120,000 pages2 Approx. 120,000 pages2 1 When printing on a page contains only one color of either Cyan, Magenta, Yellow or Black =>1 image, two...
Users Manual - English
Page 188
... memory 5-9 color fax 5-2 compatibility C-20 contrast 5-5 delayed 5-8 Easy Receive 6-5 enter Fax mode 5-1 from ADF 5-1 from memory (Dual Access) .......5-2, 7-2 from a remote site 8-7 Ring Delay, setting 6-2 Sequential Polling 10-1 sending 5-1 at extension phones 6-6 double-ringing (voice calls 6-3 F/T Ring Time 6-3 Fax Receive Code 6-6 receiving faxes 6-7 Ring Delay 6-2 Telephone Answer Code 6-6 FCC notices A-1 Fusing unit C-35 G Gray...
... memory 5-9 color fax 5-2 compatibility C-20 contrast 5-5 delayed 5-8 Easy Receive 6-5 enter Fax mode 5-1 from ADF 5-1 from memory (Dual Access) .......5-2, 7-2 from a remote site 8-7 Ring Delay, setting 6-2 Sequential Polling 10-1 sending 5-1 at extension phones 6-6 double-ringing (voice calls 6-3 F/T Ring Time 6-3 Fax Receive Code 6-6 receiving faxes 6-7 Ring Delay 6-2 Telephone Answer Code 6-6 FCC notices A-1 Fusing unit C-35 G Gray...

Users Manual - English
Page 189
Maintenance, routine C-20 replacing fusing unit C-35 OPC belt cartridge C-33 toner cartridges C-28, C-29 transfer belt cleaner C-37 transfer roller C-39 waste toner pack C-31 Manual dialing 7-1 receive 6-1 Manual ...10-1 Poster 11-5 Power failure B-1 J Jacks convert to load 2-8 size 3-9 size of Memory message 5-3 P Packing and shipping the machine ....... O One-Touch changing 7-4 setting up 7-3 using 7-1 Options (accessories) lower tray unit D-1 SO-DIMM D-3 Options key B-14 Out of document 2-10 type 3-9 PaperPort® See Software User's Guide on the CD-ROM. scanning...
Maintenance, routine C-20 replacing fusing unit C-35 OPC belt cartridge C-33 toner cartridges C-28, C-29 transfer belt cleaner C-37 transfer roller C-39 waste toner pack C-31 Manual dialing 7-1 receive 6-1 Manual ...10-1 Poster 11-5 Power failure B-1 J Jacks convert to load 2-8 size 3-9 size of Memory message 5-3 P Packing and shipping the machine ....... O One-Touch changing 7-4 setting up 7-3 using 7-1 Options (accessories) lower tray unit D-1 SO-DIMM D-3 Options key B-14 Out of document 2-10 type 3-9 PaperPort® See Software User's Guide on the CD-ROM. scanning...
Quick Setup Guide - English
Page 5
Table of the Fusing Unit 5 3. Install the Power Cord and Phone Line 8 6. Setting the LCD Contrast 11 10. Setting the Date and Time 9 7. Selecting a Receive Mode 10 9. Sending in the ...
Table of the Fusing Unit 5 3. Install the Power Cord and Phone Line 8 6. Setting the LCD Contrast 11 10. Setting the Date and Time 9 7. Selecting a Receive Mode 10 9. Sending in the ...


