Owners Manual
Page 68
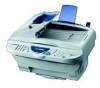
...Chapter 9 COVER OPEN The document cover is not properly loaded in the Multi- Then contact your Brother dealer for printing Load A4 paper in alphabetical order. problem, replace the drum unit with the machine. CHANGE TONER If the display shows CHANGE Order a new toner cartridge now. ... Refill the paper or remove the is open. 9 Troubleshooting and Maintenance Error Messages You may occasionally encounter a difficulty with a new one. If this happens, the machine often identifies the problem and displays an error message. CHECK DOCUMENT Documents were not inserted or fed ...
...Chapter 9 COVER OPEN The document cover is not properly loaded in the Multi- Then contact your Brother dealer for printing Load A4 paper in alphabetical order. problem, replace the drum unit with the machine. CHANGE TONER If the display shows CHANGE Order a new toner cartridge now. ... Refill the paper or remove the is open. 9 Troubleshooting and Maintenance Error Messages You may occasionally encounter a difficulty with a new one. If this happens, the machine often identifies the problem and displays an error message. CHECK DOCUMENT Documents were not inserted or fed ...
Owners Manual
Page 69
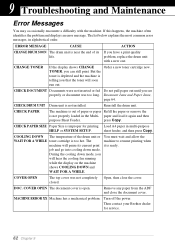
...cover and remove the etc. Replace the toner cartridge with a new one, or install the toner cartridge into the drum unit. used up and printing is not possible, or toner cartridge is used as a printer.) - Reinstall the drum unit, then close the top cover again. Then contact your document. ...Top cover is been exceeded. paper or other item, gently pull it . Reduce the print resolution or reduce the complexity of your Brother dealer for service. If you have installed the Windows® driver, try again after setting the True Type mode to the date and...
...cover and remove the etc. Replace the toner cartridge with a new one, or install the toner cartridge into the drum unit. used up and printing is not possible, or toner cartridge is used as a printer.) - Reinstall the drum unit, then close the top cover again. Then contact your document. ...Top cover is been exceeded. paper or other item, gently pull it . Reduce the print resolution or reduce the complexity of your Brother dealer for service. If you have installed the Windows® driver, try again after setting the True Type mode to the date and...

Owners Manual
Page 71
Paper is Jammed near drum unit Troubleshooting and Maintenance 65 MAINTENANCE Paper is jammed near the Drum Unit or in the Multi-purpose Sheet Feeder 1 Push down the paper lever to pull the jammed paper upward and out of the feeder. 2 Open the top cover and check that a torn piece of paper does not remain inside the machine. 3 Close the top cover. Paper is Jammed in the Fuser Unit 1 Open the top cover by pulling the lever toward you. 2 Remove the drum unit. 3 Gently pull out the jammed paper. 4 Reinstall the drum unit. 5 Close the top cover.
Paper is Jammed near drum unit Troubleshooting and Maintenance 65 MAINTENANCE Paper is jammed near the Drum Unit or in the Multi-purpose Sheet Feeder 1 Push down the paper lever to pull the jammed paper upward and out of the feeder. 2 Open the top cover and check that a torn piece of paper does not remain inside the machine. 3 Close the top cover. Paper is Jammed in the Fuser Unit 1 Open the top cover by pulling the lever toward you. 2 Remove the drum unit. 3 Gently pull out the jammed paper. 4 Reinstall the drum unit. 5 Close the top cover.
Owners Manual
Page 72
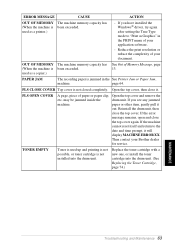
...the machine. The toner cartridge and drum unit are the first two lines and last two lines, leaves 62 the screen but do not show "MFC Connect Failure" each time you restart ...quality or the number OF MEMORY error of a document. My headers or footers appear Most laser printers have text missing. The LCD shows appears on Usually these are installed properly. Please ...the top and bottom margins in your application software is curled, you have loaded the Brother software, the PC will not accept print. DIFFICULTY SUGGESTIONS General Printing Difficulties The machine does...
...the machine. The toner cartridge and drum unit are the first two lines and last two lines, leaves 62 the screen but do not show "MFC Connect Failure" each time you restart ...quality or the number OF MEMORY error of a document. My headers or footers appear Most laser printers have text missing. The LCD shows appears on Usually these are installed properly. Please ...the top and bottom margins in your application software is curled, you have loaded the Brother software, the PC will not accept print. DIFFICULTY SUGGESTIONS General Printing Difficulties The machine does...
Owners Manual
Page 73
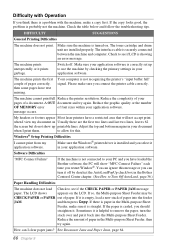
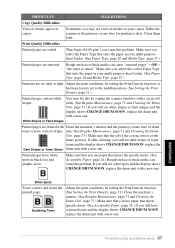
...you may fix this problem. MAINTENANCE Troubleshooting and Maintenance 67 Sometimes you still see white spots and the display shows CHANGE DRUM SOON, replace the drum unit with a new one . Thin Paper (64-69 g/m2) can cause "smeared pages"-OR- Make sure you select the Paper Type that... page 11.) Printed pages contain white stripes. You may see white stripes or faint images and the display shows CHANGE DRUM SOON, replace the drum unit with a new one . White Stripes or Faint Images Printed pages are curled. Make sure that meets the specifications. (See Acceptable Paper, page...
...you may fix this problem. MAINTENANCE Troubleshooting and Maintenance 67 Sometimes you still see white spots and the display shows CHANGE DRUM SOON, replace the drum unit with a new one . Thin Paper (64-69 g/m2) can cause "smeared pages"-OR- Make sure you select the Paper Type that... page 11.) Printed pages contain white stripes. You may see white stripes or faint images and the display shows CHANGE DRUM SOON, replace the drum unit with a new one . White Stripes or Faint Images Printed pages are curled. Make sure that meets the specifications. (See Acceptable Paper, page...
Owners Manual
Page 74
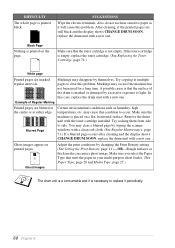
... toner cartridge. (See Replacing the Toner Cartridge, page 74.) White page Printed pages are still black and the display shows CHANGE DRUM SOON, replace the drum unit with a new one . If the toner cartridge is not empty. Blurred Page Certain environmental conditions such as it will cause this case, replace the... windows with a clean soft cloth. (See Regular Maintenance, page 71.) If a blurred page occurs after cleaning and the display shows CHANGE DRUM SOON, replace the drum unit with a new one . Remove the drum unit with a new one. SUGGESTIONS Wipe the electric terminals.
... toner cartridge. (See Replacing the Toner Cartridge, page 74.) White page Printed pages are still black and the display shows CHANGE DRUM SOON, replace the drum unit with a new one . If the toner cartridge is not empty. Blurred Page Certain environmental conditions such as it will cause this case, replace the... windows with a clean soft cloth. (See Regular Maintenance, page 71.) If a blurred page occurs after cleaning and the display shows CHANGE DRUM SOON, replace the drum unit with a new one . Remove the drum unit with a new one. SUGGESTIONS Wipe the electric terminals.
Owners Manual
Page 75
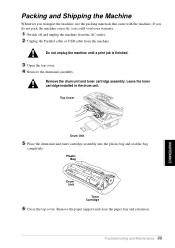
... If you do not pack the machine correctly, you transport the machine, use the packing materials that came with the machine. Plastic Bag Drum Unit Toner Cartridge 6 Close the top cover. Troubleshooting and Maintenance 69 MAINTENANCE Do not unplug the machine until a print job is finished. ...3 Open the top cover. 4 Remove the drum unit assembly. Packing and Shipping the Machine Whenever you could void your warranty. 1 Switch off and unplug the machine from the AC outlet. 2 ...
... If you do not pack the machine correctly, you transport the machine, use the packing materials that came with the machine. Plastic Bag Drum Unit Toner Cartridge 6 Close the top cover. Troubleshooting and Maintenance 69 MAINTENANCE Do not unplug the machine until a print job is finished. ...3 Open the top cover. 4 Remove the drum unit assembly. Packing and Shipping the Machine Whenever you could void your warranty. 1 Switch off and unplug the machine from the AC outlet. 2 ...
Owners Manual
Page 76
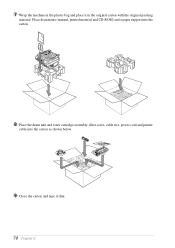
Place documents (manual, printed material and CD-ROM) and a paper support into the carton. 8 Place the drum unit and toner cartridge assembly, filter cores, cable ties, power cord and printer cable into the carton as shown below. 9 Close the carton and tape it in the plastic bag and place it shut. 70 Chapter 9 7 Wrap the machine in the original carton with the original packing material.
Place documents (manual, printed material and CD-ROM) and a paper support into the carton. 8 Place the drum unit and toner cartridge assembly, filter cores, cable ties, power cord and printer cable into the carton as shown below. 9 Close the carton and tape it in the plastic bag and place it shut. 70 Chapter 9 7 Wrap the machine in the original carton with the original packing material.
Owners Manual
Page 77
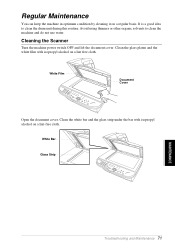
... Maintenance You can keep the machine in optimum condition by cleaning it on a regular basis. Avoid using thinners or other organic solvents to clean the drum unit during this routine. White Bar Glass Strip MAINTENANCE Troubleshooting and Maintenance 71 White Film Document Cover Open the document cover.
... Maintenance You can keep the machine in optimum condition by cleaning it on a regular basis. Avoid using thinners or other organic solvents to clean the drum unit during this routine. White Bar Glass Strip MAINTENANCE Troubleshooting and Maintenance 71 White Film Document Cover Open the document cover.

Owners Manual
Page 78
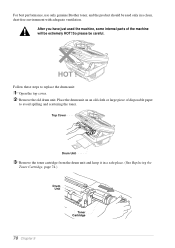
When you have used the machine, some internal parts of the machine, never touch the shaded parts shown in the diagram below. 1 Open the top cover. 2 Remove the drum unit assembly. 3 Wipe the electric terminals with isopropyl alcohol on the panel. • Do not use isopropyl alcohol to clean the .... • Do not touch the scanner window with a clean soft dry cloth. If toner scatters and your finger. • Handle the drum unit carefully as it off with cold water. Toner Sensor Gears Electrical Terminal Scanner Window After you open the top cover of the machine are extremely...
When you have used the machine, some internal parts of the machine, never touch the shaded parts shown in the diagram below. 1 Open the top cover. 2 Remove the drum unit assembly. 3 Wipe the electric terminals with isopropyl alcohol on the panel. • Do not use isopropyl alcohol to clean the .... • Do not touch the scanner window with a clean soft dry cloth. If toner scatters and your finger. • Handle the drum unit carefully as it off with cold water. Toner Sensor Gears Electrical Terminal Scanner Window After you open the top cover of the machine are extremely...
Owners Manual
Page 79
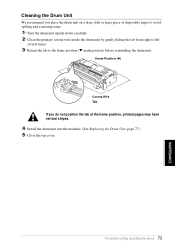
...primary corona wire inside the drum unit by gently sliding the tab from right to left several times. 3 Return the tab to the home position (w mark position) before reinstalling the drum unit. Troubleshooting and Maintenance 73 MAINTENANCE Cleaning the Drum Unit We recommend you do not... position the tab at the home position, printed pages may have vertical stripes. 4 Install the drum unit into the machine. (See Replacing the Drum Unit, page 77.) 5 Close...
...primary corona wire inside the drum unit by gently sliding the tab from right to left several times. 3 Return the tab to the home position (w mark position) before reinstalling the drum unit. Troubleshooting and Maintenance 73 MAINTENANCE Cleaning the Drum Unit We recommend you do not... position the tab at the home position, printed pages may have vertical stripes. 4 Install the drum unit into the machine. (See Replacing the Drum Unit, page 77.) 5 Close...
Owners Manual
Page 81
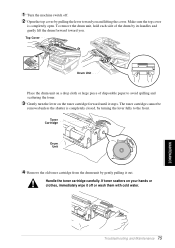
...lever fully to avoid spilling and scattering the toner. 3 Gently turn the lever on a drop cloth or large piece of the drum by gently pulling it stops. Troubleshooting and Maintenance 75 MAINTENANCE Make sure the top cover is completely closed, by pulling the lever ...shutter is completely open. Top Cover Drum Unit Place the drum unit on the toner cartridge forward until it out. Toner Cartridge Drum Unit 4 Remove the old toner cartridge from the drum unit by its handles and gently lift the drum forward toward you . To remove the drum unit, hold each side of disposable paper...
...lever fully to avoid spilling and scattering the toner. 3 Gently turn the lever on a drop cloth or large piece of the drum by gently pulling it stops. Troubleshooting and Maintenance 75 MAINTENANCE Make sure the top cover is completely closed, by pulling the lever ...shutter is completely open. Top Cover Drum Unit Place the drum unit on the toner cartridge forward until it out. Toner Cartridge Drum Unit 4 Remove the old toner cartridge from the drum unit by its handles and gently lift the drum forward toward you . To remove the drum unit, hold each side of disposable paper...
Owners Manual
Page 82
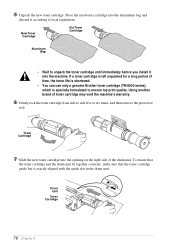
... on the right side of time, the toner life is shortened. • You can use only a genuine Brother toner cartridge (TN-8000 series), which is exactly aligned with the guide slot in the drum unit. Drum Unit Toner Cartridge 76 Chapter 9 New Toner Cartridge Old Toner Cartridge Aluminum Bag • Wait to unpack the toner...
... on the right side of time, the toner life is shortened. • You can use only a genuine Brother toner cartridge (TN-8000 series), which is exactly aligned with the guide slot in the drum unit. Drum Unit Toner Cartridge 76 Chapter 9 New Toner Cartridge Old Toner Cartridge Aluminum Bag • Wait to unpack the toner...
Owners Manual
Page 83
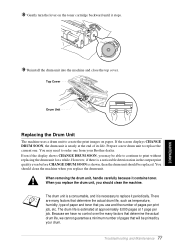
... may be printed by your Brother dealer. 8 Gently turn the lever on paper. There are many factors that determine the actual drum life, we cannot guarantee a minimum number of pages that you may need to replace the current one from your drum. Top Cover Drum Unit Replacing the Drum Unit The machine uses a drum unit to replace it is shown...
... may be printed by your Brother dealer. 8 Gently turn the lever on paper. There are many factors that determine the actual drum life, we cannot guarantee a minimum number of pages that you may need to replace the current one from your drum. Top Cover Drum Unit Replacing the Drum Unit The machine uses a drum unit to replace it is shown...
Owners Manual
Page 84
... with adequate ventilation. Place the drum unit on an old cloth or large piece of the machine will be careful. So please be extremely HOT! For best performance, use only genuine Brother toner, and the product should be used the machine, some internal parts of disposable paper to replace the drum unit: 1 Open the top cover...
... with adequate ventilation. Place the drum unit on an old cloth or large piece of the machine will be careful. So please be extremely HOT! For best performance, use only genuine Brother toner, and the product should be used the machine, some internal parts of disposable paper to replace the drum unit: 1 Open the top cover...
Owners Manual
Page 85
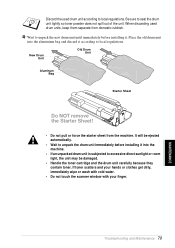
... scanner window with your finger. MAINTENANCE Troubleshooting and Maintenance 79 It will be damaged. • Handle the toner cartridge and the drum unit carefully because they contain toner. New Drum Unit Old Drum Unit Aluminum Bag Starter Sheet Do NOT remove the Starter Sheet! • Do not pull or force the starter sheet from domestic rubbish...
... scanner window with your finger. MAINTENANCE Troubleshooting and Maintenance 79 It will be damaged. • Handle the toner cartridge and the drum unit carefully because they contain toner. New Drum Unit Old Drum Unit Aluminum Bag Starter Sheet Do NOT remove the Starter Sheet! • Do not pull or force the starter sheet from domestic rubbish...
Owners Manual
Page 86
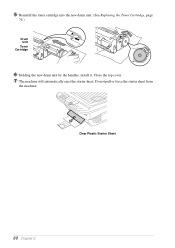
Clear Plastic Starter Sheet 80 Chapter 9 Do not pull or force the starter sheet from the machine. 5 Reinstall the toner cartridge into the new drum unit. (See Replacing the Toner Cartridge, page 74.) Drum Unit Toner Cartridge 6 Holding the new drum unit by the handles, install it. Close the top cover. 7 The machine will automatically eject the starter sheet.
Clear Plastic Starter Sheet 80 Chapter 9 Do not pull or force the starter sheet from the machine. 5 Reinstall the toner cartridge into the new drum unit. (See Replacing the Toner Cartridge, page 74.) Drum Unit Toner Cartridge 6 Holding the new drum unit by the handles, install it. Close the top cover. 7 The machine will automatically eject the starter sheet.

Owners Manual
Page 91
Drum Unit: Life Expectancy: 8,000 pages at 5% print coverage) Toner life expectancy will vary depending on the type of pages per print job, etc. G3, G4, iMac ...: Life Expectancy: up to 2,200 pages/new toner cartridge (when printing A4 paper at 1 page per job There are many factors that determine the actual drum life, such as temperature, humidity, type of paper and toner that you use, the number of average print job. Computer Requirement Operating System 95, 98...
Drum Unit: Life Expectancy: 8,000 pages at 5% print coverage) Toner life expectancy will vary depending on the type of pages per print job, etc. G3, G4, iMac ...: Life Expectancy: up to 2,200 pages/new toner cartridge (when printing A4 paper at 1 page per job There are many factors that determine the actual drum life, such as temperature, humidity, type of paper and toner that you use, the number of average print job. Computer Requirement Operating System 95, 98...
Owners Manual
Page 94
Index A Accessories 87 Administrator 32 B Brother Control Centre 35-36 C CHANGE DRUM SOON 62, 77 CHANGE TONER 62, 74 CHECK DRUM UNIT 62 CHECK PAPER 62 CHECK PAPER SIZE 62 Cleaning (Drum Unit 73 Cleaning (Printer 72 Cleaning (Scanner 71 Control Panel Overview 6 COOLING DOWN 62 Copy (2in1, 4in1,...Sort 16 Copy Contrast 16 Copy Mode 19 Copy Operations 12 COVER OPEN 62 D Device Options 31 Difficulty 66 Document Jam 64 DOS 60 Drum Unit (Replacing 77 Duplex Printing 28 E Error Messages 62 F Function Selection Table 8 H HELP 11 I iMac 53 Important Safety Instructions 81 ...
Index A Accessories 87 Administrator 32 B Brother Control Centre 35-36 C CHANGE DRUM SOON 62, 77 CHANGE TONER 62, 74 CHECK DRUM UNIT 62 CHECK PAPER 62 CHECK PAPER SIZE 62 Cleaning (Drum Unit 73 Cleaning (Printer 72 Cleaning (Scanner 71 Control Panel Overview 6 COOLING DOWN 62 Copy (2in1, 4in1,...Sort 16 Copy Contrast 16 Copy Mode 19 Copy Operations 12 COVER OPEN 62 D Device Options 31 Difficulty 66 Document Jam 64 DOS 60 Drum Unit (Replacing 77 Duplex Printing 28 E Error Messages 62 F Function Selection Table 8 H HELP 11 I iMac 53 Important Safety Instructions 81 ...


