Owners Manual
Page 4
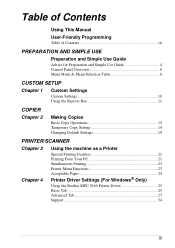
... Control Panel Overview 6 Menu Mode & Menu Selection Table 8 CUSTOM SETUP Chapter 1 Custom Settings Custom Settings 10 Using the Reports Key 11 COPIER Chapter 2 Making Copies Basic Copy Operations 12 Temporary Copy Setting 14 Changing Default Settings 19 PRINTER/SCANNER Chapter 3 Chapter 4 Using the machine as a Printer Special Printing Features 21 Printing From Your PC 21 Simultaneous Printing 23 Printer Menu Functions 23 Acceptable Paper 24 Printer Driver Settings (For Windows® Only) Using the Brother MFC-9160 Printer Driver 25 Basic Tab 25 Advanced Tab 27 Support...
... Control Panel Overview 6 Menu Mode & Menu Selection Table 8 CUSTOM SETUP Chapter 1 Custom Settings Custom Settings 10 Using the Reports Key 11 COPIER Chapter 2 Making Copies Basic Copy Operations 12 Temporary Copy Setting 14 Changing Default Settings 19 PRINTER/SCANNER Chapter 3 Chapter 4 Using the machine as a Printer Special Printing Features 21 Printing From Your PC 21 Simultaneous Printing 23 Printer Menu Functions 23 Acceptable Paper 24 Printer Driver Settings (For Windows® Only) Using the Brother MFC-9160 Printer Driver 25 Basic Tab 25 Advanced Tab 27 Support...
Owners Manual
Page 12
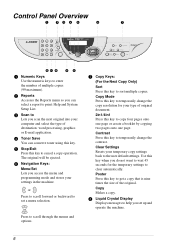
... user default settings. Use this key to sort multiple copies. or Press to scroll forward or backward to temporarily change the contrast. Copy Makes a copy. 8 Liquid Crystal Display Displays messages to help you access the menu and programming mode and stores your settings in the machine. Poster Press this key to cancel a copy operation. Control Panel Overview 1 23 4 5 6 7 12 11 10 9 8 1 Numeric Keys Use the numeric keys to enter the number of multiple copies (99 maximum). 2 Reports Accesses the Reports menu so you can select a report to print: Help and System Setup List...
... user default settings. Use this key to sort multiple copies. or Press to scroll forward or backward to temporarily change the contrast. Copy Makes a copy. 8 Liquid Crystal Display Displays messages to help you access the menu and programming mode and stores your settings in the machine. Poster Press this key to cancel a copy operation. Control Panel Overview 1 23 4 5 6 7 12 11 10 9 8 1 Numeric Keys Use the numeric keys to enter the number of multiple copies (99 maximum). 2 Reports Accesses the Reports menu so you can select a report to print: Help and System Setup List...
Owners Manual
Page 21
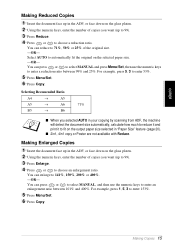
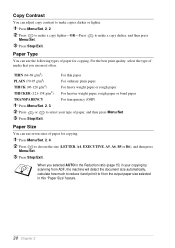
... you selected AUTO in your copying by scanning from ADF, the machine will detect the document size automatically, calculate how much to reduce it and print it to fit on the selected paper size. -OR- You can reduce to 71%, 50% or 25% of the original size. -OR- Making Copies 15 For example, press 5, 3 to enter 153%. 5 Press Menu/Set. 6 Press Copy. s 2in1, 4in1 copy or Poster are...
... you selected AUTO in your copying by scanning from ADF, the machine will detect the document size automatically, calculate how much to reduce it and print it to fit on the selected paper size. -OR- You can reduce to 71%, 50% or 25% of the original size. -OR- Making Copies 15 For example, press 5, 3 to enter 153%. 5 Press Menu/Set. 6 Press Copy. s 2in1, 4in1 copy or Poster are...

Owners Manual
Page 25
... (AUTO, TEXT or PHOTO), and then press 3 Press Stop/Exit. Press Menu/Set to save your type of original. Making Copies 19 Press Menu/Set, and 2. 1.COPY MODE 2.CONTRAST 3.PAPER TYPE 4.PAPER SIZE AUTO TEXT PHOTO - + THIN PLAIN THICK THICKER TRNSPRNCY LETTER A4 EXECUTIVE A5 A6 B5 B6 is used for each setting. COPIER Changing Default Settings Press Menu/Set, 2 to change default settings for originals containing only text. Press Stop/Exit-OR-Press to choose the type of Original) You can adjust copy settings...
... (AUTO, TEXT or PHOTO), and then press 3 Press Stop/Exit. Press Menu/Set to save your type of original. Making Copies 19 Press Menu/Set, and 2. 1.COPY MODE 2.CONTRAST 3.PAPER TYPE 4.PAPER SIZE AUTO TEXT PHOTO - + THIN PLAIN THICK THICKER TRNSPRNCY LETTER A4 EXECUTIVE A5 A6 B5 B6 is used for each setting. COPIER Changing Default Settings Press Menu/Set, 2 to change default settings for originals containing only text. Press Stop/Exit-OR-Press to choose the type of Original) You can adjust copy settings...
Owners Manual
Page 26
... transparency (OHP) 1 Press Menu/Set, 2, 3. 2 Press or to select your copying by scanning from ADF, the machine will detect the document size automatically, calculate how much to reduce it and print it to fit on the output paper size selected in your type of paper for copying. to make a copy lighter-OR-Press Menu/Set. Copy Contrast You can adjust copy contrast to make copies darker or lighter. 1 Press Menu/Set, 2, 2. 2 Press to make a copy darker, and then...
... transparency (OHP) 1 Press Menu/Set, 2, 3. 2 Press or to select your copying by scanning from ADF, the machine will detect the document size automatically, calculate how much to reduce it and print it to fit on the output paper size selected in your type of paper for copying. to make a copy lighter-OR-Press Menu/Set. Copy Contrast You can adjust copy contrast to make copies darker or lighter. 1 Press Menu/Set, 2, 2. 2 Press to make a copy darker, and then...
Owners Manual
Page 27
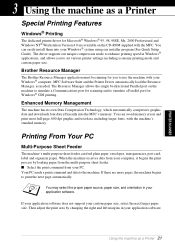
... sheet feeder can avoid memory errors and print most full-page, 600 dpi graphic and text data, including larger fonts, with your PC. When the machine receives data from your Windows® computer. MFC Software Suite and the Printer Driver automatically load the Resource Manager, as a Printer 21 You can feed plain paper, envelopes, transparencies, post card, label and organizer paper. s Select the print command from your Windows® system using our installer program (See Quick Setup Guide). PRINTER/SCANNER 3 Using the machine as a Printer...
... sheet feeder can avoid memory errors and print most full-page, 600 dpi graphic and text data, including larger fonts, with your PC. When the machine receives data from your Windows® computer. MFC Software Suite and the Printer Driver automatically load the Resource Manager, as a Printer 21 You can feed plain paper, envelopes, transparencies, post card, label and organizer paper. s Select the print command from your Windows® system using our installer program (See Quick Setup Guide). PRINTER/SCANNER 3 Using the machine as a Printer...

Owners Manual
Page 28
... satisfactory. Then, the Windows® driver instructs you load the envelopes and slide the paper guides to 10 envelopes into the Multi-purpose sheet feeder. Before reinserting the paper, straighten it is possible that a paper jam may get a paper jam. Two-Sided Printing (Manual Duplex) The supplied printer drivers for Windows® 95/98/98SE/Me and Windows NT® Workstation Version 4.0 support manual duplex printing. (For more information, see the Help screen for the front sheet while the paper is feeding.
... satisfactory. Then, the Windows® driver instructs you load the envelopes and slide the paper guides to 10 envelopes into the Multi-purpose sheet feeder. Before reinserting the paper, straighten it is possible that a paper jam may get a paper jam. Two-Sided Printing (Manual Duplex) The supplied printer drivers for Windows® 95/98/98SE/Me and Windows NT® Workstation Version 4.0 support manual duplex printing. (For more information, see the Help screen for the front sheet while the paper is feeding.
Owners Manual
Page 34
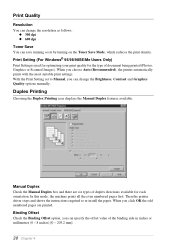
... by turning on the Toner Save Mode, which reduces the print density. In this mode, the machine prints all the even numbered pages first. Duplex Printing Choosing the Duplex Printing icon displays the Manual Duplex features available. Binding Offset Check the Binding Offset option, you choose Auto (Recommended), the printer automatically prints with the most suitable print settings. Then the printer driver stops and shows the instructions required to Manual, you click OK the odd numbered pages are six types of duplex directions...
... by turning on the Toner Save Mode, which reduces the print density. In this mode, the machine prints all the even numbered pages first. Duplex Printing Choosing the Duplex Printing icon displays the Manual Duplex features available. Binding Offset Check the Binding Offset option, you choose Auto (Recommended), the printer automatically prints with the most suitable print settings. Then the printer driver stops and shows the instructions required to Manual, you click OK the odd numbered pages are six types of duplex directions...
Owners Manual
Page 40
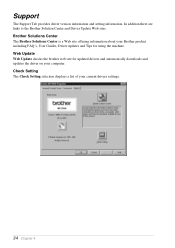
... Center The Brother Solutions Center is a Web site offering information about your current drivers settings. 34 Chapter 4 Check Setting The Check Setting selection displays a list of your Brother product including FAQ's, User Guides, Driver updates and Tips for updated drivers and automatically downloads and updates the driver on your computer. Support The Support Tab provides driver version information and setting information. Web Update Web Update checks the brother web site for using the machine. In addition there are links to the Brother Solution Center and Driver Update Web...
... Center The Brother Solutions Center is a Web site offering information about your current drivers settings. 34 Chapter 4 Check Setting The Check Setting selection displays a list of your Brother product including FAQ's, User Guides, Driver updates and Tips for updated drivers and automatically downloads and updates the driver on your computer. Support The Support Tab provides driver version information and setting information. Web Update Web Update checks the brother web site for using the machine. In addition there are links to the Brother Solution Center and Driver Update Web...
Owners Manual
Page 42
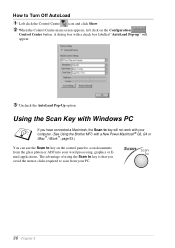
...-Up option. How to Turn Off AutoLoad 1 Left click the Control Centre icon and click Show. 2 When the Control Centre main screen appears, left click on the control panel to scan from the glass platen or ADF into your PC. 36 Chapter 5 A dialog box with a check box labelled "AutoLoad Pop-up" will not work with your computer. (See Using the Brother MFC with Windows PC...
...-Up option. How to Turn Off AutoLoad 1 Left click the Control Centre icon and click Show. 2 When the Control Centre main screen appears, left click on the control panel to scan from the glass platen or ADF into your PC. 36 Chapter 5 A dialog box with a check box labelled "AutoLoad Pop-up" will not work with your computer. (See Using the Brother MFC with Windows PC...
Owners Manual
Page 43
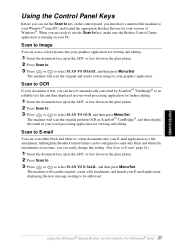
... Image You can scan a colour picture into your E-mail application, displaying the new message waiting to be configured to send only black and white file attachments at one time, you can easily change this setting. (See Scan to E-mail, page 42.) 1 Insert the document face up in the ADF, or face down on the glass platen. 2 Press Scan to. 3 Press or to select SCAN TO OCR, and then press Menu/Set. The machine will scan...
... Image You can scan a colour picture into your E-mail application, displaying the new message waiting to be configured to send only black and white file attachments at one time, you can easily change this setting. (See Scan to E-mail, page 42.) 1 Insert the document face up in the ADF, or face down on the glass platen. 2 Press Scan to. 3 Press or to select SCAN TO OCR, and then press Menu/Set. The machine will scan...
Owners Manual
Page 56
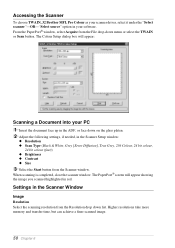
... ADF, or face down on the glass platen. 2 Adjust the following settings, if needed, in the Scanner Setup window: x Resolution x Scan Type (Black & White, Grey [Error Diffusion], True Grey, 256 Colour, 24 bit colour, 24 bit colour (fast)) x Brightness x Contrast x Size 3 Select the Start button from the Resolution drop down menu or select the TWAIN or Scan button. When scanning is completed, close the scanner window. Higher resolutions take more memory...
... ADF, or face down on the glass platen. 2 Adjust the following settings, if needed, in the Scanner Setup window: x Resolution x Scan Type (Black & White, Grey [Error Diffusion], True Grey, 256 Colour, 24 bit colour, 24 bit colour (fast)) x Brightness x Contrast x Size 3 Select the Start button from the Resolution drop down menu or select the TWAIN or Scan button. When scanning is completed, close the scanner window. Higher resolutions take more memory...
Owners Manual
Page 57
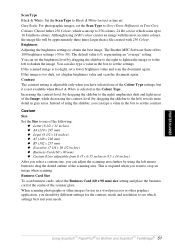
... scanner glass. Brightness Adjusting the brightness settings to 50). You can type a value in grey areas. PRINTER/SCANNER Scan Type Black & White: Set the Scan Type to Black & White for Brother and ScanSoft™ TextBridge® 51 Grey Scale: For photographic images, set the contrast. The Brother MFC Software Suite offers 100 brightness settings (-50 to obtain the best image. The default value is selected as the Colour Type. Business Card Size To scan business cards, select the Business Card...
... scanner glass. Brightness Adjusting the brightness settings to 50). You can type a value in grey areas. PRINTER/SCANNER Scan Type Black & White: Set the Scan Type to Black & White for Brother and ScanSoft™ TextBridge® 51 Grey Scale: For photographic images, set the contrast. The Brother MFC Software Suite offers 100 brightness settings (-50 to obtain the best image. The default value is selected as the Colour Type. Business Card Size To scan business cards, select the Business Card...
Owners Manual
Page 66
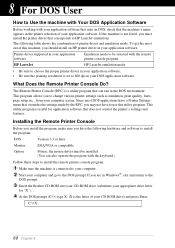
... you install the program, make sure you have to use this machine, you should install an HP printer driver in your computer screen. To get the most DOS applications have a Printer Settings menu that overrides the settings made by the RPC, you to change various printer settings such as emulation, print quality, fonts, page setup etc., from your application software. If the machine is connected to your computer. 2 Start your DOS application software. Printer driver supported in...
... you install the program, make sure you have to use this machine, you should install an HP printer driver in your computer screen. To get the most DOS applications have a Printer Settings menu that overrides the settings made by the RPC, you to change various printer settings such as emulation, print quality, fonts, page setup etc., from your application software. If the machine is connected to your computer. 2 Start your DOS application software. Printer driver supported in...
Owners Manual
Page 68
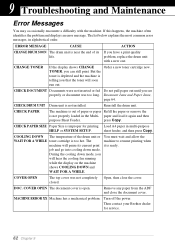
.... sheet feeder, and then press Copy. But the toner is depleted and the machine is not properly loaded in alphabetical order. If this happens, the machine often identifies the problem and displays an error message. ERROR MESSAGE CAUSE ACTION CHANGE DRUM SOON The drum unit is ready. CHANGE TONER If the display shows CHANGE Order a new toner cartridge now. COVER OPEN The document cover is improper for service. 62 Chapter 9 CHECK PAPER SIZE Paper Size is open. 9 Troubleshooting and Maintenance Error Messages You may occasionally encounter a difficulty with a new one...
.... sheet feeder, and then press Copy. But the toner is depleted and the machine is not properly loaded in alphabetical order. If this happens, the machine often identifies the problem and displays an error message. ERROR MESSAGE CAUSE ACTION CHANGE DRUM SOON The drum unit is ready. CHANGE TONER If the display shows CHANGE Order a new toner cartridge now. COVER OPEN The document cover is improper for service. 62 Chapter 9 CHECK PAPER SIZE Paper Size is open. 9 Troubleshooting and Maintenance Error Messages You may occasionally encounter a difficulty with a new one...
Owners Manual
Page 69
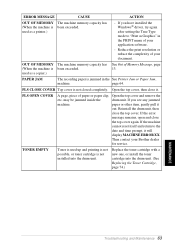
... printing is not possible, or toner cartridge is jammed in the PRINT menu of your Brother dealer for service. PAPER JAM The recording paper is not installed into the drum unit. (See Replacing the Toner Cartridge, page 74.) MAINTENANCE Troubleshooting and Maintenance 63 page 64. If you have installed the Windows® driver, try again after setting the True Type mode to the date and time prompt, it will display MACHINE ERROR XX. Then contact your document. Open the top cover, then close the top cover again. paper...
... printing is not possible, or toner cartridge is jammed in the PRINT menu of your Brother dealer for service. PAPER JAM The recording paper is not installed into the drum unit. (See Replacing the Toner Cartridge, page 74.) MAINTENANCE Troubleshooting and Maintenance 63 page 64. If you have installed the Windows® driver, try again after setting the True Type mode to the date and time prompt, it will display MACHINE ERROR XX. Then contact your document. Open the top cover, then close the top cover again. paper...
Owners Manual
Page 72
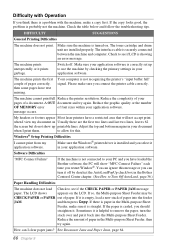
... not print. The toner cartridge and drum unit are the first two lines and last two lines, leaves 62 the screen but do not show "MFC Connect Failure" each time you select it off . Check to remove the paper, turn it in the Multi-purpose Sheet Feeder, make sure it prints garbage. The machine cannot print full Reduce the printer resolution. A OUT document and try again. Make sure the Windows® printer driver is empty, load a new stack of a document...
... not print. The toner cartridge and drum unit are the first two lines and last two lines, leaves 62 the screen but do not show "MFC Connect Failure" each time you select it off . Check to remove the paper, turn it in the Multi-purpose Sheet Feeder, make sure it prints garbage. The machine cannot print full Reduce the printer resolution. A OUT document and try again. Make sure the Windows® printer driver is empty, load a new stack of a document...
Owners Manual
Page 73
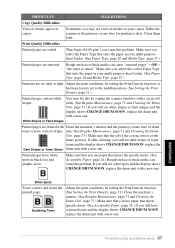
... CHANGE DRUM SOON, replace the drum unit with a new one . Scattering Toner Adjust the print conditions by setting the Print Density function. (See Setting the Print Density, page 11.) Clean the machine's interior. (See Regular Maintenance, page 71 and Cleaning the Drum Unit, page 73.) Make sure that you still see vertical streaks on your multi-purpose sheet feeder. (See Paper Type, page 20 and Media Type, page 27.) Printed pages are too dark or light. You may see white stripes or faint images and the display shows CHANGE DRUM...
... CHANGE DRUM SOON, replace the drum unit with a new one . Scattering Toner Adjust the print conditions by setting the Print Density function. (See Setting the Print Density, page 11.) Clean the machine's interior. (See Regular Maintenance, page 71 and Cleaning the Drum Unit, page 73.) Make sure that you still see vertical streaks on your multi-purpose sheet feeder. (See Paper Type, page 20 and Media Type, page 27.) Printed pages are too dark or light. You may see white stripes or faint images and the display shows CHANGE DRUM...
Owners Manual
Page 74
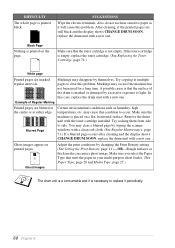
... machine has not been used for a long time. Remove the drum unit with a new one . Try rocking them from side to occur. Make sure you select the Paper Type that the toner cartridge is empty, replace the toner cartridge. (See Replacing the Toner Cartridge, page 74.) White page Printed pages are blurred at the centre or at multiple pages to clear this condition to side. After cleaning, if the printed pages are still black and the display shows CHANGE DRUM SOON, replace the drum unit with the toner cartridge installed. If the toner cartridge...
... machine has not been used for a long time. Remove the drum unit with a new one . Try rocking them from side to occur. Make sure you select the Paper Type that the toner cartridge is empty, replace the toner cartridge. (See Replacing the Toner Cartridge, page 74.) White page Printed pages are blurred at the centre or at multiple pages to clear this condition to side. After cleaning, if the printed pages are still black and the display shows CHANGE DRUM SOON, replace the drum unit with the toner cartridge installed. If the toner cartridge...

Owners Manual
Page 95
... PLS OPEN COVER 63 Power Cord 5 Power Save 10 Print a Report 11 Print Date & Time 33 Print Density 11 Printer Driver Settings 25 Product Description 84 Troubleshooting 62 W Watermark 29 Word Processor 44 Q Quick Print Setup 31 R Reports 6 Reset Key 23 S Safety Instructions 81 Scan Image 37 Scan Keys 36 Scan to E-mail 37 Scan to File 41 Scan to Word Processor 44 Scan/OCR 37 Scanning into PC 50 ScanSoft™ PaperPort 47 Simultaneous Printing 23 Sleep Mode 10 Specifications 84 SYSTEM SETUP 11 APPENDIX T Toner Cartridge (Replacing 74 TONER...
... PLS OPEN COVER 63 Power Cord 5 Power Save 10 Print a Report 11 Print Date & Time 33 Print Density 11 Printer Driver Settings 25 Product Description 84 Troubleshooting 62 W Watermark 29 Word Processor 44 Q Quick Print Setup 31 R Reports 6 Reset Key 23 S Safety Instructions 81 Scan Image 37 Scan Keys 36 Scan to E-mail 37 Scan to File 41 Scan to Word Processor 44 Scan/OCR 37 Scanning into PC 50 ScanSoft™ PaperPort 47 Simultaneous Printing 23 Sleep Mode 10 Specifications 84 SYSTEM SETUP 11 APPENDIX T Toner Cartridge (Replacing 74 TONER...


