Quick Setup Guide - English
Page 4
... Language (Canada Only 11 10. Release the Scanner Lock 6 5. Setting Your Station ID 10 9. Table of Contents Step 1 Setting Up the Machine Step 2 1. Install the Drum Unit Assembly 4 3. Load Paper in the Product Registration and Test Sheet (USA Only 11 Installing the Driver & Software Supplied CD-ROM (MFL-Pro Suite 12... Web BRAdmin (Windows® Users Only 51 Setting your IP Address, Subnet Mask and Gateway using BRAdmin Professional (Windows® Users Only 52 Options ...53 Replacement Consumables 53 3
... Language (Canada Only 11 10. Release the Scanner Lock 6 5. Setting Your Station ID 10 9. Table of Contents Step 1 Setting Up the Machine Step 2 1. Install the Drum Unit Assembly 4 3. Load Paper in the Product Registration and Test Sheet (USA Only 11 Installing the Driver & Software Supplied CD-ROM (MFL-Pro Suite 12... Web BRAdmin (Windows® Users Only 51 Setting your IP Address, Subnet Mask and Gateway using BRAdmin Professional (Windows® Users Only 52 Options ...53 Replacement Consumables 53 3

Quick Setup Guide - English
Page 54
...optional External Wireless Print/Scan Server (NC-2200w) provides the wireless network printing service and the network scanner service capability. Replacement Consumables Drum Unit DR-510 Toner TN-540/TN-570 Up to 3,300 A4/Letter pages @ 5% coverage. Network Print/Fax Server [... Chapter 21 (User's Guide). Setting Up the Machine Windows® USB Windows® Parallel Windows NT® 4.0 Parallel Options The MFC has the following optional accessories. Windows® Network Macintosh® USB Macintosh® Network For Administrators 53 You can expand the capabilities ...
...optional External Wireless Print/Scan Server (NC-2200w) provides the wireless network printing service and the network scanner service capability. Replacement Consumables Drum Unit DR-510 Toner TN-540/TN-570 Up to 3,300 A4/Letter pages @ 5% coverage. Network Print/Fax Server [... Chapter 21 (User's Guide). Setting Up the Machine Windows® USB Windows® Parallel Windows NT® 4.0 Parallel Options The MFC has the following optional accessories. Windows® Network Macintosh® USB Macintosh® Network For Administrators 53 You can expand the capabilities ...
Users Manual - English
Page 6
... Maintenance Items, such as Paper Feeding Kit, Fuser and Laser Units. The decision as otherwise provided herein, Brother warrants that the Machine and the accompanying Consumable and Accessory Items will repair or replace the Machine and/or accompanying Consumable and Accessory Items at ... Periods: • Machines: one year from the original purchase date. • Accompanying Consumable and Accessory Items: 90 days from Brother and/or alteration/removal of sale showing that you purchased is covered by Brother in shipping. Brother reserves the right to the Authorized...
... Maintenance Items, such as Paper Feeding Kit, Fuser and Laser Units. The decision as otherwise provided herein, Brother warrants that the Machine and the accompanying Consumable and Accessory Items will repair or replace the Machine and/or accompanying Consumable and Accessory Items at ... Periods: • Machines: one year from the original purchase date. • Accompanying Consumable and Accessory Items: 90 days from Brother and/or alteration/removal of sale showing that you purchased is covered by Brother in shipping. Brother reserves the right to the Authorized...
Users Manual - English
Page 20
... (For MFC-8640D, MFC-8840D and MFC-8840DN 12-11 If you are having difficulty with your MFC 12-13 Improving the print quality 12-18 Packing and shipping the MFC 12-22 Routine maintenance 12-25 Cleaning the scanner 12-25 Cleaning the printer 12-26 Cleaning the drum unit 12-27 Replacing the toner... cartridge 12-28 How to replace the toner cartridge 12-29 Replacing the drum unit 12-34 Checking the drum life 12-37 Page ...
... (For MFC-8640D, MFC-8840D and MFC-8840DN 12-11 If you are having difficulty with your MFC 12-13 Improving the print quality 12-18 Packing and shipping the MFC 12-22 Routine maintenance 12-25 Cleaning the scanner 12-25 Cleaning the printer 12-26 Cleaning the drum unit 12-27 Replacing the toner... cartridge 12-28 How to replace the toner cartridge 12-29 Replacing the drum unit 12-34 Checking the drum life 12-37 Page ...
Users Manual - English
Page 162
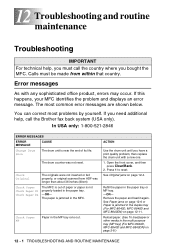
... one. 1. Check Paper Check Paper #1 Check Paper #2 The MFC is out of its life. Press 1 to reset. The most problems by yourself. then replace the drum unit with any sophisticated office product, errors may occur. See Paper jams on page 12-6 or Paper is not properly loaded in the duplex tray (For MFC-8640D, MFC-8840D and MFC...
... one. 1. Check Paper Check Paper #1 Check Paper #2 The MFC is out of its life. Press 1 to reset. The most problems by yourself. then replace the drum unit with any sophisticated office product, errors may occur. See Paper jams on page 12-6 or Paper is not properly loaded in the duplex tray (For MFC-8640D, MFC-8840D and MFC...

Users Manual - English
Page 176
Your computer is selected as the primary source. Most laser printers have text missing. Adjust the top and bottom margins in and the power switch turned On. (See the Quick Setup Guide.) • The toner cartridge and drum unit are the first two lines and last two lines, leaves 62 ...are installed properly. (See Replacing the drum unit on the screen but do not appear when I view my document on page 12-34.) • The interface cable is set up to connect the MFC cable correctly. Check the primary settings in the File menu and select the Brother TWAIN driver. 12 - 15...
Your computer is selected as the primary source. Most laser printers have text missing. Adjust the top and bottom margins in and the power switch turned On. (See the Quick Setup Guide.) • The toner cartridge and drum unit are the first two lines and last two lines, leaves 62 ...are installed properly. (See Replacing the drum unit on the screen but do not appear when I view my document on page 12-34.) • The interface cable is set up to connect the MFC cable correctly. Check the primary settings in the File menu and select the Brother TWAIN driver. 12 - 15...
Users Manual - English
Page 179
... on . Make sure that you choose the appropriate media type in the MFC itself. (See Toner Save on page 4-9.) Try installing a new toner cartridge. (See Replacing the toner cartridge on page 12-28.) Try installing a new drum unit. (See Replacing the drum unit on page 12-34.) Make sure that you use thinner paper than...
... on . Make sure that you choose the appropriate media type in the MFC itself. (See Toner Save on page 4-9.) Try installing a new toner cartridge. (See Replacing the toner cartridge on page 12-28.) Try installing a new drum unit. (See Replacing the drum unit on page 12-34.) Make sure that you use thinner paper than...
Users Manual - English
Page 180
... not solved after printing a few pages, the drum unit may be damaged. Do not touch the photosensitive drum with a cotton swab until the dust or paper powder on the surface comes off. Put in a new drum unit. (See Replacing the drum unit on . The drum unit may have located the mark on the... drum that matches the print sample, wipe the surface of the OPC drum with your fingers. Photosensitive drum 3 When you have glue from label stock on the ...
... not solved after printing a few pages, the drum unit may be damaged. Do not touch the photosensitive drum with a cotton swab until the dust or paper powder on the surface comes off. Put in a new drum unit. (See Replacing the drum unit on . The drum unit may have located the mark on the... drum that matches the print sample, wipe the surface of the OPC drum with your fingers. Photosensitive drum 3 When you have glue from label stock on the ...
Users Manual - English
Page 181
... of the printer and the primary corona wire in direct sunlight or room light, the unit may be damaged. Put in a new drum unit. (See Replacing the drum unit on page 12-26.) The toner cartridge may be damaged. The problem may disappear by wiping the scanner window with a soft... How to clear this problem, especially if the printer has not been used for laser printers, the glue from the sheets may clear the problem by itself. You may sometimes stick to curl. Install a new drum unit. (See Replacing the drum unit on page 2-1.) If you use label sheets for a long time.
... of the printer and the primary corona wire in direct sunlight or room light, the unit may be damaged. Put in a new drum unit. (See Replacing the drum unit on page 12-26.) The toner cartridge may be damaged. The problem may disappear by wiping the scanner window with a soft... How to clear this problem, especially if the printer has not been used for laser printers, the glue from the sheets may clear the problem by itself. You may sometimes stick to curl. Install a new drum unit. (See Replacing the drum unit on page 2-1.) If you use label sheets for a long time.

Users Manual - English
Page 182
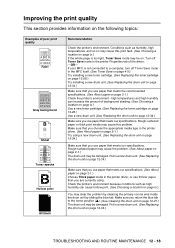
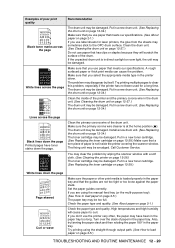
The drum unit is a consumable item and it is loaded properly. Check the paper type and quality. (See About paper on page 2-1.) Try printing using the straight-through output path. (See How to load paper on page 2-5.) Turn over the stack of poor print quality B DEFGH abc efghijk A CD bcde 1 34 Wrinkles or creases Recommendation Make sure that paper is necessary to replace it periodically. 12 - 21 TROUBLESHOOTING AND ROUTINE MAINTENANCE Examples of paper in the tray or try rotating the paper 180° in the input tray.
The drum unit is a consumable item and it is loaded properly. Check the paper type and quality. (See About paper on page 2-1.) Try printing using the straight-through output path. (See How to load paper on page 2-5.) Turn over the stack of poor print quality B DEFGH abc efghijk A CD bcde 1 34 Wrinkles or creases Recommendation Make sure that paper is necessary to replace it periodically. 12 - 21 TROUBLESHOOTING AND ROUTINE MAINTENANCE Examples of paper in the tray or try rotating the paper 180° in the input tray.
Users Manual - English
Page 188
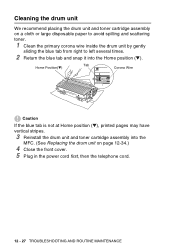
...is not at Home position (▼), printed pages may have vertical stripes. 3 Reinstall the drum unit and toner cartridge assembly into the Home position (▼). Cleaning the drum unit We recommend placing the drum unit and toner cartridge assembly on a cloth or large disposable paper to avoid spilling and ...scattering toner. 1 Clean the primary corona wire inside the drum unit by gently sliding the blue tab from right to left several times. 2 Return the blue tab and snap it into the MFC. (See Replacing the drum unit on page 12-34.) 4 Close the front cover. 5 Plug in...
...is not at Home position (▼), printed pages may have vertical stripes. 3 Reinstall the drum unit and toner cartridge assembly into the Home position (▼). Cleaning the drum unit We recommend placing the drum unit and toner cartridge assembly on a cloth or large disposable paper to avoid spilling and ...scattering toner. 1 Clean the primary corona wire inside the drum unit by gently sliding the blue tab from right to left several times. 2 Return the blue tab and snap it into the MFC. (See Replacing the drum unit on page 12-34.) 4 Close the front cover. 5 Plug in...
Users Manual - English
Page 190
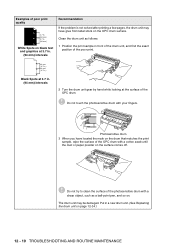
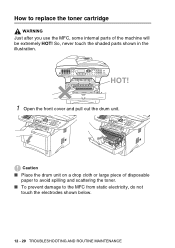
So, never touch the shaded parts shown in the illustration. HOT! 1 Open the front cover and pull out the drum unit. Caution ■ Place the drum unit on a drop cloth or large piece of disposable paper to avoid spilling and scattering the toner. ■ To prevent damage to replace the toner cartridge WARNING Just after you use the MFC, some internal parts of the machine will be extremely HOT! How to the MFC from static electricity, do not touch the electrodes shown below. 12 - 29 TROUBLESHOOTING AND ROUTINE MAINTENANCE
So, never touch the shaded parts shown in the illustration. HOT! 1 Open the front cover and pull out the drum unit. Caution ■ Place the drum unit on a drop cloth or large piece of disposable paper to avoid spilling and scattering the toner. ■ To prevent damage to replace the toner cartridge WARNING Just after you use the MFC, some internal parts of the machine will be extremely HOT! How to the MFC from static electricity, do not touch the electrodes shown below. 12 - 29 TROUBLESHOOTING AND ROUTINE MAINTENANCE
Users Manual - English
Page 195
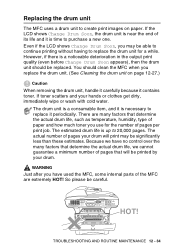
... the MFC, some internal parts of the MFC are many factors that determine the actual drum life, we cannot guarantee a minimum number of pages that determine the actual drum life, such as temperature, humidity, type of its life and it is necessary to replace it periodically. So please be replaced. If... item, and it is time to purchase a new one. TROUBLESHOOTING AND ROUTINE MAINTENANCE 12 - 34 You should be careful. There are extremely HOT! Even if the LCD shows Change Drum Soon, you replace the drum unit. (See Cleaning the drum unit on paper. However, if there is up to...
... the MFC, some internal parts of the MFC are many factors that determine the actual drum life, we cannot guarantee a minimum number of pages that determine the actual drum life, such as temperature, humidity, type of its life and it is necessary to replace it periodically. So please be replaced. If... item, and it is time to purchase a new one. TROUBLESHOOTING AND ROUTINE MAINTENANCE 12 - 34 You should be careful. There are extremely HOT! Even if the LCD shows Change Drum Soon, you replace the drum unit. (See Cleaning the drum unit on paper. However, if there is up to...
Users Manual - English
Page 196
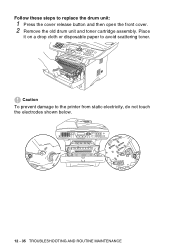
Follow these steps to avoid scattering toner. Place it on a drop cloth or disposable paper to replace the drum unit: 1 Press the cover release button and then open the front cover. 2 Remove the old drum unit and toner cartridge assembly. Caution To prevent damage to the printer from static electricity, do not touch the electrodes shown below. 12 - 35 TROUBLESHOOTING AND ROUTINE MAINTENANCE
Follow these steps to avoid scattering toner. Place it on a drop cloth or disposable paper to replace the drum unit: 1 Press the cover release button and then open the front cover. 2 Remove the old drum unit and toner cartridge assembly. Caution To prevent damage to the printer from static electricity, do not touch the electrodes shown below. 12 - 35 TROUBLESHOOTING AND ROUTINE MAINTENANCE
Users Manual - English
Page 197
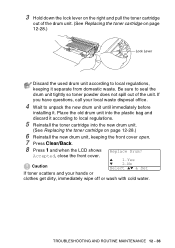
...toner cartridge on page 12-28.) Lock Lever Discard the used drum unit according to seal the drum unit tightly so toner powder does not spill out of the drum unit. (See Replacing the toner cartridge on page 12-28.) 6 Reinstall the new drum unit, keeping the front cover open. 7 Press Clear/Back.... 1 and when the LCD shows Accepted, close the front cover. Be sure to local regulations, keeping it separate from domestic waste. Caution Replace Drum? ▲ 1.Yes ▼ 2.No Select ▲▼ & Set If toner scatters and your local waste disposal office. 4 Wait to unpack the new...
...toner cartridge on page 12-28.) Lock Lever Discard the used drum unit according to seal the drum unit tightly so toner powder does not spill out of the drum unit. (See Replacing the toner cartridge on page 12-28.) 6 Reinstall the new drum unit, keeping the front cover open. 7 Press Clear/Back.... 1 and when the LCD shows Accepted, close the front cover. Be sure to local regulations, keeping it separate from domestic waste. Caution Replace Drum? ▲ 1.Yes ▼ 2.No Select ▲▼ & Set If toner scatters and your local waste disposal office. 4 Wait to unpack the new...
Users Manual - English
Page 224
... 7-8 access codes and credit card numbers 7-7 automatic fax redial ......... 6-8 from an external phone .... 7-6 Groups 6-16 Search 7-5 Speed Dial numbers ........ 7-6 Distinctive Ring 5-11 drum unit checking remaining life 12-37 replacing 12-34 Dual Access 6-9 Duplex/N in 1 key 10-11 Duplex/1 in 1 10-14 Duplex/2 in 1 10-16 Duplex/4 in 1 10-16 E Easy...
... 7-8 access codes and credit card numbers 7-7 automatic fax redial ......... 6-8 from an external phone .... 7-6 Groups 6-16 Search 7-5 Speed Dial numbers ........ 7-6 Distinctive Ring 5-11 drum unit checking remaining life 12-37 replacing 12-34 Dual Access 6-9 Duplex/N in 1 key 10-11 Duplex/1 in 1 10-14 Duplex/2 in 1 10-16 Duplex/4 in 1 10-16 E Easy...


