Quick Setup Guide - English
Page 2
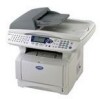
... (Support Flap) 3. (For MFC-8440) Manual Feed Tray (For MFC-8840D and MFC-8840DN) Multi-purpose Tray (MP Tray) 4. Paper Tray 5. Automatic Document Feeder (ADF) Quick Setup Guide CD-ROMs For Windows® For Macintosh® User's Guide ADF Support Drum Unit Assembly (including Toner Cartridge) AC... Power Cord Telephone Line Cord Test Sheet (USA only) Accessory Order Form (USA/Canada only) Carton components may differ from one country to use (Parallel or USB). ■ For ...
... (Support Flap) 3. (For MFC-8440) Manual Feed Tray (For MFC-8840D and MFC-8840DN) Multi-purpose Tray (MP Tray) 4. Paper Tray 5. Automatic Document Feeder (ADF) Quick Setup Guide CD-ROMs For Windows® For Macintosh® User's Guide ADF Support Drum Unit Assembly (including Toner Cartridge) AC... Power Cord Telephone Line Cord Test Sheet (USA only) Accessory Order Form (USA/Canada only) Carton components may differ from one country to use (Parallel or USB). ■ For ...
Quick Setup Guide - English
Page 4
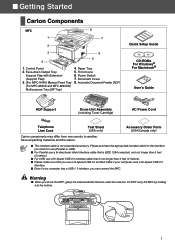
... 10 9. Sending in the Paper Tray 5 4. Selecting a Receive Mode 8 7. Table of Contents Step 1 Setting Up the Machine Step 2 1. Setting the Date and Time 9 8. Install the Drum Unit Assembly 4 3. Load Paper in the Product Registration and Test Sheet (USA Only 11 Installing the Driver & Software Supplied CD-ROM (MFL-Pro Suite 12 For...
... 10 9. Sending in the Paper Tray 5 4. Selecting a Receive Mode 8 7. Table of Contents Step 1 Setting Up the Machine Step 2 1. Setting the Date and Time 9 8. Install the Drum Unit Assembly 4 3. Load Paper in the Product Registration and Test Sheet (USA Only 11 Installing the Driver & Software Supplied CD-ROM (MFL-Pro Suite 12 For...
Quick Setup Guide - English
Page 5
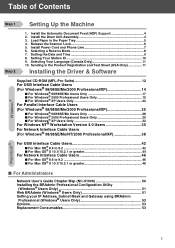
Tab Front Cover Hole Tab ADF Support 3 Push ADF Support down until it latches in place. 2 Unpack the drum unit assembly. Remove the protective part. Step 1 Setting Up the Machine 1 Install the Automatic Document Feed (ADF) Support Do NOT connect the interface ...cable. Connecting the interface cable is done when installing the driver. 2 Install the Drum Unit Assembly 1 Open the front cover by pressing the front cover release button. 1 Open the ADF cover. Front Cover Release Button ADF Cover 2 Insert ...
Tab Front Cover Hole Tab ADF Support 3 Push ADF Support down until it latches in place. 2 Unpack the drum unit assembly. Remove the protective part. Step 1 Setting Up the Machine 1 Install the Automatic Document Feed (ADF) Support Do NOT connect the interface ...cable. Connecting the interface cable is done when installing the driver. 2 Install the Drum Unit Assembly 1 Open the front cover by pressing the front cover release button. 1 Open the ADF cover. Front Cover Release Button ADF Cover 2 Insert ...

Quick Setup Guide - English
Page 6
... it from side to side several times to fit the paper size. Paper Guide Release Lever 5 Close the front cover of the machine. 4 Push the drum unit assembly into place). 2 While pressing the paper guide release lever, slide the adjusters to distribute the toner evenly inside the assembly. 3 Load Paper in the...
... it from side to side several times to fit the paper size. Paper Guide Release Lever 5 Close the front cover of the machine. 4 Push the drum unit assembly into place). 2 While pressing the paper guide release lever, slide the adjusters to distribute the toner evenly inside the assembly. 3 Load Paper in the...

Quick Setup Guide - English
Page 54
...174; Parallel Windows NT® 4.0 Parallel Options The MFC has the following optional accessories. Network Print/Fax Server [Standard on the MFC-8840DN] NC-9100h For more details, see "Memory Board" in Chapter 21 (User's Guide). Replacement Consumables Drum Unit DR-510 Toner TN-540/TN-570 Up to 3,300... A4/Letter pages @ 5% coverage. TN-540: Up to 20,000 A4/Letter pages @ 5% coverage. You can expand the capabilities of the MFC by adding these items. Lower Tray Unit DIMM Memory LT-5000 Second...
...174; Parallel Windows NT® 4.0 Parallel Options The MFC has the following optional accessories. Network Print/Fax Server [Standard on the MFC-8840DN] NC-9100h For more details, see "Memory Board" in Chapter 21 (User's Guide). Replacement Consumables Drum Unit DR-510 Toner TN-540/TN-570 Up to 3,300... A4/Letter pages @ 5% coverage. TN-540: Up to 20,000 A4/Letter pages @ 5% coverage. You can expand the capabilities of the MFC by adding these items. Lower Tray Unit DIMM Memory LT-5000 Second...
Users Manual - English
Page 4
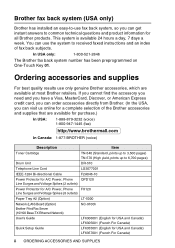
This system is available 24 hours a day, 7 days a week. In USA only: 1-800-521-2846 The Brother fax back system number has been preprogrammed on One-Touch Key 01. If you cannot find the accessory you need and you have a Visa, MasterCard, Discover, or American Express credit ... 1-800-947-1445 (fax) http://www.brothermall.com In Canada: 1-877-BROTHER (voice) Description Item Toner Cartridge TN-540 (Standard, prints up to 3,500 pages) TN-570 (High yield, prints up to 6,700 pages) Drum Unit DR-510 Telephone Line Cord LG3077001 IEEE-1284 Bi-directional Cable F2A046-10 Power...
This system is available 24 hours a day, 7 days a week. In USA only: 1-800-521-2846 The Brother fax back system number has been preprogrammed on One-Touch Key 01. If you cannot find the accessory you need and you have a Visa, MasterCard, Discover, or American Express credit ... 1-800-947-1445 (fax) http://www.brothermall.com In Canada: 1-877-BROTHER (voice) Description Item Toner Cartridge TN-540 (Standard, prints up to 3,500 pages) TN-570 (High yield, prints up to 6,700 pages) Drum Unit DR-510 Telephone Line Cord LG3077001 IEEE-1284 Bi-directional Cable F2A046-10 Power...
Users Manual - English
Page 8
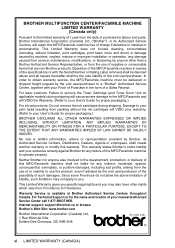
...end user/purchaser of the possibility of such damages. For laser products: Failure to remove the Toner Cartridge (and Toner Drum Unit on applicable models) during shipping. This warranty states Brother's entire liability and your User's Guide for proper packaging.)...this MFC/Facsimile machine shall be delivered or shipped freight prepaid by Brother, its Authorized Service Centers, will VOID your warranty. (Refer to your nearest Authorized Service Center call 1-877-BROTHER. Internet support: support@brother.ca or browse Brother's Web Site: www.brother.com Brother International ...
...end user/purchaser of the possibility of such damages. For laser products: Failure to remove the Toner Cartridge (and Toner Drum Unit on applicable models) during shipping. This warranty states Brother's entire liability and your User's Guide for proper packaging.)...this MFC/Facsimile machine shall be delivered or shipped freight prepaid by Brother, its Authorized Service Centers, will VOID your warranty. (Refer to your nearest Authorized Service Center call 1-877-BROTHER. Internet support: support@brother.ca or browse Brother's Web Site: www.brother.com Brother International ...
Users Manual - English
Page 20
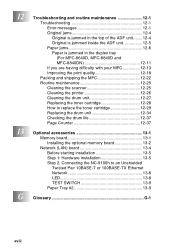
...duplex tray (For MFC-8640D, MFC-8840D and MFC-8840DN 12-11 If you are having difficulty with your MFC 12-13 Improving the print quality 12-18 Packing and shipping the MFC 12-22 Routine maintenance 12-25 Cleaning the scanner 12-25 Cleaning the printer 12-26 Cleaning the drum unit 12-27 Replacing ...the toner cartridge 12-28 How to replace the toner cartridge 12-29 Replacing the drum unit 12-34 Checking the drum life 12-37 Page ...
...duplex tray (For MFC-8640D, MFC-8840D and MFC-8840DN 12-11 If you are having difficulty with your MFC 12-13 Improving the print quality 12-18 Packing and shipping the MFC 12-22 Routine maintenance 12-25 Cleaning the scanner 12-25 Cleaning the printer 12-26 Cleaning the drum unit 12-27 Replacing ...the toner cartridge 12-28 How to replace the toner cartridge 12-29 Replacing the drum unit 12-34 Checking the drum life 12-37 Page ...
Users Manual - English
Page 24
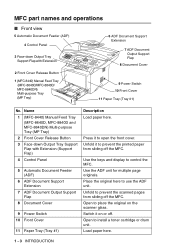
... multiple page originals. Open to install a toner cartridge or drum unit. Unfold to prevent the scanned pages from sliding off the MFC. Switch it to use the ADF unit. Load paper here. 1 - 3 INTRODUCTION MFC part names and operations ■ Front view 5 Automatic Document Feeder (ADF) 4 Control Panel...Open to place the original on or off the MFC. Unfold it on the scanner glass. Press it to control the MFC. Use the keys and display to open the front cover. Name 1 (MFC-8440) Manual Feed Tray (MFC-8640D, MFC-8840D and MFC-8840DN) Multi-purpose Tray (MP Tray) 2 Front...
... multiple page originals. Open to install a toner cartridge or drum unit. Unfold to prevent the scanned pages from sliding off the MFC. Switch it to use the ADF unit. Load paper here. 1 - 3 INTRODUCTION MFC part names and operations ■ Front view 5 Automatic Document Feeder (ADF) 4 Control Panel...Open to place the original on or off the MFC. Unfold it on the scanner glass. Press it to control the MFC. Use the keys and display to open the front cover. Name 1 (MFC-8440) Manual Feed Tray (MFC-8640D, MFC-8840D and MFC-8840DN) Multi-purpose Tray (MP Tray) 2 Front...
Users Manual - English
Page 162
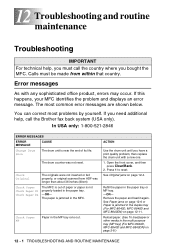
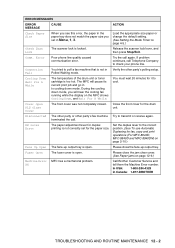
...For technical help , call the Brother fax back system (USA only). If this happens, your MFC identifies the problem and displays an error message. Check Paper Check Paper #1 Check Paper #2 The MFC is jammed in the multi-purpose tray (MP tray) (For MFC-8640D, MFC-8840D and MFC-8840DN) on page 12-4. ...ADF was not reset. Error messages As with a new one. 1. The most problems by yourself. The paper is not properly loaded in the MFC. In USA only: 1-800-521-2846 ERROR MESSAGES ERROR MESSAGE CAUSE Change Drum Soon The drum unit is near the end of paper or paper is jammed in...
...For technical help , call the Brother fax back system (USA only). If this happens, your MFC identifies the problem and displays an error message. Check Paper Check Paper #1 Check Paper #2 The MFC is jammed in the multi-purpose tray (MP tray) (For MFC-8640D, MFC-8840D and MFC-8840DN) on page 12-4. ...ADF was not reset. Error messages As with a new one. 1. The most problems by yourself. The paper is not properly loaded in the MFC. In USA only: 1-800-521-2846 ERROR MESSAGES ERROR MESSAGE CAUSE Change Drum Soon The drum unit is near the end of paper or paper is jammed in...
Users Manual - English
Page 163
...: 1-877-BROTHER TROUBLESHOOTING AND ROUTINE MAINTENANCE 12 - 2 Try the call . Cooling Down Wait For A While The temperature of the drum unit or toner cartridge is open . You must wait 20 minutes for it to the correct position. (See To use Automatic Duplexing for fax, copy and print operations (For MFC-8640D, MFC-8840D and MFC-8840DN...
...: 1-877-BROTHER TROUBLESHOOTING AND ROUTINE MAINTENANCE 12 - 2 Try the call . Cooling Down Wait For A While The temperature of the drum unit or toner cartridge is open . You must wait 20 minutes for it to the correct position. (See To use Automatic Duplexing for fax, copy and print operations (For MFC-8640D, MFC-8840D and MFC-8840DN...
Users Manual - English
Page 168
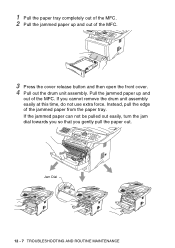
If you gently pull the paper out. If the jammed paper can not be pulled out easily, turn the jam dial towards you so that you cannot remove the drum unit assembly easily at this time, do not use extra force. Pull the jammed paper up and out of the MFC. 3 Press the cover release button and then open the front cover. 4 Pull out the drum unit assembly. Instead, pull the edge of the jammed paper from the paper tray. Jam Dial 12 - 7 TROUBLESHOOTING AND ROUTINE MAINTENANCE 1 Pull the paper tray completely out of the MFC. 2 Pull the jammed paper up and out of the MFC.
If you gently pull the paper out. If the jammed paper can not be pulled out easily, turn the jam dial towards you so that you cannot remove the drum unit assembly easily at this time, do not use extra force. Pull the jammed paper up and out of the MFC. 3 Press the cover release button and then open the front cover. 4 Pull out the drum unit assembly. Instead, pull the edge of the jammed paper from the paper tray. Jam Dial 12 - 7 TROUBLESHOOTING AND ROUTINE MAINTENANCE 1 Pull the paper tray completely out of the MFC. 2 Pull the jammed paper up and out of the MFC.

Users Manual - English
Page 171
TROUBLESHOOTING AND ROUTINE MAINTENANCE 12 - 10 Take out the jammed paper if there is any inside the drum unit. 9 Put the drum unit assembly back in the MFC. 10 Put the paper tray in the MFC. 11 Close the front cover. 8 Push the lock lever down and take the toner cartridge out of the drum unit assembly.
TROUBLESHOOTING AND ROUTINE MAINTENANCE 12 - 10 Take out the jammed paper if there is any inside the drum unit. 9 Put the drum unit assembly back in the MFC. 10 Put the paper tray in the MFC. 11 Close the front cover. 8 Push the lock lever down and take the toner cartridge out of the drum unit assembly.
Users Manual - English
Page 174
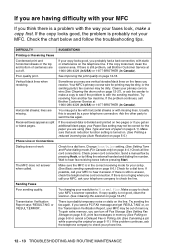
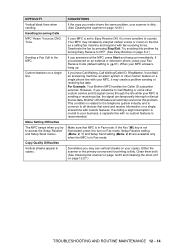
...while scanning the original on page 6-11). Transmission Verification Report says 'RESULT:NG' or 'RESULT:ERROR'. Clean your primary corona wire (See Cleaning the drum unit on page 12-27), or ask the sender to make a copy first. Try receiving from another fax machine. Make sure that auto reduction function ... by lifting the external handset and dialing the number. If possible, call Brother Customer Service at 1-800-284-4329 (in USA) or 1-877-BROTHER (in the correct receiving mode for a dial tone. Make a copy to check your MFC to check the line. If copy quality is not good, clean the...
...while scanning the original on page 6-11). Transmission Verification Report says 'RESULT:NG' or 'RESULT:ERROR'. Clean your primary corona wire (See Cleaning the drum unit on page 12-27), or ask the sender to make a copy first. Try receiving from another fax machine. Make sure that auto reduction function ... by lifting the external handset and dialing the number. If possible, call Brother Customer Service at 1-800-284-4329 (in USA) or 1-877-BROTHER (in the correct receiving mode for a dial tone. Make a copy to check your MFC to check the line. If copy quality is not good, clean the...
Users Manual - English
Page 175
...in Fax mode. When your MFC is ( 51). If you may see vertical streaks on the line as CNG Tone. Brother's ECM feature should help overcome this problem by pressing Stop/Exit. Clean them both. (See Cleaning the scanner on page 12-25 and Cleaning the drum unit on a single line. ...Custom features on page 12-27.) TROUBLESHOOTING AND ROUTINE MAINTENANCE 12 - 14 Your MFC may create a problem...
...in Fax mode. When your MFC is ( 51). If you may see vertical streaks on the line as CNG Tone. Brother's ECM feature should help overcome this problem by pressing Stop/Exit. Clean them both. (See Cleaning the scanner on page 12-25 and Cleaning the drum unit on a single line. ...Custom features on page 12-27.) TROUBLESHOOTING AND ROUTINE MAINTENANCE 12 - 14 Your MFC may create a problem...

Users Manual - English
Page 176
... your document and try again. Most laser printers have text missing. Make sure the Brother TWAIN driver is not recognizing the printer's input buffer full signal. DIFFICULTY Printer Difficulties The MFC does not print. Please make sure it prints garbage. Usually these are installed properly. (See Replacing the drum unit on page 12-34.) •...
... your document and try again. Most laser printers have text missing. Make sure the Brother TWAIN driver is not recognizing the printer's input buffer full signal. DIFFICULTY Printer Difficulties The MFC does not print. Please make sure it prints garbage. Usually these are installed properly. (See Replacing the drum unit on page 12-34.) •...
Users Manual - English
Page 179
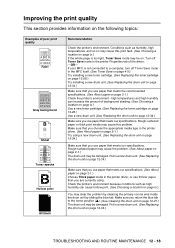
... page ix.) If the whole page is not connected to the home position (▲). (See Cleaning the drum unit on page 12-27.) The drum unit may be on page 2-1.) Try using . If your MFC is too light, Toner Save mode may be damaged. Make sure that you use paper that meets our ...(See About paper on page 2-1.) Choose Thick paper mode in the MFC itself. (See Toner Save on page 4-9.) Try installing a new toner cartridge. (See Replacing the toner cartridge on page 12-28.) Try installing a new drum unit. (See Replacing the drum unit on page 12-34.) Make sure that you are currently using a ...
... page ix.) If the whole page is not connected to the home position (▲). (See Cleaning the drum unit on page 12-27.) The drum unit may be on page 2-1.) Try using . If your MFC is too light, Toner Save mode may be damaged. Make sure that you use paper that meets our ...(See About paper on page 2-1.) Choose Thick paper mode in the MFC itself. (See Toner Save on page 4-9.) Try installing a new toner cartridge. (See Replacing the toner cartridge on page 12-28.) Try installing a new drum unit. (See Replacing the drum unit on page 12-34.) Make sure that you are currently using a ...
Users Manual - English
Page 180
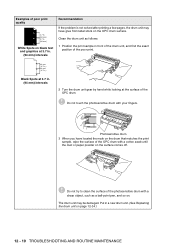
... 12-34.) 12 - 19 TROUBLESHOOTING AND ROUTINE MAINTENANCE Put in a new drum unit. (See Replacing the drum unit on the surface comes off. Clean the drum unit as a ball-point pen, and so on the OPC drum surface. Photosensitive drum 3 When you have glue from label stock on . Do not try to... intervals Recommendation If the problem is not solved after printing a few pages, the drum unit may be damaged. The drum unit may have located the mark on the drum that matches the print sample, wipe the surface of the OPC drum with your fingers. Examples of poor print quality 3.7 in. (94 mm) ...
... 12-34.) 12 - 19 TROUBLESHOOTING AND ROUTINE MAINTENANCE Put in a new drum unit. (See Replacing the drum unit on the surface comes off. Clean the drum unit as a ball-point pen, and so on the OPC drum surface. Photosensitive drum 3 When you have glue from label stock on . Do not try to... intervals Recommendation If the problem is not solved after printing a few pages, the drum unit may be damaged. The drum unit may have located the mark on the drum that matches the print sample, wipe the surface of the OPC drum with your fingers. Examples of poor print quality 3.7 in. (94 mm) ...
Users Manual - English
Page 181
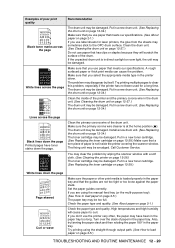
...laser printers, the glue from the sheets may sometimes stick to load paper on page 12-28.) Make sure the paper or other print media is not inside of the printer and the primary corona wire in the paper tray and that a torn piece of paper is loaded properly in the drum unit... covering the scanner window. High temperatures and high humidity will scratch the surface of the drum. Install a new drum unit. (See Replacing the drum unit on page 12-27.) The drum unit may be smudged. The fixing unit may be damaged. A rough surfaced paper or thick print media can cause the problem....
...laser printers, the glue from the sheets may sometimes stick to load paper on page 12-28.) Make sure the paper or other print media is not inside of the printer and the primary corona wire in the paper tray and that a torn piece of paper is loaded properly in the drum unit... covering the scanner window. High temperatures and high humidity will scratch the surface of the drum. Install a new drum unit. (See Replacing the drum unit on page 12-27.) The drum unit may be smudged. The fixing unit may be damaged. A rough surfaced paper or thick print media can cause the problem....

Users Manual - English
Page 182
Check the paper type and quality. (See About paper on page 2-1.) Try printing using the straight-through output path. (See How to load paper on page 2-5.) Turn over the stack of poor print quality B DEFGH abc efghijk A CD bcde 1 34 Wrinkles or creases Recommendation Make sure that paper is necessary to replace it periodically. 12 - 21 TROUBLESHOOTING AND ROUTINE MAINTENANCE The drum unit is a consumable item and it is loaded properly. Examples of paper in the tray or try rotating the paper 180° in the input tray.
Check the paper type and quality. (See About paper on page 2-1.) Try printing using the straight-through output path. (See How to load paper on page 2-5.) Turn over the stack of poor print quality B DEFGH abc efghijk A CD bcde 1 34 Wrinkles or creases Recommendation Make sure that paper is necessary to replace it periodically. 12 - 21 TROUBLESHOOTING AND ROUTINE MAINTENANCE The drum unit is a consumable item and it is loaded properly. Examples of paper in the tray or try rotating the paper 180° in the input tray.


