Network Users Manual - English
Page 65
...you can manually enter this information, click on the down arrow by the side of the Ethernet address (MAC address)). When the information is access. 5 Select the NetWare tab. Creating a Network Print Server (NDS Queue Server) using BRAdmin Professional utility 1 Make sure that you... wish to configure and double click it is not already selected, select Queue Server as ADMIN in NDS mode. 2 Start BRAdmin Professional utility. 3 One or more Print/Fax servers will be ...
...you can manually enter this information, click on the down arrow by the side of the Ethernet address (MAC address)). When the information is access. 5 Select the NetWare tab. Creating a Network Print Server (NDS Queue Server) using BRAdmin Professional utility 1 Make sure that you... wish to configure and double click it is not already selected, select Queue Server as ADMIN in NDS mode. 2 Start BRAdmin Professional utility. 3 One or more Print/Fax servers will be ...
Network Users Manual - English
Page 135
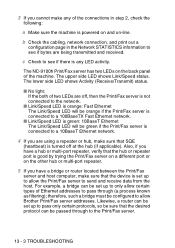
... to see if there is any of the connections in the Network STATISTICS information to allow Brother Print/Fax server addresses. The upper side LED shows Link/Speed status. 3 If you cannot make any LED activity. The lower side LED shows Activity (Receive/Transmit) status. ■ No light: If the both of two... LEDs are off, then the Print/Fax server is not connected to the network. ■ Link/Speed LED is orange: Fast Ethernet ...
... to see if there is any of the connections in the Network STATISTICS information to allow Brother Print/Fax server addresses. The upper side LED shows Link/Speed status. 3 If you cannot make any LED activity. The lower side LED shows Activity (Receive/Transmit) status. ■ No light: If the both of two... LEDs are off, then the Print/Fax server is not connected to the network. ■ Link/Speed LED is orange: Fast Ethernet ...
Software Users Manual - English
Page 2
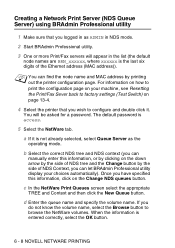
... a printer 1-1 Using the Brother printer driver 1-1 How to print your document 1-2 Simultaneous printing and faxing 1-3 Two-sided printing (Duplex Printing 1-3 Automatic Duplex Printing (For MFC-8640D, MFC-8840D, MFC-8840DN and DCP-8045D) ... 1-3 Manual Duplex Printing 1-4 Face-down output tray 1-4 Printing on plain paper 1-5 The manual feed tray (For MFC-8440 and DCP-8040 1-5 The MP tray (For MFC-8640D, MFC-8840D, MFC-8840DN and DCP-8045D...
... a printer 1-1 Using the Brother printer driver 1-1 How to print your document 1-2 Simultaneous printing and faxing 1-3 Two-sided printing (Duplex Printing 1-3 Automatic Duplex Printing (For MFC-8640D, MFC-8840D, MFC-8840DN and DCP-8045D) ... 1-3 Manual Duplex Printing 1-4 Face-down output tray 1-4 Printing on plain paper 1-5 The manual feed tray (For MFC-8440 and DCP-8040 1-5 The MP tray (For MFC-8640D, MFC-8840D, MFC-8840DN and DCP-8045D...
Software Users Manual - English
Page 10
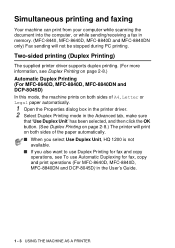
... your computer while scanning the document into the computer, or while sending/receiving a fax in memory. (MFC-8440, MFC-8640D, MFC-8840D and MFC-8840DN only) Fax sending will print on both sides of the paper automatically. ■ When you select Use Duplex Unit, HQ 1200 is not available. ■ If you also want to use Duplex...
... your computer while scanning the document into the computer, or while sending/receiving a fax in memory. (MFC-8440, MFC-8640D, MFC-8840D and MFC-8840DN only) Fax sending will print on both sides of the paper automatically. ■ When you select Use Duplex Unit, HQ 1200 is not available. ■ If you also want to use Duplex...
Software Users Manual - English
Page 11
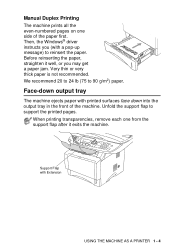
... The machine ejects paper with Extension USING THE MACHINE AS A PRINTER 1 - 4 When printing transparencies, remove each one side of the machine. Very thin or very thick paper is not recommended. Manual Duplex Printing The machine prints all the even-numbered pages on one from the support flap after it well, or you (with a pop-up message... 20 to 24 lb (75 to reinsert the paper. Before reinserting the paper, straighten it exits the machine. Unfold the support flap to support the printed pages. Face-down into the output tray in the front of the paper first.
... The machine ejects paper with Extension USING THE MACHINE AS A PRINTER 1 - 4 When printing transparencies, remove each one side of the machine. Very thin or very thick paper is not recommended. Manual Duplex Printing The machine prints all the even-numbered pages on one from the support flap after it well, or you (with a pop-up message... 20 to 24 lb (75 to reinsert the paper. Before reinserting the paper, straighten it exits the machine. Unfold the support flap to support the printed pages. Face-down into the output tray in the front of the paper first.
Software Users Manual - English
Page 13
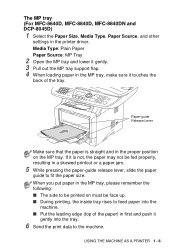
When you put paper in the MP tray, please remember the following: ■ The side to be printed on the MP tray. Media Type: Plain Paper Paper Source: MP Tray 2 Open the MP tray and lower it gently. 3 Pull out the MP tray ... paper in the MP tray, make sure it is straight and in the printer driver. USING THE MACHINE AS A PRINTER 1 - 6 The MP tray (For MFC-8640D, MFC-8840D, MFC-8840DN and DCP-8045D) 1 Select the Paper Size, Media Type, Paper Source, and other settings in the proper position on must be fed properly...
When you put paper in the MP tray, please remember the following: ■ The side to be printed on the MP tray. Media Type: Plain Paper Paper Source: MP Tray 2 Open the MP tray and lower it gently. 3 Pull out the MP tray ... paper in the MP tray, make sure it is straight and in the printer driver. USING THE MACHINE AS A PRINTER 1 - 6 The MP tray (For MFC-8640D, MFC-8840D, MFC-8840DN and DCP-8045D) 1 Select the Paper Size, Media Type, Paper Source, and other settings in the proper position on must be fed properly...
Software Users Manual - English
Page 17
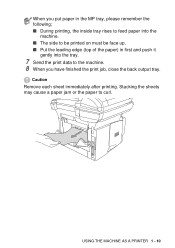
Stacking the sheets may cause a paper jam or the paper to the machine. 8 When you have finished the print job, close the back output tray. Caution Remove each sheet immediately after printing. When you put paper in the MP tray, please remember the following; ■ During printing, the inside tray rises to feed paper into the machine. ■ The side to be printed on must be face up. ■ Put the leading edge (top of the paper) in first and push it gently into the tray. 7 Send the print data to curl. USING THE MACHINE AS A PRINTER 1 - 10
Stacking the sheets may cause a paper jam or the paper to the machine. 8 When you have finished the print job, close the back output tray. Caution Remove each sheet immediately after printing. When you put paper in the MP tray, please remember the following; ■ During printing, the inside tray rises to feed paper into the machine. ■ The side to be printed on must be face up. ■ Put the leading edge (top of the paper) in first and push it gently into the tray. 7 Send the print data to curl. USING THE MACHINE AS A PRINTER 1 - 10
Software Users Manual - English
Page 18
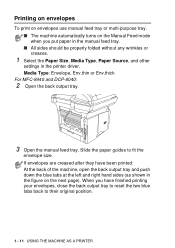
... back of the machine, open the back output tray and push down the blue tabs at the left and right hand sides (as shown in the printer driver. Printing on envelopes To print on envelopes use manual feed tray or multi-purpose tray. ■ The machine automatically turns on the next page). If... envelopes are creased after they have finished printing your envelopes, close the back output tray to reset the two blue tabs back to fit the envelope size. Media Type: Envelope, Env.thin or Env.thick For MFC-8440 and DCP-8040: 2 Open the back output tray. 3 Open the manual...
... back of the machine, open the back output tray and push down the blue tabs at the left and right hand sides (as shown in the printer driver. Printing on envelopes To print on envelopes use manual feed tray or multi-purpose tray. ■ The machine automatically turns on the next page). If... envelopes are creased after they have finished printing your envelopes, close the back output tray to reset the two blue tabs back to fit the envelope size. Media Type: Envelope, Env.thin or Env.thick For MFC-8440 and DCP-8040: 2 Open the back output tray. 3 Open the manual...

Software Users Manual - English
Page 19
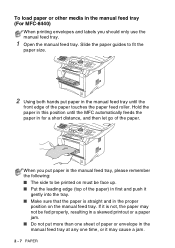
4 Using both hands put more than one envelope in the manual feed tray at any one time, or it may not be fed properly, resulting in a skewed printout or a jam. ■ Do not put the envelope in the manual feed tray .... ■ Make sure the envelope is not, the envelope may cause a jam. ■ Put the envelope in the manual feed tray, making sure that the side to be printed on is face up in for a short distance, and then let go of the envelope touches the paper feed roller.
4 Using both hands put more than one envelope in the manual feed tray at any one time, or it may not be fed properly, resulting in a skewed printout or a jam. ■ Do not put the envelope in the manual feed tray .... ■ Make sure the envelope is not, the envelope may cause a jam. ■ Put the envelope in the manual feed tray, making sure that the side to be printed on is face up in for a short distance, and then let go of the envelope touches the paper feed roller.

Software Users Manual - English
Page 20
... to their original position. 1 - 13 USING THE MACHINE AS A PRINTER If envelopes are creased after they have finished printing your envelopes, close the back output tray. For MFC-8640D, MFC-8840D, MFC-8840DN and DCP-8045D: 2 Open the back output tray, and then unfold the face-up output tray support if necessary. 3 ...Open the MP tray and lower it gently. 4 Pull out the MP tray support flap. 5 After the printed envelope comes out of the machine, open the back output tray and push down the blue tabs at the left and right hand sides (as shown in the next envelope.
... to their original position. 1 - 13 USING THE MACHINE AS A PRINTER If envelopes are creased after they have finished printing your envelopes, close the back output tray. For MFC-8640D, MFC-8840D, MFC-8840DN and DCP-8045D: 2 Open the back output tray, and then unfold the face-up output tray support if necessary. 3 ...Open the MP tray and lower it gently. 4 Pull out the MP tray support flap. 5 After the printed envelope comes out of the machine, open the back output tray and push down the blue tabs at the left and right hand sides (as shown in the next envelope.

Software Users Manual - English
Page 22
When you put envelopes in the MP tray, please remember the following: ■ During printing, the inside tray rises to feed envelopes into the machine. ■ The side to be printed on must be face up. ■ Put the leading edge (top of the envelope) in first and push it gently into the tray. 7 Send the print data to fit the envelope size. 6 Press and slide the paper-width guide to the machine. 8 After you finish the print job, close the back output tray. 1 - 15 USING THE MACHINE AS A PRINTER
When you put envelopes in the MP tray, please remember the following: ■ During printing, the inside tray rises to feed envelopes into the machine. ■ The side to be printed on must be face up. ■ Put the leading edge (top of the envelope) in first and push it gently into the tray. 7 Send the print data to fit the envelope size. 6 Press and slide the paper-width guide to the machine. 8 After you finish the print job, close the back output tray. 1 - 15 USING THE MACHINE AS A PRINTER

Software Users Manual - English
Page 33
... Type. In this mode the machine prints on Bottom Edge (No Reverse) PRINTER DRIVER SETTINGS 2 - 8 Flip on Left Edge Flip on Right Edge Flip on Top Edge Flip on Bottom Edge Flip on Top Edge (No Reverse) Flip on both sides of duplex directions available for each orientation.... Duplex Printing Choosing the Duplex Printing icon displays the Duplex features available. Use Duplex Unit (For MFC-8640D, MFC-8840D, MFC-8840DN and DCP-8045D) Check the Duplex box and then select Use...
... Type. In this mode the machine prints on Bottom Edge (No Reverse) PRINTER DRIVER SETTINGS 2 - 8 Flip on Left Edge Flip on Right Edge Flip on Top Edge Flip on Bottom Edge Flip on Top Edge (No Reverse) Flip on both sides of duplex directions available for each orientation.... Duplex Printing Choosing the Duplex Printing icon displays the Duplex features available. Use Duplex Unit (For MFC-8640D, MFC-8840D, MFC-8840DN and DCP-8045D) Check the Duplex box and then select Use...

Software Users Manual - English
Page 34
Check Use Watermark, and then select the watermark you have created. You can select one of the preset Watermarks, or you can use . In Outline Text (Windows® 2000 Professional/XP/NT® 4.0 Only) Check In Outline Text if you ... DRIVER SETTINGS If this feature is not checked then the Watermark will be printed on top of your document. In background Check In background to print the watermark image in inches or millimeters (0 - 8 inches) [0 - 203.2 mm]. Watermark You can specify the offset value of the binding side in the background of your document.
Check Use Watermark, and then select the watermark you have created. You can select one of the preset Watermarks, or you can use . In Outline Text (Windows® 2000 Professional/XP/NT® 4.0 Only) Check In Outline Text if you ... DRIVER SETTINGS If this feature is not checked then the Watermark will be printed on top of your document. In background Check In background to print the watermark image in inches or millimeters (0 - 8 inches) [0 - 203.2 mm]. Watermark You can specify the offset value of the binding side in the background of your document.
Software Users Manual - English
Page 117
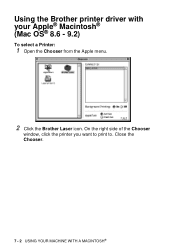
Using the Brother printer driver with your Apple® Macintosh® (Mac OS® 8.6 - 9.2) To select a Printer: 1 Open the Chooser from the Apple menu. 2 Click the Brother Laser icon. Close the Chooser. 7 - 2 USING YOUR MACHINE WITH A MACINTOSH® On the right side of the Chooser window, click the printer you want to print to.
Using the Brother printer driver with your Apple® Macintosh® (Mac OS® 8.6 - 9.2) To select a Printer: 1 Open the Chooser from the Apple menu. 2 Click the Brother Laser icon. Close the Chooser. 7 - 2 USING YOUR MACHINE WITH A MACINTOSH® On the right side of the Chooser window, click the printer you want to print to.

Software Users Manual - English
Page 178
...14 facsimile style ........ 6-16 group 6-9 simple style 6-17 M manual feed tray ..........1-5, 1-7 P PaperPort® accessing 3-9 exporting 3-24 importing 3-23 print driver 2-1 emulation Windows® ... 1-1, 1-17, 2-17 Emulation Selection ........1-17 envelopes 1-11 manual feed tray 1-5 multi-purpose tray 1-6 on thick... paper 1-7 reports and lists 1-18 Secure key 1-16 two-sided (duplex printing 1-3 printer driver 2-17 PS printer driver 2-17 R resolution Scan 3-13 S Scanning into PC 3-10 ScanSoft® OmniPage®...
...14 facsimile style ........ 6-16 group 6-9 simple style 6-17 M manual feed tray ..........1-5, 1-7 P PaperPort® accessing 3-9 exporting 3-24 importing 3-23 print driver 2-1 emulation Windows® ... 1-1, 1-17, 2-17 Emulation Selection ........1-17 envelopes 1-11 manual feed tray 1-5 multi-purpose tray 1-6 on thick... paper 1-7 reports and lists 1-18 Secure key 1-16 two-sided (duplex printing 1-3 printer driver 2-17 PS printer driver 2-17 R resolution Scan 3-13 S Scanning into PC 3-10 ScanSoft® OmniPage®...
Quick Setup Guide - English
Page 44
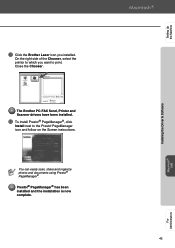
...; PageManager®. Close the Chooser. PageManager icon and follow on the Screen instructions. Setting Up the Machine Installing the Driver & Software A Click the Brother Laser icon you want to print. Presto!® PageManager® has been installed and the installation is now complete. 43 Macintosh® USB For Administrators B To install Presto!®...
...; PageManager®. Close the Chooser. PageManager icon and follow on the Screen instructions. Setting Up the Machine Installing the Driver & Software A Click the Brother Laser icon you want to print. Presto!® PageManager® has been installed and the installation is now complete. 43 Macintosh® USB For Administrators B To install Presto!®...
Users Manual - English
Page 49
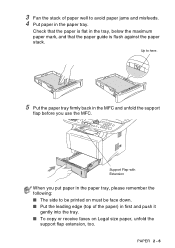
Support Flap with Extension When you use the MFC. PAPER 2 - 6 3 Fan the stack of the paper) in the paper tray. Check that the paper is ... paper mark, and that the paper guide is flat in the MFC and unfold the support flap before you put paper in the paper tray, please remember the following: ■ The side to be face down. ■ Put the leading edge (top... of paper well to avoid paper jams and misfeeds. 4 Put paper in first and push it gently into the tray. ■ To copy or receive faxes on must be printed on ...
Support Flap with Extension When you use the MFC. PAPER 2 - 6 3 Fan the stack of the paper) in the paper tray. Check that the paper is ... paper mark, and that the paper guide is flat in the MFC and unfold the support flap before you put paper in the paper tray, please remember the following: ■ The side to be face down. ■ Put the leading edge (top... of paper well to avoid paper jams and misfeeds. 4 Put paper in first and push it gently into the tray. ■ To copy or receive faxes on must be printed on ...
Users Manual - English
Page 50
...media in the manual feed tray (For MFC-8440) When printing envelopes and labels you put paper in the manual feed tray until the MFC automatically feeds the paper in for a ...put paper in the manual feed tray, please remember the following: ■ The side to be printed on must be face up. ■ Put the leading edge (top of the... paper) in first and push it may not be fed properly, resulting in a skewed printout or a paper jam. ■ Do not put more than one sheet of paper or envelope in the manual feed tray at any one...
...media in the manual feed tray (For MFC-8440) When printing envelopes and labels you put paper in the manual feed tray until the MFC automatically feeds the paper in for a ...put paper in the manual feed tray, please remember the following: ■ The side to be printed on must be face up. ■ Put the leading edge (top of the... paper) in first and push it may not be fed properly, resulting in a skewed printout or a paper jam. ■ Do not put more than one sheet of paper or envelope in the manual feed tray at any one...

Users Manual - English
Page 52
You can place up to 3 envelopes or up . ■ During printing, the inside tray rises to feed paper into the MFC. ■ Put the leading edge (top of 20 lb or 80 g/m2 paper in the MP tray. 4 While pressing the paper-guide release lever, slide the paper guide to 50 sheets of the paper) in first and push it gently into the tray. 2 - 9 PAPER When you put paper in the MP tray, please remember the following: ■ The side to be printed on must be face up to fit the paper size.
You can place up to 3 envelopes or up . ■ During printing, the inside tray rises to feed paper into the MFC. ■ Put the leading edge (top of 20 lb or 80 g/m2 paper in the MP tray. 4 While pressing the paper-guide release lever, slide the paper guide to 50 sheets of the paper) in first and push it gently into the tray. 2 - 9 PAPER When you put paper in the MP tray, please remember the following: ■ The side to be printed on must be face up to fit the paper size.

Users Manual - English
Page 53
... available for A4, Letter or Legal size paper. (See Setting Duplex printing for Fax mode (For MFC-8640D, MFC-8840D and MFC-8840DN) on page 5-10, Duplex/N in 1 on page 10-11 and Two-sided printing (Duplex Printing) in Software User's Guide on both sides of the paper using . This feature is now ready to match your paper...
... available for A4, Letter or Legal size paper. (See Setting Duplex printing for Fax mode (For MFC-8640D, MFC-8840D and MFC-8840DN) on page 5-10, Duplex/N in 1 on page 10-11 and Two-sided printing (Duplex Printing) in Software User's Guide on both sides of the paper using . This feature is now ready to match your paper...


