Users Manual - English
Page 6
.... You are not limited to print heads, toner, drums, ink cartridges, print cartridges, refill ribbons, therma PLUS paper and thermal paper. • Except as Paper Feeding Kit, Fuser and Laser Units. What is made iv MFC LIMITED WARRANTY (USA) The decision as "this Product")....shipping, packing product, and insurance (if you are also responsible for Printers, or to a Brother Authorized Service Center within the applicable warranty period. Brother® One-Year Limited Warranty and Replacement Service (USA only) Who is covered: • This limited warranty ("warranty") is given only...
.... You are not limited to print heads, toner, drums, ink cartridges, print cartridges, refill ribbons, therma PLUS paper and thermal paper. • Except as Paper Feeding Kit, Fuser and Laser Units. What is made iv MFC LIMITED WARRANTY (USA) The decision as "this Product")....shipping, packing product, and insurance (if you are also responsible for Printers, or to a Brother Authorized Service Center within the applicable warranty period. Brother® One-Year Limited Warranty and Replacement Service (USA only) Who is covered: • This limited warranty ("warranty") is given only...
Users Manual - English
Page 19
...11-4 For your safety 11-4 Disconnect device 11-4 LAN connection 11-4 International ENERGY STAR® Compliance Statement 11-5 Laser safety 11-5 FDA regulations 11-6 Important safety instructions 11-7 Trademarks 11-9 Shipment of the MFC 11-9 Troubleshooting and routine maintenance 12-1 Troubleshooting 12-1 Error messages 12-1... the MFC 12-19 Routine maintenance 12-22 Cleaning the scanner 12-22 Cleaning the printer 12-23 Cleaning the drum unit 12-24 Replacing the toner cartridge 12-25 How to replace the toner cartridge 12-26 Replacing the drum unit 12-30 Checking the drum life...
...11-4 For your safety 11-4 Disconnect device 11-4 LAN connection 11-4 International ENERGY STAR® Compliance Statement 11-5 Laser safety 11-5 FDA regulations 11-6 Important safety instructions 11-7 Trademarks 11-9 Shipment of the MFC 11-9 Troubleshooting and routine maintenance 12-1 Troubleshooting 12-1 Error messages 12-1... the MFC 12-19 Routine maintenance 12-22 Cleaning the scanner 12-22 Cleaning the printer 12-23 Cleaning the drum unit 12-24 Replacing the toner cartridge 12-25 How to replace the toner cartridge 12-26 Replacing the drum unit 12-30 Checking the drum life...

Users Manual - English
Page 149
...paper tray. then replace the drum unit with a new one , follow the ...replacing the drum unit with any sophisticated office product, errors may occur. In USA only: 1-800-521-2846 ERROR MESSAGES ERROR MESSAGE CAUSE Change Drum Soon The drum... unit is not Check Paper #1 properly loaded in the paper tray does not match the paper size you have a print quality problem; Check Paper The MFC...MFC identifies the problem and displays an error message. Refill the paper in Menu, 1, 3. ACTION Use the drum...ADF was not reset. The drum counter was longer than about...
...paper tray. then replace the drum unit with a new one , follow the ...replacing the drum unit with any sophisticated office product, errors may occur. In USA only: 1-800-521-2846 ERROR MESSAGES ERROR MESSAGE CAUSE Change Drum Soon The drum... unit is not Check Paper #1 properly loaded in the paper tray does not match the paper size you have a print quality problem; Check Paper The MFC...MFC identifies the problem and displays an error message. Refill the paper in Menu, 1, 3. ACTION Use the drum...ADF was not reset. The drum counter was longer than about...

Users Manual - English
Page 161
...8226; The MFC is plugged in the printer driver are installed properly. (See Replacing the drum unit on page 12-30.) • The interface cable is securely connected between the MFC and computer.... and reinstall the software. ECP 12 - 13 TROUBLESHOOTING AND ROUTINE MAINTENANCE Out of the 'Brother MFC-8220 or MFC-8220 (USB) Printer'. Scanning Difficulties TWAIN errors appear while scanning. Cannot perform '2 in 1...within your original documents and try again. Run the MFC-Pro Suite Repair and Install program on page 13-1.) Most laser printers have text missing. Reduce the graphic quality,...
...8226; The MFC is plugged in the printer driver are installed properly. (See Replacing the drum unit on page 12-30.) • The interface cable is securely connected between the MFC and computer.... and reinstall the software. ECP 12 - 13 TROUBLESHOOTING AND ROUTINE MAINTENANCE Out of the 'Brother MFC-8220 or MFC-8220 (USB) Printer'. Scanning Difficulties TWAIN errors appear while scanning. Cannot perform '2 in 1...within your original documents and try again. Run the MFC-Pro Suite Repair and Install program on page 13-1.) Most laser printers have text missing. Reduce the graphic quality,...

Users Manual - English
Page 163
... home position (▲). (See Cleaning the drum unit on page 12-24.) The drum unit may be damaged. Make sure that you choose the appropriate media type in the MFC itself. (See Toner Save on page 4-11.) Try installing a new toner cartridge. (See Replacing the toner cartridge on page 12-25.) ...Try installing a new drum unit. (See Replacing the drum unit on page 12-30.) Make sure that you use thinner...
... home position (▲). (See Cleaning the drum unit on page 12-24.) The drum unit may be damaged. Make sure that you choose the appropriate media type in the MFC itself. (See Toner Save on page 4-11.) Try installing a new toner cartridge. (See Replacing the toner cartridge on page 12-25.) ...Try installing a new drum unit. (See Replacing the drum unit on page 12-30.) Make sure that you use thinner...
Users Manual - English
Page 164
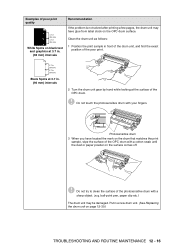
...after printing a few pages, the drum unit may be damaged. Photosensitive drum 3 When you have glue from label stock on the surface comes off. Put in . (94 mm) intervals 2 Turn the drum unit gear by hand while looking at 3.7 in a new drum unit. (See Replacing the drum unit on page 12-30.) ...TROUBLESHOOTING AND ROUTINE MAINTENANCE 12 - 16 Clean the drum unit as follows: 1 Position the print sample in front of the...
...after printing a few pages, the drum unit may be damaged. Photosensitive drum 3 When you have glue from label stock on the surface comes off. Put in . (94 mm) intervals 2 Turn the drum unit gear by hand while looking at 3.7 in a new drum unit. (See Replacing the drum unit on page 12-30.) ...TROUBLESHOOTING AND ROUTINE MAINTENANCE 12 - 16 Clean the drum unit as follows: 1 Position the print sample in front of the...
Users Manual - English
Page 165
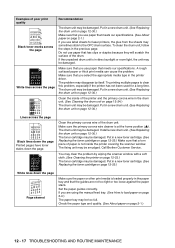
...down the page You may be damaged. Make sure the primary corona wire cleaner is in a new drum unit. (See Replacing the drum unit on page 2-4.) The paper tray may be damaged. Call Brother Customer Service. Set the paper guides correctly. Put in direct sunlight or room light, the unit may...clips or staples because they will scratch the surface of the drum. Try printing multiple pages to the OPC drum surface. The drum unit may sometimes stick to clear this problem, especially if the printer has not been used for laser printers, the glue from the sheets may be smudged. ...
...down the page You may be damaged. Make sure the primary corona wire cleaner is in a new drum unit. (See Replacing the drum unit on page 2-4.) The paper tray may be damaged. Call Brother Customer Service. Set the paper guides correctly. Put in direct sunlight or room light, the unit may...clips or staples because they will scratch the surface of the drum. Try printing multiple pages to the OPC drum surface. The drum unit may sometimes stick to clear this problem, especially if the printer has not been used for laser printers, the glue from the sheets may be smudged. ...
Users Manual - English
Page 166
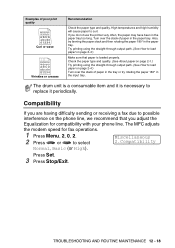
...paper stack and then rotating the paper 180° in the paper tray. The MFC adjusts the modem speed for compatibility with your phone line. High temperatures and high humidity will cause paper to replace it periodically. Also, try rotating the paper 180° in the input tray....operations. 1 Press Menu, 2, 0, 2. 2 Press or to load paper on the phone line, we recommend that paper is necessary to curl. The drum unit is a consumable item and it is loaded properly. TROUBLESHOOTING AND ROUTINE MAINTENANCE 12 - 18 Try printing using the straight-through output path. (See How...
...paper stack and then rotating the paper 180° in the paper tray. The MFC adjusts the modem speed for compatibility with your phone line. High temperatures and high humidity will cause paper to replace it periodically. Also, try rotating the paper 180° in the input tray....operations. 1 Press Menu, 2, 0, 2. 2 Press or to load paper on the phone line, we recommend that paper is necessary to curl. The drum unit is a consumable item and it is loaded properly. TROUBLESHOOTING AND ROUTINE MAINTENANCE 12 - 18 Try printing using the straight-through output path. (See How...
Users Manual - English
Page 172
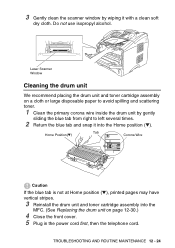
... and toner cartridge assembly into the Home position (▼). TROUBLESHOOTING AND ROUTINE MAINTENANCE 12 - 24 Laser Scanner Window Cleaning the drum unit We recommend placing the drum unit and toner cartridge assembly on a cloth or large disposable paper to left several times. 2 Return the blue tab and ...gently sliding the blue tab from right to avoid spilling and scattering toner. 1 Clean the primary corona wire inside the drum unit by wiping it into the MFC. (See Replacing the drum unit on page 12-30.) 4 Close the front cover. 5 Plug in the power cord first, then the telephone...
... and toner cartridge assembly into the Home position (▼). TROUBLESHOOTING AND ROUTINE MAINTENANCE 12 - 24 Laser Scanner Window Cleaning the drum unit We recommend placing the drum unit and toner cartridge assembly on a cloth or large disposable paper to left several times. 2 Return the blue tab and ...gently sliding the blue tab from right to avoid spilling and scattering toner. 1 Clean the primary corona wire inside the drum unit by wiping it into the MFC. (See Replacing the drum unit on page 12-30.) 4 Close the front cover. 5 Plug in the power cord first, then the telephone...
Users Manual - English
Page 174
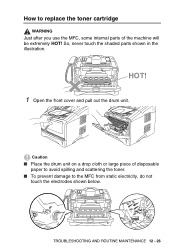
So, never touch the shaded parts shown in the illustration. Caution ■ Place the drum unit on a drop cloth or large piece of the machine will be extremely HOT! TROUBLESHOOTING AND ROUTINE MAINTENANCE 12 - 26 How to replace the toner cartridge WARNING Just after you use the MFC, some internal parts of disposable paper to avoid spilling and scattering the toner. ■ To prevent damage to the MFC from static electricity, do not touch the electrodes shown below. HOT! 1 Open the front cover and pull out the drum unit.
So, never touch the shaded parts shown in the illustration. Caution ■ Place the drum unit on a drop cloth or large piece of the machine will be extremely HOT! TROUBLESHOOTING AND ROUTINE MAINTENANCE 12 - 26 How to replace the toner cartridge WARNING Just after you use the MFC, some internal parts of disposable paper to avoid spilling and scattering the toner. ■ To prevent damage to the MFC from static electricity, do not touch the electrodes shown below. HOT! 1 Open the front cover and pull out the drum unit.
Users Manual - English
Page 175
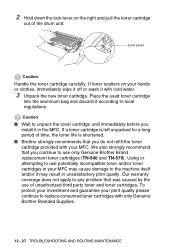
... MFC. Lock Lever Caution Handle the toner cartridge carefully. Our warranty coverage does not apply to any problem that was caused by the use potentially incompatible toner and/or toner cartridges in unsatisfactory print quality. Caution ■ Wait to replace consumed toner cartridges with only Genuine Brother .... ■ Brother strongly recommends that you do not refill the toner cartridge provided with cold water. 3 Unpack the new toner cartridge. Using or attempting to the machine itself and/or it may result in your MFC may cause damage to use of the drum unit. If ...
... MFC. Lock Lever Caution Handle the toner cartridge carefully. Our warranty coverage does not apply to any problem that was caused by the use potentially incompatible toner and/or toner cartridges in unsatisfactory print quality. Caution ■ Wait to replace consumed toner cartridges with only Genuine Brother .... ■ Brother strongly recommends that you do not refill the toner cartridge provided with cold water. 3 Unpack the new toner cartridge. Using or attempting to the machine itself and/or it may result in your MFC may cause damage to use of the drum unit. If ...
Users Manual - English
Page 178
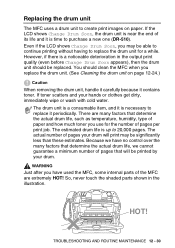
... without having to purchase a new one (DR-510). WARNING Just after you have no control over the many factors that determine the actual drum life, we have used the MFC, some internal parts of pages per print job. There are extremely HOT! However, if there is time to replace the drum unit for the number of...
... without having to purchase a new one (DR-510). WARNING Just after you have no control over the many factors that determine the actual drum life, we have used the MFC, some internal parts of pages per print job. There are extremely HOT! However, if there is time to replace the drum unit for the number of...

Users Manual - English
Page 179
Caution To prevent damage to replace the drum unit: 1 Press the cover release button and then open the front cover. 2 Remove the old drum unit and toner cartridge assembly. Follow these steps to the printer from static electricity, do not touch the electrodes shown below. 12 - 31 TROUBLESHOOTING AND ROUTINE MAINTENANCE Place it on a drop cloth or disposable paper to avoid scattering toner.
Caution To prevent damage to replace the drum unit: 1 Press the cover release button and then open the front cover. 2 Remove the old drum unit and toner cartridge assembly. Follow these steps to the printer from static electricity, do not touch the electrodes shown below. 12 - 31 TROUBLESHOOTING AND ROUTINE MAINTENANCE Place it on a drop cloth or disposable paper to avoid scattering toner.

Users Manual - English
Page 180
... regulations. 5 Reinstall the toner cartridge into the new drum unit. (See Replacing the toner cartridge on page 12-25.) Lock Lever Discard the used drum unit according to seal the drum unit tightly so toner powder does not spill out of the drum unit. (See Replacing the toner cartridge on page 12-25.) 6 Reinstall..., keeping the front cover open. 7 Press Clear/Back. 8 Press 1 and when the LCD shows Accepted, and close the front Replace Drum? 1.Yes 2.No cover. TROUBLESHOOTING AND ROUTINE MAINTENANCE 12 - 32 3 Hold down the lock lever on the right and pull the toner cartridge out of...
... regulations. 5 Reinstall the toner cartridge into the new drum unit. (See Replacing the toner cartridge on page 12-25.) Lock Lever Discard the used drum unit according to seal the drum unit tightly so toner powder does not spill out of the drum unit. (See Replacing the toner cartridge on page 12-25.) 6 Reinstall..., keeping the front cover open. 7 Press Clear/Back. 8 Press 1 and when the LCD shows Accepted, and close the front Replace Drum? 1.Yes 2.No cover. TROUBLESHOOTING AND ROUTINE MAINTENANCE 12 - 32 3 Hold down the lock lever on the right and pull the toner cartridge out of...

Users Manual - English
Page 206
... and credit card numbers 7-6 automatic fax redial .......... 6-7 Groups 6-14 stored numbers 7-1 Distinctive Ring 5-10 setting ring pattern 5-11, 5-12 turning off 5-12 Drum unit checking remaining life ...12-33 replacing 12-30 Dual Access 6-7 E Easy Receive 5-4 ECM (Error Correction Mode) 1-11 Ecology Sleep Time 4-11 Toner Save 4-11 Enlarge/Reduce key (copying...
... and credit card numbers 7-6 automatic fax redial .......... 6-7 Groups 6-14 stored numbers 7-1 Distinctive Ring 5-10 setting ring pattern 5-11, 5-12 turning off 5-12 Drum unit checking remaining life ...12-33 replacing 12-30 Dual Access 6-7 E Easy Receive 5-4 ECM (Error Correction Mode) 1-11 Ecology Sleep Time 4-11 Toner Save 4-11 Enlarge/Reduce key (copying...
Quick Setup Guide - English
Page 5
... Only 55 Web BRAdmin...55 Setting your IP Address, Subnet Mask and Gateway using BRAdmin Professional (Windows® Users Only 56 Options ...57 Replacement Consumables 57 3 Installing the Power Cord and Phone Line 7 6. Attaching the Supports 4 2. Selecting Your Language (Canada Only 11 10. Sending... in the Paper Tray 6 5. Table of Contents Step 1 Setting Up the Machine Step 2 1. Installing the Drum Unit Assembly 5 4. Selecting a Receive Mode 10 9. Installing the Handset 4 3. Setting Your Station ID 9 8. Setting the Date and Time 8 7.
... Only 55 Web BRAdmin...55 Setting your IP Address, Subnet Mask and Gateway using BRAdmin Professional (Windows® Users Only 56 Options ...57 Replacement Consumables 57 3 Installing the Power Cord and Phone Line 7 6. Attaching the Supports 4 2. Selecting Your Language (Canada Only 11 10. Sending... in the Paper Tray 6 5. Table of Contents Step 1 Setting Up the Machine Step 2 1. Installing the Drum Unit Assembly 5 4. Selecting a Receive Mode 10 9. Installing the Handset 4 3. Setting Your Station ID 9 8. Setting the Date and Time 8 7.

Quick Setup Guide - English
Page 59
...3,500 Letter pages @ 5% coverage. Windows NT® 4.0 Parallel Windows® Network Macintosh® USB Macintosh® Network For Administrators 57 Replacement Consumables Drum Unit DR-510 Toner TN-540/TN-570 Up to 6,700 Letter pages @ 5% coverage. TN-570: Up to 20,000 Letter pages ...User's Guide. Setting Up the Machine Windows® USB Windows® Parallel Options The MFC has the following optional accessories. The optional Network Print/FAX Server (NC-9100h) transforms your MFC into a Network Multi Function Center, offering Network Printing / Network PC-FAX send and ...
...3,500 Letter pages @ 5% coverage. Windows NT® 4.0 Parallel Windows® Network Macintosh® USB Macintosh® Network For Administrators 57 Replacement Consumables Drum Unit DR-510 Toner TN-540/TN-570 Up to 6,700 Letter pages @ 5% coverage. TN-570: Up to 20,000 Letter pages ...User's Guide. Setting Up the Machine Windows® USB Windows® Parallel Options The MFC has the following optional accessories. The optional Network Print/FAX Server (NC-9100h) transforms your MFC into a Network Multi Function Center, offering Network Printing / Network PC-FAX send and ...


