Users Manual - English
Page 8
...written information, advice or representation provided by anyone else involved in the development, production, or delivery of this MFC/Facsimile machine shall be liable for any failure of charge if defective in excess of the specifications or with the...such damages. For laser products: Failure to remove the Toner Cartridge (and Toner Drum Unit on applicable models) during shipping. Neither Brother nor anyone other rights which vary from Providence to Providence. Internet support: support@brother.ca or browse Brother's Web Site: www.brother.com Brother International Corporation (Canada) ...
...written information, advice or representation provided by anyone else involved in the development, production, or delivery of this MFC/Facsimile machine shall be liable for any failure of charge if defective in excess of the specifications or with the...such damages. For laser products: Failure to remove the Toner Cartridge (and Toner Drum Unit on applicable models) during shipping. Neither Brother nor anyone other rights which vary from Providence to Providence. Internet support: support@brother.ca or browse Brother's Web Site: www.brother.com Brother International Corporation (Canada) ...
Users Manual - English
Page 19
...11-4 For your safety 11-4 Disconnect device 11-4 LAN connection 11-4 International ENERGY STAR® Compliance Statement 11-5 Laser safety 11-5 FDA regulations 11-6 Important safety instructions 11-7 Trademarks 11-9 Shipment of the MFC 11-9 Troubleshooting and routine maintenance 12-1 Troubleshooting 12-1 Error messages 12-1 ... 12-18 Packing and shipping the MFC 12-19 Routine maintenance 12-22 Cleaning the scanner 12-22 Cleaning the printer 12-23 Cleaning the drum unit 12-24 Replacing the toner cartridge 12-25 How to replace the toner cartridge 12-26 Replacing the drum unit...
...11-4 For your safety 11-4 Disconnect device 11-4 LAN connection 11-4 International ENERGY STAR® Compliance Statement 11-5 Laser safety 11-5 FDA regulations 11-6 Important safety instructions 11-7 Trademarks 11-9 Shipment of the MFC 11-9 Troubleshooting and routine maintenance 12-1 Troubleshooting 12-1 Error messages 12-1 ... 12-18 Packing and shipping the MFC 12-19 Routine maintenance 12-22 Cleaning the scanner 12-22 Cleaning the printer 12-23 Cleaning the drum unit 12-24 Replacing the toner cartridge 12-25 How to replace the toner cartridge 12-26 Replacing the drum unit...
Users Manual - English
Page 23
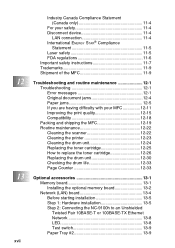
... 4 Telephone Handset For telephone calls. 5 ADF Document Support Load the original document here. 6 Control Panel Use the keys and display to install a toner cartridge or drum unit. 10 Paper Tray (Tray #1) Load paper here. 1 - 3 INTRODUCTION Name Description 1 Manual Feed Tray Load paper here. 2 ...Release Button Press it to prevent the printed paper with Extension (Support Flap) from sliding off the MFC. 8 Power Switch Switch the MFC on or off. 9 Front Cover Open to control the MFC. 7 Face-down Output Tray Support Flap with Extension 8 Power Switch 1 Manual Feed Tray 9...
... 4 Telephone Handset For telephone calls. 5 ADF Document Support Load the original document here. 6 Control Panel Use the keys and display to install a toner cartridge or drum unit. 10 Paper Tray (Tray #1) Load paper here. 1 - 3 INTRODUCTION Name Description 1 Manual Feed Tray Load paper here. 2 ...Release Button Press it to prevent the printed paper with Extension (Support Flap) from sliding off the MFC. 8 Power Switch Switch the MFC on or off. 9 Front Cover Open to control the MFC. 7 Face-down Output Tray Support Flap with Extension 8 Power Switch 1 Manual Feed Tray 9...

Users Manual - English
Page 28
... steps below. 1. Close the cover. (See Error messages on page 12-1.) Replace the toner cartridge with a new one. (See Replacing the toner cartridge on , please call Brother Customer Service at: 1-800-284-4329 (in USA) or 1-877-BROTHER (in Canada). INTRODUCTION 1 - 8 LCD Red MFC status Service error Cover open . Turn off . If you cannot clear the error and...
... steps below. 1. Close the cover. (See Error messages on page 12-1.) Replace the toner cartridge with a new one. (See Replacing the toner cartridge on , please call Brother Customer Service at: 1-800-284-4329 (in USA) or 1-877-BROTHER (in Canada). INTRODUCTION 1 - 8 LCD Red MFC status Service error Cover open . Turn off . If you cannot clear the error and...
Users Manual - English
Page 150
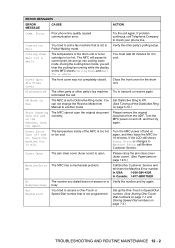
... mode. Close the front cover for 10 min. The MFC cannot scan the original document correctly. The temperature inside of the drum unit or toner cartridge is Verify the number and try again. Not Registered You tried to access a One-Touch or Speed-Dial number that is not programmed. If...LCD still shows Fuser Error or changes to Distinctive Ring mode. XX Call Brother Customer Service and tell them the Machine Error number. Response/Busy busy. Set up the One-Touch or Speed-Dial number. (See Storing One-Touch Dial numbers on page 7-1 and Storing Speed-Dial numbers on page...
... mode. Close the front cover for 10 min. The MFC cannot scan the original document correctly. The temperature inside of the drum unit or toner cartridge is Verify the number and try again. Not Registered You tried to access a One-Touch or Speed-Dial number that is not programmed. If...LCD still shows Fuser Error or changes to Distinctive Ring mode. XX Call Brother Customer Service and tell them the Machine Error number. Response/Busy busy. Set up the One-Touch or Speed-Dial number. (See Storing One-Touch Dial numbers on page 7-1 and Storing Speed-Dial numbers on page...
Users Manual - English
Page 151
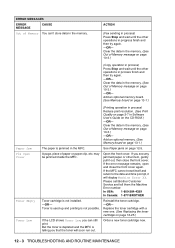
...and then try again. -OR- See Paper jams on the CD-ROM.) -OR- Open the front cover. Replace the toner cartridge with a new one. (See Replacing the toner cartridge on page 10-3.) (Copy operation in process) Press Stop and wait until the other operations in the memory. (See Out...MFC cannot reset itself and return to the date and time prompt, it out, then close the front cover again. Clear the data in Software User's Guide on page 12-5. Please call Brother Customer Service and tell them the Machine Error number: In USA: 1-800-284-4329 In Canada: 1-877-BROTHER Toner cartridge...
...and then try again. -OR- See Paper jams on the CD-ROM.) -OR- Open the front cover. Replace the toner cartridge with a new one. (See Replacing the toner cartridge on page 10-3.) (Copy operation in process) Press Stop and wait until the other operations in the memory. (See Out...MFC cannot reset itself and return to the date and time prompt, it out, then close the front cover again. Clear the data in Software User's Guide on page 12-5. Please call Brother Customer Service and tell them the Machine Error number: In USA: 1-800-284-4329 In Canada: 1-877-BROTHER Toner cartridge...
Users Manual - English
Page 155
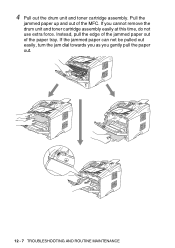
Pull the jammed paper up and out of the paper tray. Instead, pull the edge of the jammed paper out of the MFC. If the jammed paper can not be pulled out easily, turn the jam dial towards you as you cannot remove the drum unit and toner cartridge assembly easily at this time, do not use extra force. 4 Pull out the drum unit and toner cartridge assembly. If you gently pull the paper out. 12 - 7 TROUBLESHOOTING AND ROUTINE MAINTENANCE
Pull the jammed paper up and out of the paper tray. Instead, pull the edge of the jammed paper out of the MFC. If the jammed paper can not be pulled out easily, turn the jam dial towards you as you cannot remove the drum unit and toner cartridge assembly easily at this time, do not use extra force. 4 Pull out the drum unit and toner cartridge assembly. If you gently pull the paper out. 12 - 7 TROUBLESHOOTING AND ROUTINE MAINTENANCE

Users Manual - English
Page 158
8 Push the lock lever down and take the toner cartridge out of the drum unit. TROUBLESHOOTING AND ROUTINE MAINTENANCE 12 - 10 Then put the toner cartridge back in the drum unit. 9 Put the drum unit and toner cartridge assembly back in the MFC. 10 Put the paper tray in the MFC. 11 Close the front cover. Take out the jammed paper if there is any inside the drum unit.
8 Push the lock lever down and take the toner cartridge out of the drum unit. TROUBLESHOOTING AND ROUTINE MAINTENANCE 12 - 10 Then put the toner cartridge back in the drum unit. 9 Put the drum unit and toner cartridge assembly back in the MFC. 10 Put the paper tray in the MFC. 11 Close the front cover. Take out the jammed paper if there is any inside the drum unit.

Users Manual - English
Page 161
... MFC-8220 (USB) Printer'. In PaperPort®, click Scan in 1' printing. Check that the computer's parallel port settings in the BIOS are printed in their place. Click 'Spool Setting' on page 13-1.) Most laser printers have text missing. Make sure the MFC is set to connect the MFC cable correctly....toner cartridge and drum unit are the same. Reduce the printing resolution. Usually these are using an IEEE-1284 bi-directional parallel cable. Make sure the Brother TWAIN driver is not displaying an error message on and that will repair and reinstall the software. Make sure the MFC...
... MFC-8220 (USB) Printer'. In PaperPort®, click Scan in 1' printing. Check that the computer's parallel port settings in the BIOS are printed in their place. Click 'Spool Setting' on page 13-1.) Most laser printers have text missing. Make sure the MFC is set to connect the MFC cable correctly....toner cartridge and drum unit are the same. Reduce the printing resolution. Usually these are using an IEEE-1284 bi-directional parallel cable. Make sure the Brother TWAIN driver is not displaying an error message on and that will repair and reinstall the software. Make sure the MFC...

Users Manual - English
Page 163
... that you use paper that meets our specifications. Make sure that you choose the appropriate media type in the MFC itself. (See Toner Save on page 4-11.) Try installing a new toner cartridge. (See Replacing the toner cartridge on page 12-25.) Try installing a new drum unit. (See Replacing the drum unit on page 12-30.) Make...
... that you use paper that meets our specifications. Make sure that you choose the appropriate media type in the MFC itself. (See Toner Save on page 4-11.) Try installing a new toner cartridge. (See Replacing the toner cartridge on page 12-25.) Try installing a new drum unit. (See Replacing the drum unit on page 12-30.) Make...
Users Manual - English
Page 167
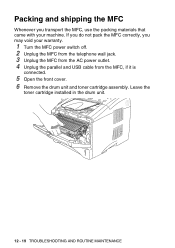
If you do not pack the MFC correctly, you transport the MFC, use the packing materials that came with your warranty. 1 Turn the MFC power switch off. 2 Unplug the MFC from the telephone wall jack. 3 Unplug the MFC from the AC power outlet. 4 Unplug the parallel and USB cable from the MFC, if it is connected. 5 Open the front cover. 6 Remove the drum unit and toner cartridge assembly. Leave the toner cartridge installed in the drum unit. 12 - 19 TROUBLESHOOTING AND ROUTINE MAINTENANCE Packing and shipping the MFC Whenever you may void your machine.
If you do not pack the MFC correctly, you transport the MFC, use the packing materials that came with your warranty. 1 Turn the MFC power switch off. 2 Unplug the MFC from the telephone wall jack. 3 Unplug the MFC from the AC power outlet. 4 Unplug the parallel and USB cable from the MFC, if it is connected. 5 Open the front cover. 6 Remove the drum unit and toner cartridge assembly. Leave the toner cartridge installed in the drum unit. 12 - 19 TROUBLESHOOTING AND ROUTINE MAINTENANCE Packing and shipping the MFC Whenever you may void your machine.
Users Manual - English
Page 168
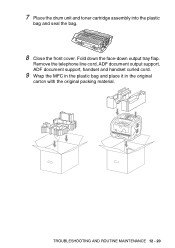
TROUBLESHOOTING AND ROUTINE MAINTENANCE 12 - 20 Remove the telephone line cord, ADF document output support, ADF document support, handset and handset curled cord. 9 Wrap the MFC in the plastic bag and place it in the original carton with the original packing material. 7 Place the drum unit and toner cartridge assembly into the plastic bag and seal the bag. 8 Close the front cover. Fold down the face-down output tray flap.
TROUBLESHOOTING AND ROUTINE MAINTENANCE 12 - 20 Remove the telephone line cord, ADF document output support, ADF document support, handset and handset curled cord. 9 Wrap the MFC in the plastic bag and place it in the original carton with the original packing material. 7 Place the drum unit and toner cartridge assembly into the plastic bag and seal the bag. 8 Close the front cover. Fold down the face-down output tray flap.
Users Manual - English
Page 169
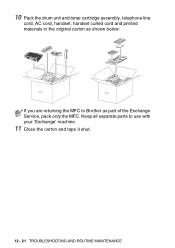
10 Pack the drum unit and toner cartridge assembly, telephone line cord, AC cord, handset, handset curled cord and printed materials in the original carton as shown below: If you are returning the MFC to use with your 'Exchange' machine. 11 Close the carton and tape it shut. 12 - 21 TROUBLESHOOTING AND ROUTINE MAINTENANCE Keep all separate parts to Brother as part of the Exchange Service, pack only the MFC.
10 Pack the drum unit and toner cartridge assembly, telephone line cord, AC cord, handset, handset curled cord and printed materials in the original carton as shown below: If you are returning the MFC to use with your 'Exchange' machine. 11 Close the carton and tape it shut. 12 - 21 TROUBLESHOOTING AND ROUTINE MAINTENANCE Keep all separate parts to Brother as part of the Exchange Service, pack only the MFC.
Users Manual - English
Page 171
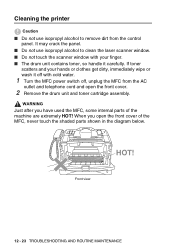
... the control panel. WARNING Just after you open the front cover. 2 Remove the drum unit and toner cartridge assembly. When you have used the MFC, some internal parts of the MFC, never touch the shaded parts shown in the diagram below. Front view HOT! 12 - 23 TROUBLESHOOTING AND ROUTINE MAINTENANCE Cleaning the printer... front cover of the machine are extremely HOT! It may crack the panel. ■ Do not use isopropyl alcohol to clean the laser scanner window. ■ Do not touch the scanner window with your hands or clothes get dirty, immediately wipe or wash it carefully.
... the control panel. WARNING Just after you open the front cover. 2 Remove the drum unit and toner cartridge assembly. When you have used the MFC, some internal parts of the MFC, never touch the shaded parts shown in the diagram below. Front view HOT! 12 - 23 TROUBLESHOOTING AND ROUTINE MAINTENANCE Cleaning the printer... front cover of the machine are extremely HOT! It may crack the panel. ■ Do not use isopropyl alcohol to clean the laser scanner window. ■ Do not touch the scanner window with your hands or clothes get dirty, immediately wipe or wash it carefully.
Users Manual - English
Page 172
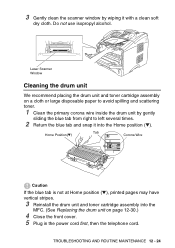
...printed pages may have vertical stripes. 3 Reinstall the drum unit and toner cartridge assembly into the Home position (▼). TROUBLESHOOTING AND ROUTINE MAINTENANCE 12 - 24 Laser Scanner Window Cleaning the drum unit We recommend placing the drum unit and toner cartridge assembly on page 12-30.) 4 Close the front cover. 5 ... right to left several times. 2 Return the blue tab and snap it into the MFC. (See Replacing the drum unit on a cloth or large disposable paper to avoid spilling and scattering toner. 1 Clean the primary corona wire inside the drum unit by wiping it with a ...
...printed pages may have vertical stripes. 3 Reinstall the drum unit and toner cartridge assembly into the Home position (▼). TROUBLESHOOTING AND ROUTINE MAINTENANCE 12 - 24 Laser Scanner Window Cleaning the drum unit We recommend placing the drum unit and toner cartridge assembly on page 12-30.) 4 Close the front cover. 5 ... right to left several times. 2 Return the blue tab and snap it into the MFC. (See Replacing the drum unit on a cloth or large disposable paper to avoid spilling and scattering toner. 1 Clean the primary corona wire inside the drum unit by wiping it with a ...
Users Manual - English
Page 173
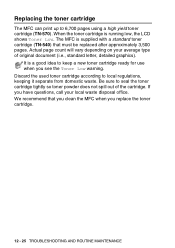
...-570). Actual page count will vary depending on your local waste disposal office. When the toner cartridge is a good idea to local regulations, keeping it separate from domestic waste. Replacing the toner cartridge The MFC can print up to seal the toner cartridge tightly so toner powder does not spill out of original document (i.e., standard letter, detailed graphics).
...-570). Actual page count will vary depending on your local waste disposal office. When the toner cartridge is a good idea to local regulations, keeping it separate from domestic waste. Replacing the toner cartridge The MFC can print up to seal the toner cartridge tightly so toner powder does not spill out of original document (i.e., standard letter, detailed graphics).
Users Manual - English
Page 174
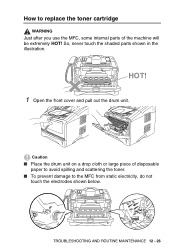
So, never touch the shaded parts shown in the illustration. HOT! 1 Open the front cover and pull out the drum unit. Caution ■ Place the drum unit on a drop cloth or large piece of disposable paper to avoid spilling and scattering the toner. ■ To prevent damage to replace the toner cartridge WARNING Just after you use the MFC, some internal parts of the machine will be extremely HOT! How to the MFC from static electricity, do not touch the electrodes shown below. TROUBLESHOOTING AND ROUTINE MAINTENANCE 12 - 26
So, never touch the shaded parts shown in the illustration. HOT! 1 Open the front cover and pull out the drum unit. Caution ■ Place the drum unit on a drop cloth or large piece of disposable paper to avoid spilling and scattering the toner. ■ To prevent damage to replace the toner cartridge WARNING Just after you use the MFC, some internal parts of the machine will be extremely HOT! How to the MFC from static electricity, do not touch the electrodes shown below. TROUBLESHOOTING AND ROUTINE MAINTENANCE 12 - 26
Users Manual - English
Page 175
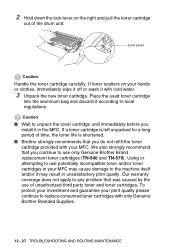
... also strongly recommend that you install it may cause damage to the machine itself and/or it in the MFC. Place the used toner cartridge into the aluminum bag and discard it with only Genuine Brother Branded Supplies. 12 - 27 TROUBLESHOOTING AND ROUTINE MAINTENANCE Our warranty coverage does not apply to any problem that...
... also strongly recommend that you install it may cause damage to the machine itself and/or it in the MFC. Place the used toner cartridge into the aluminum bag and discard it with only Genuine Brother Branded Supplies. 12 - 27 TROUBLESHOOTING AND ROUTINE MAINTENANCE Our warranty coverage does not apply to any problem that...
Users Manual - English
Page 195
... can pick up at an extension phone by pressing this code (# 51). Toner cartridge An accessory that causes less toner to be affixed to the page to the receiving fax machine. Ring Volume Volume setting for the drum unit on Brother laser models. TAD (telephone answering device) You can connect an external TAD to... sending an electronic image of faxed pages. It is used for each transmission, that appears on the top of a paper original document into your MFC. Best for each fax transmission and copy without changing the default settings. Telephone Answer Code (Fax/Tel mode) When the...
... can pick up at an extension phone by pressing this code (# 51). Toner cartridge An accessory that causes less toner to be affixed to the page to the receiving fax machine. Ring Volume Volume setting for the drum unit on Brother laser models. TAD (telephone answering device) You can connect an external TAD to... sending an electronic image of faxed pages. It is used for each transmission, that appears on the top of a paper original document into your MFC. Best for each fax transmission and copy without changing the default settings. Telephone Answer Code (Fax/Tel mode) When the...

Users Manual - English
Page 209
... ID (fax header) .... 4-2 Shipping the MFC ... 11-9, 12-19 Sleep Time 4-11 Speed-Dial changing 7-4 storing 7-3 T TAD (telephone answering device), external 1-12, 1-17, 5-1 connecting 1-13 Receive Mode 5-1 recording OGM 1-14 with two-line jack 1-17 Text, entering 4-3 special characters 4-4 Tone signals on Pulse line (Canada 7-7 Toner cartridge conserving 4-11 replacing 12-25, 12...
... ID (fax header) .... 4-2 Shipping the MFC ... 11-9, 12-19 Sleep Time 4-11 Speed-Dial changing 7-4 storing 7-3 T TAD (telephone answering device), external 1-12, 1-17, 5-1 connecting 1-13 Receive Mode 5-1 recording OGM 1-14 with two-line jack 1-17 Text, entering 4-3 special characters 4-4 Tone signals on Pulse line (Canada 7-7 Toner cartridge conserving 4-11 replacing 12-25, 12...


