Users Manual - English
Page 8
... limitation, print cartridges, print head, toner and drum) or damage caused by accident, neglect, misuse or improper installation or operation, any failure of the MFC/Facsimile machine to operate properly. Internet support: support@brother.ca or browse Brother's Web Site: www.brother.com Brother International Corporation (Canada)...legal rights and you may not apply to you. For laser products: Failure to remove the Toner Cartridge (and Toner Drum Unit on applicable models) during shipping will cause severe damage to the MFC/Facsimile and will VOID your warranty. (Refer to your User...
... limitation, print cartridges, print head, toner and drum) or damage caused by accident, neglect, misuse or improper installation or operation, any failure of the MFC/Facsimile machine to operate properly. Internet support: support@brother.ca or browse Brother's Web Site: www.brother.com Brother International Corporation (Canada)...legal rights and you may not apply to you. For laser products: Failure to remove the Toner Cartridge (and Toner Drum Unit on applicable models) during shipping will cause severe damage to the MFC/Facsimile and will VOID your warranty. (Refer to your User...
Users Manual - English
Page 19
...11-4 For your safety 11-4 Disconnect device 11-4 LAN connection 11-4 International ENERGY STAR® Compliance Statement 11-5 Laser safety 11-5 FDA regulations 11-6 Important safety instructions 11-7 Trademarks 11-9 Shipment of the MFC 11-9 Troubleshooting and routine maintenance 12-1 Troubleshooting 12-1 Error messages 12-1 ... 12-18 Packing and shipping the MFC 12-19 Routine maintenance 12-22 Cleaning the scanner 12-22 Cleaning the printer 12-23 Cleaning the drum unit 12-24 Replacing the toner cartridge 12-25 How to replace the toner cartridge 12-26 Replacing the drum unit...
...11-4 For your safety 11-4 Disconnect device 11-4 LAN connection 11-4 International ENERGY STAR® Compliance Statement 11-5 Laser safety 11-5 FDA regulations 11-6 Important safety instructions 11-7 Trademarks 11-9 Shipment of the MFC 11-9 Troubleshooting and routine maintenance 12-1 Troubleshooting 12-1 Error messages 12-1 ... 12-18 Packing and shipping the MFC 12-19 Routine maintenance 12-22 Cleaning the scanner 12-22 Cleaning the printer 12-23 Cleaning the drum unit 12-24 Replacing the toner cartridge 12-25 How to replace the toner cartridge 12-26 Replacing the drum unit...
Users Manual - English
Page 23
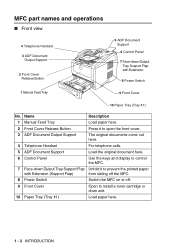
...ADF Document Support Load the original document here. 6 Control Panel Use the keys and display to install a toner cartridge or drum unit. 10 Paper Tray (Tray #1) Load paper here. 1 - 3 INTRODUCTION MFC part names and operations ■ Front view 4 Telephone Handset 3 ADF Document Output Support 2 Front Cover ...Flap Unfold it to prevent the printed paper with Extension (Support Flap) from sliding off the MFC. 8 Power Switch Switch the MFC on or off. 9 Front Cover Open to control the MFC. 7 Face-down Output Tray Support Flap with Extension 8 Power Switch 1 Manual Feed Tray...
...ADF Document Support Load the original document here. 6 Control Panel Use the keys and display to install a toner cartridge or drum unit. 10 Paper Tray (Tray #1) Load paper here. 1 - 3 INTRODUCTION MFC part names and operations ■ Front view 4 Telephone Handset 3 ADF Document Output Support 2 Front Cover ...Flap Unfold it to prevent the printed paper with Extension (Support Flap) from sliding off the MFC. 8 Power Switch Switch the MFC on or off. 9 Front Cover Open to control the MFC. 7 Face-down Output Tray Support Flap with Extension 8 Power Switch 1 Manual Feed Tray...

Users Manual - English
Page 28
... a new one. (See Replacing the toner cartridge on and try to print again. INTRODUCTION 1 - 8 If you cannot clear the error and still see the Red back light color after turning the MFC back on page 12-1.) When the power switch is off or the MFC is in Canada). Check the LCD message.... is full. (See Error messages on page 12-1.) Check the LCD message. (See Troubleshooting on , please call Brother Customer Service at: 1-800-284-4329 (in USA) or 1-877-BROTHER (in Sleep mode, the LCD back light is off the power switch. 2. Turn off . LCD Red MFC status Service error Cover open .
... a new one. (See Replacing the toner cartridge on and try to print again. INTRODUCTION 1 - 8 If you cannot clear the error and still see the Red back light color after turning the MFC back on page 12-1.) When the power switch is off or the MFC is in Canada). Check the LCD message.... is full. (See Error messages on page 12-1.) Check the LCD message. (See Troubleshooting on , please call Brother Customer Service at: 1-800-284-4329 (in USA) or 1-877-BROTHER (in Sleep mode, the LCD back light is off the power switch. 2. Turn off . LCD Red MFC status Service error Cover open .
Users Manual - English
Page 150
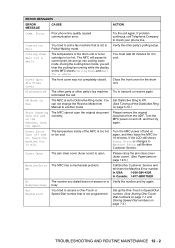
...the Distinctive Ring Manual to transmit or receive again. If problem continues, call . Turn the MFC power on again, and then leave the MFC for 10 min. Not Registered You tried to access a One-Touch or Speed-Dial number that is set to check your phone line. ERROR MESSAGES ERROR ... mode. Try the call Brother Customer Service. Please remove the original document from (See Turning off , and then try again. The temperature inside of the drum unit or toner cartridge is too hot. If the LCD still shows Fuser Error or changes to Off. The MFC will hear the cooling fan...
...the Distinctive Ring Manual to transmit or receive again. If problem continues, call . Turn the MFC power on again, and then leave the MFC for 10 min. Not Registered You tried to access a One-Touch or Speed-Dial number that is set to check your phone line. ERROR MESSAGES ERROR ... mode. Try the call Brother Customer Service. Please remove the original document from (See Turning off , and then try again. The temperature inside of the drum unit or toner cartridge is too hot. If the LCD still shows Fuser Error or changes to Off. The MFC will hear the cooling fan...
Users Manual - English
Page 151
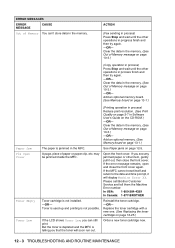
... If the error message remains, open and close the front cover. Replace the toner cartridge with a new one. (See Replacing the toner cartridge on page 12-5. But the toner is depleted and the MFC is not possible. If the MFC cannot reset itself and return to the date and time prompt, it out, then... Error number: In USA: 1-800-284-4329 In Canada: 1-877-BROTHER Toner cartridge is jammed in the memory. (See Out of Memory message on the CD-ROM.) -OR- Reinstall the toner cartridge. -OR- Clear the data in the MFC. ERROR MESSAGES ERROR MESSAGE CAUSE Out of Memory You can still print....
... If the error message remains, open and close the front cover. Replace the toner cartridge with a new one. (See Replacing the toner cartridge on page 12-5. But the toner is depleted and the MFC is not possible. If the MFC cannot reset itself and return to the date and time prompt, it out, then... Error number: In USA: 1-800-284-4329 In Canada: 1-877-BROTHER Toner cartridge is jammed in the memory. (See Out of Memory message on the CD-ROM.) -OR- Reinstall the toner cartridge. -OR- Clear the data in the MFC. ERROR MESSAGES ERROR MESSAGE CAUSE Out of Memory You can still print....
Users Manual - English
Page 155
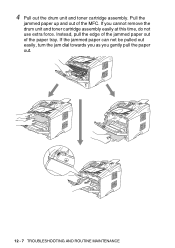
If you gently pull the paper out. 12 - 7 TROUBLESHOOTING AND ROUTINE MAINTENANCE 4 Pull out the drum unit and toner cartridge assembly. Instead, pull the edge of the jammed paper out of the MFC. If the jammed paper can not be pulled out easily, turn the jam dial towards you as you cannot remove the drum unit and toner cartridge assembly easily at this time, do not use extra force. Pull the jammed paper up and out of the paper tray.
If you gently pull the paper out. 12 - 7 TROUBLESHOOTING AND ROUTINE MAINTENANCE 4 Pull out the drum unit and toner cartridge assembly. Instead, pull the edge of the jammed paper out of the MFC. If the jammed paper can not be pulled out easily, turn the jam dial towards you as you cannot remove the drum unit and toner cartridge assembly easily at this time, do not use extra force. Pull the jammed paper up and out of the paper tray.

Users Manual - English
Page 158
Take out the jammed paper if there is any inside the drum unit. TROUBLESHOOTING AND ROUTINE MAINTENANCE 12 - 10 8 Push the lock lever down and take the toner cartridge out of the drum unit. Then put the toner cartridge back in the drum unit. 9 Put the drum unit and toner cartridge assembly back in the MFC. 10 Put the paper tray in the MFC. 11 Close the front cover.
Take out the jammed paper if there is any inside the drum unit. TROUBLESHOOTING AND ROUTINE MAINTENANCE 12 - 10 8 Push the lock lever down and take the toner cartridge out of the drum unit. Then put the toner cartridge back in the drum unit. 9 Put the drum unit and toner cartridge assembly back in the MFC. 10 Put the paper tray in the MFC. 11 Close the front cover.

Users Manual - English
Page 161
Out of the 'Brother MFC-8220 or MFC-8220 (USB) Printer'. Check the primary settings in your computer manufacturer...command lines in use" Error Message appears. Your computer is not displaying an error message on page 13-1.) Most laser printers have text missing. Reduce the graphic quality, the number of an original document. In PaperPort®, click ... application and in your original documents and try again. Make sure the MFC is plugged in and power switch turned on . • The toner cartridge and drum unit are running automatically when you are set up the computer...
Out of the 'Brother MFC-8220 or MFC-8220 (USB) Printer'. Check the primary settings in your computer manufacturer...command lines in use" Error Message appears. Your computer is not displaying an error message on page 13-1.) Most laser printers have text missing. Reduce the graphic quality, the number of an original document. In PaperPort®, click ... application and in your original documents and try again. Make sure the MFC is plugged in and power switch turned on . • The toner cartridge and drum unit are running automatically when you are set up the computer...

Users Manual - English
Page 163
... using. Conditions such as high humidity can increase the amount of background shading. (See Choosing a location on page ix.) Use a new toner cartridge. (See Replacing the toner cartridge on page 12-25.) Use a new drum unit. (See Replacing the drum unit on page 12-30.) Make sure you return the... by cleaning the primary corona wire inside the drum unit by sliding the blue tab. Put in the MFC itself. (See Toner Save on page 4-11.) Try installing a new toner cartridge. (See Replacing the toner cartridge on page 12-25.) Try installing a new drum unit. (See Replacing the drum unit on page ...
... using. Conditions such as high humidity can increase the amount of background shading. (See Choosing a location on page ix.) Use a new toner cartridge. (See Replacing the toner cartridge on page 12-25.) Use a new drum unit. (See Replacing the drum unit on page 12-30.) Make sure you return the... by cleaning the primary corona wire inside the drum unit by sliding the blue tab. Put in the MFC itself. (See Toner Save on page 4-11.) Try installing a new toner cartridge. (See Replacing the toner cartridge on page 12-25.) Try installing a new drum unit. (See Replacing the drum unit on page ...
Users Manual - English
Page 167
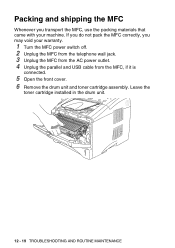
Leave the toner cartridge installed in the drum unit. 12 - 19 TROUBLESHOOTING AND ROUTINE MAINTENANCE If you do not pack the MFC correctly, you transport the MFC, use the packing materials that came with your warranty. 1 Turn the MFC power switch off. 2 Unplug the MFC from the telephone wall jack. 3 Unplug the MFC from the AC power outlet. 4 Unplug the parallel and USB cable from the MFC, if it is connected. 5 Open the front cover. 6 Remove the drum unit and toner cartridge assembly. Packing and shipping the MFC Whenever you may void your machine.
Leave the toner cartridge installed in the drum unit. 12 - 19 TROUBLESHOOTING AND ROUTINE MAINTENANCE If you do not pack the MFC correctly, you transport the MFC, use the packing materials that came with your warranty. 1 Turn the MFC power switch off. 2 Unplug the MFC from the telephone wall jack. 3 Unplug the MFC from the AC power outlet. 4 Unplug the parallel and USB cable from the MFC, if it is connected. 5 Open the front cover. 6 Remove the drum unit and toner cartridge assembly. Packing and shipping the MFC Whenever you may void your machine.
Users Manual - English
Page 168
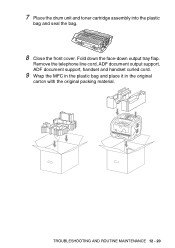
Fold down the face-down output tray flap. TROUBLESHOOTING AND ROUTINE MAINTENANCE 12 - 20 7 Place the drum unit and toner cartridge assembly into the plastic bag and seal the bag. 8 Close the front cover. Remove the telephone line cord, ADF document output support, ADF document support, handset and handset curled cord. 9 Wrap the MFC in the plastic bag and place it in the original carton with the original packing material.
Fold down the face-down output tray flap. TROUBLESHOOTING AND ROUTINE MAINTENANCE 12 - 20 7 Place the drum unit and toner cartridge assembly into the plastic bag and seal the bag. 8 Close the front cover. Remove the telephone line cord, ADF document output support, ADF document support, handset and handset curled cord. 9 Wrap the MFC in the plastic bag and place it in the original carton with the original packing material.
Users Manual - English
Page 169
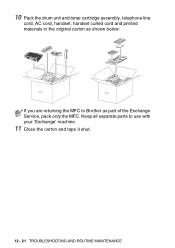
10 Pack the drum unit and toner cartridge assembly, telephone line cord, AC cord, handset, handset curled cord and printed materials in the original carton as shown below: If you are returning the MFC to use with your 'Exchange' machine. 11 Close the carton and tape it shut. 12 - 21 TROUBLESHOOTING AND ROUTINE MAINTENANCE Keep all separate parts to Brother as part of the Exchange Service, pack only the MFC.
10 Pack the drum unit and toner cartridge assembly, telephone line cord, AC cord, handset, handset curled cord and printed materials in the original carton as shown below: If you are returning the MFC to use with your 'Exchange' machine. 11 Close the carton and tape it shut. 12 - 21 TROUBLESHOOTING AND ROUTINE MAINTENANCE Keep all separate parts to Brother as part of the Exchange Service, pack only the MFC.
Users Manual - English
Page 171
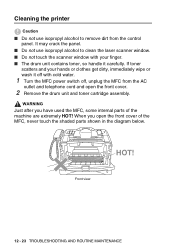
...MFC, some internal parts of the MFC, never touch the shaded parts shown in the diagram below. If toner scatters and your finger. ■ The drum unit contains toner, so handle it off with cold water. 1 Turn the MFC power switch off, unplug the MFC ...from the control panel. It may crack the panel. ■ Do not use isopropyl alcohol to clean the laser scanner window. &#... WARNING Just after you open the front cover. 2 Remove the drum unit and toner cartridge assembly.
...MFC, some internal parts of the MFC, never touch the shaded parts shown in the diagram below. If toner scatters and your finger. ■ The drum unit contains toner, so handle it off with cold water. 1 Turn the MFC power switch off, unplug the MFC ...from the control panel. It may crack the panel. ■ Do not use isopropyl alcohol to clean the laser scanner window. &#... WARNING Just after you open the front cover. 2 Remove the drum unit and toner cartridge assembly.
Users Manual - English
Page 172
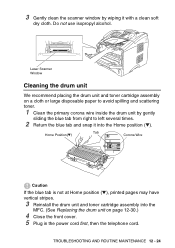
... it into the MFC. (See Replacing the drum unit on a cloth or large disposable paper to left several times. 2 Return the blue tab and snap it with a clean soft dry cloth. Do not use isopropyl alcohol. Laser Scanner Window Cleaning the drum unit We recommend placing the drum unit and toner cartridge assembly on...(▼) Corona Wire Caution If the blue tab is not at Home position (▼), printed pages may have vertical stripes. 3 Reinstall the drum unit and toner cartridge assembly into the Home position (▼). TROUBLESHOOTING AND ROUTINE MAINTENANCE 12 - 24
... it into the MFC. (See Replacing the drum unit on a cloth or large disposable paper to left several times. 2 Return the blue tab and snap it with a clean soft dry cloth. Do not use isopropyl alcohol. Laser Scanner Window Cleaning the drum unit We recommend placing the drum unit and toner cartridge assembly on...(▼) Corona Wire Caution If the blue tab is not at Home position (▼), printed pages may have vertical stripes. 3 Reinstall the drum unit and toner cartridge assembly into the Home position (▼). TROUBLESHOOTING AND ROUTINE MAINTENANCE 12 - 24
Users Manual - English
Page 173
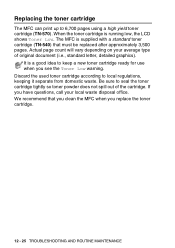
... your local waste disposal office. It is running low, the LCD shows Toner Low. Replacing the toner cartridge The MFC can print up to local regulations, keeping it separate from domestic waste. When the toner cartridge is a good idea to seal the toner cartridge tightly so toner powder does not spill out of original document (i.e., standard letter, detailed graphics...
... your local waste disposal office. It is running low, the LCD shows Toner Low. Replacing the toner cartridge The MFC can print up to local regulations, keeping it separate from domestic waste. When the toner cartridge is a good idea to seal the toner cartridge tightly so toner powder does not spill out of original document (i.e., standard letter, detailed graphics...
Users Manual - English
Page 174
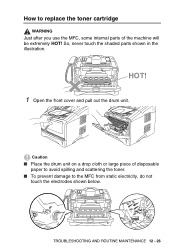
TROUBLESHOOTING AND ROUTINE MAINTENANCE 12 - 26 So, never touch the shaded parts shown in the illustration. Caution ■ Place the drum unit on a drop cloth or large piece of disposable paper to avoid spilling and scattering the toner. ■ To prevent damage to replace the toner cartridge WARNING Just after you use the MFC, some internal parts of the machine will be extremely HOT! How to the MFC from static electricity, do not touch the electrodes shown below. HOT! 1 Open the front cover and pull out the drum unit.
TROUBLESHOOTING AND ROUTINE MAINTENANCE 12 - 26 So, never touch the shaded parts shown in the illustration. Caution ■ Place the drum unit on a drop cloth or large piece of disposable paper to avoid spilling and scattering the toner. ■ To prevent damage to replace the toner cartridge WARNING Just after you use the MFC, some internal parts of the machine will be extremely HOT! How to the MFC from static electricity, do not touch the electrodes shown below. HOT! 1 Open the front cover and pull out the drum unit.
Users Manual - English
Page 175
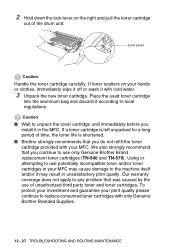
... in the MFC. Place the used toner cartridge into the aluminum bag and discard it with cold water. 3 Unpack the new toner cartridge. If toner scatters on the right and pull the toner cartridge out of unauthorized third party toner and toner cartridges. 2 Hold down the lock lever on your print quality please continue to replace consumed toner cartridges with only Genuine Brother Branded...
... in the MFC. Place the used toner cartridge into the aluminum bag and discard it with cold water. 3 Unpack the new toner cartridge. If toner scatters on the right and pull the toner cartridge out of unauthorized third party toner and toner cartridges. 2 Hold down the lock lever on your print quality please continue to replace consumed toner cartridges with only Genuine Brother Branded...
Users Manual - English
Page 195
...on the top of your computer. jack of faxed pages. You can connect an external TAD to the receiving fax machine. Toner cartridge An accessory that causes less toner to be affixed to the page to start the dialing process. Standard resolution 203 x 98 dpi. Super fine resolution 203... Touch Tone telephones. Ring Volume Volume setting for each transmission, that appears on Brother laser models. Scanning The process of sending an electronic image of sending faxes over the phone lines from your MFC to the EXT. Station ID The stored information that shows its date, time and...
...on the top of your computer. jack of faxed pages. You can connect an external TAD to the receiving fax machine. Toner cartridge An accessory that causes less toner to be affixed to the page to start the dialing process. Standard resolution 203 x 98 dpi. Super fine resolution 203... Touch Tone telephones. Ring Volume Volume setting for each transmission, that appears on Brother laser models. Scanning The process of sending an electronic image of sending faxes over the phone lines from your MFC to the EXT. Station ID The stored information that shows its date, time and...

Users Manual - English
Page 209
... ID (fax header) .... 4-2 Shipping the MFC ... 11-9, 12-19 Sleep Time 4-11 Speed-Dial changing 7-4 storing 7-3 T TAD (telephone answering device), external 1-12, 1-17, 5-1 connecting 1-13 Receive Mode 5-1 recording OGM 1-14 with two-line jack 1-17 Text, entering 4-3 special characters 4-4 Tone signals on Pulse line (Canada 7-7 Toner cartridge conserving 4-11 replacing 12-25, 12...
... ID (fax header) .... 4-2 Shipping the MFC ... 11-9, 12-19 Sleep Time 4-11 Speed-Dial changing 7-4 storing 7-3 T TAD (telephone answering device), external 1-12, 1-17, 5-1 connecting 1-13 Receive Mode 5-1 recording OGM 1-14 with two-line jack 1-17 Text, entering 4-3 special characters 4-4 Tone signals on Pulse line (Canada 7-7 Toner cartridge conserving 4-11 replacing 12-25, 12...


