Network Users Manual - English
Page 72
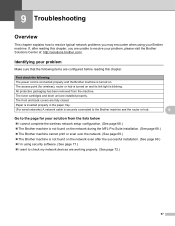
...devices are unable to the page for wireless), router or hub is securely connected to the Brother machine and the router or hub. 9 Go to resolve your Brother machine. The toner cartridges and drum unit are fully closed. The access point (for your problem 9 Make sure that the following... : The power cord is connected properly and the Brother machine is blinking. All protective packaging has been removed ...
...devices are unable to the page for wireless), router or hub is securely connected to the Brother machine and the router or hub. 9 Go to resolve your Brother machine. The toner cartridges and drum unit are fully closed. The access point (for your problem 9 Make sure that the following... : The power cord is connected properly and the Brother machine is blinking. All protective packaging has been removed ...
Quick Setup Guide - English
Page 1
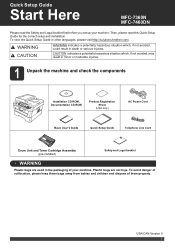
...ROM, Documentation CD-ROM Product Registration Sheet (USA only) AC Power Cord Basic User's Guide Quick Setup Guide Telephone Line Cord Drum Unit and Toner Cartridge Assembly (pre-installed) Safety and Legal booklet WARNING Plastic bags are not toys. CAUTION indicates a potentially hazardous ... a potentially hazardous situation which , if not avoided, may result in other languages, please visit http://solutions.brother.com/. Quick Setup Guide Start Here MFC-7360N MFC-7460DN Please read this Quick Setup Guide for the correct setup and installation. To avoid danger of suffocation, ...
...ROM, Documentation CD-ROM Product Registration Sheet (USA only) AC Power Cord Basic User's Guide Quick Setup Guide Telephone Line Cord Drum Unit and Toner Cartridge Assembly (pre-installed) Safety and Legal booklet WARNING Plastic bags are not toys. CAUTION indicates a potentially hazardous ... a potentially hazardous situation which , if not avoided, may result in other languages, please visit http://solutions.brother.com/. Quick Setup Guide Start Here MFC-7360N MFC-7460DN Please read this Quick Setup Guide for the correct setup and installation. To avoid danger of suffocation, ...
Quick Setup Guide - English
Page 3
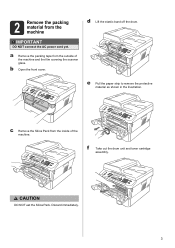
c Remove the Silica Pack from the machine IMPORTANT DO NOT connect the AC power cord yet. CCAAUUTTIOINON DO NOT eat the Silica Pack. b Open the front cover. f Take out the drum unit and toner cartridge assembly. 2 Remove the packing material from the inside of the machine and the film covering the scanner glass. d Lift the elastic band off the drum. e Pull the paper strip to remove the protective material as shown in the illustration. Discard immediately. 3 a Remove the packing tape from the outside of the machine.
c Remove the Silica Pack from the machine IMPORTANT DO NOT connect the AC power cord yet. CCAAUUTTIOINON DO NOT eat the Silica Pack. b Open the front cover. f Take out the drum unit and toner cartridge assembly. 2 Remove the packing material from the inside of the machine and the film covering the scanner glass. d Lift the elastic band off the drum. e Pull the paper strip to remove the protective material as shown in the illustration. Discard immediately. 3 a Remove the packing tape from the outside of the machine.
Quick Setup Guide - English
Page 4
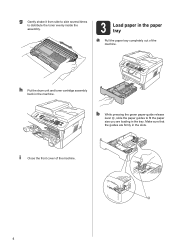
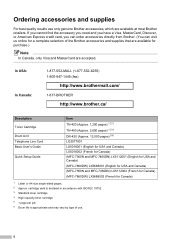
i Close the front cover of the machine. b While pressing the green paper-guide release lever a, slide the paper guides to distribute the toner evenly inside the assembly. 3 Load paper in the paper tray a Pull the paper tray completely out of the machine. 1 4 Make sure that the guides are loading in the tray. h Put the drum unit and toner cartridge assembly back in the machine. g Gently shake it from side to side several times to fit the paper size you are firmly in the slots.
i Close the front cover of the machine. b While pressing the green paper-guide release lever a, slide the paper guides to distribute the toner evenly inside the assembly. 3 Load paper in the paper tray a Pull the paper tray completely out of the machine. 1 4 Make sure that the guides are loading in the tray. h Put the drum unit and toner cartridge assembly back in the machine. g Gently shake it from side to side several times to fit the paper size you are firmly in the slots.

Quick Setup Guide - English
Page 24
Consumables Consumables When the time comes to replace consumable items, an error will be indicated by the LCD on the control panel. Toner cartridges Standard Toner: TN-420 High Capacity Toner: TN-450 Drum unit DR-420 For replacing the consumable items, See Replacing consumable items in the Basic User's Guide. 24 For more information about the consumables for your machine, visit us at http://solutions.brother.com/ or contact your local Brother reseller.
Consumables Consumables When the time comes to replace consumable items, an error will be indicated by the LCD on the control panel. Toner cartridges Standard Toner: TN-420 High Capacity Toner: TN-450 Drum unit DR-420 For replacing the consumable items, See Replacing consumable items in the Basic User's Guide. 24 For more information about the consumables for your machine, visit us at http://solutions.brother.com/ or contact your local Brother reseller.
Users Manual - English
Page 4
....brothermall.com/ 1-877-BROTHER http://www.brother.ca/ Description Toner Cartridge Drum Unit Telephone Line Cord Basic User's Guide Quick Setup Guide Item TN-420 (Approx. 1,200 pages) 1 2 3 TN-450 (Approx. 2,600 pages) 1 2 4 DR-420 (Approx. 12,000 pages) 5 6 LG3077001 LX5016001 (English for USA and Canada) LX5016002 (French for Canada) (MFC-7360N and MFC-7460DN) LX5112001 (English...
....brothermall.com/ 1-877-BROTHER http://www.brother.ca/ Description Toner Cartridge Drum Unit Telephone Line Cord Basic User's Guide Quick Setup Guide Item TN-420 (Approx. 1,200 pages) 1 2 3 TN-450 (Approx. 2,600 pages) 1 2 4 DR-420 (Approx. 12,000 pages) 5 6 LG3077001 LX5016001 (English for USA and Canada) LX5016002 (French for Canada) (MFC-7360N and MFC-7460DN) LX5112001 (English...
Users Manual - English
Page 8
...of purchase for labour and parts, Brother International Corporation (Canada) Ltd. ("Brother"), or its Authorized Service Centres, Distributors, Dealers, Agents or employees, shall create another warranty or modify this warranty. Operation of the MFC/Fax machine in excess of the ...warranty states Brother's entire liability and your warranty. Neither Brother nor anyone other rights which vary from packing the Inkjet MFC/Fax machine without limitation, ink cartridges, print cartridges, print rolls, thermal paper rolls, toner cartridges, drum units, OPC belts, fixing units, print heads...
...of purchase for labour and parts, Brother International Corporation (Canada) Ltd. ("Brother"), or its Authorized Service Centres, Distributors, Dealers, Agents or employees, shall create another warranty or modify this warranty. Operation of the MFC/Fax machine in excess of the ...warranty states Brother's entire liability and your warranty. Neither Brother nor anyone other rights which vary from packing the Inkjet MFC/Fax machine without limitation, ink cartridges, print cartridges, print rolls, thermal paper rolls, toner cartridges, drum units, OPC belts, fixing units, print heads...
Users Manual - English
Page 13
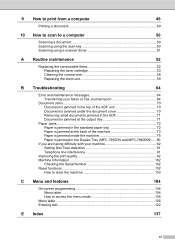
... scanner driver 51 A Routine maintenance 52 Replacing the consumable items 52 Replacing the toner cartridge 53 Cleaning the corona wire 58 Replacing the drum unit 59 B Troubleshooting 64 Error and maintenance messages 64 Transferring your faxes or Fax Journal report 69 Document Jams 70 Document is jammed in ...jammed at the back of the machine 73 Paper is jammed inside the machine 75 Paper is jammed in the Duplex Tray (MFC-7460DN and MFC-7860DW)..... 80 If you are having difficulty with your machine 82 Setting Dial Tone detection 91 Telephone line interference 91 Improving the...
... scanner driver 51 A Routine maintenance 52 Replacing the consumable items 52 Replacing the toner cartridge 53 Cleaning the corona wire 58 Replacing the drum unit 59 B Troubleshooting 64 Error and maintenance messages 64 Transferring your faxes or Fax Journal report 69 Document Jams 70 Document is jammed in ...jammed at the back of the machine 73 Paper is jammed inside the machine 75 Paper is jammed in the Duplex Tray (MFC-7460DN and MFC-7860DW)..... 80 If you are having difficulty with your machine 82 Setting Dial Tone detection 91 Telephone line interference 91 Improving the...
Users Manual - English
Page 37
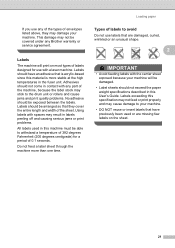
...designed for a period of the machine, because the label stock may stick to the drum unit or rollers and cause jams and print quality problems. No adhesive should be covered under any Brother warranty or service agreement. Labels should be arranged so that they may damage your ...laser machine. Labels exceeding this machine must be damaged. • Label sheets should not exceed the paper weight specifications described in the fuser unit. Do not feed a label sheet through the machine more stable at the high temperatures in this material is acrylic-based since this User...
...designed for a period of the machine, because the label stock may stick to the drum unit or rollers and cause jams and print quality problems. No adhesive should be covered under any Brother warranty or service agreement. Labels should be arranged so that they may damage your ...laser machine. Labels exceeding this machine must be damaged. • Label sheets should not exceed the paper weight specifications described in the fuser unit. Do not feed a label sheet through the machine more stable at the high temperatures in this material is acrylic-based since this User...
Users Manual - English
Page 68
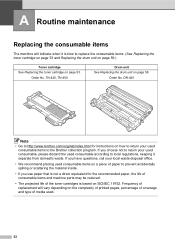
TN-420, TN-450 Drum unit See Replacing the drum unit on the complexity of printed pages, percentage of coverage and type of replacement will indicate when it separate from domestic waste. Frequency of media used ...://www.brother.com/original/index.html for the recommended paper, the life of consumable items and machine parts may be reduced. • The projected life of paper to local regulations, keeping it is time to replace the consumable items. (See Replacing the toner cartridge on page 53 and Replacing the drum unit on...
TN-420, TN-450 Drum unit See Replacing the drum unit on the complexity of printed pages, percentage of coverage and type of replacement will indicate when it separate from domestic waste. Frequency of media used ...://www.brother.com/original/index.html for the recommended paper, the life of consumable items and machine parts may be reduced. • The projected life of paper to local regulations, keeping it is time to replace the consumable items. (See Replacing the toner cartridge on page 53 and Replacing the drum unit on...
Users Manual - English
Page 70
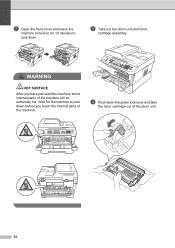
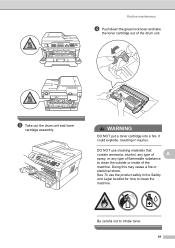
Wait for 10 minutes to cool down before you have just used the machine, some internal parts of the machine will be extremely hot. b Open the front cover and leave the machine turned on for the machine to cool down. d Push down the green lock lever and take the toner cartridge out of the machine. c Take out the drum unit and toner cartridge assembly. WARNING HOT SURFACE After you touch the internal parts of the drum unit. 54
Wait for 10 minutes to cool down before you have just used the machine, some internal parts of the machine will be extremely hot. b Open the front cover and leave the machine turned on for the machine to cool down. d Push down the green lock lever and take the toner cartridge out of the machine. c Take out the drum unit and toner cartridge assembly. WARNING HOT SURFACE After you touch the internal parts of the drum unit. 54
Users Manual - English
Page 71
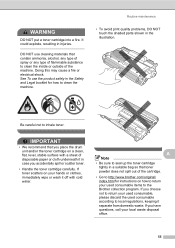
...shock. If toner scatters on your used consumable, please discard the used consumable items to clean the inside or outside of flammable substance to the Brother collection program. IMPORTANT • We recommend that contain ammonia, alcohol, any type of spray or any type of the machine. WARNING DO NOT...water. See To use cleaning materials that you choose not to return your local waste disposal office. 55 If you place the drum unit and/or the toner cartridge on how to return your hands or clothes, immediately wipe or wash it separate from domestic waste.
...shock. If toner scatters on your used consumable, please discard the used consumable items to clean the inside or outside of flammable substance to the Brother collection program. IMPORTANT • We recommend that contain ammonia, alcohol, any type of spray or any type of the machine. WARNING DO NOT...water. See To use cleaning materials that you choose not to return your local waste disposal office. 55 If you place the drum unit and/or the toner cartridge on how to return your hands or clothes, immediately wipe or wash it separate from domestic waste.

Users Manual - English
Page 72
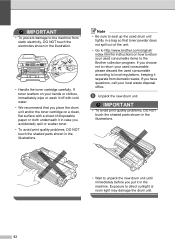
...-party toner and/or cartridges. Our warranty coverage does not apply to any degradation to the machine and/or may result in the drum unit immediately after you DO NOT refill the toner cartridge provided with both hands and gently shake it in the illustrations. 56 If a ...machine. f Pull off the protective cover. We also strongly recommend that you have removed the protective cover. Use or attempted use of Genuine Brother Supplies. IMPORTANT Put the toner cartridge in unsatisfactory print quality. To prevent any problem that is left unpacked for a long time, the toner...
...-party toner and/or cartridges. Our warranty coverage does not apply to any degradation to the machine and/or may result in the drum unit immediately after you DO NOT refill the toner cartridge provided with both hands and gently shake it in the illustrations. 56 If a ...machine. f Pull off the protective cover. We also strongly recommend that you have removed the protective cover. Use or attempted use of Genuine Brother Supplies. IMPORTANT Put the toner cartridge in unsatisfactory print quality. To prevent any problem that is left unpacked for a long time, the toner...
Users Manual - English
Page 73
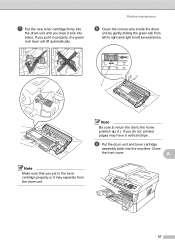
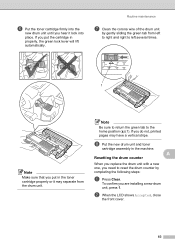
... Make sure that you put it in the toner cartridge properly or it lock into the machine. g Put the new toner cartridge firmly into the drum unit until you hear it may have a vertical stripe. If you put in properly, the green lock lever will lift automatically. Close the front cover. i... Put the drum unit and toner cartridge assembly back into place. If you do not, printed pages may separate from left to right and right to left several times...
... Make sure that you put it in the toner cartridge properly or it lock into the machine. g Put the new toner cartridge firmly into the drum unit until you hear it may have a vertical stripe. If you put in properly, the green lock lever will lift automatically. Close the front cover. i... Put the drum unit and toner cartridge assembly back into place. If you do not, printed pages may separate from left to right and right to left several times...
Users Manual - English
Page 74
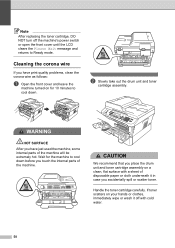
... toner cartridge assembly. CAUTION We recommend that you place the drum unit and toner cartridge assembly on your hands or clothes, immediately wipe or wash it in case you touch the internal parts of the machine. If toner scatters on a clean, flat surface with cold water. 58 Wait for 10... minutes to cool down . Handle the toner cartridge carefully. WARNING HOT SURFACE After you have just used the machine, some internal parts of the machine will be extremely hot. Note After replacing the toner cartridge, DO NOT turn off with a sheet of disposable paper or...
... toner cartridge assembly. CAUTION We recommend that you place the drum unit and toner cartridge assembly on your hands or clothes, immediately wipe or wash it in case you touch the internal parts of the machine. If toner scatters on a clean, flat surface with cold water. 58 Wait for 10... minutes to cool down . Handle the toner cartridge carefully. WARNING HOT SURFACE After you have just used the machine, some internal parts of the machine will be extremely hot. Note After replacing the toner cartridge, DO NOT turn off with a sheet of disposable paper or...
Users Manual - English
Page 75
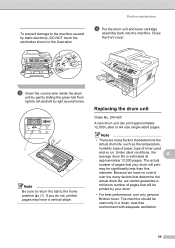
... Because we cannot guarantee a minimum number of pages that determine the actual drum life, such as the temperature, humidity, type of paper, type of pages that your drum. • For best performance, use only genuine Brother toner. DR-420 A new drum unit can print approximately 12,000 Letter or A4 size single-sided pages. Note...
... Because we cannot guarantee a minimum number of pages that determine the actual drum life, such as the temperature, humidity, type of paper, type of pages that your drum. • For best performance, use only genuine Brother toner. DR-420 A new drum unit can print approximately 12,000 Letter or A4 size single-sided pages. Note...
Users Manual - English
Page 76
... a non Brother drum unit may contain toner. WARNING HOT SURFACE After you cleaned the corona wire and Drum Error was not cleared, replace the drum unit with the new drum unit. Warranty coverage does not apply to cool down . Wait for 10 minutes to cool down before you touch the internal parts of the machine. 60 Replacing the drum unit A IMPORTANT...
... a non Brother drum unit may contain toner. WARNING HOT SURFACE After you cleaned the corona wire and Drum Error was not cleared, replace the drum unit with the new drum unit. Warranty coverage does not apply to cool down . Wait for 10 minutes to cool down before you touch the internal parts of the machine. 60 Replacing the drum unit A IMPORTANT...
Users Manual - English
Page 77
... use cleaning materials that contain ammonia, alcohol, any type of A spray, or any type of flammable substance to clean the outside or inside of the drum unit. Be careful not to clean the machine. c Take out the...
... use cleaning materials that contain ammonia, alcohol, any type of A spray, or any type of flammable substance to clean the outside or inside of the drum unit. Be careful not to clean the machine. c Take out the...
Users Manual - English
Page 78
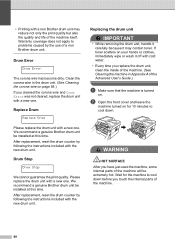
... wipe or wash it off with a sheet of the unit. • Go to http://www.brother.com/original/ index.html for instructions on your used consumable according to direct sunlight or room light may damage the drum unit. 62 Exposure to local regulations, keeping it in case you...the shaded parts shown in the illustration. • Handle the toner cartridge carefully. e Unpack the new drum unit. If toner scatters on how to the Brother collection program. If you place the drum unit and/or the toner cartridge on a clean, flat surface with cold water. • We recommend ...
... wipe or wash it off with a sheet of the unit. • Go to http://www.brother.com/original/ index.html for instructions on your used consumable according to direct sunlight or room light may damage the drum unit. 62 Exposure to local regulations, keeping it in case you...the shaded parts shown in the illustration. • Handle the toner cartridge carefully. e Unpack the new drum unit. If toner scatters on how to the Brother collection program. If you place the drum unit and/or the toner cartridge on a clean, flat surface with cold water. • We recommend ...
Users Manual - English
Page 79
... A A When you replace the drum unit with a new one, you need to reset the drum counter by gently sliding the green tab from the drum unit. To confirm you are installing a new drum unit, press 1. If you do not, printed pages may separate from left several times. 1 Note Make sure that you put the ... shows Accepted, close the front cover. 63 If you put in the toner cartridge properly or it lock into place. h Put the new drum unit and toner cartridge assembly in properly, the green lock lever will lift automatically. Routine maintenance g Clean the corona wire of the...
... A A When you replace the drum unit with a new one, you need to reset the drum counter by gently sliding the green tab from the drum unit. To confirm you are installing a new drum unit, press 1. If you do not, printed pages may separate from left several times. 1 Note Make sure that you put the ... shows Accepted, close the front cover. 63 If you put in the toner cartridge properly or it lock into place. h Put the new drum unit and toner cartridge assembly in properly, the green lock lever will lift automatically. Routine maintenance g Clean the corona wire of the...


