Users Manual - English
Page 6
What Brother will repair or replace the Machine and/or accompanying Consumable and Accessory Items at 1-800-284-4329 for Fax, MFC and DCP and... heads, toner, drums, ink cartridges, print cartridges, refill ribbons, thermal PLUS paper, thermal paper, and the cordless handset battery. • Except as otherwise provided herein, Brother warrants that you...original purchase date or the rated life of consumable, whichever comes first. Brother® One Year Limited Warranty and Replacement Service (USA only) Who is covered: • This limited warranty ...Feeding Kit, Fuser and Laser Units.
What Brother will repair or replace the Machine and/or accompanying Consumable and Accessory Items at 1-800-284-4329 for Fax, MFC and DCP and... heads, toner, drums, ink cartridges, print cartridges, refill ribbons, thermal PLUS paper, thermal paper, and the cordless handset battery. • Except as otherwise provided herein, Brother warrants that you...original purchase date or the rated life of consumable, whichever comes first. Brother® One Year Limited Warranty and Replacement Service (USA only) Who is covered: • This limited warranty ...Feeding Kit, Fuser and Laser Units.
Users Manual - English
Page 17
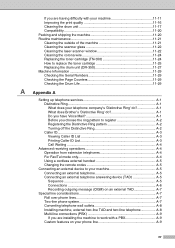
... 11-21 Cleaning the scanner glass 11-22 Cleaning the laser scanner window 11-22 Cleaning the corona wire 11-24 Replacing the toner cartridge (TN-350 11-24 How to replace the toner cartridge 11-25 Replacing the drum unit (DR-350 11-27 Machine Information 11-29 Checking... the Serial Numbers 11-29 Checking the Page Counters 11-29 Checking the Drum Life 11-29 A Appendix A Setting up telephone services A-1 Distinctive Ring A-1 What does your telephone company's 'Distinctive Ring' do A-1 What does Brother's '...
... 11-21 Cleaning the scanner glass 11-22 Cleaning the laser scanner window 11-22 Cleaning the corona wire 11-24 Replacing the toner cartridge (TN-350 11-24 How to replace the toner cartridge 11-25 Replacing the drum unit (DR-350 11-27 Machine Information 11-29 Checking... the Serial Numbers 11-29 Checking the Page Counters 11-29 Checking the Drum Life 11-29 A Appendix A Setting up telephone services A-1 Distinctive Ring A-1 What does your telephone company's 'Distinctive Ring' do A-1 What does Brother's '...
Users Manual - English
Page 89
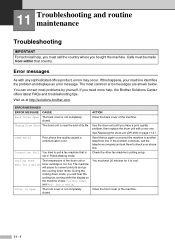
... one. If you have a print quality problem; ERROR MESSAGES ERROR MESSAGE CAUSE Back Cover Open The back cover is not completely closed . Cover is Open The front cover is not completely closed . Visit us at http://solutions.brother.com. Send the fax again or connect the machine to cool. See Replacing the drum unit...
... one. If you have a print quality problem; ERROR MESSAGES ERROR MESSAGE CAUSE Back Cover Open The back cover is not completely closed . Cover is Open The front cover is not completely closed . Visit us at http://solutions.brother.com. Send the fax again or connect the machine to cool. See Replacing the drum unit...
Users Manual - English
Page 92
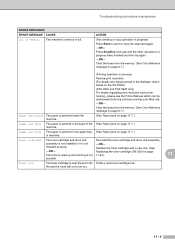
...one. (See -OR- Press Stop/Exit and wait until the other operations in progress) Press Start to send or copy the scanned pages. -OR- assembly is not installed or it is near the end of its Order a new toner cartridge now. installed properly. Replacing... the toner cartridge (TN-350) on page 11-7.) of machine. Toner Low The toner cartridge is not -OR- Toner Life End The toner cartridge and drum unit Re-install the toner cartridge and drum...details see the Printer Manual which can be downloaded from the solutions.brother.com Web site. -OR- Clear the faxes from the memory....
...one. (See -OR- Press Stop/Exit and wait until the other operations in progress) Press Start to send or copy the scanned pages. -OR- assembly is not installed or it is near the end of its Order a new toner cartridge now. installed properly. Replacing... the toner cartridge (TN-350) on page 11-7.) of machine. Toner Low The toner cartridge is not -OR- Toner Life End The toner cartridge and drum unit Re-install the toner cartridge and drum...details see the Printer Manual which can be downloaded from the solutions.brother.com Web site. -OR- Clear the faxes from the memory....
Users Manual - English
Page 101
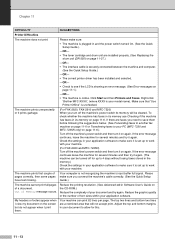
... the memory.) Check the settings in Software User's Guide on again. Your machine can be cleared. Right-click 'Brother MFC-XXXX,' (where XXXX is set up to your PC (MFC-7220 and MFC-7225N only) on the screen but do not appear when I view my document on page 11-6.) Turn off the machine... machine is plugged in and the power switch turned On. (See the Quick Setup Guide.) -OR- • The toner cartridge and drum unit are installed properly. (See Replacing the drum unit (DR-350) on page 11-27.) -OR- • The interface cable is securely connected between the machine and computer. (See...
... the memory.) Check the settings in Software User's Guide on again. Your machine can be cleared. Right-click 'Brother MFC-XXXX,' (where XXXX is set up to your PC (MFC-7220 and MFC-7225N only) on the screen but do not appear when I view my document on page 11-6.) Turn off the machine... machine is plugged in and the power switch turned On. (See the Quick Setup Guide.) -OR- • The toner cartridge and drum unit are installed properly. (See Replacing the drum unit (DR-350) on page 11-27.) -OR- • The interface cable is securely connected between the machine and computer. (See...
Users Manual - English
Page 104
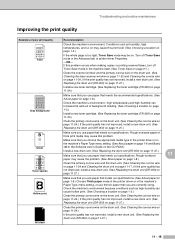
...paper on page 1-8.) Choose Thick paper mode in the printer driver or in the Software User's Guide on the CD-ROM.) Install a new drum unit. (See Replacing the drum unit (DR-350) on page 11-27.) Make sure that you use paper that meets the recommended specifications. (See About paper on page .... (See Cleaning the laser scanner window on page 11-22 and Cleaning the corona wire on page 11-24.) If the print quality has not improved, install a new drum unit. (See Replacing the drum unit (DR-350) on page 11-27.) Install a new toner cartridge. (See Replacing the toner cartridge (TN-350) on page ...
...paper on page 1-8.) Choose Thick paper mode in the printer driver or in the Software User's Guide on the CD-ROM.) Install a new drum unit. (See Replacing the drum unit (DR-350) on page 11-27.) Make sure that you use paper that meets the recommended specifications. (See About paper on page .... (See Cleaning the laser scanner window on page 11-22 and Cleaning the corona wire on page 11-24.) If the print quality has not improved, install a new drum unit. (See Replacing the drum unit (DR-350) on page 11-27.) Install a new toner cartridge. (See Replacing the toner cartridge (TN-350) on page ...
Users Manual - English
Page 105
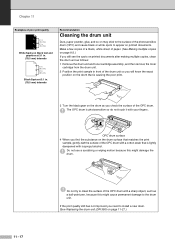
... Position the print sample in . (78.5 mm) intervals Recommendation Cleaning the drum unit Dust, paper powder, glue, and so on may stick to the surface of the photosensitive drum (OPC) and cause black or white spots to install a new drum. (See Replacing the drum unit (DR-350) on page 11-27.) Do not use a scrubbing... or wiping motion because this might damage the drum. 11 - 17 Do not try to clean the...
... Position the print sample in . (78.5 mm) intervals Recommendation Cleaning the drum unit Dust, paper powder, glue, and so on may stick to the surface of the photosensitive drum (OPC) and cause black or white spots to install a new drum. (See Replacing the drum unit (DR-350) on page 11-27.) Do not use a scrubbing... or wiping motion because this might damage the drum. 11 - 17 Do not try to clean the...
Users Manual - English
Page 106
... media can cause the problem. The drum unit may be damaged. The drum unit may be damaged. Install a new drum unit. (See Replacing the drum unit (DR-350) on page 11-27.) Clean the inside the machine covering the laser scanner window. Call Brother Customer Service at the home position (&#...9650;). Set the paper guides correctly. Also, fan the paper stack and then rotate the paper 180° in a new drum unit (See Replacing the drum unit (DR-350) on page 1-8.)...
... media can cause the problem. The drum unit may be damaged. The drum unit may be damaged. Install a new drum unit. (See Replacing the drum unit (DR-350) on page 11-27.) Clean the inside the machine covering the laser scanner window. Call Brother Customer Service at the home position (&#...9650;). Set the paper guides correctly. Also, fan the paper stack and then rotate the paper 180° in a new drum unit (See Replacing the drum unit (DR-350) on page 1-8.)...
Users Manual - English
Page 112
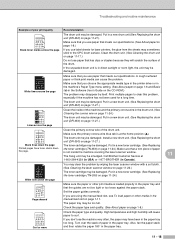
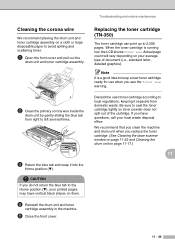
... toner cartridge. (See Cleaning the laser scanner window on page 11-22 and Cleaning the drum unit on page 11-17.) 11 11 - 24 Replacing the toner cartridge (TN-350) The toner cartridge can print up to seal the toner cartridge tightly so toner powder does not spill out of ... cartridge assembly in the machine. 5 Close the front cover. CAUTION If you see the Toner Low warning. We recommend that you clean the machine and drum unit when you have vertical black stripes on your local waste disposal office. Troubleshooting and routine maintenance Cleaning the corona wire We recommend placing the...
... toner cartridge. (See Cleaning the laser scanner window on page 11-22 and Cleaning the drum unit on page 11-17.) 11 11 - 24 Replacing the toner cartridge (TN-350) The toner cartridge can print up to seal the toner cartridge tightly so toner powder does not spill out of ... cartridge assembly in the machine. 5 Close the front cover. CAUTION If you see the Toner Low warning. We recommend that you clean the machine and drum unit when you have vertical black stripes on your local waste disposal office. Troubleshooting and routine maintenance Cleaning the corona wire We recommend placing the...
Users Manual - English
Page 113
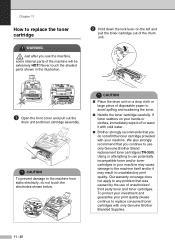
... does not apply to any problem that you continue to use only Genuine Brother Brand replacement toner cartridges (TN-350). Chapter 11 How to replace the toner cartridge WARNING Just after you use the machine, some internal parts of disposable paper to avoid spilling and scattering the toner. ■... strongly recommend that was caused by the use potentially incompatible toner and/or toner cartridges in your machine. CAUTION ■ Place the drum unit on the left and pull the toner cartridge out of unauthorized third party toner and toner cartridges. To protect your investment and ...
... does not apply to any problem that you continue to use only Genuine Brother Brand replacement toner cartridges (TN-350). Chapter 11 How to replace the toner cartridge WARNING Just after you use the machine, some internal parts of disposable paper to avoid spilling and scattering the toner. ■... strongly recommend that was caused by the use potentially incompatible toner and/or toner cartridges in your machine. CAUTION ■ Place the drum unit on the left and pull the toner cartridge out of unauthorized third party toner and toner cartridges. To protect your investment and ...

Users Manual - English
Page 115
... new one. You should be significantly less than these estimates. There are extremely HOT! The estimated drum life is necessary to replace it ...internal parts of pages your drum will be printed by your hands or clothes get dirty, immediately wipe or wash it off with cold water. So please be able to continue printing without having to replace the drum...Drum Soon, the drum unit is near the end of pages per print job. If toner scatters and your drum. WARNING Just after you use for a while. Even if the LCD shows Change Drum Soon, you replace the drum unit. (See Cleaning the laser...
... new one. You should be significantly less than these estimates. There are extremely HOT! The estimated drum life is necessary to replace it ...internal parts of pages your drum will be printed by your hands or clothes get dirty, immediately wipe or wash it off with cold water. So please be able to continue printing without having to replace the drum...Drum Soon, the drum unit is near the end of pages per print job. If toner scatters and your drum. WARNING Just after you use for a while. Even if the LCD shows Change Drum Soon, you replace the drum unit. (See Cleaning the laser...
Users Manual - English
Page 116
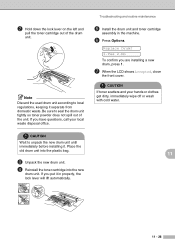
.... Be sure to unpack the new drum unit until immediately before installing it. Place the old drum unit into the plastic bag. 11 3 Unpack the new drum unit. 4 Reinstall the toner cartridge into the new drum unit. If you put it separate from domestic waste. Replace Drum? 1.Yes 2.No To confirm you ...have questions, call your hands or clothes get dirty, immediately wipe off or wash with cold water. CAUTION Wait to seal the drum unit tightly so toner powder does ...
.... Be sure to unpack the new drum unit until immediately before installing it. Place the old drum unit into the plastic bag. 11 3 Unpack the new drum unit. 4 Reinstall the toner cartridge into the new drum unit. If you put it separate from domestic waste. Replace Drum? 1.Yes 2.No To confirm you ...have questions, call your hands or clothes get dirty, immediately wipe off or wash with cold water. CAUTION Wait to seal the drum unit tightly so toner powder does ...
Users Manual - English
Page 152
Index Dialing a pause 5-4 access codes and credit card numbers 5-4 automatic fax redial 3-3 automatic transmission 3-3 Groups 3-7 manual 3-1 One-Touch 3-1 Speed-Dial 3-2 Distinctive Ring A-1 setting ring pattern A-2 turning off A-2 Drum Unit cleaning 11-17, 11-24 replacing 11-27 Dual Access 3-6 E ECM (Error Correction Mode 1-13 Equalization 11-20 Error messages on the CD-ROM. Error...
Index Dialing a pause 5-4 access codes and credit card numbers 5-4 automatic fax redial 3-3 automatic transmission 3-3 Groups 3-7 manual 3-1 One-Touch 3-1 Speed-Dial 3-2 Distinctive Ring A-1 setting ring pattern A-2 turning off A-2 Drum Unit cleaning 11-17, 11-24 replacing 11-27 Dual Access 3-6 E ECM (Error Correction Mode 1-13 Equalization 11-20 Error messages on the CD-ROM. Error...

Quick Setup Guide - English
Page 5
...BRAdmin Professional (Windows® Users Only 35 ■ Options and Consumables Options ...36 Replacement Consumables 36 3 Send the Product Registration and Test Sheet (USA Only 11 Step 2... 17 For Windows NT® Workstation Version 4.0 Users 20 For Network Interface Cable Users (MFC-7225N and Optional NC-2200w only) ■ For Windows® 98/98SE/Me/NT/2000 ... Receive Mode 10 9. Select Your Language (Canada only 11 10. Table of Contents Step 1 Setting Up the MFC 1. Install the Drum Unit Assembly 5 4. Install the Handset 4 3. Load Paper in the Paper Tray 6 5. Set the Date...
...BRAdmin Professional (Windows® Users Only 35 ■ Options and Consumables Options ...36 Replacement Consumables 36 3 Send the Product Registration and Test Sheet (USA Only 11 Step 2... 17 For Windows NT® Workstation Version 4.0 Users 20 For Network Interface Cable Users (MFC-7225N and Optional NC-2200w only) ■ For Windows® 98/98SE/Me/NT/2000 ... Receive Mode 10 9. Select Your Language (Canada only 11 10. Table of Contents Step 1 Setting Up the MFC 1. Install the Drum Unit Assembly 5 4. Install the Handset 4 3. Load Paper in the Paper Tray 6 5. Set the Date...

Quick Setup Guide - English
Page 38
... or greater. Drum Unit Toner DR-350 TN-350 36 The NC-2200w can be connected to the USB interface port of your Ethernet network, buy the optional Network device. Replacement Consumables When the time comes to replace consumables, an ...error message will be connected to the parallel interface port of the MFC by adding these items. External Wireless Print/Scan Server External Print Server NC-2200w NC-2100p If you are going to connect the MFC-7220 to one networked computer only. • Support for your printer, visit http://solutions.brother...
... or greater. Drum Unit Toner DR-350 TN-350 36 The NC-2200w can be connected to the USB interface port of your Ethernet network, buy the optional Network device. Replacement Consumables When the time comes to replace consumables, an ...error message will be connected to the parallel interface port of the MFC by adding these items. External Wireless Print/Scan Server External Print Server NC-2200w NC-2100p If you are going to connect the MFC-7220 to one networked computer only. • Support for your printer, visit http://solutions.brother...


