Users Manual - English
Page 5
... Tones and Handshake 2 ECM (Error Correction Mode 3 MFC 4350, MFC 4650 and MFC 7750 Control Panel Overview 4 MFC 4350, MFC 4650 and MFC 7750 Control Panel Keys 5 MFC 6650MC Control Panel Overview 6 MFC 6650MC Control Panel Keys 7 2MFC Setup and Connections Caution ...9 Packing List ...10 Choosing a Location 11 Assembly ...12 Installing the Drum Unit Assembly (with Toner Cartridge 12 Setting Up the...
... Tones and Handshake 2 ECM (Error Correction Mode 3 MFC 4350, MFC 4650 and MFC 7750 Control Panel Overview 4 MFC 4350, MFC 4650 and MFC 7750 Control Panel Keys 5 MFC 6650MC Control Panel Overview 6 MFC 6650MC Control Panel Keys 7 2MFC Setup and Connections Caution ...9 Packing List ...10 Choosing a Location 11 Assembly ...12 Installing the Drum Unit Assembly (with Toner Cartridge 12 Setting Up the...
Users Manual - English
Page 13
... Laser Safety (For 110-120V Models Only 185 FDA Regulations 186 Manufactured ...186 Attention ...186 Industry Canada Compliance Statement (For Canada Only 187 International Energy Star Compliance Statement 187 Important Safety Instructions 188 Notice - TABLE OF CONTENTS xi 17Optional Accessories (For MFC 4350, MFC 4650 and MFC 6650MC Only) Memory Board ...179 Optional Memory for the Printer...
... Laser Safety (For 110-120V Models Only 185 FDA Regulations 186 Manufactured ...186 Attention ...186 Industry Canada Compliance Statement (For Canada Only 187 International Energy Star Compliance Statement 187 Important Safety Instructions 188 Notice - TABLE OF CONTENTS xi 17Optional Accessories (For MFC 4350, MFC 4650 and MFC 6650MC Only) Memory Board ...179 Optional Memory for the Printer...
Users Manual - English
Page 14
xii TABLE OF CONTENTS 20Specifications Packing and Shipping the MFC 210 Regular Maintenance 213 Cleaning the Document Scanner 213 Cleaning the Printer 214 Cleaning the Drum Unit 215 Replacing the Toner Cartridge 216 Toner Empty Indicator 216 How to Replace the Toner Cartridge 217 Replacing the Drum Unit 221 For Customer Service 226 Product Description 227 Fax Specifications ...227 Printer Specifications 228 Electrical and Environment 229 Parallel Interface Specifications 230 Resident Fonts ...231 Symbol Sets/Character Sets 231 Glossary ...233 Index ...239
xii TABLE OF CONTENTS 20Specifications Packing and Shipping the MFC 210 Regular Maintenance 213 Cleaning the Document Scanner 213 Cleaning the Printer 214 Cleaning the Drum Unit 215 Replacing the Toner Cartridge 216 Toner Empty Indicator 216 How to Replace the Toner Cartridge 217 Replacing the Drum Unit 221 For Customer Service 226 Product Description 227 Fax Specifications ...227 Printer Specifications 228 Electrical and Environment 229 Parallel Interface Specifications 230 Resident Fonts ...231 Symbol Sets/Character Sets 231 Glossary ...233 Index ...239
Users Manual - English
Page 24
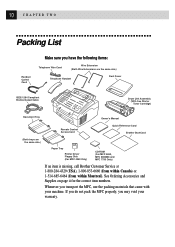
... Cable Drum Unit Assembly (With free Starter Toner Cartridge) Document Tray Owner's Manual Remote Control Access Card Quick Reference Card Brother StartCard (Both trays are the same size.) Paper Tray Printer Driver Floppy Disk (For MFC 4350 Only) CD-ROM (For MFC 4650, MFC 6650MC and MFC 7750 Only...) If an item is missing, call Brother Customer Service at 1-800-284-4329 (USA...
... Cable Drum Unit Assembly (With free Starter Toner Cartridge) Document Tray Owner's Manual Remote Control Access Card Quick Reference Card Brother StartCard (Both trays are the same size.) Paper Tray Printer Driver Floppy Disk (For MFC 4350 Only) CD-ROM (For MFC 4650, MFC 6650MC and MFC 7750 Only...) If an item is missing, call Brother Customer Service at 1-800-284-4329 (USA...
Users Manual - English
Page 26
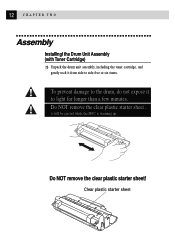
12 CHAPTER TWO Assembly Installingl the Drum Unit Assembly (with Toner Cartridge) 1 Unpack the drum unit assembly, including the toner cartridge, and gently rock it will be ejected while the MFC is warming up. it from side to light for longer than a few minutes. Clear plastic starter sheet Do NOT remove the clear plastic starter sheet! Do NOT remove the clear plastic starter sheet - To prevent damage to the drum, do not expose it to side five or six times.
12 CHAPTER TWO Assembly Installingl the Drum Unit Assembly (with Toner Cartridge) 1 Unpack the drum unit assembly, including the toner cartridge, and gently rock it will be ejected while the MFC is warming up. it from side to light for longer than a few minutes. Clear plastic starter sheet Do NOT remove the clear plastic starter sheet! Do NOT remove the clear plastic starter sheet - To prevent damage to the drum, do not expose it to side five or six times.

Users Manual - English
Page 27
13 M F C S E T U P A N D C O N N E C T I O N S 2 Open the top cover of the MFC. 3 Holding the drum unit by its handles, insert it in the MFC. 4 Close the top cover.
13 M F C S E T U P A N D C O N N E C T I O N S 2 Open the top cover of the MFC. 3 Holding the drum unit by its handles, insert it in the MFC. 4 Close the top cover.
Users Manual - English
Page 31
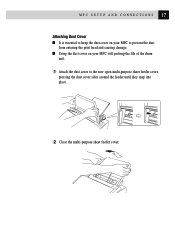
s Using the dust cover on your MFC will prolong the life of the drum unit. 1 Attach the dust cover to prevent the dust from entering the print head and causing damage. 17 M F C S E T U P A N D C O N N E C T I O N S Attaching Dust Cover s It is essential to keep the dust cover on your MFC to the now open multi-purpose sheet feeder cover, pressing the dust cover sides around the feeder until they snap into place. 2 Close the multi-purpose sheet feeder cover.
s Using the dust cover on your MFC will prolong the life of the drum unit. 1 Attach the dust cover to prevent the dust from entering the print head and causing damage. 17 M F C S E T U P A N D C O N N E C T I O N S Attaching Dust Cover s It is essential to keep the dust cover on your MFC to the now open multi-purpose sheet feeder cover, pressing the dust cover sides around the feeder until they snap into place. 2 Close the multi-purpose sheet feeder cover.

Users Manual - English
Page 208
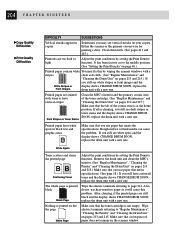
then replace the drum unit with your MFC often identifies the problem and displays an error message. will be set correctly for the paper you see this happens, your MFC or telephone line. ERROR CONNECTION FAIL A poor quality phone line Try the call the Brother Fax-Back System at USA:... 1-800-521-2846 From within Canada: 1-800-681-9838 ERROR MESSAGES ERROR MESSAGE CAUSE ACTION CHANGE DRUM SOON The drum unit is not in the...
then replace the drum unit with your MFC often identifies the problem and displays an error message. will be set correctly for the paper you see this happens, your MFC or telephone line. ERROR CONNECTION FAIL A poor quality phone line Try the call the Brother Fax-Back System at USA:... 1-800-521-2846 From within Canada: 1-800-681-9838 ERROR MESSAGES ERROR MESSAGE CAUSE ACTION CHANGE DRUM SOON The drum unit is not in the...

Users Manual - English
Page 212
198 C H A P T E R N I N E T E E N Paper is Jammed near the Drum Unit or in the Multi-purpose Sheet Feeder 1 Open the multi-purpose sheet feeder to pull the jammed paper upward and out of the feeder. 2 Close the multi-purpose sheet feeder. 3 Open the top cover and check that a torn piece of paper does not remain inside the MFC. Multi-purpose Sheet Feeder Paper is Jammed in the Fuser Unit. 1 Open the top cover. 2 Remove the drum unit. 3 Gently pull out the jammed paper. 4 Reinstall the drum unit. 5 Close the top cover.
198 C H A P T E R N I N E T E E N Paper is Jammed near the Drum Unit or in the Multi-purpose Sheet Feeder 1 Open the multi-purpose sheet feeder to pull the jammed paper upward and out of the feeder. 2 Close the multi-purpose sheet feeder. 3 Open the top cover and check that a torn piece of paper does not remain inside the MFC. Multi-purpose Sheet Feeder Paper is Jammed in the Fuser Unit. 1 Open the top cover. 2 Remove the drum unit. 3 Gently pull out the jammed paper. 4 Reinstall the drum unit. 5 Close the top cover.
Users Manual - English
Page 215
...is not a fax so it . When your MFC's Telephone Answer Code (default setting is signaling you to (For MFC 4350, MFC 4650 hold while you catch the other custom features (For MFC 4350, MFC 4650 on the LCD. I N T E...). Then stop speaking and MFC 6650MC only) until you hear the Call Waiting signal, ask the other party to answer the telephone call. Brother's ECM feature should help overcome...MFC's Remote Activation Code (default setting is plugged in . Check the primary settings in your application software to make sure it back in (see page 14.) • The toner cartridge and drum unit...
...is not a fax so it . When your MFC's Telephone Answer Code (default setting is signaling you to (For MFC 4350, MFC 4650 hold while you catch the other custom features (For MFC 4350, MFC 4650 on the LCD. I N T E...). Then stop speaking and MFC 6650MC only) until you hear the Call Waiting signal, ask the other party to answer the telephone call. Brother's ECM feature should help overcome...MFC's Remote Activation Code (default setting is plugged in . Check the primary settings in your application software to make sure it back in (see page 14.) • The toner cartridge and drum unit...
Users Manual - English
Page 218
...toner stains and the display shows CHANGE DRUM SOON, replace the drum unit with a new one . Make sure that the toner cartridge is not empty. Remove the drum unit and clean the MFC's interior. (See "Regular Maintenance", "Cleaning the Printer" and "Cleaning the Drum Unit" on pages 213 and 215.) Make...or faint images and the White Stripes or display shows CHANGE DRUM SOON, replace the Faint lmages drum unit with a new one . Wipe the electric terminals referring to "Regular Maintenance", "Cleaning the Printer" and "Cleaning the Drum Unit" on pages 213 and 215.) If you still see ...
...toner stains and the display shows CHANGE DRUM SOON, replace the drum unit with a new one . Make sure that the toner cartridge is not empty. Remove the drum unit and clean the MFC's interior. (See "Regular Maintenance", "Cleaning the Printer" and "Cleaning the Drum Unit" on pages 213 and 215.) Make...or faint images and the White Stripes or display shows CHANGE DRUM SOON, replace the Faint lmages drum unit with a new one . Wipe the electric terminals referring to "Regular Maintenance", "Cleaning the Printer" and "Cleaning the Drum Unit" on pages 213 and 215.) If you still see ...
Users Manual - English
Page 219
... the scanner windows with a clean soft cloth. (See "Regular Maintenance", "Cleaning the Printer" and "Cleaning the Drum Unit" on a flat, horizontal surface. You may be that Example of the drum is placed on pages 214 and 215.) If a blurred page occurs after cleaning and the... display shows CHANGE DRUM SOON, replace the drum unit with a new one . Printed pages are marked Markings may occur if the MFC has not been used for a long time. 205 T R O U B L E S H O O T I N G A N D M A I N T E N A N C E ...
... the scanner windows with a clean soft cloth. (See "Regular Maintenance", "Cleaning the Printer" and "Cleaning the Drum Unit" on a flat, horizontal surface. You may be that Example of the drum is placed on pages 214 and 215.) If a blurred page occurs after cleaning and the... display shows CHANGE DRUM SOON, replace the drum unit with a new one . Printed pages are marked Markings may occur if the MFC has not been used for a long time. 205 T R O U B L E S H O O T I N G A N D M A I N T E N A N C E ...
Users Manual - English
Page 224
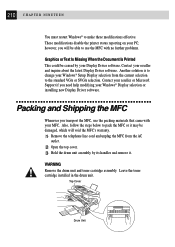
...be able to the standard VGA or SVGA selection. Top Cover Drum Unit however, you transport the MFC, use the MFC with your Display Driver software. Also, follow the steps below to make these modifications effective. WARNING Remove the drum unit and toner cartridge assembly. 210 C H A P T ...E E N You must restart Windows® to pack the MFC or it may be caused by its handles and remove it. Leave the toner cartridge installed in the drum unit. Contact your PC; These modifications disable the printer status reporting on your reseller and inquire about the latest Display...
...be able to the standard VGA or SVGA selection. Top Cover Drum Unit however, you transport the MFC, use the MFC with your Display Driver software. Also, follow the steps below to make these modifications effective. WARNING Remove the drum unit and toner cartridge assembly. 210 C H A P T ...E E N You must restart Windows® to pack the MFC or it may be caused by its handles and remove it. Leave the toner cartridge installed in the drum unit. Contact your PC; These modifications disable the printer status reporting on your reseller and inquire about the latest Display...
Users Manual - English
Page 225
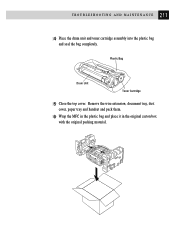
Remove the wire extension, document tray, dust cover, paper tray and handset and pack them. 6 Wrap the MFC in the plastic bag and place it in the original carton box with the original packing material. 211 T R O U B L E S H O O T I N G A N D M A I N T E N A N C E 4 Place the drum unit and toner cartridge assembly into the plastic bag and seal the bag completely. Plastic Bag Drum Unit Toner Cartridge 5 Close the top cover.
Remove the wire extension, document tray, dust cover, paper tray and handset and pack them. 6 Wrap the MFC in the plastic bag and place it in the original carton box with the original packing material. 211 T R O U B L E S H O O T I N G A N D M A I N T E N A N C E 4 Place the drum unit and toner cartridge assembly into the plastic bag and seal the bag completely. Plastic Bag Drum Unit Toner Cartridge 5 Close the top cover.
Users Manual - English
Page 226
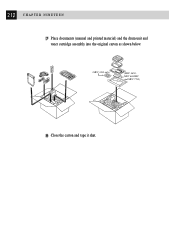
212 C H A P T E R N I N E T E E N 7 Place documents (manual and printed material) and the drum unit and toner cartridge assembly into the original carton as shown below: (MFC 4350 only) (MFC 4650, MFC 6650MC and MFC 7750) 8 Close the carton and tape it shut.
212 C H A P T E R N I N E T E E N 7 Place documents (manual and printed material) and the drum unit and toner cartridge assembly into the original carton as shown below: (MFC 4350 only) (MFC 4650, MFC 6650MC and MFC 7750) 8 Close the carton and tape it shut.
Users Manual - English
Page 227
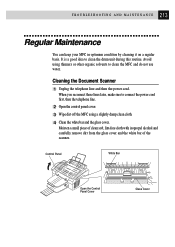
... sure to connect the power cord first, then the telephone line. 2 Open the control panel cover. 3 Wipe dirt off the MFC using thinners or other organic solvents to clean the drum unit during this routine. Control Panel White Bar Open the Control Panel Cover Glass Cover Avoid using a slightly damp clean cloth. 4 Clean...
... sure to connect the power cord first, then the telephone line. 2 Open the control panel cover. 3 Wipe dirt off the MFC using thinners or other organic solvents to clean the drum unit during this routine. Control Panel White Bar Open the Control Panel Cover Glass Cover Avoid using a slightly damp clean cloth. 4 Clean...
Users Manual - English
Page 228
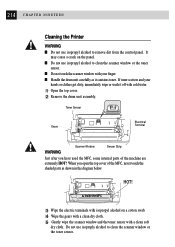
...1 Open the top cover. 2 Remove the drum unit assembly. v Inside the MFC 3 Wipe the electric terminals with your hands or clothes get dirty, immediately wipe or wash it contains toner. When you have used the MFC, some internal parts of the MFC, never touch the shaded parts as it off... remove dirt from the control panel. HOT! s Handle the drum unit carefully as shown in the diagram below. s Do not touch the scanner window with isopropyl alcohol on the panel. 214 C H A P T E R N I N E T E E N Cleaning the Printer WARNING s Do not use isopropyl alcohol to clean the scanner ...
...1 Open the top cover. 2 Remove the drum unit assembly. v Inside the MFC 3 Wipe the electric terminals with your hands or clothes get dirty, immediately wipe or wash it contains toner. When you have used the MFC, some internal parts of the MFC, never touch the shaded parts as it off... remove dirt from the control panel. HOT! s Handle the drum unit carefully as shown in the diagram below. s Do not touch the scanner window with isopropyl alcohol on the panel. 214 C H A P T E R N I N E T E E N Cleaning the Printer WARNING s Do not use isopropyl alcohol to clean the scanner ...
Users Manual - English
Page 229
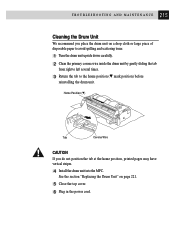
.... 1 Turn the drum unit upside down carefully. 2 Clean the primary corona wire inside the drum unit by gently sliding the tab from right to left several times. 3 Return the tab to the home position (w mark position) before reinstalling the drum unit. Home Position (w)... Tab Corona Wire CAUTION If you place the drum unit on page 221. 5 Close the top cover. 6 Plug in the power cord. 215 T R O U B L E S H O O T I N G A N D M A I N T E N A N C E Cleaning the Drum Unit We recommend you do not position the tab...
.... 1 Turn the drum unit upside down carefully. 2 Clean the primary corona wire inside the drum unit by gently sliding the tab from right to left several times. 3 Return the tab to the home position (w mark position) before reinstalling the drum unit. Home Position (w)... Tab Corona Wire CAUTION If you place the drum unit on page 221. 5 Close the top cover. 6 Plug in the power cord. 215 T R O U B L E S H O O T I N G A N D M A I N T E N A N C E Cleaning the Drum Unit We recommend you do not position the tab...
Users Manual - English
Page 231
... v Inside the MFC 1 Open the top cover. So, never touch the shaded parts shown in the illustration. Top Cover Top Cover Drum Unit Place the drum unit on a drop cloth or large piece of the MFC will be extremely HOT! HOT! To remove the drum unit, hold each side of the drum by its handles and... gently lift the drum forward toward you have used the MFC, some internal parts of disposable paper to...
... v Inside the MFC 1 Open the top cover. So, never touch the shaded parts shown in the illustration. Top Cover Top Cover Drum Unit Place the drum unit on a drop cloth or large piece of the MFC will be extremely HOT! HOT! To remove the drum unit, hold each side of the drum by its handles and... gently lift the drum forward toward you have used the MFC, some internal parts of disposable paper to...
Users Manual - English
Page 232
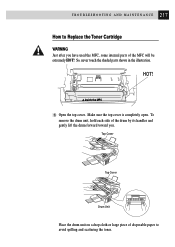
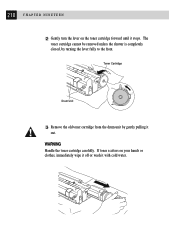
Toner Cartridge Drum Unit 3 Remove the old toner cartridge from the drum unit by turning the lever fully to the front. WARNING Handle the toner cartridge carefully. If toner scatters on the toner cartridge forward until it stops. The toner cartridge cannot be removed unless the shutter is completely closed, by gently pulling it with cold water. 218 C H A P T E R N I N E T E E N 2 Gently turn the lever on your hands or clothes, immediately wipe it off or wash it out.
Toner Cartridge Drum Unit 3 Remove the old toner cartridge from the drum unit by turning the lever fully to the front. WARNING Handle the toner cartridge carefully. If toner scatters on the toner cartridge forward until it stops. The toner cartridge cannot be removed unless the shutter is completely closed, by gently pulling it with cold water. 218 C H A P T E R N I N E T E E N 2 Gently turn the lever on your hands or clothes, immediately wipe it off or wash it out.


