
Quick Setup Guide - English
Page 1
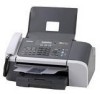
Please read this Quick Setup Guide, the User's Guide and the supplied CD-ROM in a convenient place for the correct setup procedure and installation instructions. STEP 1 Setting Up the Machine STEP 2 Installing the Driver & Software Setup is Complete! Keep this Quick Setup Guide for quick and easy reference at all times. Quick Setup Guide MFC-3360C Before you can use the machine, you must set up the hardware and install the software.
Please read this Quick Setup Guide, the User's Guide and the supplied CD-ROM in a convenient place for the correct setup procedure and installation instructions. STEP 1 Setting Up the Machine STEP 2 Installing the Driver & Software Setup is Complete! Keep this Quick Setup Guide for quick and easy reference at all times. Quick Setup Guide MFC-3360C Before you can use the machine, you must set up the hardware and install the software.

Quick Setup Guide - English
Page 2
Caution Improper Setup Cautions specify procedures you must Improper Setup icons alert you to follow or avoid to prevent possible devices and operations that may arise or give tips about how the current operation works with the machine. User's Guide or Software User's Guide Indicates reference to the User's Guide or Software User's Guide we have supplied. Note Notes tell you how you what to do to prevent possible personal injury. Symbols used in this guide 1 Warning Warnings tell you should respond to a situation that are not damage to the machine or other features. ...
Caution Improper Setup Cautions specify procedures you must Improper Setup icons alert you to follow or avoid to prevent possible devices and operations that may arise or give tips about how the current operation works with the machine. User's Guide or Software User's Guide Indicates reference to the User's Guide or Software User's Guide we have supplied. Note Notes tell you how you what to do to prevent possible personal injury. Symbols used in this guide 1 Warning Warnings tell you should respond to a situation that are not damage to the machine or other features. ...

Quick Setup Guide - English
Page 3
Installing the Driver & Software Windows® For USB Interface Users (For Windows® 98/98SE/Me/2000 Professional/XP/XP Professional x64 Edition 16 Macintosh® For USB Interface Users (For Mac OS® X 10.2.4 or greater) ...18 Consumables Replacement consumables ...20 Ink cartridge ...20 1 Table of Contents Getting Started Carton components ...2 Control panel...3 STEP 1 - Setting Up the Machine Removing the protective parts ...4 Opening the document support and document tray 4 Loading paper ...4 Connecting the phone line ...6 Connecting the power cord ...6 Installing the ink ...
Installing the Driver & Software Windows® For USB Interface Users (For Windows® 98/98SE/Me/2000 Professional/XP/XP Professional x64 Edition 16 Macintosh® For USB Interface Users (For Mac OS® X 10.2.4 or greater) ...18 Consumables Replacement consumables ...20 Ink cartridge ...20 1 Table of Contents Getting Started Carton components ...2 Control panel...3 STEP 1 - Setting Up the Machine Removing the protective parts ...4 Opening the document support and document tray 4 Loading paper ...4 Connecting the phone line ...6 Connecting the power cord ...6 Installing the ink ...
Quick Setup Guide - English
Page 4
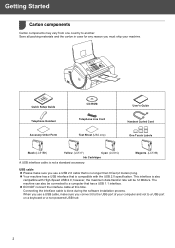
...USB 2.0 specification. This interface is done during the software installation process. Getting Started 1 Carton components 1 Carton components may vary from one country to a computer that is not a standard accessory. Quick Setup Guide Telephone Handset Accesory Order Form CD-ROM Telephone Line Cord Test... Sheet (USA only) User's Guide Handset Curled Cord One Touch Labels Black (LC51BK) Yellow (LC51Y) Cyan (LC51C) Ink Cartridges A USB interface cable is compatible with High-Speed USB 2.0; ...
...USB 2.0 specification. This interface is done during the software installation process. Getting Started 1 Carton components 1 Carton components may vary from one country to a computer that is not a standard accessory. Quick Setup Guide Telephone Handset Accesory Order Form CD-ROM Telephone Line Cord Test... Sheet (USA only) User's Guide Handset Curled Cord One Touch Labels Black (LC51BK) Yellow (LC51Y) Cyan (LC51C) Ink Cartridges A USB interface cable is compatible with High-Speed USB 2.0; ...

Quick Setup Guide - English
Page 5
... shows the date, time, and the current receive mode. 3 Control panel 2 Getting Started 14 13 12 11 10 01/01 13:00 Fax 12 1 Shift 2 One Touch keys 3 Copy Options key 4 Fax and telephone keys 5 Ink key 6 Dial Pad 7 Clear/Back key 3 45 6 78 9 8 OK key 9 Start keys 10 Stop/Exit...
... shows the date, time, and the current receive mode. 3 Control panel 2 Getting Started 14 13 12 11 10 01/01 13:00 Fax 12 1 Shift 2 One Touch keys 3 Copy Options key 4 Fax and telephone keys 5 Ink key 6 Dial Pad 7 Clear/Back key 3 45 6 78 9 8 OK key 9 Start keys 10 Stop/Exit...

Quick Setup Guide - English
Page 6
STEP 1 Setting Up the Machine 1 1 Removing the protective parts 1 Remove the protective tape. 2 Remove the foam bag containing the ink cartridges from on top of 20 lb (80 g/m2) paper. Connecting the USB cable is open, close it. If the paper support flap (1) is done during the software installation process. 3 Loading paper You can load up to match the paper size you slide out the front of the machine. For details, see Acceptable paper and other media in Chapter 2 of the User's Guide. 1 Pull the paper tray completely out of the paper tray to 100 sheets of the paper tray. ...
STEP 1 Setting Up the Machine 1 1 Removing the protective parts 1 Remove the protective tape. 2 Remove the foam bag containing the ink cartridges from on top of 20 lb (80 g/m2) paper. Connecting the USB cable is open, close it. If the paper support flap (1) is done during the software installation process. 3 Loading paper You can load up to match the paper size you slide out the front of the machine. For details, see Acceptable paper and other media in Chapter 2 of the User's Guide. 1 Pull the paper tray completely out of the paper tray to 100 sheets of the paper tray. ...

Quick Setup Guide - English
Page 7
Make sure that the paper side guides and paper length guide touch the edges of the paper. 9 While holding the paper tray in place, pull out the paper support ( ) until it forward. 2 4 Fan the stack of paper well to avoid paper jams and misfeeds. 1 Note If you do not push the paper in the tray. 6 Gently adjust the paper side guides with both hands and the paper length guide to the end of the tray and cause paper feed problems. 7 Close the output paper tray cover (1) and slide it clicks and unfold the paper support flap ( ). 2 1 Note Do not use the paper support flap for Legal ...
Make sure that the paper side guides and paper length guide touch the edges of the paper. 9 While holding the paper tray in place, pull out the paper support ( ) until it forward. 2 4 Fan the stack of paper well to avoid paper jams and misfeeds. 1 Note If you do not push the paper in the tray. 6 Gently adjust the paper side guides with both hands and the paper length guide to the end of the tray and cause paper feed problems. 7 Close the output paper tray cover (1) and slide it clicks and unfold the paper support flap ( ). 2 1 Note Do not use the paper support flap for Legal ...

Quick Setup Guide - English
Page 8
... telephone 2 External telephone 6 Connecting the USB cable is done during the software installation process. Improper Setup DO NOT connect the USB cable. Connect one phone line with an external telephone answering machine, connect it as shown below . 1 Set the receive mode to a modular wall jack. Note ...If you are sharing one phone line with an external telephone, connect it as shown below . Note If you have an external answering machine. STEP 1 Setting Up ...
... telephone 2 External telephone 6 Connecting the USB cable is done during the software installation process. Improper Setup DO NOT connect the USB cable. Connect one phone line with an external telephone answering machine, connect it as shown below . 1 Set the receive mode to a modular wall jack. Note ...If you are sharing one phone line with an external telephone, connect it as shown below . Note If you have an external answering machine. STEP 1 Setting Up ...

Quick Setup Guide - English
Page 9
Note If the protective yellow cap comes off when you open the bag, the cartridge will need it if you transport the machine. 7 You will not be damaged. 1 Note Do not throw away the yellow protective part. Warning If ink gets in the illustration below. The LCD shows: No Cartridge 2 Open the ink cartridge cover (1). 5 Carefully remove the protective yellow cap (1). 1 1 3 Pull all the lock release levers down and remove the yellow protective part (1). Setting Up the Machine 6 Installing the ink cartridges 4 Take out the ink cartridge. Improper Setup DO NOT touch the area shown ...
Note If the protective yellow cap comes off when you open the bag, the cartridge will need it if you transport the machine. 7 You will not be damaged. 1 Note Do not throw away the yellow protective part. Warning If ink gets in the illustration below. The LCD shows: No Cartridge 2 Open the ink cartridge cover (1). 5 Carefully remove the protective yellow cap (1). 1 1 3 Pull all the lock release levers down and remove the yellow protective part (1). Setting Up the Machine 6 Installing the ink cartridges 4 Take out the ink cartridge. Improper Setup DO NOT touch the area shown ...

Quick Setup Guide - English
Page 10
... ink may seep out of the cartridge. • If you install the ink cartridges, check that was caused by the use only Genuine Brother Brand replacement ink cartridges. Note If the LCD shows Install Black, Install Yellow, Install Cyan or Install Magenta after correcting the cartridge installation.... (See Cleaning the print head in Appendix B of the User's Guide.) • Once you do not need to match the color of installation. The LCD shows: Preparing System q Approx 4 Minutes Cleaning q Please Wait 8 Caution • DO NOT take out ink cartridges if you...
... ink may seep out of the cartridge. • If you install the ink cartridges, check that was caused by the use only Genuine Brother Brand replacement ink cartridges. Note If the LCD shows Install Black, Install Yellow, Install Cyan or Install Magenta after correcting the cartridge installation.... (See Cleaning the print head in Appendix B of the User's Guide.) • Once you do not need to match the color of installation. The LCD shows: Preparing System q Approx 4 Minutes Cleaning q Please Wait 8 Caution • DO NOT take out ink cartridges if you...

Quick Setup Guide - English
Page 11
... go to choose your fingers. 4 The LCD shows: Is Quality OK? q 1.Yes 2.No Color OK? OK Poor 8 Choosing your language (Canada only) 1 Press Menu, 0, 0. 2 Press a or b to step 6. q 1.Yes 2.No 5 Do one of the following: „ If all lines are clear and visible, press 1 (Yes) on... the dial pad. The machine starts printing the Print Quality Check Sheet again and goes back to step 3. Press Color Start. The machine starts printing the Print Quality Check...
... go to choose your fingers. 4 The LCD shows: Is Quality OK? q 1.Yes 2.No Color OK? OK Poor 8 Choosing your language (Canada only) 1 Press Menu, 0, 0. 2 Press a or b to step 6. q 1.Yes 2.No 5 Do one of the following: „ If all lines are clear and visible, press 1 (Yes) on... the dial pad. The machine starts printing the Print Quality Check Sheet again and goes back to step 3. Press Color Start. The machine starts printing the Print Quality Check...

Quick Setup Guide - English
Page 12
Time:15:25 (e.g. Year:2007 (e.g. Month:03 (e.g. Day:01 (e.g. Enter 1 5, 2 5 for the month on the dial pad, and then press OK. Enter 0 7 for 2007.) 3 Enter the two digits for 3:25 P.M.) 6 Press Stop/Exit. Enter 0 1 for improved viewing. 1 Press Menu, 1, 7. 2 Press a or b to choose Dark or Light. 3 Press OK. 4 Press Stop/Exit. Contrast:Light Contrast:Dark 10 Setting the date and time The machine displays the date and time, and if you set up the station ID it will add it to each fax you are having difficulty seeing the LCD from your position, we recommend the following ...
Time:15:25 (e.g. Year:2007 (e.g. Month:03 (e.g. Day:01 (e.g. Enter 1 5, 2 5 for the month on the dial pad, and then press OK. Enter 0 7 for 2007.) 3 Enter the two digits for 3:25 P.M.) 6 Press Stop/Exit. Enter 0 1 for improved viewing. 1 Press Menu, 1, 7. 2 Press a or b to choose Dark or Light. 3 Press OK. 4 Press Stop/Exit. Contrast:Light Contrast:Dark 10 Setting the date and time The machine displays the date and time, and if you set up the station ID it will add it to each fax you are having difficulty seeing the LCD from your position, we recommend the following ...

Quick Setup Guide - English
Page 13
... of the transmission, the date and time it is sent and an identification of the business or other entity or other entity or individual. Press One time Two key times 2 A B 3 D E 4 G H 5 J K 6 M N 7 P Q 8 T U 9 W X 4 Press Stop/Exit...
... of the transmission, the date and time it is sent and an identification of the business or other entity or other entity or individual. Press One time Two key times 2 A B 3 D E 4 G H 5 J K 6 M N 7 P Q 8 T U 9 W X 4 Press Stop/Exit...

Quick Setup Guide - English
Page 14
Fax Only Yes Your machine automatically answers every call yourself. STEP 1 Setting Up the Machine 12 Setting tone or pulse dialing mode Your machine comes set for you connecting an external telephone or external TAD (telephone answering device) to the machine? No Do you using the voice message function of your external TAD (telephone answering device)? For details, see Using receive modes in Chapter 7 of the User's Guide. 12 Press OK. 3 Press Stop/Exit. 13 Choosing a Receive Mode There are stored on the external TAD. Yes No Are you want to use a ...
Fax Only Yes Your machine automatically answers every call yourself. STEP 1 Setting Up the Machine 12 Setting tone or pulse dialing mode Your machine comes set for you connecting an external telephone or external TAD (telephone answering device) to the machine? No Do you using the voice message function of your external TAD (telephone answering device)? For details, see Using receive modes in Chapter 7 of the User's Guide. 12 Press OK. 3 Press Stop/Exit. 13 Choosing a Receive Mode There are stored on the external TAD. Yes No Are you want to use a ...

Quick Setup Guide - English
Page 15
... Registration. Note You will receive a confirmation fax of your product online using the On-Line Registration link from the installation CDROM or visit http://www.brother.com/registration. Now go to Go to Supplied CD-ROM 'MFL-Pro Suite' on the next page to install the drivers. 13
... Registration. Note You will receive a confirmation fax of your product online using the On-Line Registration link from the installation CDROM or visit http://www.brother.com/registration. Now go to Go to Supplied CD-ROM 'MFL-Pro Suite' on the next page to install the drivers. 13
Quick Setup Guide - English
Page 16
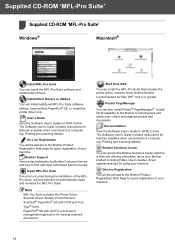
... 'MFL-Pro Suite' 1 Windows® Macintosh® Install MFL-Pro Suite You can access the Brother Solutions Center which is a document management application for viewing scanned documents. Brother Support View contact infirmation for Brohter Customer Service and how to a computer. (eg. User's Guide ...; 10.2.4 or greater. PageManager You can install the MFL-Pro Suite that includes the printer driver, scanner driver and the Brother ControlCenter2 for using your machine. Install Other Drivers or Utilities You can install additional MFL-Pro Suite software utilities, install without...
... 'MFL-Pro Suite' 1 Windows® Macintosh® Install MFL-Pro Suite You can access the Brother Solutions Center which is a document management application for viewing scanned documents. Brother Support View contact infirmation for Brohter Customer Service and how to a computer. (eg. User's Guide ...; 10.2.4 or greater. PageManager You can install the MFL-Pro Suite that includes the printer driver, scanner driver and the Brother ControlCenter2 for using your machine. Install Other Drivers or Utilities You can install additional MFL-Pro Suite software utilities, install without...

Quick Setup Guide - English
Page 17
... Guide are based on Windows® XP. STEP 2 Installing the Driver & Software Follow the instructions on this page for your problem or question, access the Brother Solutions Center directly from the driver or visit http://solutions...
... Guide are based on Windows® XP. STEP 2 Installing the Driver & Software Follow the instructions on this page for your problem or question, access the Brother Solutions Center directly from the driver or visit http://solutions...

Quick Setup Guide - English
Page 18
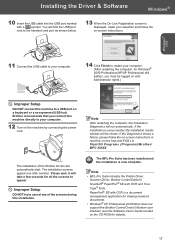
... The installation continues. 4 The CD-ROM main menu will automatically start and is followed by the installation of MFL-Pro Suite. 7 When the Brother MFL-Pro Suite Software License Agreement window appears, click Yes if you agree to the Software License Agreement. 2 Turn on your PC. (For ... 98/98SE/Me/2000 Professional/XP/XP Professional x64 Edition) Important Make sure that you already connected an interface cable. 6 The installation of the Brother CD-ROM. 16 If the language screen appears, choose your machine. Click Install MFL-Pro Suite. 9 When this window does not appear, use...
... The installation continues. 4 The CD-ROM main menu will automatically start and is followed by the installation of MFL-Pro Suite. 7 When the Brother MFL-Pro Suite Software License Agreement window appears, click Yes if you agree to the Software License Agreement. 2 Turn on your PC. (For ... 98/98SE/Me/2000 Professional/XP/XP Professional x64 Edition) Important Make sure that you already connected an interface cable. 6 The installation of the Brother CD-ROM. 16 If the language screen appears, choose your machine. Click Install MFL-Pro Suite. 9 When this window does not appear, use...
Quick Setup Guide - English
Page 19
...; fonts. The installation screens appear one after another. Improper Setup DO NOT try to cancel any of the Brother drivers will automatically start. If the...documents. • Windows® XP Professional x64 Edition does not support the Brother ControlCenter3 Modern user interface (see the Software User's Guide located on a .... Note • MFL-Pro Suite includes the Printer Driver, Scanner Driver, Brother ControlCenter3, ScanSoft® PaperPort® SE with a symbol. The MFL-Pro...to appear. Brother recommends that you must be logged on -line help and FAQ's ...
...; fonts. The installation screens appear one after another. Improper Setup DO NOT try to cancel any of the Brother drivers will automatically start. If the...documents. • Windows® XP Professional x64 Edition does not support the Brother ControlCenter3 Modern user interface (see the Software User's Guide located on a .... Note • MFL-Pro Suite includes the Printer Driver, Scanner Driver, Brother ControlCenter3, ScanSoft® PaperPort® SE with a symbol. The MFL-Pro...to appear. Brother recommends that you must be logged on -line help and FAQ's ...

Quick Setup Guide - English
Page 20
...1 Insert the USB cable into your computer. During this time the following screen will search for the software to finish installing the software. 7 The Brother software will appear. 8 When this screen appears, click OK. Go to step 13. 9 For Mac OS® X 10.2.4 to your CD-...have been installed and the installation is now complete. For Mac OS® X 10.3.x or greater users: The MFL-Pro Suite, Brother printer driver, scanner driver and Brother ControlCenter2 have finished the instructions from Step 1 Setting Up the Machine on pages 4 through 13. 4 Turn on a keyboard or a...
...1 Insert the USB cable into your computer. During this time the following screen will search for the software to finish installing the software. 7 The Brother software will appear. 8 When this screen appears, click OK. Go to step 13. 9 For Mac OS® X 10.2.4 to your CD-...have been installed and the installation is now complete. For Mac OS® X 10.3.x or greater users: The MFL-Pro Suite, Brother printer driver, scanner driver and Brother ControlCenter2 have finished the instructions from Step 1 Setting Up the Machine on pages 4 through 13. 4 Turn on a keyboard or a...
