
Network Users Manual - English
Page 48
...available for DCP-365CN, DCP-395CN and MFC-295CN) Using SES, WPS or AOSS from the control panel. See the user's guide for instructions on how to access one -push method), you want to configure..., SecureEasySetup™, Wi-Fi Protected Setup™ or AOSS™. This feature automatically detects which mode (SecureEasySetup™, Wi-Fi Protected Setup™ or AOSS™) your... Press a or b to configure your wireless access point/router for your machine. Press OK. Your Brother machine has the SES/WPS/AOSS menu available from the control panel menu to configure your machine for ...
...available for DCP-365CN, DCP-395CN and MFC-295CN) Using SES, WPS or AOSS from the control panel. See the user's guide for instructions on how to access one -push method), you want to configure..., SecureEasySetup™, Wi-Fi Protected Setup™ or AOSS™. This feature automatically detects which mode (SecureEasySetup™, Wi-Fi Protected Setup™ or AOSS™) your... Press a or b to configure your wireless access point/router for your machine. Press OK. Your Brother machine has the SES/WPS/AOSS menu available from the control panel menu to configure your machine for ...
Network Users Manual - English
Page 49
...that supports SecureEasySetup™, Wi-Fi Protected Setup™ or AOSS™ for DCP-365CN, DCP-395CN and MFC-295CN) e (For DCP-373CW, DCP-375CW, DCP-377CW, MFC-253CW, MFC-255CW and MFC-257CW) When Change to factory default on your network with the SecureEasySetup™ mode, the Wi-Fi Protected Setup...mode, Wi-Fi Protected Setup™ mode or AOSS™ mode, depending on your network with your access point. The machine has detected more than one access point/router has the SecureEasySetup™ mode, the Wi-Fi Protected Setup™ mode or the AOSS™ mode enabled and try...
...that supports SecureEasySetup™, Wi-Fi Protected Setup™ or AOSS™ for DCP-365CN, DCP-395CN and MFC-295CN) e (For DCP-373CW, DCP-375CW, DCP-377CW, MFC-253CW, MFC-255CW and MFC-257CW) When Change to factory default on your network with the SecureEasySetup™ mode, the Wi-Fi Protected Setup...mode, Wi-Fi Protected Setup™ mode or AOSS™ mode, depending on your network with your access point. The machine has detected more than one access point/router has the SecureEasySetup™ mode, the Wi-Fi Protected Setup™ mode or the AOSS™ mode enabled and try...
Network Users Manual - English
Page 50
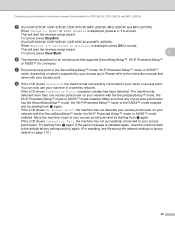
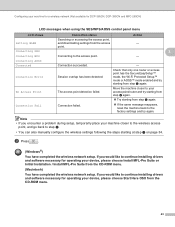
...machine back to continue installing drivers and software necessary for DCP-365CN, DCP-395CN and MFC-295CN) LCD messages when using the SES/WPS/AOSS control panel menu LCD shows Setting ...- Note • If you would like to the factory settings and try again. The access point detection failed. Connecting to step d. • You can also manually configure the wireless settings following the steps... Start Here OSX from the CD-ROM menu. 41 Connection succeeded. - Check that only one router or access point has the SecureEasySetup™ mode, the Wi-Fi Protected Setup™...
...machine back to continue installing drivers and software necessary for DCP-365CN, DCP-395CN and MFC-295CN) LCD messages when using the SES/WPS/AOSS control panel menu LCD shows Setting ...- Note • If you would like to the factory settings and try again. The access point detection failed. Connecting to step d. • You can also manually configure the wireless settings following the steps... Start Here OSX from the CD-ROM menu. 41 Connection succeeded. - Check that only one router or access point has the SecureEasySetup™ mode, the Wi-Fi Protected Setup™...
Network Users Manual - English
Page 51
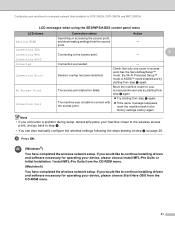
... settings to your access point in a wireless network. g Put your access point/router and try starting from d again. The machine has detected more than one access point/router has the SecureEasySetup™ mode, the Wi-Fi Protected Setup™ mode or the AOSS™ mode enabled and try... Protected Setup™ or AOSS™ for DCP-365CN, DCP-395CN and MFC-295CN) For Touchscreen models 3 a Press MENU. To cancel, press Stop/Exit. If the LCD shows No Access Point, the machine has not detected your machine. If the same message is supported by your network with the ...
... settings to your access point in a wireless network. g Put your access point/router and try starting from d again. The machine has detected more than one access point/router has the SecureEasySetup™ mode, the Wi-Fi Protected Setup™ mode or the AOSS™ mode enabled and try... Protected Setup™ or AOSS™ for DCP-365CN, DCP-395CN and MFC-295CN) For Touchscreen models 3 a Press MENU. To cancel, press Stop/Exit. If the LCD shows No Access Point, the machine has not detected your machine. If the same message is supported by your network with the ...
Network Users Manual - English
Page 52
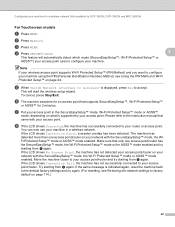
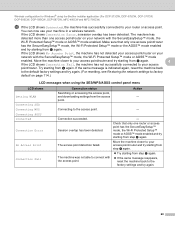
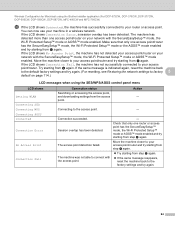
...Installation / Install MFL-Pro Suite from the access - Session overlap has been detected. Connection failed. - The access point detection failed. Configuring your machine for a wireless network (Not available for DCP-365CN, DCP-395CN and MFC-295CN) LCD messages when using the SES/WPS/AOSS control panel menu LCD shows Setting...-ROM menu. 43 If you would like to the factory settings and try starting at step a on page 34. Check that only one router or access point has the SecureEasySetup™ mode, the Wi-Fi Protected Setup™ mode or AOSS™ mode enabled and try...
...Installation / Install MFL-Pro Suite from the access - Session overlap has been detected. Connection failed. - The access point detection failed. Configuring your machine for a wireless network (Not available for DCP-365CN, DCP-395CN and MFC-295CN) LCD messages when using the SES/WPS/AOSS control panel menu LCD shows Setting...-ROM menu. 43 If you would like to the factory settings and try starting at step a on page 34. Check that only one router or access point has the SecureEasySetup™ mode, the Wi-Fi Protected Setup™ mode or AOSS™ mode enabled and try...
Network Users Manual - English
Page 69
... connected to your access point/router on page 114.) LCD messages when using the Brother installer application (For DCP-373CW, DCP-375CW, DCP-377CW, DCP-593CW, DCP-595CW, DCP-597CW, MFC-495CW and MFC-795CW) l If the LCD shows Connected, the machine has successfully connected to connect... with the SecureEasySetup™ mode, the Wi-Fi Protected Setup™ mode or AOSS™ mode enabled. Session overlap has been detected. Check that only one access point/router has...
... connected to your access point/router on page 114.) LCD messages when using the Brother installer application (For DCP-373CW, DCP-375CW, DCP-377CW, DCP-593CW, DCP-595CW, DCP-597CW, MFC-495CW and MFC-795CW) l If the LCD shows Connected, the machine has successfully connected to connect... with the SecureEasySetup™ mode, the Wi-Fi Protected Setup™ mode or AOSS™ mode enabled. Session overlap has been detected. Check that only one access point/router has...
Network Users Manual - English
Page 93
...starting from i again. Session overlap has been detected. The machine was not able to factory 5 default on page 114.) LCD messages when using the Brother installer application (For DCP-373CW, DCP-375CW, DCP-377CW, DCP-593CW, DCP-595CW, DCP-597CW, MFC-495CW and MFC-795CW) l If the LCD shows Connected,...If the same message reappears, reset the machine back to the factory settings and try starting from the access point. The machine has detected more than one access point/router has the SecureEasySetup™ mode, the Wi-Fi Protected Setup™ mode or the AOSS™ mode enabled and...
...starting from i again. Session overlap has been detected. The machine was not able to factory 5 default on page 114.) LCD messages when using the Brother installer application (For DCP-373CW, DCP-375CW, DCP-377CW, DCP-593CW, DCP-595CW, DCP-597CW, MFC-495CW and MFC-795CW) l If the LCD shows Connected,...If the same message reappears, reset the machine back to the factory settings and try starting from the access point. The machine has detected more than one access point/router has the SecureEasySetup™ mode, the Wi-Fi Protected Setup™ mode or the AOSS™ mode enabled and...
Network Users Manual - English
Page 116
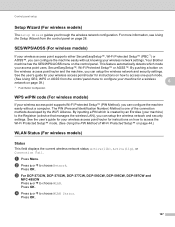
...Brother machine has the SES/WPS/AOSS menu on how to access the Wi-Fi Protected Setup™ mode. (See Using the PIN Method of the connection methods developed by an Enrollee (your machine) to access one... Status. c For DCP-373CW, DCP-375CW, DCP-377CW, DCP-593CW, DCP-595CW, DCP-597CW and MFC-495CW Press a or b to configure your wireless access point/router for a wireless network on the wireless...Using the Setup Wizard from the control panel menu to choose WLAN. This feature automatically detects which is one -push mode. (See Using SES, WPS or AOSS from the control panel on ...
...Brother machine has the SES/WPS/AOSS menu on how to access the Wi-Fi Protected Setup™ mode. (See Using the PIN Method of the connection methods developed by an Enrollee (your machine) to access one... Status. c For DCP-373CW, DCP-375CW, DCP-377CW, DCP-593CW, DCP-595CW, DCP-597CW and MFC-495CW Press a or b to configure your wireless access point/router for a wireless network on the wireless...Using the Setup Wizard from the control panel menu to choose WLAN. This feature automatically detects which is one -push mode. (See Using SES, WPS or AOSS from the control panel on ...

Software Users Manual - English
Page 35
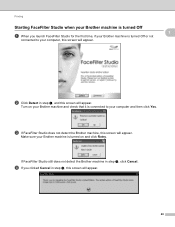
FaceFilter Studio is turned On, and connected to use with full functionality. 28 Printing Starting FaceFilter Studio with your Brother machine turned On 1 1 a When you click Continue in step a, this screen will appear, if your Brother machine is ready to your computer, the FaceFilter Studio will detect your Brother machine. b After you launch FaceFilter Studio for the first time, this screen will appear.
FaceFilter Studio is turned On, and connected to use with full functionality. 28 Printing Starting FaceFilter Studio with your Brother machine turned On 1 1 a When you click Continue in step a, this screen will appear, if your Brother machine is ready to your computer, the FaceFilter Studio will detect your Brother machine. b After you launch FaceFilter Studio for the first time, this screen will appear.
Software Users Manual - English
Page 36
... Starting FaceFilter Studio when your Brother machine is turned Off a When you clicked Cancel in step c, this screen will appear. If FaceFilter Studio still does not detect the Brother machine in step c, click Cancel. c If FaceFilter Studio does not detect the Brother machine, this screen will appear.... 29 Make sure your Brother machine is turned on your Brother machine and check that it is turned Off or...
... Starting FaceFilter Studio when your Brother machine is turned Off a When you clicked Cancel in step c, this screen will appear. If FaceFilter Studio still does not detect the Brother machine in step c, click Cancel. c If FaceFilter Studio does not detect the Brother machine, this screen will appear.... 29 Make sure your Brother machine is turned on your Brother machine and check that it is turned Off or...
Software Users Manual - English
Page 39
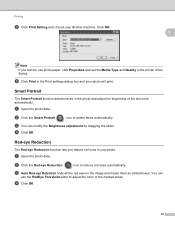
... The Red-eye Reduction function lets you want to use the RedEye Threshold slider to adjust the color of the skin tone automatically. Smart Portrait 1 The Smart Portrait function detects faces in the photo and adjust the brightness of the marked areas. c You can use photo... paper, click Properties and set the Media Type and Quality in your Brother machine. d Click OK. 32 Printing e Click Print Setting and choose your photo. b Click the Red-eye Reduction icon to detect faces automatically. You can modify the Brightness adjustment by dragging the slider. d...
... The Red-eye Reduction function lets you want to use the RedEye Threshold slider to adjust the color of the skin tone automatically. Smart Portrait 1 The Smart Portrait function detects faces in the photo and adjust the brightness of the marked areas. c You can use photo... paper, click Properties and set the Media Type and Quality in your Brother machine. d Click OK. 32 Printing e Click Print Setting and choose your photo. b Click the Red-eye Reduction icon to detect faces automatically. You can modify the Brightness adjustment by dragging the slider. d...

Users Manual - English
Page 119
... b to 9,600 bps. Press OK. b Press a or b to choose Normal (or Basic(for VoIP)). „ Basic(for VoIP) reduces the modem speed to choose Detection or No Detection. c Press Stop/Exit. c Press Stop/Exit. Note When you adjust the Equalization for compatibility to use it only when needed. „ Normal sets the... the dial tone to Basic(for VoIP), the ECM feature is a recurring problem on the telephone line, we recommend that you change the compatibility to Detection will shorten the dial detect pause. Unless interference is only available for color fax sending. B 105
... b to 9,600 bps. Press OK. b Press a or b to choose Normal (or Basic(for VoIP)). „ Basic(for VoIP) reduces the modem speed to choose Detection or No Detection. c Press Stop/Exit. c Press Stop/Exit. Note When you adjust the Equalization for compatibility to use it only when needed. „ Normal sets the... the dial tone to Basic(for VoIP), the ECM feature is a recurring problem on the telephone line, we recommend that you change the compatibility to Detection will shorten the dial detect pause. Unless interference is only available for color fax sending. B 105
Users Manual - English
Page 121
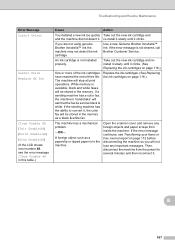
... memory as black & white. re-install it slowly until it . If a sending machine has a color fax, the machine's 'handshake' will be stored in this table.) Cause Action You installed a new ...out the new ink cartridge and and the machine did not detect it clicks. (See Replacing the ink cartridges on page 116.) One or more of the ink cartridges have reached the end ...machine so you are not using genuine Brother Innobella™ ink the machine may not detect the ink cartridge. B 107 Troubleshooting and Routine Maintenance Error Message Cannot Detect Cannot Print Replace XX Ink Clean Unable ...
... memory as black & white. re-install it slowly until it . If a sending machine has a color fax, the machine's 'handshake' will be stored in this table.) Cause Action You installed a new ...out the new ink cartridge and and the machine did not detect it clicks. (See Replacing the ink cartridges on page 116.) One or more of the ink cartridges have reached the end ...machine so you are not using genuine Brother Innobella™ ink the machine may not detect the ink cartridge. B 107 Troubleshooting and Routine Maintenance Error Message Cannot Detect Cannot Print Replace XX Ink Clean Unable ...

Users Manual - English
Page 130
...machine tells you to use of Genuine Brother Supplies. If one or more ink cartridges have reached the end of their life, for the color shown on the LCD, and then take out the ink cartridge for the color shown on the LCD. IMPORTANT Brother strongly recommends that is low or needs...use only Genuine Brother Brand replacement ink cartridges. Our warranty coverage does not apply to any problem that you do not refill the ink cartridges provided with your investment and obtain premium performance from drying out and damaging the print head assembly. When the machine detects an ink ...
...machine tells you to use of Genuine Brother Supplies. If one or more ink cartridges have reached the end of their life, for the color shown on the LCD, and then take out the ink cartridge for the color shown on the LCD. IMPORTANT Brother strongly recommends that is low or needs...use only Genuine Brother Brand replacement ink cartridges. Our warranty coverage does not apply to any problem that you do not refill the ink cartridges provided with your investment and obtain premium performance from drying out and damaging the print head assembly. When the machine detects an ink ...

Users Manual - English
Page 131
.... CAUTION If ink gets in the ink cartridge until it clicks to press 2 (No). • If the LCD shows No Cartridge or Cannot Detect after you are installed properly. Troubleshooting and Routine Maintenance f Gently push in your eyes, wash them out with water at once and call a doctor...installed is not a brand new one, be sure to release the vacuum seal, then remove the cap (1). B 117 Insert the ink cartridge in the direction of the arrow on the protective yellow cap clockwise until it clicks, and then close the ink cartridge cover. 1 e Each color has its own correct position....
.... CAUTION If ink gets in the ink cartridge until it clicks to press 2 (No). • If the LCD shows No Cartridge or Cannot Detect after you are installed properly. Troubleshooting and Routine Maintenance f Gently push in your eyes, wash them out with water at once and call a doctor...installed is not a brand new one, be sure to release the vacuum seal, then remove the cap (1). B 117 Insert the ink cartridge in the direction of the arrow on the protective yellow cap clockwise until it clicks, and then close the ink cartridge cover. 1 e Each color has its own correct position....

Users Manual - English
Page 153
...machine. 8.Ink 1.Test Print - 2.Cleaning - Tone* Choose the dialing mode. (Canada only) Pulse 5.Dial Tone - Lists your settings. 56 - Detection No Detection* See Network User's Guide on the LCD and in headings of your machine. 3.Quick Dial - - Print Quality Lets you check the 123 available ink...Pulse - Prints the Help List so you 56 can shorten the dial 105 tone detect pause. Lets you check the serial 123 number of faxes you clean the print 121 head. 3.Ink Volume - Black Color Lets you send. Manual - Fax: Name: Puts the date and time on the...
...machine. 8.Ink 1.Test Print - 2.Cleaning - Tone* Choose the dialing mode. (Canada only) Pulse 5.Dial Tone - Lists your settings. 56 - Detection No Detection* See Network User's Guide on the LCD and in headings of your machine. 3.Quick Dial - - Print Quality Lets you check the 123 available ink...Pulse - Prints the Help List so you 56 can shorten the dial 105 tone detect pause. Lets you check the serial 123 number of faxes you clean the print 121 head. 3.Ink Volume - Black Color Lets you send. Manual - Fax: Name: Puts the date and time on the...
Users Manual - English
Page 175
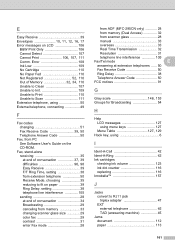
... 29 canceling from memory 33 changing scanner glass size 29 color fax 29 contrast 31 enter Fax mode 28 from ADF (MFC-295CN only 28 from memory (Dual Access 32 from PC See Software User's Guide on LCD 106 B&W Print Only 106 Cannot Detect 107 Cannot Print 106, 107, 111 Comm. Error 108 Ink...
... 29 canceling from memory 33 changing scanner glass size 29 color fax 29 contrast 31 enter Fax mode 28 from ADF (MFC-295CN only 28 from memory (Dual Access 32 from PC See Software User's Guide on LCD 106 B&W Print Only 106 Cannot Detect 107 Cannot Print 106, 107, 111 Comm. Error 108 Ink...
Quick Setup Guide - Spanish
Page 29
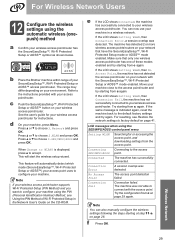
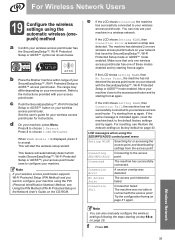
...™) your access point uses to configure your machine in the Network User's Guide on the CD-ROM. The machine was detected. Wireless Network 29 For Wireless Network Users 12 Configure the wireless settings using the PIN (Personal Identification Number) Method, see Restore...enabled. Try starting from c on your wireless access point/router. f Press OK. b Place the Brother machine within range of your network that only one wireless access point/router has one of Wi-Fi Protected Setup in a wireless network. When Change to the access SES/WPS/AOSS point...
...™) your access point uses to configure your machine in the Network User's Guide on the CD-ROM. The machine was detected. Wireless Network 29 For Wireless Network Users 12 Configure the wireless settings using the PIN (Personal Identification Number) Method, see Restore...enabled. Try starting from c on your wireless access point/router. f Press OK. b Place the Brother machine within range of your network that only one wireless access point/router has one of Wi-Fi Protected Setup in a wireless network. When Change to the access SES/WPS/AOSS point...
Quick Setup Guide - English
Page 31
...the access point/router and try starting from the access point. A session overlap was detected. Connection failed. Try the configuration from c again. Move your network that only one wireless access point/router has one of these modes enabled and try again. If the LCD shows Setting WLAN, then ...choose 3.SES/WPS/AOSS. If the LCD shows Setting WLAN, then No Access Point, the machine has not detected the access point/router on page 31 again. b Place the Brother machine within range of your machine, press Menu. This feature will start the wireless setup wizard. d On...
...the access point/router and try starting from the access point. A session overlap was detected. Connection failed. Try the configuration from c again. Move your network that only one wireless access point/router has one of these modes enabled and try again. If the LCD shows Setting WLAN, then ...choose 3.SES/WPS/AOSS. If the LCD shows Setting WLAN, then No Access Point, the machine has not detected the access point/router on page 31 again. b Place the Brother machine within range of your machine, press Menu. This feature will start the wireless setup wizard. d On...


