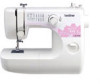
Users Manual - English and Spanish
Page 2
...use by the manufacturer as described in this manual. 3. Never operate this sewing machine. Keep the ventilation openings of the sewing machine and foot controller free from the accumulation of burns, fire, electric shock, or injury to the symbol "O" position which represents off , symbol "O" ... Do not use ." 1 Young children should be used as threading the needle, changing the needle, threading the bobbin, or changing the presser foot. 15. Never operate the sewing machine with same type rated 15 watts. The wrong plate can cause the needle to the nearest authorized ...
...use by the manufacturer as described in this manual. 3. Never operate this sewing machine. Keep the ventilation openings of the sewing machine and foot controller free from the accumulation of burns, fire, electric shock, or injury to the symbol "O" position which represents off , symbol "O" ... Do not use ." 1 Young children should be used as threading the needle, changing the needle, threading the bobbin, or changing the presser foot. 15. Never operate the sewing machine with same type rated 15 watts. The wrong plate can cause the needle to the nearest authorized ...
Users Manual - English and Spanish
Page 4
...MACHINE PARTS AND THEIR FUNCTIONS 5 The main parts ...5 Needle and presser foot section ...6 Flat bed attachment ...6 ACCESSORIES ...7 OPTIONAL ACCESSORIES 7 USING YOUR SEWING MACHINE 8 Power supply precautions ...8 Power supply ...8 Foot controller ...9 Steadying the machine ...9 THREADING THE MACHINE 10 Winding ...needle ...16 Replacing the needle ...16 Sewing with a twin needle (Option) ...18 REPLACING THE PRESSER FOOT 19 Replacing the presser foot ...19 Removing the presser foot holder ...20 2. UTILITY STITCHES 27 USEFUL STITCHES ...27 Zigzag stitches ...27 Basic stitching ...28 ...
...MACHINE PARTS AND THEIR FUNCTIONS 5 The main parts ...5 Needle and presser foot section ...6 Flat bed attachment ...6 ACCESSORIES ...7 OPTIONAL ACCESSORIES 7 USING YOUR SEWING MACHINE 8 Power supply precautions ...8 Power supply ...8 Foot controller ...9 Steadying the machine ...9 THREADING THE MACHINE 10 Winding ...needle ...16 Replacing the needle ...16 Sewing with a twin needle (Option) ...18 REPLACING THE PRESSER FOOT 19 Replacing the presser foot ...19 Removing the presser foot holder ...20 2. UTILITY STITCHES 27 USEFUL STITCHES ...27 Zigzag stitches ...27 Basic stitching ...28 ...
Users Manual - English and Spanish
Page 6
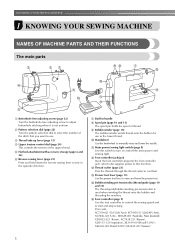
... to use as the lower thread. g Built-in the opposite direction. n Presser foot lever (page 13) Use the presser foot lever to manually raise and lower the needle. j Handwheel Use the handwheel to raise and lower the presser foot. m Thread cutter (page 23) Pass the threads through the thread cutter to... XE4302-001(Brazil(220V)),XE3447-001(Taiwan) 5 k Main power/sewing light switch (page 8) Use this switch to this machine. p Foot controller (page 9) Use the foot controller to control the sewing speed and to sew in handle h Spool pin (page 10 and 13) The spool pin holds the spool...
... to use as the lower thread. g Built-in the opposite direction. n Presser foot lever (page 13) Use the presser foot lever to manually raise and lower the needle. j Handwheel Use the handwheel to raise and lower the presser foot. m Thread cutter (page 23) Pass the threads through the thread cutter to... XE4302-001(Brazil(220V)),XE3447-001(Taiwan) 5 k Main power/sewing light switch (page 8) Use this switch to this machine. p Foot controller (page 9) Use the foot controller to control the sewing speed and to sew in handle h Spool pin (page 10 and 13) The spool pin holds the spool...

Users Manual - English and Spanish
Page 7
... the fabric in a compartment inside the compartment. a Presser foot holder assembly The presser foot is marked with guides for the selected stitching. b Presser foot screw Use the presser foot screw to hold the presser foot holder assembly in the bag, and then store the bag inside the flat bed attachment. c Presser foot (Zigzag) The presser foot applies pressure consistently on the fabric as the...
... the fabric in a compartment inside the compartment. a Presser foot holder assembly The presser foot is marked with guides for the selected stitching. b Presser foot screw Use the presser foot screw to hold the presser foot holder assembly in the bag, and then store the bag inside the flat bed attachment. c Presser foot (Zigzag) The presser foot applies pressure consistently on the fabric as the...
Users Manual - English and Spanish
Page 8
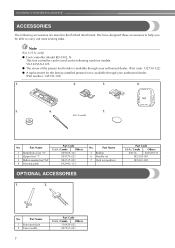
...YOUR SEWING MACHINE ACCESSORIES The following machine models: VX-1435/LX-3125. ● The screw of the presser foot holder is available through your authorized dealer. (Part code: 132730-122) ● A replacement for the factory-installed presser foot is available through your authorized dealer. (Part number: 138135...-122) 1. 2. 3. 4. 5. 6. 7. 90/14 needle No. only) ● Foot controller: Model KD-1902, N This foot controller can be able to help you be...
...YOUR SEWING MACHINE ACCESSORIES The following machine models: VX-1435/LX-3125. ● The screw of the presser foot holder is available through your authorized dealer. (Part code: 132730-122) ● A replacement for the factory-installed presser foot is available through your authorized dealer. (Part number: 138135...-122) 1. 2. 3. 4. 5. 6. 7. 90/14 needle No. only) ● Foot controller: Model KD-1902, N This foot controller can be able to help you be...

Users Manual - English and Spanish
Page 12
... ● The needle bar does not move when you turn the power off the foot controller. If bobbins from other models are used, the machine will make a clicking sound; Press the foot controller to the left and remove the bobbin. KNOWING YOUR SEWING MACHINE Trim the excess... thread above the bobbin. h When the bobbin seems full and begins spinning i slowly, take your foot off while threading the machine. If you (counterclockwise) and raise the presser foot lever. 1 2 a Wound evenly b Wound poorly 11 Raise the needle to break. g Lower threading Install the...
... ● The needle bar does not move when you turn the power off the foot controller. If bobbins from other models are used, the machine will make a clicking sound; Press the foot controller to the left and remove the bobbin. KNOWING YOUR SEWING MACHINE Trim the excess... thread above the bobbin. h When the bobbin seems full and begins spinning i slowly, take your foot off while threading the machine. If you (counterclockwise) and raise the presser foot lever. 1 2 a Wound evenly b Wound poorly 11 Raise the needle to break. g Lower threading Install the...
Users Manual - English and Spanish
Page 14
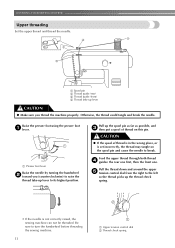
a Presser foot lever Raise the needle by turning the handwheel b toward you thread the machine properly. Be sure to break. CAUTION ● If the spool of thread ... before threading the sewing machine. 13 a Upper tension control dial b Thread check spring Otherwise, the thread could tangle and break the needle. Raise the presser foot using the presser foot a lever. Feed the upper thread through both thread d guides: the rear one first, then the front one. KNOWING YOUR SEWING MACHINE Upper threading Set...
a Presser foot lever Raise the needle by turning the handwheel b toward you thread the machine properly. Be sure to break. CAUTION ● If the spool of thread ... before threading the sewing machine. 13 a Upper tension control dial b Thread check spring Otherwise, the thread could tangle and break the needle. Raise the presser foot using the presser foot a lever. Feed the upper thread through both thread d guides: the rear one first, then the front one. KNOWING YOUR SEWING MACHINE Upper threading Set...
Users Manual - English and Spanish
Page 15
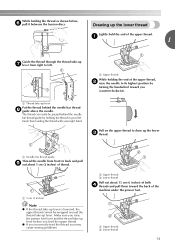
a Upper thread While holding the end of the machine under the presser foot. a Needle bar thread guide Thread the needle from right to left hand, then feeding the thread with your left . The thread can easily be wrapped ...around the thread take-up the lower thread Lightly hold the end of thread. Make sure you raise the presser foot lever and the thread take -up lever before you feed the upper thread. ● If you incorrectly feed the thread you (counterclockwise). a 1 Guide the thread...
a Upper thread While holding the end of the machine under the presser foot. a Needle bar thread guide Thread the needle from right to left hand, then feeding the thread with your left . The thread can easily be wrapped ...around the thread take-up the lower thread Lightly hold the end of thread. Make sure you raise the presser foot lever and the thread take -up lever before you feed the upper thread. ● If you incorrectly feed the thread you (counterclockwise). a 1 Guide the thread...
Users Manual - English and Spanish
Page 17
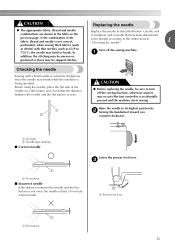
...fabrics (such as denim) with a bent needle is extremely dangerous since the needle may occur if the foot controller is accidentally pressed and the machine starts sewing. Lower the presser foot lever. Do not use a bent needle. CAUTION ● The appropriate fabric, thread and needle combinations ... Replace the needle as described below. Before using the needle, place the flat side of the fabric, thread and needle is bent. c a Presser foot lever 1 a Flat surface 16 Raise the needle to turn off the sewing machine. In addition, the stitching may be sure to its highest ...
...fabrics (such as denim) with a bent needle is extremely dangerous since the needle may occur if the foot controller is accidentally pressed and the machine starts sewing. Lower the presser foot lever. Do not use a bent needle. CAUTION ● The appropriate fabric, thread and needle combinations ... Replace the needle as described below. Before using the needle, place the flat side of the fabric, thread and needle is bent. c a Presser foot lever 1 a Flat surface 16 Raise the needle to turn off the sewing machine. In addition, the stitching may be sure to its highest ...
Users Manual - English and Spanish
Page 19
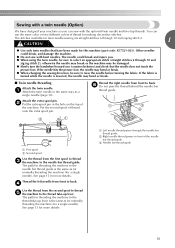
...twin-needle sewing are straight stitches 6 through 10 and zigzag stitch 2. 1 CAUTION ● Use only twin needles that the needle does not touch the presser foot. If the fabric is turned while the needle is lowered, the needle may bend or break. ● When changing the sewing direction, be damaged. ...sew with the optional twin needle and two top threads. Put the second spool of the needle bar thread guide. If the needle hits the presser foot, the needle may bend or break. ■ Twin needle threading Attach the twin needle. The path for threading the machine to the thread...
...twin-needle sewing are straight stitches 6 through 10 and zigzag stitch 2. 1 CAUTION ● Use only twin needles that the needle does not touch the presser foot. If the fabric is turned while the needle is lowered, the needle may bend or break. ● When changing the sewing direction, be damaged. ...sew with the optional twin needle and two top threads. Put the second spool of the needle bar thread guide. If the needle hits the presser foot, the needle may bend or break. ■ Twin needle threading Attach the twin needle. The path for threading the machine to the thread...
Users Manual - English and Spanish
Page 20
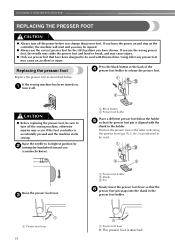
... machine starts sewing. Raise the needle to be used with the shank in the presser foot holder. c a Presser foot holder b Shank c Pin Slowly lower the presser foot lever so that the f presser foot pin snaps into the shank in the holder. a Presser foot lever 19 a Presser foot lever X The presser foot is positioned to its highest position by b turning the handwheel toward you change...
... machine starts sewing. Raise the needle to be used with the shank in the presser foot holder. c a Presser foot holder b Shank c Pin Slowly lower the presser foot lever so that the f presser foot pin snaps into the shank in the holder. a Presser foot lever 19 a Presser foot lever X The presser foot is positioned to its highest position by b turning the handwheel toward you change...
Users Manual - English and Spanish
Page 21
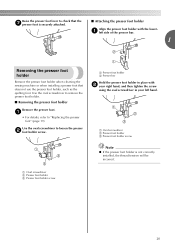
... screwdriver b Presser foot holder c Presser foot holder screw 20 a Presser foot holder b Presser bar Hold the presser foot holder in place with the lower- a • For details, refer to remove the presser foot holder. ■ Removing the presser foot holder Remove the presser foot. Use the oval screwdriver to loosen the presser b foot holder screw. Raise the presser foot lever to check that does not use the presser foot holder, such...
... screwdriver b Presser foot holder c Presser foot holder screw 20 a Presser foot holder b Presser bar Hold the presser foot holder in place with the lower- a • For details, refer to remove the presser foot holder. ■ Removing the presser foot holder Remove the presser foot. Use the oval screwdriver to loosen the presser b foot holder screw. Raise the presser foot lever to check that does not use the presser foot holder, such...
Users Manual - English and Spanish
Page 22
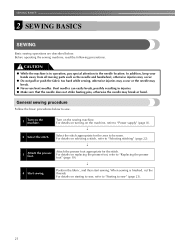
... machine, read the following precautions. CAUTION ● While the machine is finished, cut the threads. For details on replacing the presser foot, refer to "Replacing the presser foot" (page 19). ↓ 4 Start sewing. In addition, keep your hands away from all moving parts such as the needle... the stitch appropriate for the stitch. For details on selecting a stitch, refer to "Selecting stitching" (page 22). ↓ 3 Attach the presser foot. When sewing is in injuries. ● Make sure that the needle does not strike basting pins, otherwise the needle may break. ● ...
... machine, read the following precautions. CAUTION ● While the machine is finished, cut the threads. For details on replacing the presser foot, refer to "Replacing the presser foot" (page 19). ↓ 4 Start sewing. In addition, keep your hands away from all moving parts such as the needle... the stitch appropriate for the stitch. For details on selecting a stitch, refer to "Selecting stitching" (page 22). ↓ 3 Attach the presser foot. When sewing is in injuries. ● Make sure that the needle does not strike basting pins, otherwise the needle may break. ● ...
Users Manual - English and Spanish
Page 24
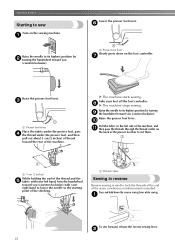
...Pull the fabric to the starting point of thread toward you (counterclockwise). a Presser foot lever Slowly press down the reverse sewing lever while sewing. c a Presser foot lever Place the fabric under the presser foot, pass d the thread under the presser foot, and then pull out about 5 cm (2 inches) of the stitching. ...needed. a Thread cutter Sewing in reverse Reverse sewing is used to lock the threads at the end of the presser foot bar to sew Lower the presser foot lever. Take your left side of the machine, and k then pass the threads through the thread cutter on the...
...Pull the fabric to the starting point of thread toward you (counterclockwise). a Presser foot lever Slowly press down the reverse sewing lever while sewing. c a Presser foot lever Place the fabric under the presser foot, pass d the thread under the presser foot, and then pull out about 5 cm (2 inches) of the stitching. ...needed. a Thread cutter Sewing in reverse Reverse sewing is used to lock the threads at the end of the presser foot bar to sew Lower the presser foot lever. Take your left side of the machine, and k then pass the threads through the thread cutter on the...

Users Manual - English and Spanish
Page 26
...a curve while using the twin needle, be achieved. SEWING BASICS USEFUL SEWING TIPS Various ways to achieve better results for your project. Lower the presser foot lever and continue c sewing. 25 CAUTION ● If fabric more than 6 mm (15/64 inches) thick is sewn or if the fabric...or break. Since the results differ depending on the type of fabric sewn, perform the trial sewing under the presser foot, raise the presser foot lever even higher to bring the presser foot to its highest position. Sewing curves Stop sewing, and then slightly change the sewing direction to raise the needle...
...a curve while using the twin needle, be achieved. SEWING BASICS USEFUL SEWING TIPS Various ways to achieve better results for your project. Lower the presser foot lever and continue c sewing. 25 CAUTION ● If fabric more than 6 mm (15/64 inches) thick is sewn or if the fabric...or break. Since the results differ depending on the type of fabric sewn, perform the trial sewing under the presser foot, raise the presser foot lever even higher to bring the presser foot to its highest position. Sewing curves Stop sewing, and then slightly change the sewing direction to raise the needle...

Users Manual - English and Spanish
Page 28
CAUTION ● Slowly turn the handwheel toward you (counterclockwise) and check that the needle does not touch the presser foot. c • For details, refer to "Starting to sew" (page 23). If the needle hits the presser foot, the needle may bend or break. 27 Memo ● When sewing with the decorative satin stitches. Select a stitch...
CAUTION ● Slowly turn the handwheel toward you (counterclockwise) and check that the needle does not touch the presser foot. c • For details, refer to "Starting to sew" (page 23). If the needle hits the presser foot, the needle may bend or break. 27 Memo ● When sewing with the decorative satin stitches. Select a stitch...

Users Manual - English and Spanish
Page 31
... side up. For invisible stitching, make sure that both threads are the same color as a shown below, and then remove both the presser foot and presser foot holder assembly. 3 a Wrong side of fabric b Right side of fabric Select the desired length for reinforcement. Number on the needle plate... i catches the fold of the hem. Stop sewing when the portion to strain. Darning Reinforce points that will be darned under the c presser foot together with a fabric underlay for straight stitch b (6-10). Start sewing while gently moving the fabric d with parallel stitching. 30 Place the...
... side up. For invisible stitching, make sure that both threads are the same color as a shown below, and then remove both the presser foot and presser foot holder assembly. 3 a Wrong side of fabric b Right side of fabric Select the desired length for reinforcement. Number on the needle plate... i catches the fold of the hem. Stop sewing when the portion to strain. Darning Reinforce points that will be darned under the c presser foot together with a fabric underlay for straight stitch b (6-10). Start sewing while gently moving the fabric d with parallel stitching. 30 Place the...

Users Manual - English and Spanish
Page 32
... Step c (Back end of button hole) Step d (Right side) a Reinforcement stitching Making the buttonhole The names of parts of buttonhole foot "A", which is directly in the presser foot. Select stitch "a" of the outside frame back until the sliding insert reaches the front of the 4-step automatic c buttonhole (1). Sew 5 ...to mark the position and length of the presser foot to the back, as shown below . e Step Step a (Front end of button hole) Sewn portion Memo ● Before sewing buttonholes...
... Step c (Back end of button hole) Step d (Right side) a Reinforcement stitching Making the buttonhole The names of parts of buttonhole foot "A", which is directly in the presser foot. Select stitch "a" of the outside frame back until the sliding insert reaches the front of the 4-step automatic c buttonhole (1). Sew 5 ...to mark the position and length of the presser foot to the back, as shown below . e Step Step a (Front end of button hole) Sewn portion Memo ● Before sewing buttonholes...

Users Manual - English and Spanish
Page 33
... of the stitching, and then raise the needle by turning the handwheel toward you . Sew the right side of the 4-step j automatic buttonhole (1). Raise the presser foot lever, remove the o fabric, and cut the thread. ■ If the right side is too tight compared to the left side f of the front bar...
... of the stitching, and then raise the needle by turning the handwheel toward you . Sew the right side of the 4-step j automatic buttonhole (1). Raise the presser foot lever, remove the o fabric, and cut the thread. ■ If the right side is too tight compared to the left side f of the front bar...

Users Manual - English and Spanish
Page 34
...hole buttons, first sew the two holes closest to check that the needle goes into the two holes of dial 2 3 4 Attach the button sewing foot "M". Pull the fabric to the following table. Then, slide the button so that the needle correctly goes into the two holes toward you e (counterclockwise...or break. UTILITY STITCHES Button sewing Buttons can be attached. Turn the handwheel toward the rear of 15 cm (6 inches). Distance between the presser foot and d the fabric. f • After sewing for about 10 seconds at a low speed, press and hold down the reverse sewing lever to step...
...hole buttons, first sew the two holes closest to check that the needle goes into the two holes of dial 2 3 4 Attach the button sewing foot "M". Pull the fabric to the following table. Then, slide the button so that the needle correctly goes into the two holes toward you e (counterclockwise...or break. UTILITY STITCHES Button sewing Buttons can be attached. Turn the handwheel toward the rear of 15 cm (6 inches). Distance between the presser foot and d the fabric. f • After sewing for about 10 seconds at a low speed, press and hold down the reverse sewing lever to step...


