Users Manual - English and Spanish
Page 4
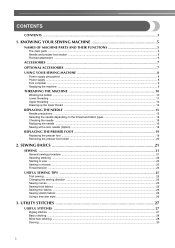
SEWING BASICS 21 SEWING ...21 General sewing procedure ...21 Selecting stitching ...22 Starting to sew ...23 Sewing in reverse ...23 Thread tension ...24 USEFUL SEWING TIPS ...25 Trial sewing ...25 Changing the sewing direction ...25 Sewing curves ...25 Sewing thick fabrics ...25 Sewing thin fabrics ...26 Sewing ...
SEWING BASICS 21 SEWING ...21 General sewing procedure ...21 Selecting stitching ...22 Starting to sew ...23 Sewing in reverse ...23 Thread tension ...24 USEFUL SEWING TIPS ...25 Trial sewing ...25 Changing the sewing direction ...25 Sewing curves ...25 Sewing thick fabrics ...25 Sewing thin fabrics ...26 Sewing ...
Users Manual - English and Spanish
Page 5
APPENDIX ...39 MAINTENANCE ...39 Oiling ...39 Changing the bulb ...39 Cleaning the machine surface ...40 Cleaning the shuttle race ...40 Cleaning the feed dogs ...41 Bobbin case tension adjustment ...42 TROUBLESHOOTING ...43 INDEX ...46 4 BUTTONHOLE SEWING 31 Making the buttonhole ...31 Adjusting buitching stitching ...32 Button sewing ...33 ZIPPER INSERTION ...34 APPLIQUÉ, MONOGRAMMING AND EMBROIDERING 35 Appliqués ...35 Monogramming and embroidering ...35 DECORATIVE STITCHING 37 Gathering ...37 Shell tuck stitching ...37 Elastic stitching ...38 4.
APPENDIX ...39 MAINTENANCE ...39 Oiling ...39 Changing the bulb ...39 Cleaning the machine surface ...40 Cleaning the shuttle race ...40 Cleaning the feed dogs ...41 Bobbin case tension adjustment ...42 TROUBLESHOOTING ...43 INDEX ...46 4 BUTTONHOLE SEWING 31 Making the buttonhole ...31 Adjusting buitching stitching ...32 Button sewing ...33 ZIPPER INSERTION ...34 APPLIQUÉ, MONOGRAMMING AND EMBROIDERING 35 Appliqués ...35 Monogramming and embroidering ...35 DECORATIVE STITCHING 37 Gathering ...37 Shell tuck stitching ...37 Elastic stitching ...38 4.
Users Manual - English and Spanish
Page 6
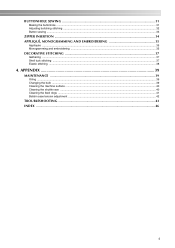
c Thread take-up lever (page 13) d Upper tension control dial (page 24) This controls the tension of thread. l Foot controller jack/jack Insert the foot controller plug into the foot controller jack, which also supplies power to this switch to sew ... (page 23) Pass the threads through the thread cutter to manually raise and lower the needle. o Bobbin winding pre-tension disc/thread guide (page 10 and 13) The thread guide/bobbin winding pre-tension disc is not uniform. Part code; j Handwheel Use the handwheel to cut them. p Foot controller (page 9) Use the...
c Thread take-up lever (page 13) d Upper tension control dial (page 24) This controls the tension of thread. l Foot controller jack/jack Insert the foot controller plug into the foot controller jack, which also supplies power to this switch to sew ... (page 23) Pass the threads through the thread cutter to manually raise and lower the needle. o Bobbin winding pre-tension disc/thread guide (page 10 and 13) The thread guide/bobbin winding pre-tension disc is not uniform. Part code; j Handwheel Use the handwheel to cut them. p Foot controller (page 9) Use the...
Users Manual - English and Spanish
Page 11
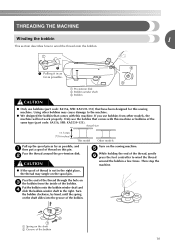
... Groove of the bobbin. Put the bobbin onto the bobbin winder shaft and d slide the bobbin winder shaft to wind the thread around the pre-tension disk. a Spring on the spool pin. Only use bobbins (part code: SA156, SFB: XA5539-151) that have been designed for this sewing machine...THREADING THE MACHINE Winding the bobbin 1 This section describes how to the machine. ● We designed the bobbin that comes with this pin. a Pre-tension disk b Bobbin winder shaft c Bobbin CAUTION ● Only use the bobbin that comes with this machine. Using other models, the machine will not work ...
... Groove of the bobbin. Put the bobbin onto the bobbin winder shaft and d slide the bobbin winder shaft to wind the thread around the pre-tension disk. a Spring on the spool pin. Only use bobbins (part code: SA156, SFB: XA5539-151) that have been designed for this sewing machine...THREADING THE MACHINE Winding the bobbin 1 This section describes how to the machine. ● We designed the bobbin that comes with this pin. a Pre-tension disk b Bobbin winder shaft c Bobbin CAUTION ● Only use the bobbin that comes with this machine. Using other models, the machine will not work ...

Users Manual - English and Spanish
Page 12
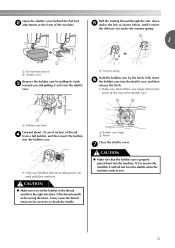
...seems full and begins spinning i slowly, take your foot off while threading the machine. CAUTION ● Winding the bobbin improperly may cause the thread tension to loosen, breaking the needle and resulting in injury. 1 2 a Wound evenly b Wound poorly ● The bobbin was designed specifically for ...winding shaft to loosen, breaking the needle and resulting in injury. CAUTION ● Winding the bobbin improperly may cause the thread tension to the right. KNOWING YOUR SEWING MACHINE Trim the excess thread above the bobbin. this sewing machine. Press the foot controller to...
...seems full and begins spinning i slowly, take your foot off while threading the machine. CAUTION ● Winding the bobbin improperly may cause the thread tension to loosen, breaking the needle and resulting in injury. 1 2 a Wound evenly b Wound poorly ● The bobbin was designed specifically for ...winding shaft to loosen, breaking the needle and resulting in injury. CAUTION ● Winding the bobbin improperly may cause the thread tension to the right. KNOWING YOUR SEWING MACHINE Trim the excess thread above the bobbin. this sewing machine. Press the foot controller to...
Users Manual - English and Spanish
Page 13
... bobbin case. • Only use bobbins that the bobbin case is incorrectly installed, it may cause the thread tension to the left, as shown below, until it enters the delivery eye under the tension spring. 1 a Flat bed attachment b Shuttle cover Remove the bobbin case by the latch, fully insert f...trailing thread through the slot, down e and to be used with this machine. g CAUTION ● Make sure that were designed to sew. 12 a Tension spring Hold the bobbin case by pulling its latch c toward you set the bobbin so the thread unrolls in the wrong direction, it will fall...
... bobbin case. • Only use bobbins that the bobbin case is incorrectly installed, it may cause the thread tension to the left, as shown below, until it enters the delivery eye under the tension spring. 1 a Flat bed attachment b Shuttle cover Remove the bobbin case by the latch, fully insert f...trailing thread through the slot, down e and to be used with this machine. g CAUTION ● Make sure that were designed to sew. 12 a Tension spring Hold the bobbin case by pulling its latch c toward you set the bobbin so the thread unrolls in the wrong direction, it will fall...
Users Manual - English and Spanish
Page 14
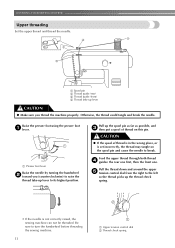
.... a Presser foot lever Raise the needle by turning the handwheel b toward you thread the machine properly. Pull the thread down and around the upper e tension control dial from the right to its highest position. Be sure to break. CAUTION ● If the spool of thread on the spool pin and... cause the needle to turn the handwheel before threading the sewing machine. 13 a Upper tension control dial b Thread check spring Feed the upper thread through both thread d guides: the rear one first, then the front one. Raise the presser...
.... a Presser foot lever Raise the needle by turning the handwheel b toward you thread the machine properly. Pull the thread down and around the upper e tension control dial from the right to its highest position. Be sure to break. CAUTION ● If the spool of thread on the spool pin and... cause the needle to turn the handwheel before threading the sewing machine. 13 a Upper tension control dial b Thread check spring Feed the upper thread through both thread d guides: the rear one first, then the front one. Raise the presser...
Users Manual - English and Spanish
Page 15
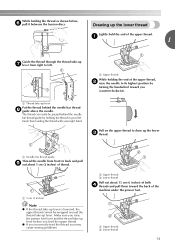
... foot lever and the thread take-up g lever from front to its highest position by holding the thread as shown below, f pull it between the tension discs. a 5 cm (2 inches) Note ● If the thread take-up lever is lowered, the upper thread cannot be passed behind the needle bar thread h guide...
... foot lever and the thread take-up g lever from front to its highest position by holding the thread as shown below, f pull it between the tension discs. a 5 cm (2 inches) Note ● If the thread take-up lever is lowered, the upper thread cannot be passed behind the needle bar thread h guide...
Users Manual - English and Spanish
Page 21
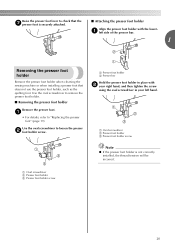
... Remove the presser foot holder when cleaning the sewing machine or when installing a presser foot that the g presser foot is not correctly installed, the thread tension will be incorrect. Use the oval screwdriver to loosen the presser b foot holder screw. Use the oval screwdriver to remove the presser foot holder. ■...
... Remove the presser foot holder when cleaning the sewing machine or when installing a presser foot that the g presser foot is not correctly installed, the thread tension will be incorrect. Use the oval screwdriver to loosen the presser b foot holder screw. Use the oval screwdriver to remove the presser foot holder. ■...

Users Manual - English and Spanish
Page 25
.... 1 2 3 5 4 a Wrong side b Surface c Upper thread d Lower thread e Loops appear on surface of fabric Solution Reduce the tension by turning the upper tensioncontrol dial to change fabric or thread. For most sewing applications, no adjustment is needed. 24 You may appear on the... a Wrong side b Surface c Upper thread d Lower thread e Loops appear on surface of the fabric. In addition, be too loose. Thread tension ■ Upper tension is too loose Loops appear on the wrong side of the fabric when sewing thin fabric with a small oval screwdriver. Solution Increase the...
.... 1 2 3 5 4 a Wrong side b Surface c Upper thread d Lower thread e Loops appear on surface of fabric Solution Reduce the tension by turning the upper tensioncontrol dial to change fabric or thread. For most sewing applications, no adjustment is needed. 24 You may appear on the... a Wrong side b Surface c Upper thread d Lower thread e Loops appear on surface of the fabric. In addition, be too loose. Thread tension ■ Upper tension is too loose Loops appear on the wrong side of the fabric when sewing thin fabric with a small oval screwdriver. Solution Increase the...

Users Manual - English and Spanish
Page 26
... needle by turning the handwheel toward you (counterclockwise). If the fabric is turned while the needle is pushed with your project, and check the thread tension and stitch length and width. Changing the sewing direction When the stitching reaches a corner, stop the a sewing machine. Sewing thick fabrics ■ If the fabric...
... needle by turning the handwheel toward you (counterclockwise). If the fabric is turned while the needle is pushed with your project, and check the thread tension and stitch length and width. Changing the sewing direction When the stitching reaches a corner, stop the a sewing machine. Sewing thick fabrics ■ If the fabric...

Users Manual - English and Spanish
Page 38
...position) gathers or darning, etc. They are called "shell tucks". a Select the shell tuck stitch (13), and increase b the thread tension. • For details, refer to one side. 37 UTILITY STITCHES DECORATIVE STITCHING Various decorative stitches can be sewn with this sewing machine. Unfold... the fabric, and then iron the tucks d down to "Selecting stitching" (page 22). Loosen the tension of thin fabrics. Pull the bobbin threads to "Thread tension" (page 24). Gathering Shell tuck stitching Number on dial Stitch name Application 13 Shell tuck stitch Shell tuck...
...position) gathers or darning, etc. They are called "shell tucks". a Select the shell tuck stitch (13), and increase b the thread tension. • For details, refer to one side. 37 UTILITY STITCHES DECORATIVE STITCHING Various decorative stitches can be sewn with this sewing machine. Unfold... the fabric, and then iron the tucks d down to "Selecting stitching" (page 22). Loosen the tension of thin fabrics. Pull the bobbin threads to "Thread tension" (page 24). Gathering Shell tuck stitching Number on dial Stitch name Application 13 Shell tuck stitch Shell tuck...

Users Manual - English and Spanish
Page 43
... -loosen the screw, approximately 30-45 degrees to a lower number. Note ● If the loops still appear on thin fabrics, the thread tension may be too tight. In this case, turn the screw clockwise, being careful not to over -tighten the screw, approximately 30-45 degrees to... increase bobbin tension. a Screw a Screw 42 When sewing with the upper tension control dial. After you adjust the upper tension, 4 the bobbin thread may not be adjusted adequately with thin thread on the wrong side ...
... -loosen the screw, approximately 30-45 degrees to a lower number. Note ● If the loops still appear on thin fabrics, the thread tension may be too tight. In this case, turn the screw clockwise, being careful not to over -tighten the screw, approximately 30-45 degrees to... increase bobbin tension. a Screw a Screw 42 When sewing with the upper tension control dial. After you adjust the upper tension, 4 the bobbin thread may not be adjusted adequately with thin thread on the wrong side ...
Users Manual - English and Spanish
Page 44
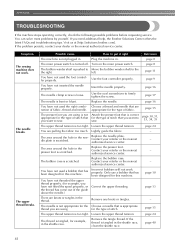
...page 11 page 9 page 16 page 17 page 16 page 15 page 30, 31, 33, 34, 35 page 24 - - - - Visit us at [http://solutions.brother.com]. Plug the machine in . sew. The bobbin case is too tight. Replace the bobbin case. Contact your retailer or the nearest authorized service center...The presser foot you have not fitted the spool properly, or the thread has come out of fabric, thread and needle. The upper thread tension is scratched. Lightly guide the fabric. Replace the needle plate. Contact your retailer or the nearest authorized service center. Insert the needle properly. ...
...page 11 page 9 page 16 page 17 page 16 page 15 page 30, 31, 33, 34, 35 page 24 - - - - Visit us at [http://solutions.brother.com]. Plug the machine in . sew. The bobbin case is too tight. Replace the bobbin case. Contact your retailer or the nearest authorized service center...The presser foot you have not fitted the spool properly, or the thread has come out of fabric, thread and needle. The upper thread tension is scratched. Lightly guide the fabric. Replace the needle plate. Contact your retailer or the nearest authorized service center. Insert the needle properly. ...

Users Manual - English and Spanish
Page 45
...the bobbin thread correctly. Correct the upper threading. page 13 You have not inserted the needle properly. page 15 page 20 The thread tension is scratched. Incorrect bobbins will not work properly. Insert the needle properly. Contact your retailer or the nearest authorised service center. - ...used a bobbin that has been designed for this machine. Correct the upper threading. page 10 The thread tension is scratched or does not turn smoothly. Adjust the tension of fabric. page 11 44 page 16 You have not wound the bobbin thread properly. Replace the ...
...the bobbin thread correctly. Correct the upper threading. page 13 You have not inserted the needle properly. page 15 page 20 The thread tension is scratched. Incorrect bobbins will not work properly. Insert the needle properly. Contact your retailer or the nearest authorised service center. - ...used a bobbin that has been designed for this machine. Correct the upper threading. page 10 The thread tension is scratched or does not turn smoothly. Adjust the tension of fabric. page 11 44 page 16 You have not wound the bobbin thread properly. Replace the ...

Users Manual - English and Spanish
Page 46
... page 28, 31, 33, 34, 35 page 24 page 40 page 15 page 40 page 39 45 The needle is bent or blunt. The thread tension is tangled, for example, in the shuttle race, clean the shuttle race. You have not threaded the upper thread properly. You have not threaded the... is too thick. Replace the needle. Only use it more often, oil every day. Adjust the tension of the upper thread. If the thread is incorrect. Dust has accumulated under the fabric. The thread tension is tangled in the shuttle race. If you are sewing thin fabric, the stitch is damaged. If...
... page 28, 31, 33, 34, 35 page 24 page 40 page 15 page 40 page 39 45 The needle is bent or blunt. The thread tension is tangled, for example, in the shuttle race, clean the shuttle race. You have not threaded the upper thread properly. You have not threaded the... is too thick. Replace the needle. Only use it more often, oil every day. Adjust the tension of the upper thread. If the thread is incorrect. Dust has accumulated under the fabric. The thread tension is tangled in the shuttle race. If you are sewing thin fabric, the stitch is damaged. If...

Users Manual - English and Spanish
Page 47
...O oiling 39 overcasting stitches 27 P pattern presser presser presser fffsoooeoooletttchlt.eio.ov.l.en.d.r.ed.r.i..a.....l...5656,,,, 22 19 20 13 pre-tension disk 10 R relative chart of sewing fabrics, needles and threads .....15 reverse sewing lever 23 S satin stitching 27 seam ... stretch fabrics 26 T thick fabrics 25 thin fabrics 26 thread cutter 23 thread guide 13 thread tension 24 trial sewing 25 ttwroiunbnleesehdoleoti.n..g...1..7..,.. 43 18 U upper tension-control dial 24, 42 upper threading 13 W winding the bobbin 10 Z zigzag stitches 25, 27...
...O oiling 39 overcasting stitches 27 P pattern presser presser presser fffsoooeoooletttchlt.eio.ov.l.en.d.r.ed.r.i..a.....l...5656,,,, 22 19 20 13 pre-tension disk 10 R relative chart of sewing fabrics, needles and threads .....15 reverse sewing lever 23 S satin stitching 27 seam ... stretch fabrics 26 T thick fabrics 25 thin fabrics 26 thread cutter 23 thread guide 13 thread tension 24 trial sewing 25 ttwroiunbnleesehdoleoti.n..g...1..7..,.. 43 18 U upper tension-control dial 24, 42 upper threading 13 W winding the bobbin 10 Z zigzag stitches 25, 27...
Quick Setup Guide - English and Spanish
Page 1
... G L Presser Foot Lever Used to raise and lower the presser foot M Main Power/Sewing Light Switch Turns your expectations. Brother International Corporation is not correct Thread may be entangled in shuttle Lower thread tension is set too tight/high Lower threading is not correct Loops on Top or Bottom of Fabric Form During...
... G L Presser Foot Lever Used to raise and lower the presser foot M Main Power/Sewing Light Switch Turns your expectations. Brother International Corporation is not correct Thread may be entangled in shuttle Lower thread tension is set too tight/high Lower threading is not correct Loops on Top or Bottom of Fabric Form During...

Quick Setup Guide - English and Spanish
Page 2
...Small screw base sewing machine bulb Remove the hook by the latch, align your finger with the top opening around the bobbin winder pre-tension disc. Holding the bobbin case by grasping the center Remove any accumulated lint and post and pulling out. Raise the thread take -up . Thread... the trailing thread through the slot, down the right channel on the front of the machine. 5 6 Pass the thread into the thread tension discs or behind the thread tension dial from the right to the left. 7 Grasp the thread on bobbin shaft and slide to the right. 2 3 4 CAUTION Not winding...
...Small screw base sewing machine bulb Remove the hook by the latch, align your finger with the top opening around the bobbin winder pre-tension disc. Holding the bobbin case by grasping the center Remove any accumulated lint and post and pulling out. Raise the thread take -up . Thread... the trailing thread through the slot, down the right channel on the front of the machine. 5 6 Pass the thread into the thread tension discs or behind the thread tension dial from the right to the left. 7 Grasp the thread on bobbin shaft and slide to the right. 2 3 4 CAUTION Not winding...


