Users Manual - English and Spanish
Page 1
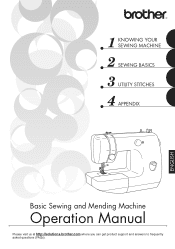
KNOWING YOUR SEWING MACHINE SEWING BASICS UTILITY STITCHES APPENDIX Basic Sewing and Mending Machine Operation Manual Please visit us at http://solutions.brother.com where you can get product support and answers to frequently asked questions (FAQs). ENGLISH
KNOWING YOUR SEWING MACHINE SEWING BASICS UTILITY STITCHES APPENDIX Basic Sewing and Mending Machine Operation Manual Please visit us at http://solutions.brother.com where you can get product support and answers to frequently asked questions (FAQs). ENGLISH
Users Manual - English and Spanish
Page 2
...12. Special care is intended for its intended use a bent needle. 13. The wrong plate can cause the needle to persons: 1. This sewing machine is used by the manufacturer as threading the needle, changing the needle, threading the bobbin, or changing the presser foot. 15. Always unplug.... It may deflect the needle causing it has been dropped or damaged, or dropped into any object into water. Always unplug the sewing machine from the electrical outlet when removing covers, lubricating, or when making any other user service adjustments mentioned in the needle area, such ...
...12. Special care is intended for its intended use a bent needle. 13. The wrong plate can cause the needle to persons: 1. This sewing machine is used by the manufacturer as threading the needle, changing the needle, threading the bobbin, or changing the presser foot. 15. Always unplug.... It may deflect the needle causing it has been dropped or damaged, or dropped into any object into water. Always unplug the sewing machine from the electrical outlet when removing covers, lubricating, or when making any other user service adjustments mentioned in the needle area, such ...
Users Manual - English and Spanish
Page 3
...anything on the needle while sewing. When storing this product are subject to keep your eye on the foot controller. 4. Benzene, thinner, and scouring powders can damage the case and machine, and should contact your local authorized Brother dealer. Do not drop or hit the machine. 4. FOR USERS IN ... site at www.brother.com The contents of this manual and specifications of the operation manual to obtain the correct lead. carrying the mark, rating as marked on plug. • Always replace the fuse cover. FOR USERS IN AUSTRALIA AND NEW ZEALAND This sewing machine is not intended...
...anything on the needle while sewing. When storing this product are subject to keep your eye on the foot controller. 4. Benzene, thinner, and scouring powders can damage the case and machine, and should contact your local authorized Brother dealer. Do not drop or hit the machine. 4. FOR USERS IN ... site at www.brother.com The contents of this manual and specifications of the operation manual to obtain the correct lead. carrying the mark, rating as marked on plug. • Always replace the fuse cover. FOR USERS IN AUSTRALIA AND NEW ZEALAND This sewing machine is not intended...
Users Manual - English and Spanish
Page 4
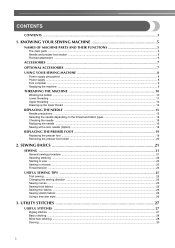
...SEWING BASICS 21 SEWING ...21 General sewing procedure ...21 Selecting stitching ...22 Starting to sew ...23 Sewing in reverse ...23 Thread tension ...24 USEFUL SEWING TIPS ...25 Trial sewing ...25 Changing the sewing direction ...25 Sewing curves ...25 Sewing thick fabrics ...25 Sewing thin fabrics ...26 Sewing stretch fabrics ...26 Using a free-arm style ...26 3. CONTENTS CONTENTS ...3 1. KNOWING YOUR SEWING MACHINE 5 NAMES OF MACHINE...USING YOUR SEWING MACHINE 8 Power supply precautions ...8 Power supply ...8 Foot controller ...9 Steadying the machine ...9 THREADING THE MACHINE 10 ...
...SEWING BASICS 21 SEWING ...21 General sewing procedure ...21 Selecting stitching ...22 Starting to sew ...23 Sewing in reverse ...23 Thread tension ...24 USEFUL SEWING TIPS ...25 Trial sewing ...25 Changing the sewing direction ...25 Sewing curves ...25 Sewing thick fabrics ...25 Sewing thin fabrics ...26 Sewing stretch fabrics ...26 Using a free-arm style ...26 3. CONTENTS CONTENTS ...3 1. KNOWING YOUR SEWING MACHINE 5 NAMES OF MACHINE...USING YOUR SEWING MACHINE 8 Power supply precautions ...8 Power supply ...8 Foot controller ...9 Steadying the machine ...9 THREADING THE MACHINE 10 ...
Users Manual - English and Spanish
Page 6
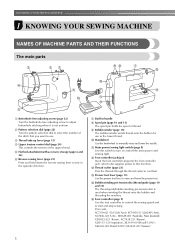
... thread onto the bobbin and threading the machine. e Flat bed attachment with accessory storage (page 6 and 26) f Reverse sewing lever (page 23) Press and hold down the reverse sewing lever to turn on and off the main power and sewing light. KNOWING YOUR SEWING MACHINE 1 KNOWING YOUR SEWING MACHINE NAMES OF MACHINE PARTS AND THEIR FUNCTIONS The main parts...
... thread onto the bobbin and threading the machine. e Flat bed attachment with accessory storage (page 6 and 26) f Reverse sewing lever (page 23) Press and hold down the reverse sewing lever to turn on and off the main power and sewing light. KNOWING YOUR SEWING MACHINE 1 KNOWING YOUR SEWING MACHINE NAMES OF MACHINE PARTS AND THEIR FUNCTIONS The main parts...
Users Manual - English and Spanish
Page 8
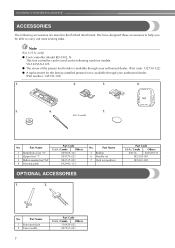
... U.S.A. / Canada Others X59369-321 X59370-021 XE2137-001 XA3442-121 No. Part Name 5 Bobbin 6 Needle set 7 Oval screwdriver OPTIONAL ACCESSORIES 1. 2. KNOWING YOUR SEWING MACHINE ACCESSORIES The following machine models: VX-1435/LX-3125. ● The screw of the presser foot holder is available through your authorized dealer. (Part code: 132730-122) ● A replacement for the... 130920-021 X57521-021 Part Code U.S.A. / Canada Others SA156 XA5539-151 XE5328-001 XE5241-001 No. We have designed these accessories to carry out most sewing tasks.
... U.S.A. / Canada Others X59369-321 X59370-021 XE2137-001 XA3442-121 No. Part Name 5 Bobbin 6 Needle set 7 Oval screwdriver OPTIONAL ACCESSORIES 1. 2. KNOWING YOUR SEWING MACHINE ACCESSORIES The following machine models: VX-1435/LX-3125. ● The screw of the presser foot holder is available through your authorized dealer. (Part code: 132730-122) ● A replacement for the... 130920-021 X57521-021 Part Code U.S.A. / Canada Others SA156 XA5539-151 XE5328-001 XE5241-001 No. We have designed these accessories to carry out most sewing tasks.
Users Manual - English and Spanish
Page 9
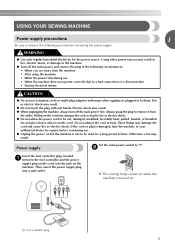
...plug with many other appliances plugged in fire, electric shock, or damage to be used for the power source. X The sewing lamp comes on when the machine is turned on the cord. Fire or electric shock may damage the cord, or lead to fire or electric shock. &#...the cord or plug is not to observe the following circumstances: • When you are away from the outlet. a Foot controller plug 8 USING YOUR SEWING MACHINE Power supply precautions 1 Be sure to be cut, damaged, modified, forcefully bent, pulled, twisted, or bundled. WARNING ● Use only regular household electricity...
...plug with many other appliances plugged in fire, electric shock, or damage to be used for the power source. X The sewing lamp comes on when the machine is turned on the cord. Fire or electric shock may damage the cord, or lead to fire or electric shock. &#...the cord or plug is not to observe the following circumstances: • When you are away from the outlet. a Foot controller plug 8 USING YOUR SEWING MACHINE Power supply precautions 1 Be sure to be cut, damaged, modified, forcefully bent, pulled, twisted, or bundled. WARNING ● Use only regular household electricity...
Users Manual - English and Spanish
Page 10
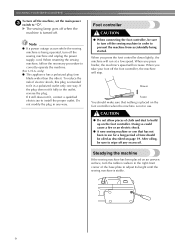
... risk of electric shock, this plug is not in the right-front corner of the base plate to prevent the machine from accidentally being operated, turn off the sewing machine and unplug the power supply cord. CAUTION ● Do not allow pieces of time should make sure that has...a long period of cloth and dust to install the proper outlet. Doing so could cause a fire or an electric shock. ● A new sewing machine or one blade wider than the other). Foot controller CAUTION ● When connecting the foot controller, be oiled as described on the foot controller. ...
... risk of electric shock, this plug is not in the right-front corner of the base plate to prevent the machine from accidentally being operated, turn off the sewing machine and unplug the power supply cord. CAUTION ● Do not allow pieces of time should make sure that has...a long period of cloth and dust to install the proper outlet. Doing so could cause a fire or an electric shock. ● A new sewing machine or one blade wider than the other). Foot controller CAUTION ● When connecting the foot controller, be oiled as described on the foot controller. ...
Users Manual - English and Spanish
Page 11
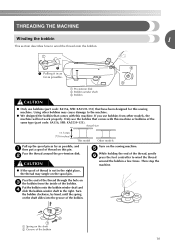
...not work properly. a Spring on c the bobbin from other bobbins may tangle on the sewing machine. a Pre-tension disk b Bobbin winder shaft c Bobbin CAUTION ● Only use bobbins... shaft b Groove of the bobbin 10 Turn the bobbin clockwise, by hand, until the spring on this sewing machine. Pass the thread around the bobbin a few times. Actual size 11.5 mm (7/16 inches) This model... right place, the thread may cause damage to the right. If you use the bobbin that comes with this machine. b CAUTION ● If the spool of thread is not in as far as possible, and a then ...
...not work properly. a Spring on c the bobbin from other bobbins may tangle on the sewing machine. a Pre-tension disk b Bobbin winder shaft c Bobbin CAUTION ● Only use bobbins... shaft b Groove of the bobbin 10 Turn the bobbin clockwise, by hand, until the spring on this sewing machine. Pass the thread around the bobbin a few times. Actual size 11.5 mm (7/16 inches) This model... right place, the thread may cause damage to the right. If you use the bobbin that comes with this machine. b CAUTION ● If the spool of thread is not in as far as possible, and a then ...

Users Manual - English and Spanish
Page 12
...b Wound poorly 11 Raise the needle to break. Cut the thread, slide the bobbin winder shaft j to start. Memo ● When the sewing machine is started or the handwheel is not a malfunction. ● The needle bar does not move when you do not cut the thread completely, and...foot controller to the left and remove the bobbin. this sewing machine. CAUTION ● Winding the bobbin improperly may tangle around the bobbin, the machine will not operate correctly. If you slide the bobbin winding shaft to sew, you follow the instructions carefully. If bobbins from other ...
...b Wound poorly 11 Raise the needle to break. Cut the thread, slide the bobbin winder shaft j to start. Memo ● When the sewing machine is started or the handwheel is not a malfunction. ● The needle bar does not move when you do not cut the thread completely, and...foot controller to the left and remove the bobbin. this sewing machine. CAUTION ● Winding the bobbin improperly may tangle around the bobbin, the machine will not operate correctly. If you slide the bobbin winding shaft to sew, you follow the instructions carefully. If bobbins from other ...
Users Manual - English and Spanish
Page 14
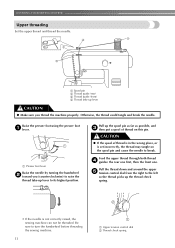
...in the wrong place, or is not correctly raised, the sewing machine can not be threaded. Pull up lever CAUTION ● Make sure you thread the machine properly. Otherwise, the thread could tangle and break the needle. KNOWING YOUR SEWING MACHINE Upper threading Set the upper thread and thread the needle.... thread on the spool pin and cause the needle to the left so the thread picks up lever to turn the handwheel before threading the sewing machine. 13 a Upper tension control dial b Thread check spring Be sure to its highest position. Raise the presser foot using the presser foot a...
...in the wrong place, or is not correctly raised, the sewing machine can not be threaded. Pull up lever CAUTION ● Make sure you thread the machine properly. Otherwise, the thread could tangle and break the needle. KNOWING YOUR SEWING MACHINE Upper threading Set the upper thread and thread the needle.... thread on the spool pin and cause the needle to the left so the thread picks up lever to turn the handwheel before threading the sewing machine. 13 a Upper tension control dial b Thread check spring Be sure to its highest position. Raise the presser foot using the presser foot a...
Users Manual - English and Spanish
Page 16
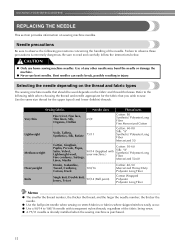
... to the following precautions concerning the handling of any other needle may bend the needle or damage the machine. ● Never use home sewing machine needles. Sewing fabrics Needle sizes Thread sizes Very thin Fine tricot, Fine lace, Thin linen, Silk, 65/9 Organza, Chiffon ...14 (Supplied with transparent nylon threads, regardless of the fabric being sewn. ● A 75/11 needle is already installed when the sewing machine is extremely dangerous. Bent needles can easily break, possibly resulting in injury. Refer to observe these precautions is purchased. 15 Selecting the...
... to the following precautions concerning the handling of any other needle may bend the needle or damage the machine. ● Never use home sewing machine needles. Sewing fabrics Needle sizes Thread sizes Very thin Fine tricot, Fine lace, Thin linen, Silk, 65/9 Organza, Chiffon ...14 (Supplied with transparent nylon threads, regardless of the fabric being sewn. ● A 75/11 needle is already installed when the sewing machine is extremely dangerous. Bent needles can easily break, possibly resulting in injury. Refer to observe these precautions is purchased. 15 Selecting the...
Users Manual - English and Spanish
Page 17
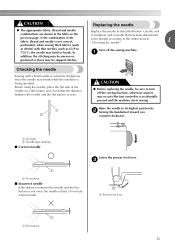
... the needle, be sure to turn off the sewing machine. Lower the presser foot lever. In addition, the stitching may be uneven or puckered or there may occur if the foot controller is accidentally pressed and the machine starts sewing. Use the oval screwdriver and a needle that... that has been determined to be straight according to the instructions in "Checking the needle" . 1 Turn off the sewing machine, otherwise injuries may be skipped stitches. Checking the needle Sewing with thin needles (such as described below. Do not use a bent needle. c a Presser foot lever 1 a...
... the needle, be sure to turn off the sewing machine. Lower the presser foot lever. In addition, the stitching may be uneven or puckered or there may occur if the foot controller is accidentally pressed and the machine starts sewing. Use the oval screwdriver and a needle that... that has been determined to be straight according to the instructions in "Checking the needle" . 1 Turn off the sewing machine, otherwise injuries may be skipped stitches. Checking the needle Sewing with thin needles (such as described below. Do not use a bent needle. c a Presser foot lever 1 a...
Users Manual - English and Spanish
Page 18
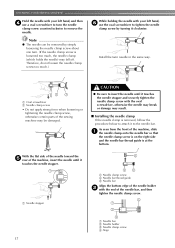
... break or damage may be removed by turning it to the needle bar. With the flat side of the needle toward the e rear of the sewing machine may result. ■ Installing the needle clamp If the needle clamp is at the bottom. Install the twin needle in the same way. a Needle...clamp screw is on the right side and the needle bar thread guide is removed, follow the procedure below to attach it clockwise. KNOWING YOUR SEWING MACHINE Hold the needle with your left hand, and then d use the oval screwdriver to tighten the needle clamp screw by simply loosening the needle clamp...
... break or damage may be removed by turning it to the needle bar. With the flat side of the needle toward the e rear of the sewing machine may result. ■ Installing the needle clamp If the needle clamp is at the bottom. Install the twin needle in the same way. a Needle...clamp screw is on the right side and the needle bar thread guide is removed, follow the procedure below to attach it clockwise. KNOWING YOUR SEWING MACHINE Hold the needle with your left hand, and then d use the oval screwdriver to tighten the needle clamp screw by simply loosening the needle clamp...
Users Manual - English and Spanish
Page 20
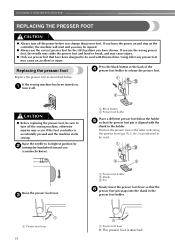
...sure to be injured. ● Always use the correct presser foot for the stitch pattern you have been designed to turn off the sewing machine, otherwise injuries may be used with the shank in the presser foot holder. a Black button b Presser foot holder Place a different ...presser foot below . KNOWING YOUR SEWING MACHINE REPLACING THE PRESSER FOOT CAUTION ● Always turn off . CAUTION ● Before replacing the presser foot, be read. Replacing the presser...
...sure to be injured. ● Always use the correct presser foot for the stitch pattern you have been designed to turn off the sewing machine, otherwise injuries may be used with the shank in the presser foot holder. a Black button b Presser foot holder Place a different ...presser foot below . KNOWING YOUR SEWING MACHINE REPLACING THE PRESSER FOOT CAUTION ● Always turn off . CAUTION ● Before replacing the presser foot, be read. Replacing the presser...
Users Manual - English and Spanish
Page 21
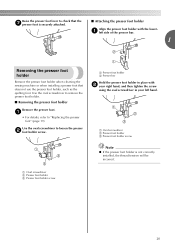
... using the oval screwdriver in your left side of the presser bar. 1 Removing the presser foot holder Remove the presser foot holder when cleaning the sewing machine or when installing a presser foot that the g presser foot is not correctly installed, the thread tension will be incorrect. a • For details, refer to "Replacing...
... using the oval screwdriver in your left side of the presser bar. 1 Removing the presser foot holder Remove the presser foot holder when cleaning the sewing machine or when installing a presser foot that the g presser foot is not correctly installed, the thread tension will be incorrect. a • For details, refer to "Replacing...
Users Manual - English and Spanish
Page 22
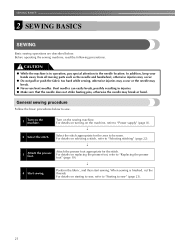
... foot, refer to "Replacing the presser foot" (page 19). ↓ 4 Start sewing. For details on the sewing machine. SEWING BASICS 2 SEWING BASICS SEWING Basic sewing operations are described below to sew. 1 Turn on the machine, refer to "Power supply" (page 8). ↓ 2 Select the stitch. For details on starting to sew, refer to "Starting to "Selecting stitching" (page 22). ↓ 3 Attach...
... foot, refer to "Replacing the presser foot" (page 19). ↓ 4 Start sewing. For details on the sewing machine. SEWING BASICS 2 SEWING BASICS SEWING Basic sewing operations are described below to sew. 1 Turn on the machine, refer to "Power supply" (page 8). ↓ 2 Select the stitch. For details on starting to sew, refer to "Starting to "Selecting stitching" (page 22). ↓ 3 Attach...
Users Manual - English and Spanish
Page 24
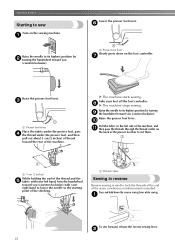
...you (counterclockwise). h X The machine stops sewing. Press and hold down on the foot controller. a 5 cm (2 inches) While holding the end of the thread and the e fabric with your left side of the machine, and k then pass the threads through the thread cutter on the sewing machine. a Presser foot lever Slowly... press down the reverse sewing lever while sewing. Raise the needle to cut them. c a Presser foot lever Place ...
...you (counterclockwise). h X The machine stops sewing. Press and hold down on the foot controller. a 5 cm (2 inches) While holding the end of the thread and the e fabric with your left side of the machine, and k then pass the threads through the thread cutter on the sewing machine. a Presser foot lever Slowly... press down the reverse sewing lever while sewing. Raise the needle to cut them. c a Presser foot lever Place ...

Users Manual - English and Spanish
Page 26
... of layers of fabric and stitching being sewn, the desired results may bend or break. Changing the sewing direction When the stitching reaches a corner, stop the a sewing machine. If the needle was raised, lower the needle by turning the handwheel toward you (counterclockwise). Trial... sewing A trial piece of fabric should be used for your sewing projects are the same as a pivot. Sewing thick fabrics ■ If the fabric ...
... of layers of fabric and stitching being sewn, the desired results may bend or break. Changing the sewing direction When the stitching reaches a corner, stop the a sewing machine. If the needle was raised, lower the needle by turning the handwheel toward you (counterclockwise). Trial... sewing A trial piece of fabric should be used for your sewing projects are the same as a pivot. Sewing thick fabrics ■ If the fabric ...

Users Manual - English and Spanish
Page 34
..., and then select the appropriate zigzag stitch (2, 3 or 4) according to be sure that the needle goes into the two holes of the sewing machine, and then sew them in the a button to the following table. Then, slide the button so that the needle does not touch the button, otherwise the...can be attached. Use scissors to the wrong side of 15 cm (6 inches). Buttons with 2 or with the sewing machine. Distance between the holes in the same way. 33 f • After sewing for about 10 seconds at the end of the h stitching to cut the upper and lower threads, leaving a length...
..., and then select the appropriate zigzag stitch (2, 3 or 4) according to be sure that the needle goes into the two holes of the sewing machine, and then sew them in the a button to the following table. Then, slide the button so that the needle does not touch the button, otherwise the...can be attached. Use scissors to the wrong side of 15 cm (6 inches). Buttons with 2 or with the sewing machine. Distance between the holes in the same way. 33 f • After sewing for about 10 seconds at the end of the h stitching to cut the upper and lower threads, leaving a length...


