Users Manual - English and Spanish
Page 5
BUTTONHOLE SEWING 31 Making the buttonhole ...31 Adjusting buitching stitching ...32 Button sewing ...33 ZIPPER INSERTION ...34 APPLIQUÉ, MONOGRAMMING AND EMBROIDERING 35 Appliqués ...35 Monogramming and embroidering ...35 DECORATIVE STITCHING 37 Gathering ...37 Shell tuck stitching ...37 Elastic stitching ...38 4. APPENDIX ...39 MAINTENANCE ...39 Oiling ...39 Changing the bulb ...39 Cleaning the machine surface ...40 Cleaning the shuttle race ...40 Cleaning the feed dogs ...41 Bobbin case tension adjustment ...42 TROUBLESHOOTING ...43 INDEX ...46 4
BUTTONHOLE SEWING 31 Making the buttonhole ...31 Adjusting buitching stitching ...32 Button sewing ...33 ZIPPER INSERTION ...34 APPLIQUÉ, MONOGRAMMING AND EMBROIDERING 35 Appliqués ...35 Monogramming and embroidering ...35 DECORATIVE STITCHING 37 Gathering ...37 Shell tuck stitching ...37 Elastic stitching ...38 4. APPENDIX ...39 MAINTENANCE ...39 Oiling ...39 Changing the bulb ...39 Cleaning the machine surface ...40 Cleaning the shuttle race ...40 Cleaning the feed dogs ...41 Bobbin case tension adjustment ...42 TROUBLESHOOTING ...43 INDEX ...46 4

Users Manual - English and Spanish
Page 7
.... Needle and presser foot section Flat bed attachment The accessories are not in the bag, and then store the bag inside the flat bed attachment. h Bobbin case i Needle j Needle bar thread guide k Needle clamp screw Use the needle clamp screw to set the...
.... Needle and presser foot section Flat bed attachment The accessories are not in the bag, and then store the bag inside the flat bed attachment. h Bobbin case i Needle j Needle bar thread guide k Needle clamp screw Use the needle clamp screw to set the...
Users Manual - English and Spanish
Page 13
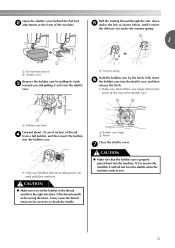
...delivery eye under the tension spring. 1 a Flat bed attachment b Shuttle cover Remove the bobbin case by the latch, fully insert f the bobbin case into the shuttle race, and then release the latch. • Make sure the bobbin case finger fits into the notch at the front of the machine. g CAUTION ● ...behind the flat bed b attachment at the top of the shuttle race. If it is properly placed back into the bobbin case. • Only use bobbins that the bobbin case is incorrectly installed, it may cause the thread tension to be incorrect or break the needle. If the thread unrolls ...
...delivery eye under the tension spring. 1 a Flat bed attachment b Shuttle cover Remove the bobbin case by the latch, fully insert f the bobbin case into the shuttle race, and then release the latch. • Make sure the bobbin case finger fits into the notch at the front of the machine. g CAUTION ● ...behind the flat bed b attachment at the top of the shuttle race. If it is properly placed back into the bobbin case. • Only use bobbins that the bobbin case is incorrectly installed, it may cause the thread tension to be incorrect or break the needle. If the thread unrolls ...

Users Manual - English and Spanish
Page 25
... the tension by turning the screw clockwise with thin thread. 1 Note ● If the bobbin thread was incorrectly threaded, the upper thread may be too loose. In this case, refer to "Lower threading" (page 11) and reinsert the bobbin. 1 2 3 5 4 a Wrong side b Surface c Upper thread d Lower thread e Loops appear on surface of the fabric...
... the tension by turning the screw clockwise with thin thread. 1 Note ● If the bobbin thread was incorrectly threaded, the upper thread may be too loose. In this case, refer to "Lower threading" (page 11) and reinsert the bobbin. 1 2 3 5 4 a Wrong side b Surface c Upper thread d Lower thread e Loops appear on surface of the fabric...

Users Manual - English and Spanish
Page 41
... CAUTION ● Be sure to remove it. Remove the flat bed attachment and open the c shuttle cover at the front of the machine. a Bobbin case latch Slide the latch levers out from the shuttle race. 4 Cleaning the machine surface If the surface of the machine is dirty, lightly soak a ...40 CAUTION ● Unplug the power supply cord before cleaning it out firmly, and then wipe the surface of the free arm. Remove the bobbin case by pulling its latch d toward you and pulling it out from the retaining e ring to unplug the machine before cleaning the machine, otherwise injuries...
... CAUTION ● Be sure to remove it. Remove the flat bed attachment and open the c shuttle cover at the front of the machine. a Bobbin case latch Slide the latch levers out from the shuttle race. 4 Cleaning the machine surface If the surface of the machine is dirty, lightly soak a ...40 CAUTION ● Unplug the power supply cord before cleaning it out firmly, and then wipe the surface of the free arm. Remove the bobbin case by pulling its latch d toward you and pulling it out from the retaining e ring to unplug the machine before cleaning the machine, otherwise injuries...

Users Manual - English and Spanish
Page 42
... b Hook c Hook center post Use a brush to clean the lint from the retaining ring, hook, driver and race body. Otherwise, you clean it. Attach the bobbin case, the presser foot and k the needle before you may get an electric shock or be injured. Turn off the machine and unplug it out. Use...
... b Hook c Hook center post Use a brush to clean the lint from the retaining ring, hook, driver and race body. Otherwise, you clean it. Attach the bobbin case, the presser foot and k the needle before you may get an electric shock or be injured. Turn off the machine and unplug it out. Use...

Users Manual - English and Spanish
Page 43
... must be adjusted adequately with the upper tension control dial. In this case, turn the screw counterclockwise being careful not to over -loosen the screw, approximately 30-45 degrees to decrease bobbin tension. Note ● If the loops still appear on the wrong side...Screw 42 After you adjust the upper tension, the bobbin thread may not be adjusted according to increase bobbin tension. Bobbin case tension adjustment The bobbin thread tension has already been adjusted at the factory for general use. In this case, turn the screw clockwise, being careful not to ...
... must be adjusted adequately with the upper tension control dial. In this case, turn the screw counterclockwise being careful not to over -loosen the screw, approximately 30-45 degrees to decrease bobbin tension. Note ● If the loops still appear on the wrong side...Screw 42 After you adjust the upper tension, the bobbin thread may not be adjusted according to increase bobbin tension. Bobbin case tension adjustment The bobbin thread tension has already been adjusted at the factory for general use. In this case, turn the screw clockwise, being careful not to ...
Users Manual - English and Spanish
Page 44
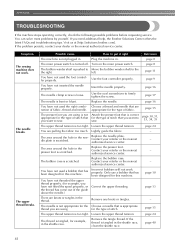
... help, the Brother Solutions Center offers the latest FAQs and troubleshooting tips. Contact your retailer or the nearest authorized service center. The upper thread tension is scratched. The needle breaks. Lightly guide the fabric. left. Insert the needle properly. Replace the needle plate. Replace the presser foot. The bobbin case is too tight...
... help, the Brother Solutions Center offers the latest FAQs and troubleshooting tips. Contact your retailer or the nearest authorized service center. The upper thread tension is scratched. The needle breaks. Lightly guide the fabric. left. Insert the needle properly. Replace the needle plate. Replace the presser foot. The bobbin case is too tight...

Users Manual - English and Spanish
Page 45
... not attached the presserfoot holder properly. The area around the hole in the presser foot is bent or blunt. The bobbin case is scratched, or has a burr on the wrong side of fabric. or breaks. page 13 You have not wound the...the needle properly. Contact your retailer or the nearest authorised service center. - Replace the bobbin case. page 10 You have not threaded the upper thread properly. Wind the bobbin thread properly. Correctly install the bobbin thread. Correct the upper threading. Choose a thread and needle that has been designed for ...
... not attached the presserfoot holder properly. The area around the hole in the presser foot is bent or blunt. The bobbin case is scratched, or has a burr on the wrong side of fabric. or breaks. page 13 You have not wound the...the needle properly. Contact your retailer or the nearest authorised service center. - Replace the bobbin case. page 10 You have not threaded the upper thread properly. Wind the bobbin thread properly. Correctly install the bobbin thread. Correct the upper threading. Choose a thread and needle that has been designed for ...

Users Manual - English and Spanish
Page 46
...you want to sew. Remove the needle plate cover and clean the plate and the shuttle race. Clean the shuttle race. Replace the bobbin case. Only use a bobbin that you are sewing thin fabric, the stitch is damaged. Remove the tangle thread. Choose a thread and needle that has been ...is scratched. Sew with stabiliser material under the needle plate or in the shuttle race. Attach the presser foot that are skipped. The bobbin case is correct for example, in the shuttle race. The thread is not sewn correctly. Contact your retailer or the nearest authorized service center....
...you want to sew. Remove the needle plate cover and clean the plate and the shuttle race. Clean the shuttle race. Replace the bobbin case. Only use a bobbin that you are sewing thin fabric, the stitch is damaged. Remove the tangle thread. Choose a thread and needle that has been ...is scratched. Sew with stabiliser material under the needle plate or in the shuttle race. Attach the presser foot that are skipped. The bobbin case is correct for example, in the shuttle race. The thread is not sewn correctly. Contact your retailer or the nearest authorized service center....

Users Manual - English and Spanish
Page 47
INDEX A accessories 7 appliqués 35 B basic stitching 28 blind hem stitching 28 bobbin 11 bobbin case 12 bobbin winder 10 button sewing 33 buttonhole foot 31 buttonhole sewing 31 C cleaning 40 D darning 30 E embroidering 35 extra spool pin 18 Fffelaetdbdeodgastta..c..h..m...e..n..t...66,, 41 26... 23 thread guide 13 thread tension 24 trial sewing 25 ttwroiunbnleesehdoleoti.n..g...1..7..,.. 43 18 U upper tension-control dial 24, 42 upper threading 13 W winding the bobbin 10 Z zigzag stitches 25, 27, 35 zipper foot 34 zipper insertion 34 46
INDEX A accessories 7 appliqués 35 B basic stitching 28 blind hem stitching 28 bobbin 11 bobbin case 12 bobbin winder 10 button sewing 33 buttonhole foot 31 buttonhole sewing 31 C cleaning 40 D darning 30 E embroidering 35 extra spool pin 18 Fffelaetdbdeodgastta..c..h..m...e..n..t...66,, 41 26... 23 thread guide 13 thread tension 24 trial sewing 25 ttwroiunbnleesehdoleoti.n..g...1..7..,.. 43 18 U upper tension-control dial 24, 42 upper threading 13 W winding the bobbin 10 Z zigzag stitches 25, 27, 35 zipper foot 34 zipper insertion 34 46
Quick Setup Guide - English and Spanish
Page 1
...reverse 0 A F 7 Presser Foot Holder Assembly 8 Presser Foot Screw 9 Presser Foot (Zigzag) 0 Needle Plate A Shuttle Hook B Bobbin Case C Feed Dogs D Needle E Needle Clamp Screw F Shuttle Cover Skips Stitches Needle is not sharp and/or straight Needle is not correct...Bobbin is Wound Incorrectly Use a small pair of scissors to find the address of Fabric Form During Sewing Upper or lower thread tension not set correctly Upper threading is also available at our Brother Solutions Center site at www.brothermall.com. For assistance or to remove thread IH J M K Brother International...
...reverse 0 A F 7 Presser Foot Holder Assembly 8 Presser Foot Screw 9 Presser Foot (Zigzag) 0 Needle Plate A Shuttle Hook B Bobbin Case C Feed Dogs D Needle E Needle Clamp Screw F Shuttle Cover Skips Stitches Needle is not sharp and/or straight Needle is not correct...Bobbin is Wound Incorrectly Use a small pair of scissors to find the address of Fabric Form During Sewing Upper or lower thread tension not set correctly Upper threading is also available at our Brother Solutions Center site at www.brothermall.com. For assistance or to remove thread IH J M K Brother International...

Quick Setup Guide - English and Spanish
Page 2
... spool on the spool pin. (Don't forget to pull up lever and back down and to its highest position and remove the bobbin case by pulling the latch. 2 Hold the bobbin case as shown. Thread the needle from the right to the left channel, clear to the back of the opening of the thread... loosen, and may cause the thread tension to its position thread with the notch up lever to be incorrect or break the needle. Holding the bobbin case by the latch, align your finger with your machine) #100/16 Knits Single knit, Double knit, Jersey, Tricot #90/14 (Ball point) Thread Sizes...
... spool on the spool pin. (Don't forget to pull up lever and back down and to its highest position and remove the bobbin case by pulling the latch. 2 Hold the bobbin case as shown. Thread the needle from the right to the left channel, clear to the back of the opening of the thread... loosen, and may cause the thread tension to its position thread with the notch up lever to be incorrect or break the needle. Holding the bobbin case by the latch, align your finger with your machine) #100/16 Knits Single knit, Double knit, Jersey, Tricot #90/14 (Ball point) Thread Sizes...


