
Accessory Catalog
Page 11
.... It can be used with maximum stitch width. Line up the cords, and select zigzag stitch with brother sewing machines of the presser foot, and place each cord into each hole on the presser foot. 2. Attach the presser foot...;! 1. Slip a cord from satin or decorative stitches. 2. Place cord under the presser foot. 3. SA157 ABCDEFJKMN Cording Foot (7-hole) Used for embellishing 1 to 3 cords or decorative threads. SA145 ABCDEFGHJKLMNO SA144 IP Brother Embellishment Feet Cording Foot Cording Foot (5-hole) 20 Cording Foot (7-hole) Cording Foot Used for embellishing...
.... It can be used with maximum stitch width. Line up the cords, and select zigzag stitch with brother sewing machines of the presser foot, and place each cord into each hole on the presser foot. 2. Attach the presser foot...;! 1. Slip a cord from satin or decorative stitches. 2. Place cord under the presser foot. 3. SA157 ABCDEFJKMN Cording Foot (7-hole) Used for embellishing 1 to 3 cords or decorative threads. SA145 ABCDEFGHJKLMNO SA144 IP Brother Embellishment Feet Cording Foot Cording Foot (5-hole) 20 Cording Foot (7-hole) Cording Foot Used for embellishing...

Accessory Catalog
Page 12
...Place the fabric to medium weight fabrics. Metal type SA186 ABCDEFGHJKLMNO Plastic type SA147 ABCDEFGHJKLMNO Pearls and Sequins Foot Attaches threaded beads, sequins or rounded cords up the center guide mark (red) of the presser foot to 4 mm in groove of the foot. 3. Adjust the upper thread tension. ...for edge-stitching heavy fabric such as home decor. Zigzag-sew with the surface of appliqué. 2. Also used for details.) Brother Embellishment Feet Open Toe Foot 22 Pearls and Sequins Foot Metal type SA146 IP Open Toe Foot Provides better visibility in the needle area....
...Place the fabric to medium weight fabrics. Metal type SA186 ABCDEFGHJKLMNO Plastic type SA147 ABCDEFGHJKLMNO Pearls and Sequins Foot Attaches threaded beads, sequins or rounded cords up the center guide mark (red) of the presser foot to 4 mm in groove of the foot. 3. Adjust the upper thread tension. ...for edge-stitching heavy fabric such as home decor. Zigzag-sew with the surface of appliqué. 2. Also used for details.) Brother Embellishment Feet Open Toe Foot 22 Pearls and Sequins Foot Metal type SA146 IP Open Toe Foot Provides better visibility in the needle area....

Accessory Catalog
Page 13
Sew slowly for details.) Brother Embellishment Feet Pin Tuck Foot 24 Ruffler Foot Pin Tuck Foot This presser foot has 7 grooves and produces perfect pin tucks and corded pin tucks using a twin needle on the lower portion of stitch length, tuck setting and depth setting. 2. For seven grooves:... with evenly spaced tucks and gathers. Adjust the amount of tuck or gather by placing the completed row in the center position. 3. Brother Embellishment Feet 23 Bed Runner & Pillowcase Innov-is Project Book (See pages 16 and 17 for most consistent results. SA143 AFJKM Ruffler ...
Sew slowly for details.) Brother Embellishment Feet Pin Tuck Foot 24 Ruffler Foot Pin Tuck Foot This presser foot has 7 grooves and produces perfect pin tucks and corded pin tucks using a twin needle on the lower portion of stitch length, tuck setting and depth setting. 2. For seven grooves:... with evenly spaced tucks and gathers. Adjust the amount of tuck or gather by placing the completed row in the center position. 3. Brother Embellishment Feet 23 Bed Runner & Pillowcase Innov-is Project Book (See pages 16 and 17 for most consistent results. SA143 AFJKM Ruffler ...
Users Manual - English and Spanish
Page 2
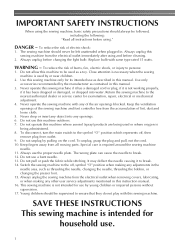
...the ventilation openings of burns, fire, electric shock, or injury to break. 12. To unplug, grasp the plug and pull, not the cord. 10. Always unplug the sewing machine from the electrical outlet when removing covers, lubricating, or when making any openings. 6. To reduce the ... can cause the needle to persons: 1. Never operate this sewing machine from outlet. 9. Use only accessories recommended by pulling on the cord. Switch the sewing machine to the nearest authorized dealer or service center for household use the proper needle plate. Return the sewing machine ...
...the ventilation openings of burns, fire, electric shock, or injury to break. 12. To unplug, grasp the plug and pull, not the cord. 10. Always unplug the sewing machine from the electrical outlet when removing covers, lubricating, or when making any openings. 6. To reduce the ... can cause the needle to persons: 1. Never operate this sewing machine from outlet. 9. Use only accessories recommended by pulling on the cord. Switch the sewing machine to the nearest authorized dealer or service center for household use the proper needle plate. Return the sewing machine ...

Users Manual - English and Spanish
Page 3
... • Maintaining the machine • Leaving the machine unattended 3. For additional product information and updates, visit our web site at www.brother.com The contents of this manual and specifications of the operation manual to BS 1362, i.e. When storing this machine, avoid direct sunlight and...Always consult the operation manual when replacing or installing any other hot objects. 2. Be sure to turn off the power switch and unplug the cord when: • Operation is completed • Replacing or removing the needle or any assemblies, the presser feet, needle, or other moving ...
... • Maintaining the machine • Leaving the machine unattended 3. For additional product information and updates, visit our web site at www.brother.com The contents of this manual and specifications of the operation manual to BS 1362, i.e. When storing this machine, avoid direct sunlight and...Always consult the operation manual when replacing or installing any other hot objects. 2. Be sure to turn off the power switch and unplug the cord when: • Operation is completed • Replacing or removing the needle or any assemblies, the presser feet, needle, or other moving ...

Users Manual - English and Spanish
Page 5
... APPLIQUÉ, MONOGRAMMING AND EMBROIDERING 34 Appliqués ...34 Monogramming and embroidering ...34 DECORATIVE STITCHING 36 Gathering ...36 Satin stitches ...36 Attaching the lace ...37 Cording ...37 4. 3.
... APPLIQUÉ, MONOGRAMMING AND EMBROIDERING 34 Appliqués ...34 Monogramming and embroidering ...34 DECORATIVE STITCHING 36 Gathering ...36 Satin stitches ...36 Attaching the lace ...37 Cording ...37 4. 3.

Users Manual - English and Spanish
Page 9
...modified, forcefully bent, pulled, twisted, or bundled. Using other appliances plugged in to them. Do not place heavy objects on the cord may damage the cord and cause fire or electric shock. Always grasp the plug to remove it from the machine • After using the machine •...or a disconnection • During electrical storms CAUTION ● Do not use . ● Unplug the power cord if the machine is turned on the cord, into a wall outlet. Do not subject the cord to "I". Otherwise a fire may result. ● Do not touch the plug with many other power sources ...
...modified, forcefully bent, pulled, twisted, or bundled. Using other appliances plugged in to them. Do not place heavy objects on the cord may damage the cord and cause fire or electric shock. Always grasp the plug to remove it from the machine • After using the machine •...or a disconnection • During electrical storms CAUTION ● Do not use . ● Unplug the power cord if the machine is turned on the cord, into a wall outlet. Do not subject the cord to "I". Otherwise a fire may result. ● Do not touch the plug with many other power sources ...

Users Manual - English and Spanish
Page 10
... fit fully in order to build up on page 38. KNOWING YOUR SEWING MACHINE To turn off the sewing machine and unplug the power supply cord.
... fit fully in order to build up on page 38. KNOWING YOUR SEWING MACHINE To turn off the sewing machine and unplug the power supply cord.

Users Manual - English and Spanish
Page 38
...by hand along the path which you wish to attach it will a just clear both sides of the cord being used. Note ● A decorative touch can be sewn. Cording Stitch width Stitch length Needle position Presser foot Needle Set according to attach the lace. 37 Lower the ...presser foot making sure the cord is c centered and sew using the Satin Stitch or a Decorative Stitch to the thickness of the cording. UTILITY STITCHES Attaching the lace Stitch width 0 Stitch length 2-4 Needle position M Presser foot...
...by hand along the path which you wish to attach it will a just clear both sides of the cord being used. Note ● A decorative touch can be sewn. Cording Stitch width Stitch length Needle position Presser foot Needle Set according to attach the lace. 37 Lower the ...presser foot making sure the cord is c centered and sew using the Satin Stitch or a Decorative Stitch to the thickness of the cording. UTILITY STITCHES Attaching the lace Stitch width 0 Stitch length 2-4 Needle position M Presser foot...

Users Manual - English and Spanish
Page 40
... the c shuttle cover at the front of the machine is dirty, lightly soak a cloth in neutral detergent, squeeze it . CAUTION ● Unplug the power supply cord before cleaning it again with a dry cloth. d Cleaning the shuttle race CAUTION ● Be sure to remove it. After cleaning it once with a wet cloth...
... the c shuttle cover at the front of the machine is dirty, lightly soak a cloth in neutral detergent, squeeze it . CAUTION ● Unplug the power supply cord before cleaning it again with a dry cloth. d Cleaning the shuttle race CAUTION ● Be sure to remove it. After cleaning it once with a wet cloth...

Users Manual - English and Spanish
Page 46
... machine and unplug it to break. APPENDIX When the thread is moved to the left into the sewing position. a CAUTION ● Unplug the power supply cord, otherwise injuries or an electric shock may bend the needle causing it . Cut the entangled thread with small scissors c above the needle plate and then...
... machine and unplug it to break. APPENDIX When the thread is moved to the left into the sewing position. a CAUTION ● Unplug the power supply cord, otherwise injuries or an electric shock may bend the needle causing it . Cut the entangled thread with small scissors c above the needle plate and then...


