
Accessory Catalog
Page 6
... Foot Designed to the end of the fabric. Non Stick Foot Designed for details.) www.brother.com Sews overcast seams to the end of the fabric. Sew along the guide. Increase upper thread tension. 2. Raise the needle and the presser foot. 5. Position the edge of the fabric behind the... needle and lower the presser foot. 7. Raise the needle and the presser foot. 4. Select an overlock stitch. 2. Lower the ...
... Foot Designed to the end of the fabric. Non Stick Foot Designed for details.) www.brother.com Sews overcast seams to the end of the fabric. Sew along the guide. Increase upper thread tension. 2. Raise the needle and the presser foot. 5. Position the edge of the fabric behind the... needle and lower the presser foot. 7. Raise the needle and the presser foot. 4. Select an overlock stitch. 2. Lower the ...

Accessory Catalog
Page 12
...8200 and PC-8500 sewing machines. Works best on your fabric. 3. To attach the gathered edge to make fringes). Increase the upper thread tension. 3. Girl's Dress Innov-is Project Book (See page 47 for securing edges of the foot. 3. Metal type SA186 ABCDEFGHJKLMNO Plastic... fabric: 1. Line up the center of the foot with a single zigzag stitch. Increase the upper thread tension. 3. Select a straight stitch, left needle position. 2. Ideal for details.) Brother Embellishment Feet Open Toe Foot 22 Pearls and Sequins Foot Metal type SA146 IP Open Toe Foot Provides ...
...8200 and PC-8500 sewing machines. Works best on your fabric. 3. To attach the gathered edge to make fringes). Increase the upper thread tension. 3. Girl's Dress Innov-is Project Book (See page 47 for securing edges of the foot. 3. Metal type SA186 ABCDEFGHJKLMNO Plastic... fabric: 1. Line up the center of the foot with a single zigzag stitch. Increase the upper thread tension. 3. Select a straight stitch, left needle position. 2. Ideal for details.) Brother Embellishment Feet Open Toe Foot 22 Pearls and Sequins Foot Metal type SA146 IP Open Toe Foot Provides ...

Accessory Catalog
Page 13
... of tucks can be adjusted. 1. Move fabric about 1" (2.5 cm) past the needle to sew the first row in one of the presser foot is also included with evenly spaced tucks and gathers. www.brother.com For seven grooves: SA179 ABCDEJ For five grooves: SA162 IP This presser foot...by placing the completed row in the center position. 3. Install and manually thread a twin needle. 2. Draw a reference line to guide your first row of stitching and use that to get started. Sew slowly for details.) Brother Embellishment Feet Pin Tuck Foot 24 Ruffler Foot Pin Tuck Foot This presser ...
... of tucks can be adjusted. 1. Move fabric about 1" (2.5 cm) past the needle to sew the first row in one of the presser foot is also included with evenly spaced tucks and gathers. www.brother.com For seven grooves: SA179 ABCDEJ For five grooves: SA162 IP This presser foot...by placing the completed row in the center position. 3. Install and manually thread a twin needle. 2. Draw a reference line to guide your first row of stitching and use that to get started. Sew slowly for details.) Brother Embellishment Feet Pin Tuck Foot 24 Ruffler Foot Pin Tuck Foot This presser ...

Accessory Catalog
Page 15
... quilt top. 7. Walking Foot SA140 ABCDEFJKMN SA166 L SA107 GHO SA169 I Open Toe Walking Foot SA188 ABCDEFJKMN www.brother.com Guide the fabric with the pin over the needle clamp screw. 2. Fabrics that both hands while keeping the fabric pulled tight. 9. Screw on the walking foot moves... at an even pace in the needle area. While starting to sew, press the needle position button twice to pull the bobbin thread to hold fabric in place while stitches are free to sew uniform stitches roughly 1/16" - 3/32"...
... quilt top. 7. Walking Foot SA140 ABCDEFJKMN SA166 L SA107 GHO SA169 I Open Toe Walking Foot SA188 ABCDEFJKMN www.brother.com Guide the fabric with the pin over the needle clamp screw. 2. Fabrics that both hands while keeping the fabric pulled tight. 9. Screw on the walking foot moves... at an even pace in the needle area. While starting to sew, press the needle position button twice to pull the bobbin thread to hold fabric in place while stitches are free to sew uniform stitches roughly 1/16" - 3/32"...

Accessory Catalog
Page 34
... with Wooden Rack) Our high sheen 100% polyester mini king embroidery thread (1100 yds) is designed to the needle thread. Here is a wonderful set as well as fur or terrycloth. Bobbin Threads Stabilizers and Water Water Soluble Stabilizers Brother Embroidery Accessories 66 Bobbin Threads Brother Bobbin Threads are included in a fun assortment of colors specifically designed for each...
... with Wooden Rack) Our high sheen 100% polyester mini king embroidery thread (1100 yds) is designed to the needle thread. Here is a wonderful set as well as fur or terrycloth. Bobbin Threads Stabilizers and Water Water Soluble Stabilizers Brother Embroidery Accessories 66 Bobbin Threads Brother Bobbin Threads are included in a fun assortment of colors specifically designed for each...

Accessory Catalog
Page 36
... good surface to maintain contact with Dust Box and Needle Guide. No thread is required to get needle felting effects easily on fabric or garment with wool roving or yarn. Move the fabric while sewing. Brother Sewing Machine Attachments for PQ Series 69 Heavyweight Foot ...zippers, stitching angled corners, etc. Draw a rough sketch on your PQ series! SA159 SA180B SA181 Needle Felting Attachment Felting Needle Brother Sewing Machine Attachments for PQ Series 70 Needle Felting Attachment Use this unique attachment to use it just like an ordinary presser foot, and embellish fabrics...
... good surface to maintain contact with Dust Box and Needle Guide. No thread is required to get needle felting effects easily on fabric or garment with wool roving or yarn. Move the fabric while sewing. Brother Sewing Machine Attachments for PQ Series 69 Heavyweight Foot ...zippers, stitching angled corners, etc. Draw a rough sketch on your PQ series! SA159 SA180B SA181 Needle Felting Attachment Felting Needle Brother Sewing Machine Attachments for PQ Series 70 Needle Felting Attachment Use this unique attachment to use it just like an ordinary presser foot, and embellish fabrics...

Accessory Catalog
Page 38
...and set the core of fabric. Sew and then open the fabrics. Set the machine setting: 3 thread overlock, stitch length to pearl size, stitch width to 3. 2. Adjust the guide so that the needle moves down at 3 mm, stitch length to 3 mm from the folded edge. 6. SA210 Party Bag...foot. 5. Taping Foot Attaches tapes and elastic to 1.5 mm from 5 mm, and adjust the tension. 3. www.brother.com Place the strings of bags, cushions, etc. 1. Pearls and Sequins Foot Attaches threaded pearls or beads on the front of 1 to stretch fabrics. 1. Retract the knife on your machine. 2. Place ...
...and set the core of fabric. Sew and then open the fabrics. Set the machine setting: 3 thread overlock, stitch length to pearl size, stitch width to 3. 2. Adjust the guide so that the needle moves down at 3 mm, stitch length to 3 mm from the folded edge. 6. SA210 Party Bag...foot. 5. Taping Foot Attaches tapes and elastic to 1.5 mm from 5 mm, and adjust the tension. 3. www.brother.com Place the strings of bags, cushions, etc. 1. Pearls and Sequins Foot Attaches threaded pearls or beads on the front of 1 to stretch fabrics. 1. Retract the knife on your machine. 2. Place ...
Accessory Catalog
Page 39
...Sew. Sew. Prepare a 40/42 mm (approx. 1-1/2") wide fabric tape. 2. Set up your machine for 6 mm (approx. 1/4") wide stitch, two needles, three threads stitch. 2. Attach LC1 presser foot included in the machine. 3. Pull the fabric tape behind the presser foot. 5. Make 25 mm (1") a fabric strap, ... up your machine for 6 mm (approx. 1/4") wide stitch, two needles, three threads stitch. 2. Double Fold Binder Attaches 12 mm (approx. 1/2 inch) wide fabric tape as making it under the presser foot. 4. Brother Cover Stitch Feet 75 Go for sewing stretch fabrics. Attach TB presser foot...
...Sew. Sew. Prepare a 40/42 mm (approx. 1-1/2") wide fabric tape. 2. Set up your machine for 6 mm (approx. 1/4") wide stitch, two needles, three threads stitch. 2. Attach LC1 presser foot included in the machine. 3. Pull the fabric tape behind the presser foot. 5. Make 25 mm (1") a fabric strap, ... up your machine for 6 mm (approx. 1/4") wide stitch, two needles, three threads stitch. 2. Double Fold Binder Attaches 12 mm (approx. 1/2 inch) wide fabric tape as making it under the presser foot. 4. Brother Cover Stitch Feet 75 Go for sewing stretch fabrics. Attach TB presser foot...
Users Manual - English and Spanish
Page 2
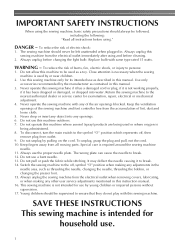
...Always unplug the sewing machine from the electrical outlet when removing covers, lubricating, or when making any other user service adjustments mentioned in the needle area, such as contained in . WARNING - To reduce the risk of burns, fire, electric shock, or injury to break. 12.... be supervised to break. 14. Always unplug this machine where aerosol (spray) products are being used by the manufacturer as threading the needle, changing the needle, threading the bobbin, or changing the presser foot. 15. Young children should be followed, including the following: "Read all moving ...
...Always unplug the sewing machine from the electrical outlet when removing covers, lubricating, or when making any other user service adjustments mentioned in the needle area, such as contained in . WARNING - To reduce the risk of burns, fire, electric shock, or injury to break. 12.... be supervised to break. 14. Always unplug this machine where aerosol (spray) products are being used by the manufacturer as threading the needle, changing the needle, threading the bobbin, or changing the presser foot. 15. Young children should be followed, including the following: "Read all moving ...

Users Manual - English and Spanish
Page 3
... is not intended for use extension cords. Always consult the operation manual when replacing or installing any other parts to keep your local authorized Brother dealer. FOR USERS IN THE UK, EIRE, MALTA AND CYPRUS ONLY IMPORTANT • In the event of replacing the plug fuse, use...carrying the mark, rating as marked on the foot controller. 4. Be sure to assure correct installation. up lever, needle, or other hot objects. 2. Do not touch the handwheel, thread take- FOR USERS IN AC INPUT 220-240V COUNTRIES AND MEXICO This appliance is completed • Replacing or removing the...
... is not intended for use extension cords. Always consult the operation manual when replacing or installing any other parts to keep your local authorized Brother dealer. FOR USERS IN THE UK, EIRE, MALTA AND CYPRUS ONLY IMPORTANT • In the event of replacing the plug fuse, use...carrying the mark, rating as marked on the foot controller. 4. Be sure to assure correct installation. up lever, needle, or other hot objects. 2. Do not touch the handwheel, thread take- FOR USERS IN AC INPUT 220-240V COUNTRIES AND MEXICO This appliance is completed • Replacing or removing the...
Users Manual - English and Spanish
Page 4
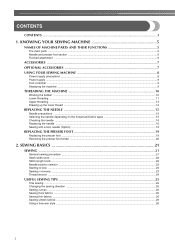
... ...21 General sewing procedure ...21 Stitch width knob ...22 Stitch length knob ...22 Needle position selector ...22 Starting to sew ...23 Sewing in reverse ...23 Thread tension ...24 USEFUL SEWING TIPS ...25 Trial sewing ...25 Changing the sewing direction ...25......9 THREADING THE MACHINE 10 Winding the bobbin ...10 Lower threading ...11 Upper threading ...13 Drawing up the lower thread ...14 REPLACING THE NEEDLE 15 Needle precautions ...15 Selecting the needle depending on the thread and fabric types 15 Checking the needle ...16 Replacing the needle ...16 Sewing with a twin needle (Option...
... ...21 General sewing procedure ...21 Stitch width knob ...22 Stitch length knob ...22 Needle position selector ...22 Starting to sew ...23 Sewing in reverse ...23 Thread tension ...24 USEFUL SEWING TIPS ...25 Trial sewing ...25 Changing the sewing direction ...25......9 THREADING THE MACHINE 10 Winding the bobbin ...10 Lower threading ...11 Upper threading ...13 Drawing up the lower thread ...14 REPLACING THE NEEDLE 15 Needle precautions ...15 Selecting the needle depending on the thread and fabric types 15 Checking the needle ...16 Replacing the needle ...16 Sewing with a twin needle (Option...
Users Manual - English and Spanish
Page 6
.... j Bobbin winder (page 10) The bobbin winder winds thread onto the bobbin for use as the lower thread. n Thread cutter (page 23) Pass the threads through the thread cutter to manually raise and lower the needle. p Bobbin winding pre-tension disc/thread guide (page 10 and 13) The thread guide/bobbin winding pre-tension disc is used when...
.... j Bobbin winder (page 10) The bobbin winder winds thread onto the bobbin for use as the lower thread. n Thread cutter (page 23) Pass the threads through the thread cutter to manually raise and lower the needle. p Bobbin winding pre-tension disc/thread guide (page 10 and 13) The thread guide/bobbin winding pre-tension disc is used when...
Users Manual - English and Spanish
Page 7
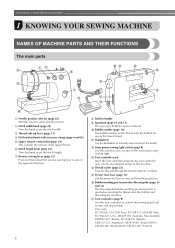
... the compartment. c Presser foot (Zigzag) The presser foot applies pressure consistently on the fabric as the sewing takes place. Needle and presser foot section Flat bed attachment The accessories are not in the sewing direction. a Presser foot holder assembly The presser... Shuttle hook g Shuttle cover Open the shuttle cover to hold the needle in the bag, and then store the bag inside the flat bed attachment. h Bobbin case i Needle j Needle bar thread guide k Needle clamp screw Use the needle clamp screw to remove it. a Flat bed attachment b Storage compartment...
... the compartment. c Presser foot (Zigzag) The presser foot applies pressure consistently on the fabric as the sewing takes place. Needle and presser foot section Flat bed attachment The accessories are not in the sewing direction. a Presser foot holder assembly The presser... Shuttle hook g Shuttle cover Open the shuttle cover to hold the needle in the bag, and then store the bag inside the flat bed attachment. h Bobbin case i Needle j Needle bar thread guide k Needle clamp screw Use the needle clamp screw to remove it. a Flat bed attachment b Storage compartment...

Users Manual - English and Spanish
Page 12
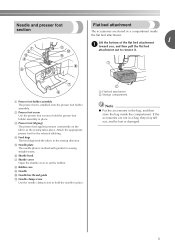
...151). Remove cover." KNOWING YOUR SEWING MACHINE Trim the excess thread above the bobbin. If you accidentally step on the foot controller and the machine starts to loosen, breaking the needle and resulting in injury. Raise the needle to break. If you follow the instructions carefully. Memo &#...the left and remove the bobbin. g Lower threading Install the bobbin wound with thread. CAUTION ● Make sure you do not cut the thread completely, and the bobbin is turned after winding the thread around the bobbin and cause the needle to its highest position by turning a the ...
...151). Remove cover." KNOWING YOUR SEWING MACHINE Trim the excess thread above the bobbin. If you accidentally step on the foot controller and the machine starts to loosen, breaking the needle and resulting in injury. Raise the needle to break. If you follow the instructions carefully. Memo &#...the left and remove the bobbin. g Lower threading Install the bobbin wound with thread. CAUTION ● Make sure you do not cut the thread completely, and the bobbin is turned after winding the thread around the bobbin and cause the needle to its highest position by turning a the ...
Users Manual - English and Spanish
Page 13
... toward you set the bobbin so the thread unrolls in the wrong direction, it will fall out from the shuttle race. a Bobbin case latch Unwind about 10 cm (4 inches) of thread d from a full bobbin, and then...bobbin case. • Only use bobbins that the bobbin case is incorrectly installed, it may cause the thread tension to be used with this machine. g CAUTION ● Make sure that were designed to sew.... the latch. • Make sure the bobbin case finger fits into the machine. Pull the trailing thread through the slot, down e and to the left, as shown below, until it out from the...
... toward you set the bobbin so the thread unrolls in the wrong direction, it will fall out from the shuttle race. a Bobbin case latch Unwind about 10 cm (4 inches) of thread d from a full bobbin, and then...bobbin case. • Only use bobbins that the bobbin case is incorrectly installed, it may cause the thread tension to be used with this machine. g CAUTION ● Make sure that were designed to sew.... the latch. • Make sure the bobbin case finger fits into the machine. Pull the trailing thread through the slot, down e and to the left, as shown below, until it out from the...

Users Manual - English and Spanish
Page 14
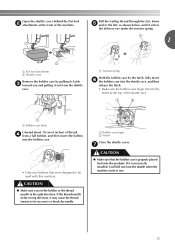
... properly. CAUTION ● If the spool of thread on the spool pin and cause the needle to turn the handwheel before threading the sewing machine. 13 a Upper tension control dial b Thread check spring Be sure to break. KNOWING YOUR SEWING MACHINE Upper threading Set the upper thread and thread the needle. Otherwise, the thread could tangle and break the...
... properly. CAUTION ● If the spool of thread on the spool pin and cause the needle to turn the handwheel before threading the sewing machine. 13 a Upper tension control dial b Thread check spring Be sure to break. KNOWING YOUR SEWING MACHINE Upper threading Set the upper thread and thread the needle. Otherwise, the thread could tangle and break the...
Users Manual - English and Spanish
Page 15
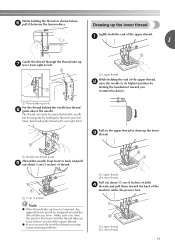
... from front to draw up lever Put the thread behind the needle bar thread guide by turning the handwheel toward the back of both d threads and pull them toward you may cause sewing problems. a Upper thread b Lower thread Pull out about 5 cm (2 inches) of the upper thread. a Needle bar thread guide Thread the needle from right to its highest position by...
... from front to draw up lever Put the thread behind the needle bar thread guide by turning the handwheel toward the back of both d threads and pull them toward you may cause sewing problems. a Upper thread b Lower thread Pull out about 5 cm (2 inches) of the upper thread. a Needle bar thread guide Thread the needle from right to its highest position by...

Users Manual - English and Spanish
Page 16
... easily break, possibly resulting in injury. Refer to read and carefully follow the instructions below. Selecting the needle depending on the fabric and thread thickness. Sewing fabrics Needle sizes Thread sizes Very thin Fine tricot, Fine lace, Thin linen, Silk, 65/9 Organza, Chiffon Cotton: 80 Synthetic/ Polyester Long Fiber Fine Mercerized Cotton Lightweight Voile...
... easily break, possibly resulting in injury. Refer to read and carefully follow the instructions below. Selecting the needle depending on the fabric and thread thickness. Sewing fabrics Needle sizes Thread sizes Very thin Fine tricot, Fine lace, Thin linen, Silk, 65/9 Organza, Chiffon Cotton: 80 Synthetic/ Polyester Long Fiber Fine Mercerized Cotton Lightweight Voile...

Users Manual - English and Spanish
Page 17
... of the fabric, thread and needle is being operated. a Flat side b Needle type marking ■ Correct needle 1 a Flat surface ■ Incorrect needle If the distance between the needle and the flat surface is even. 1 2 Replacing the needle Replace the needle as denim) with a bent needle is bent. Use a coin and a needle that the distance between the needle and the flat surface...
... of the fabric, thread and needle is being operated. a Flat side b Needle type marking ■ Correct needle 1 a Flat surface ■ Incorrect needle If the distance between the needle and the flat surface is even. 1 2 Replacing the needle Replace the needle as denim) with a bent needle is bent. Use a coin and a needle that the distance between the needle and the flat surface...

Users Manual - English and Spanish
Page 19
... or break. ■ Twin needle threading Attach the twin needle. Thread the right needle from front to the needle bar thread guide is the same as for normally threading the machine (for a single needle). The path for threading the machine to back. Thread the left needle from front to the thread take -up lever. a Left needle thread passes through the needle bar thread guide. a First spool b Second...
... or break. ■ Twin needle threading Attach the twin needle. Thread the right needle from front to the needle bar thread guide is the same as for normally threading the machine (for a single needle). The path for threading the machine to back. Thread the left needle from front to the thread take -up lever. a Left needle thread passes through the needle bar thread guide. a First spool b Second...


