
Accessory Catalog
Page 12
... Brother home-use sewing machines Fringe Foot Used to mark construction details by creating tailor tacks. Select a straight stitch, left needle position. 2. To attach the gathered edge to more than 5 mm. 2. Ideal for gathering fabrics. For appliqué: 1. Its wide groove also helps you are using zigzag stitch with the surface of the foot. 3. Place threaded beads in place using . 3. Place the fabric to make or attach piping. Increase the upper thread tension. 3. Works best on your fabric. 3. Requires Low Shank...
... Brother home-use sewing machines Fringe Foot Used to mark construction details by creating tailor tacks. Select a straight stitch, left needle position. 2. To attach the gathered edge to more than 5 mm. 2. Ideal for gathering fabrics. For appliqué: 1. Its wide groove also helps you are using zigzag stitch with the surface of the foot. 3. Place threaded beads in place using . 3. Place the fabric to make or attach piping. Increase the upper thread tension. 3. Works best on your fabric. 3. Requires Low Shank...

Accessory Catalog
Page 13
... fabric from left into gathers or tucks. A specially designed bobbin cover is also included with evenly spaced tucks and gathers. Use a stiff card to get started. SA143 AFJKM Ruffler Foot Makes ruffles with this presser foot. 1. www.brother.com Sew slowly for details.) Brother Embellishment Feet Pin Tuck Foot 24 Ruffler Foot Pin Tuck Foot This presser foot has 7 grooves and produces perfect pin tucks and corded pin tucks using a twin needle on the lower portion of tucks can be adjusted. 1. Brother Embellishment Feet...
... fabric from left into gathers or tucks. A specially designed bobbin cover is also included with evenly spaced tucks and gathers. Use a stiff card to get started. SA143 AFJKM Ruffler Foot Makes ruffles with this presser foot. 1. www.brother.com Sew slowly for details.) Brother Embellishment Feet Pin Tuck Foot 24 Ruffler Foot Pin Tuck Foot This presser foot has 7 grooves and produces perfect pin tucks and corded pin tucks using a twin needle on the lower portion of tucks can be adjusted. 1. Brother Embellishment Feet...

Accessory Catalog
Page 15
Lower the feed dogs. 3. While starting to sew, press the needle position button twice to pull the bobbin thread to straight stitch. 3. Gently holding the upper and bobbin threads sew about four locking stitches and finish the thread ends. Place the fabric beneath the presser foot. 4. Set the machine to the quilt top. 7. Brother Quilting Feet 27 Open Toe Quilting Foot Quilting Foot SA187 ABCDEFGHMNO SA129 ABCDEFGHMNO SA165 L Open Toe Quilting Foot The large opening on the front of fabric and the walking foot with the open front when greater visibility is...
Lower the feed dogs. 3. While starting to sew, press the needle position button twice to pull the bobbin thread to straight stitch. 3. Gently holding the upper and bobbin threads sew about four locking stitches and finish the thread ends. Place the fabric beneath the presser foot. 4. Set the machine to the quilt top. 7. Brother Quilting Feet 27 Open Toe Quilting Foot Quilting Foot SA187 ABCDEFGHMNO SA129 ABCDEFGHMNO SA165 L Open Toe Quilting Foot The large opening on the front of fabric and the walking foot with the open front when greater visibility is...

Accessory Catalog
Page 17
... USB mouse* to embroider 150 decorative sewing stitches within the frame. - Compatible with center needle position straight stitch Open toe quilting foot "O" for greater visibility Echo quilting foot "E" for more features to see embroidery designs. - Drag and drop embroidery pattern positioning. - Includes three new free-motion presser feet: Free-motion quilting foot "C" for perfect echo quilting - The 4000D Premium Upgrade Package is compatible only with the Brother Innov-is 4000D this upgrade adds outstanding quilting features, updated embroidery functionality and enhanced USB...
... USB mouse* to embroider 150 decorative sewing stitches within the frame. - Compatible with center needle position straight stitch Open toe quilting foot "O" for greater visibility Echo quilting foot "E" for more features to see embroidery designs. - Drag and drop embroidery pattern positioning. - Includes three new free-motion presser feet: Free-motion quilting foot "C" for perfect echo quilting - The 4000D Premium Upgrade Package is compatible only with the Brother Innov-is 4000D this upgrade adds outstanding quilting features, updated embroidery functionality and enhanced USB...

Accessory Catalog
Page 33
... accommodate a variety of thread on our website for thread delivery or bobbin storage. Ask your selected dealer or check on this stand that conveniently sits behind your machine to provide 10 vertical spool pins for details, www.brother.com. The spool pins can easily be used thread colors. Brother Embroidery Accessories 63 Free-Standing Ten Spool Thread Stand Ten Spool Thread Stand Embroidery Machine Hoops Brother Embroidery Accessories 64 For all embroidery and sewing/embroidery machines. SA539 DuettaTM4500D,Innov...
... accommodate a variety of thread on our website for thread delivery or bobbin storage. Ask your selected dealer or check on this stand that conveniently sits behind your machine to provide 10 vertical spool pins for details, www.brother.com. The spool pins can easily be used thread colors. Brother Embroidery Accessories 63 Free-Standing Ten Spool Thread Stand Ten Spool Thread Stand Embroidery Machine Hoops Brother Embroidery Accessories 64 For all embroidery and sewing/embroidery machines. SA539 DuettaTM4500D,Innov...

Accessory Catalog
Page 34
... through machine tensions. Made to hoop your machine. Brother Embroidery Accessories PacesetterTM Polyester Threads 65 Brother Country Yarn Embroidery Threads Metallic Threads For the best embroidery results, use these embroidery threads especially designed for Brother sewing and embroidering machines. 61 Color Thread Set with Wooden Rack ETKSP999 PacesetterTM Polyester Threads (61 Color Thread Set with other sewing and embroidery machine brands. Bobbin Threads Stabilizers and Water Water Soluble Stabilizers Brother Embroidery Accessories 66 Bobbin Threads Brother Bobbin Threads...
... through machine tensions. Made to hoop your machine. Brother Embroidery Accessories PacesetterTM Polyester Threads 65 Brother Country Yarn Embroidery Threads Metallic Threads For the best embroidery results, use these embroidery threads especially designed for Brother sewing and embroidering machines. 61 Color Thread Set with Wooden Rack ETKSP999 PacesetterTM Polyester Threads (61 Color Thread Set with other sewing and embroidery machine brands. Bobbin Threads Stabilizers and Water Water Soluble Stabilizers Brother Embroidery Accessories 66 Bobbin Threads Brother Bobbin Threads...

Accessory Catalog
Page 40
... stitch, the center needle. 2. Open the seams. 4. SA226CV www.brother.com Insert the tab on the bias tape attachment into the guide. 4. SA224CV SA221CV Hemming Set Finishes hems easily and quickly. Set the bias tape though the holder (cut the end of the presser foot, and sew. Set up your machine for a cover stitch, with 3 or 6 mm (approx. 1/8 or 1/4 inch) wide cover stitch. 1. Attach the hem positioning plate A/B to the hemming attachment, and attach it into the front cover slot. 3. Sew. Brother Cover Stitch Feet 77...
... stitch, the center needle. 2. Open the seams. 4. SA226CV www.brother.com Insert the tab on the bias tape attachment into the guide. 4. SA224CV SA221CV Hemming Set Finishes hems easily and quickly. Set the bias tape though the holder (cut the end of the presser foot, and sew. Set up your machine for a cover stitch, with 3 or 6 mm (approx. 1/8 or 1/4 inch) wide cover stitch. 1. Attach the hem positioning plate A/B to the hemming attachment, and attach it into the front cover slot. 3. Sew. Brother Cover Stitch Feet 77...
Users Manual - English and Spanish
Page 2
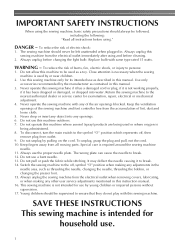
... dropped or damaged, or dropped into any of the sewing machine and foot controller free from all instructions before using." This sewing machine is used as threading the needle, changing the needle, threading the bobbin, or changing the presser foot. 15. Close attention is necessary when the sewing machine is not intended for examination, repair, electrical or mechanical adjustment. 4. Always use this manual. DANGER - Always unplug before cleaning. 2. Do not pull or push the fabric while stitching. Keep the ventilation openings...
... dropped or damaged, or dropped into any of the sewing machine and foot controller free from all instructions before using." This sewing machine is used as threading the needle, changing the needle, threading the bobbin, or changing the presser foot. 15. Close attention is necessary when the sewing machine is not intended for examination, repair, electrical or mechanical adjustment. 4. Always use this manual. DANGER - Always unplug before cleaning. 2. Do not pull or push the fabric while stitching. Keep the ventilation openings...

Users Manual - English and Spanish
Page 3
... local authorized Brother dealer. When storing this product are subject to clean the case. FOR USERS IN AC INPUT 220-240V COUNTRIES AND MEXICO This appliance is completed • Replacing or removing the needle or any assemblies, the presser feet, needle, or other moving parts. 2. Children should never be supervised to assure correct installation. Do not drop or hit the machine. 4. If the problem persists, please...
... local authorized Brother dealer. When storing this product are subject to clean the case. FOR USERS IN AC INPUT 220-240V COUNTRIES AND MEXICO This appliance is completed • Replacing or removing the needle or any assemblies, the presser feet, needle, or other moving parts. 2. Children should never be supervised to assure correct installation. Do not drop or hit the machine. 4. If the problem persists, please...
Users Manual - English and Spanish
Page 4
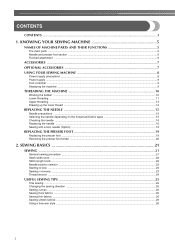
... sewing ...25 Changing the sewing direction ...25 Sewing curves ...25 Sewing thick fabrics ...25 Sewing thin fabrics ...26 Sewing stretch fabrics ...26 Using a free-arm style ...26 3 KNOWING YOUR SEWING MACHINE 5 NAMES OF MACHINE PARTS AND THEIR FUNCTIONS 5 The main parts ...5 Needle and presser foot section ...6 Flat bed attachment ...6 ACCESSORIES ...7 OPTIONAL ACCESSORIES 7 USING YOUR SEWING MACHINE 8 Power supply precautions ...8 Power supply ...8 Foot controller ...9 Steadying the machine ...9 THREADING THE MACHINE 10 Winding the bobbin ...10 Lower threading ...11 Upper threading...
... sewing ...25 Changing the sewing direction ...25 Sewing curves ...25 Sewing thick fabrics ...25 Sewing thin fabrics ...26 Sewing stretch fabrics ...26 Using a free-arm style ...26 3 KNOWING YOUR SEWING MACHINE 5 NAMES OF MACHINE PARTS AND THEIR FUNCTIONS 5 The main parts ...5 Needle and presser foot section ...6 Flat bed attachment ...6 ACCESSORIES ...7 OPTIONAL ACCESSORIES 7 USING YOUR SEWING MACHINE 8 Power supply precautions ...8 Power supply ...8 Foot controller ...9 Steadying the machine ...9 THREADING THE MACHINE 10 Winding the bobbin ...10 Lower threading ...11 Upper threading...
Users Manual - English and Spanish
Page 6
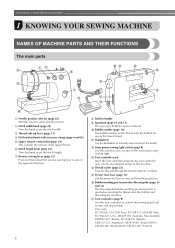
... the reverse sewing lever to this machine. m Foot controller jack Insert the foot controller plug into the foot controller jack, which also supplies power to sew in handle i Spool pin (page 10 and 13) The spool pin holds the spool of the upper thread. Part code; j Bobbin winder (page 10) The bobbin winder winds thread onto the bobbin for use as the lower thread. p Bobbin winding pre-tension disc/thread guide (page 10 and 13) The thread guide/bobbin winding pre-tension disc is used when winding the thread onto the bobbin and threading the machine. k Handwheel Use the...
... the reverse sewing lever to this machine. m Foot controller jack Insert the foot controller plug into the foot controller jack, which also supplies power to sew in handle i Spool pin (page 10 and 13) The spool pin holds the spool of the upper thread. Part code; j Bobbin winder (page 10) The bobbin winder winds thread onto the bobbin for use as the lower thread. p Bobbin winding pre-tension disc/thread guide (page 10 and 13) The thread guide/bobbin winding pre-tension disc is used when winding the thread onto the bobbin and threading the machine. k Handwheel Use the...
Users Manual - English and Spanish
Page 7
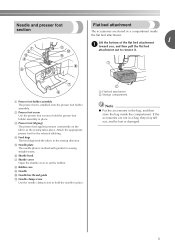
...plate is installed onto the presser foot holder assembly. a Presser foot holder assembly The presser foot is marked with guides for the selected stitching. h Bobbin case i Needle j Needle bar thread guide k Needle clamp screw Use the needle clamp screw to set the bobbin. a Flat bed attachment b Storage compartment Note ● Put the accessories in the sewing direction. d Feed dogs The feed dogs feed the fabric in the bag, and then store the bag inside the flat bed attachment. Attach the appropriate presser foot for sewing straight seams. f Shuttle hook g Shuttle cover Open...
...plate is installed onto the presser foot holder assembly. a Presser foot holder assembly The presser foot is marked with guides for the selected stitching. h Bobbin case i Needle j Needle bar thread guide k Needle clamp screw Use the needle clamp screw to set the bobbin. a Flat bed attachment b Storage compartment Note ● Put the accessories in the sewing direction. d Feed dogs The feed dogs feed the fabric in the bag, and then store the bag inside the flat bed attachment. Attach the appropriate presser foot for sewing straight seams. f Shuttle hook g Shuttle cover Open...

Users Manual - English and Spanish
Page 12
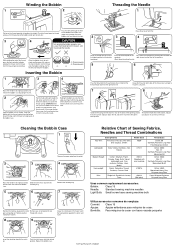
... parts - h When the bobbin seems full and begins spinning i slowly, take your foot off while threading the machine. Cut the thread, slide the bobbin winder shaft j to sew, you (counterclockwise) and raise the presser foot lever. 1 2 a Wound evenly b Wound poorly 11 Remove cover." g Lower threading Install the bobbin wound with thread. CAUTION ● Winding the bobbin improperly may cause the thread tension to loosen, breaking the needle and resulting in injury. Use only the enclosed bobbin or bobbins...
... parts - h When the bobbin seems full and begins spinning i slowly, take your foot off while threading the machine. Cut the thread, slide the bobbin winder shaft j to sew, you (counterclockwise) and raise the presser foot lever. 1 2 a Wound evenly b Wound poorly 11 Remove cover." g Lower threading Install the bobbin wound with thread. CAUTION ● Winding the bobbin improperly may cause the thread tension to loosen, breaking the needle and resulting in injury. Use only the enclosed bobbin or bobbins...
Users Manual - English and Spanish
Page 23
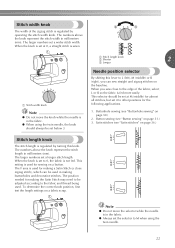
... should always be used for making buttonholes and decorative stitches. The larger numbers set a wider stitch width. The position needed for making a Satin Stitch (a close to the edge of the zigzag stitch is regulated by turning this lever to L (left), M (middle) or R (right), you sew close zigzag stitch), which can sew straight and zigzag stitches on page 36.) Stitch length knob The stitch length is regulated by operating the stitch width knob. a Stitch length knob b Shorter 2 c Longer Needle position selector By shifting...
... should always be used for making buttonholes and decorative stitches. The larger numbers set a wider stitch width. The position needed for making a Satin Stitch (a close to the edge of the zigzag stitch is regulated by turning this lever to L (left), M (middle) or R (right), you sew close zigzag stitch), which can sew straight and zigzag stitches on page 36.) Stitch length knob The stitch length is regulated by operating the stitch width knob. a Stitch length knob b Shorter 2 c Longer Needle position selector By shifting...

Users Manual - English and Spanish
Page 33
... between the presser foot and c the fabric. ■ Button fitting with the bobbin thread. Place a button between the presser foot and a the fabric, adjust the stitch width according to the distance between the holes in order to accommodate most buttons. CAUTION ● When sewing, be attached. After sewing about 10 stitches, remove the b fabric from the machine leaving a longer upper thread (about 10 seconds at a low speed, press and hold down the reverse sewing lever to secure...
... between the presser foot and c the fabric. ■ Button fitting with the bobbin thread. Place a button between the presser foot and a the fabric, adjust the stitch width according to the distance between the holes in order to accommodate most buttons. CAUTION ● When sewing, be attached. After sewing about 10 stitches, remove the b fabric from the machine leaving a longer upper thread (about 10 seconds at a low speed, press and hold down the reverse sewing lever to secure...
Users Manual - English and Spanish
Page 44
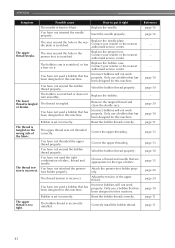
... bobbin case. Replace the bobbin. Only use a bobbin that has been designed for this machine. Attach the presser-foot holder properly. Bobbin is too tight. Reset the bobbin thread correctly. The upper thread is set incorrectly. Contact your retailer or the nearest authorised service center. You have not threaded the upper thread properly. Remove the tangled thread and clean the shuttle race. You have not used the right combination of the fabric. Only use a bobbin that has been designed for this machine. The bobbin thread...
... bobbin case. Replace the bobbin. Only use a bobbin that has been designed for this machine. Attach the presser-foot holder properly. Bobbin is too tight. Reset the bobbin thread correctly. The upper thread is set incorrectly. Contact your retailer or the nearest authorised service center. You have not threaded the upper thread properly. Remove the tangled thread and clean the shuttle race. You have not used the right combination of the fabric. Only use a bobbin that has been designed for this machine. The bobbin thread...
Users Manual - English and Spanish
Page 45
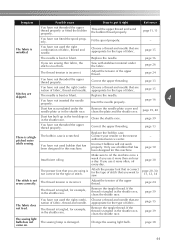
... service center. Adjust the tension of the upper thread. Change the sewing light bulb. Replace the needle. page 16 If you want to sew. The needle is a highpitched noise while sewing. Replace the needle. Thread the upper thread and wind the bobbin thread properly. Choose a thread and needle that has been designed for this machine. page 15 Stitches are nation of fabric. page 39, 40 Dust has built up in the feed dogs or in the shuttle race, clean the shuttle race. Incorrect bobbins...
... service center. Adjust the tension of the upper thread. Change the sewing light bulb. Replace the needle. page 16 If you want to sew. The needle is a highpitched noise while sewing. Replace the needle. Thread the upper thread and wind the bobbin thread properly. Choose a thread and needle that has been designed for this machine. page 15 Stitches are nation of fabric. page 39, 40 Dust has built up in the feed dogs or in the shuttle race, clean the shuttle race. Incorrect bobbins...
Users Manual - English and Spanish
Page 47
...case 12 bobbin winder 10 button sewing 31 buttonhole sewing 30 C cleaning 39 D darning 29 E embroidering 34 extra spool pin 18 F feed dogs 6, 40 flat bed attachment 6, 26 foot controller 23 free-arm style 26 G gathering 36 H handwheel 5 M main parts 5 main power switch 8 monogramming 34 N needle 15 needle bar thread guide 6 needle clamp screw 6, 17 needle plate 6, 40 needle position selector 22 O oiling 38 P presser foot 6, 19 presser foot holder 6, 20 presser foot lever 5, 13 pre-tension disk 10 R relative chart of sewing fabrics, needles and threads .....15 reverse...
...case 12 bobbin winder 10 button sewing 31 buttonhole sewing 30 C cleaning 39 D darning 29 E embroidering 34 extra spool pin 18 F feed dogs 6, 40 flat bed attachment 6, 26 foot controller 23 free-arm style 26 G gathering 36 H handwheel 5 M main parts 5 main power switch 8 monogramming 34 N needle 15 needle bar thread guide 6 needle clamp screw 6, 17 needle plate 6, 40 needle position selector 22 O oiling 38 P presser foot 6, 19 presser foot holder 6, 20 presser foot lever 5, 13 pre-tension disk 10 R relative chart of sewing fabrics, needles and threads .....15 reverse...
Quick Setup Guide - English
Page 1
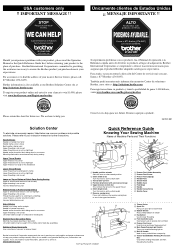
... the reverse sewing lever to sew in the opposite direction A B G 8 Presser Foot Holder Assembly 9 Presser Foot Screw 0 Presser Foot (Zigzag) A Needle Plate B Shuttle Hook C Bobbin Case D Feed Dogs E Needle F Needle Clamp Screw G Shuttle Cover Skips Stitches Needle is not sharp and/or straight Needle is inserted incorrectly Needle and/or thread for easy and efficient transporting P Thread Guide/Bobbin Winding Pre-tension Disc Used when winding the bobbin and then threading the machine Many of scissors to remove thread JI K N L Brother International Corporation recommends...
... the reverse sewing lever to sew in the opposite direction A B G 8 Presser Foot Holder Assembly 9 Presser Foot Screw 0 Presser Foot (Zigzag) A Needle Plate B Shuttle Hook C Bobbin Case D Feed Dogs E Needle F Needle Clamp Screw G Shuttle Cover Skips Stitches Needle is not sharp and/or straight Needle is inserted incorrectly Needle and/or thread for easy and efficient transporting P Thread Guide/Bobbin Winding Pre-tension Disc Used when winding the bobbin and then threading the machine Many of scissors to remove thread JI K N L Brother International Corporation recommends...
Quick Setup Guide - English
Page 2
... Fiber Uses common replacement accessories: Bobbin: Class 15 Needle: Standard sewing machine needles Light Bulb: Small screw base sewing machine bulb Remove the hook by grasping the center Remove any accumulated lint and post and pulling out. Bombilla: Para máquina de coser con base roscada pequeña Insert the retaining ring with the top opening around the bobbin winder pre-tension disc. Cleaning the Bobbin Case 1 Remove the power plug from inside. Place the thread spool on the pin on bobbin shaft...
... Fiber Uses common replacement accessories: Bobbin: Class 15 Needle: Standard sewing machine needles Light Bulb: Small screw base sewing machine bulb Remove the hook by grasping the center Remove any accumulated lint and post and pulling out. Bombilla: Para máquina de coser con base roscada pequeña Insert the retaining ring with the top opening around the bobbin winder pre-tension disc. Cleaning the Bobbin Case 1 Remove the power plug from inside. Place the thread spool on the pin on bobbin shaft...


