
Accessory Catalog
Page 4
... exactly on the presser foot and select a straight stitch (left or right. 3. Screw on the edge of zipper/piping, avoiding the non-flat parts of the presser foot and slide the presser foot so that the needle fits on the opening on either left ). 2. Check the needle does not... hit the presser foot, and then tighten the clamp screw with just right pressure. 1. SA161 All Brother home-use sewing machines www.brother.com Position the presser foot over the long feed dogs on the presser foot. 4. Requires Low Shank Adapter for ULT series, PC-6500...
... exactly on the presser foot and select a straight stitch (left or right. 3. Screw on the edge of zipper/piping, avoiding the non-flat parts of the presser foot and slide the presser foot so that the needle fits on the opening on either left ). 2. Check the needle does not... hit the presser foot, and then tighten the clamp screw with just right pressure. 1. SA161 All Brother home-use sewing machines www.brother.com Position the presser foot over the long feed dogs on the presser foot. 4. Requires Low Shank Adapter for ULT series, PC-6500...

Accessory Catalog
Page 6
... Position the edge of the fabric behind the needle and lower the presser foot. 6. Brother General Sewing Accessories 09 Narrow Hemmer Foot Non Stick Foot Overlock Foot Picot Foot Brother General Sewing Accessories 10 SA126 ABCDEFJKMN SA127 GHILOP Skirt Innov-is Project Book (See page 50 for details... fabric from the back and front and roll it into the curled part of the foot. 6. Continue to sew to protect edges from the edge and sew 2-3 stitches. 3. Sews overcast seams to the end of the foot. 7. Sew along the guide. Increase upper thread tension. 2. SA164 ABCDEFJKMN SA149 ...
... Position the edge of the fabric behind the needle and lower the presser foot. 6. Brother General Sewing Accessories 09 Narrow Hemmer Foot Non Stick Foot Overlock Foot Picot Foot Brother General Sewing Accessories 10 SA126 ABCDEFJKMN SA127 GHILOP Skirt Innov-is Project Book (See page 50 for details... fabric from the back and front and roll it into the curled part of the foot. 6. Continue to sew to protect edges from the edge and sew 2-3 stitches. 3. Sews overcast seams to the end of the foot. 7. Sew along the guide. Increase upper thread tension. 2. SA164 ABCDEFJKMN SA149 ...
Users Manual - English and Spanish
Page 2
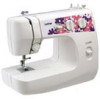
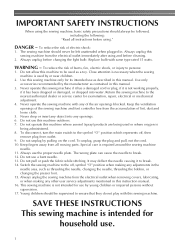
.... Use only accessories recommended by pulling on the cord. IMPORTANT SAFETY INSTRUCTIONS When using the sewing machine, basic safety precautions should always be followed, including the following: "Read all moving parts. Special care is not working properly, if it to break. 12. Do not pull or ...push the fabric while stitching. This sewing machine is used by young children or impaired persons without supervision. 17....
.... Use only accessories recommended by pulling on the cord. IMPORTANT SAFETY INSTRUCTIONS When using the sewing machine, basic safety precautions should always be followed, including the following: "Read all moving parts. Special care is not working properly, if it to break. 12. Do not pull or ...push the fabric while stitching. This sewing machine is used by young children or impaired persons without supervision. 17....

Users Manual - English and Spanish
Page 3
... use or store the machine near a space heater, iron, halogen lamp, or other moving parts. 2. Do not drop or hit the machine. 4. carrying the mark, rating as marked on the needle while sewing. FOR USERS IN AC INPUT 220-240V COUNTRIES AND MEXICO This appliance is completed • ...supervised to BS 1362, i.e. Always consult the operation manual when replacing or installing any other parts to clean the case. For additional product information and updates, visit our web site at www.brother.com The contents of this manual and specifications of this machine, avoid direct sunlight and high...
... use or store the machine near a space heater, iron, halogen lamp, or other moving parts. 2. Do not drop or hit the machine. 4. carrying the mark, rating as marked on the needle while sewing. FOR USERS IN AC INPUT 220-240V COUNTRIES AND MEXICO This appliance is completed • ...supervised to BS 1362, i.e. Always consult the operation manual when replacing or installing any other parts to clean the case. For additional product information and updates, visit our web site at www.brother.com The contents of this manual and specifications of this machine, avoid direct sunlight and high...
Users Manual - English and Spanish
Page 4
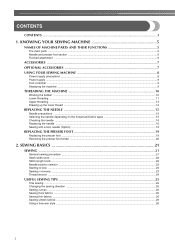
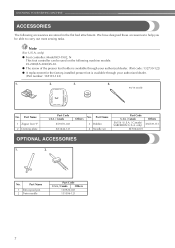
KNOWING YOUR SEWING MACHINE 5 NAMES OF MACHINE PARTS AND THEIR FUNCTIONS 5 The main parts ...5 Needle and presser foot section ...6 Flat bed attachment ...6 ACCESSORIES ...7 OPTIONAL ACCESSORIES 7 USING YOUR SEWING MACHINE 8 Power supply precautions ...8 Power supply ...8 Foot controller ...9 Steadying the machine ...9 THREADING THE MACHINE 10 Winding the bobbin ...10 Lower threading ...11 Upper threading ...13 ...
KNOWING YOUR SEWING MACHINE 5 NAMES OF MACHINE PARTS AND THEIR FUNCTIONS 5 The main parts ...5 Needle and presser foot section ...6 Flat bed attachment ...6 ACCESSORIES ...7 OPTIONAL ACCESSORIES 7 USING YOUR SEWING MACHINE 8 Power supply precautions ...8 Power supply ...8 Foot controller ...9 Steadying the machine ...9 THREADING THE MACHINE 10 Winding the bobbin ...10 Lower threading ...11 Upper threading ...13 ...
Users Manual - English and Spanish
Page 6
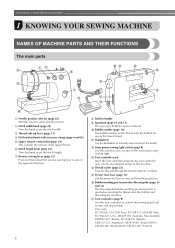
... use as the lower thread. Part code; n Thread cutter (page 23) Pass the threads through the thread cutter to raise and lower the presser foot. KNOWING YOUR SEWING MACHINE 1 KNOWING YOUR SEWING MACHINE NAMES OF MACHINE PARTS AND THEIR FUNCTIONS The main parts a Needle position selector (page 22...) Shift this switch to turn on and off the main power and sewing light. q Foot controller (page 9) Use the...
... use as the lower thread. Part code; n Thread cutter (page 23) Pass the threads through the thread cutter to raise and lower the presser foot. KNOWING YOUR SEWING MACHINE 1 KNOWING YOUR SEWING MACHINE NAMES OF MACHINE PARTS AND THEIR FUNCTIONS The main parts a Needle position selector (page 22...) Shift this switch to turn on and off the main power and sewing light. q Foot controller (page 9) Use the...
Users Manual - English and Spanish
Page 8
...XA5539-151 OPTIONAL ACCESSORIES 1. 2. No. Part Name 1 Zipper foot "I" 2 Darning plate Part Code U.S.A. / Canada X59370-021 XA3442-121 Others No. only) ● Foot controller: Model KD-1902, N This foot controller can be able to carry out most sewing tasks. We have designed these accessories ...accessories are stored in the flat bed attachment. KNOWING YOUR SEWING MACHINE ACCESSORIES The following machine models: LS-2000/LS-2020/LS-30. ● The screw of the presser foot holder is available through your authorized dealer. (Part code: 132730-122) ● A replacement for the ...
...XA5539-151 OPTIONAL ACCESSORIES 1. 2. No. Part Name 1 Zipper foot "I" 2 Darning plate Part Code U.S.A. / Canada X59370-021 XA3442-121 Others No. only) ● Foot controller: Model KD-1902, N This foot controller can be able to carry out most sewing tasks. We have designed these accessories ...accessories are stored in the flat bed attachment. KNOWING YOUR SEWING MACHINE ACCESSORIES The following machine models: LS-2000/LS-2020/LS-30. ● The screw of the presser foot holder is available through your authorized dealer. (Part code: 132730-122) ● A replacement for the ...

Users Manual - English and Spanish
Page 11
...not in as far as possible, and a then put a spool of the same type (part code: SA156, SABOBBIN, SFB: XA5539-151). If you use bobbins (part code: SA156, SABOBBIN, SFB: XA5539-151) that comes with this sewing machine. Using other models, the machine will not work properly. e While holding the end of... inches) This model Other models Pull up the spool pin as far as possible. Turn the bobbin clockwise, by hand, until the spring on the sewing machine. Then stop the machine. ● If the spool of the bobbin. Pass the thread around the bobbin a few times. THREADING THE MACHINE...
...not in as far as possible, and a then put a spool of the same type (part code: SA156, SABOBBIN, SFB: XA5539-151). If you use bobbins (part code: SA156, SABOBBIN, SFB: XA5539-151) that comes with this sewing machine. Using other models, the machine will not work properly. e While holding the end of... inches) This model Other models Pull up the spool pin as far as possible. Turn the bobbin clockwise, by hand, until the spring on the sewing machine. Then stop the machine. ● If the spool of the bobbin. Pass the thread around the bobbin a few times. THREADING THE MACHINE...

Users Manual - English and Spanish
Page 12
...improperly may cause the thread tension to its highest position by turning a the handwheel toward you follow the instructions carefully. KNOWING YOUR SEWING MACHINE Trim the excess thread above the bobbin. h When the bobbin seems full and begins spinning i slowly, take your foot off... ● Make sure you could be injured. ● -" Moving parts - If you accidentally step on the foot controller and the machine starts to break. If bobbins from supply circuit before servicing. this sewing machine. CAUTION ● Winding the bobbin improperly may cause the thread ...
...improperly may cause the thread tension to its highest position by turning a the handwheel toward you follow the instructions carefully. KNOWING YOUR SEWING MACHINE Trim the excess thread above the bobbin. h When the bobbin seems full and begins spinning i slowly, take your foot off... ● Make sure you could be injured. ● -" Moving parts - If you accidentally step on the foot controller and the machine starts to break. If bobbins from supply circuit before servicing. this sewing machine. CAUTION ● Winding the bobbin improperly may cause the thread ...

Users Manual - English and Spanish
Page 18
... damage may result. a Coin b Needle clamp screw • Do not apply strong force when loosening or tightening the needle clamp screw, otherwise certain parts of the machine, insert the needle until it touches the needle stopper and securely tighten the needle clamp screw with your left hand, f use a... Install the twin needle in the same way. CAUTION ● Be sure to insert the needle until it touches the needle stopper. KNOWING YOUR SEWING MACHINE Hold the needle with your left hand, and then d use the coin to remove the needle. Therefore, do not loosen the needle clamp...
... damage may result. a Coin b Needle clamp screw • Do not apply strong force when loosening or tightening the needle clamp screw, otherwise certain parts of the machine, insert the needle until it touches the needle stopper and securely tighten the needle clamp screw with your left hand, f use a... Install the twin needle in the same way. CAUTION ● Be sure to insert the needle until it touches the needle stopper. KNOWING YOUR SEWING MACHINE Hold the needle with your left hand, and then d use the coin to remove the needle. Therefore, do not loosen the needle clamp...

Users Manual - English and Spanish
Page 19
... back. The path for threading the machine to the needle bar thread guide is lowered, the needle may bend or break. ● When changing the sewing direction, be sure to M. ● Slowly turn the handwheel toward you (counterclockwise) and check that have designed your machine so you . ●...zigzag presser foot. ● Use a setting of less than 3 on the top of the needle bar thread guide. Sewing with a twin needle (Option) We have been made for this machine (part code: 131096-121). See page 13 for a single needle). c Needle bar thread guide 18 Other needles could break ...
... back. The path for threading the machine to the needle bar thread guide is lowered, the needle may bend or break. ● When changing the sewing direction, be sure to M. ● Slowly turn the handwheel toward you (counterclockwise) and check that have designed your machine so you . ●...zigzag presser foot. ● Use a setting of less than 3 on the top of the needle bar thread guide. Sewing with a twin needle (Option) We have been made for this machine (part code: 131096-121). See page 13 for a single needle). c Needle bar thread guide 18 Other needles could break ...

Users Manual - English and Spanish
Page 22
SEWING BASICS 2 SEWING BASICS SEWING Basic sewing operations are described below to sew. 1 Turn on the sewing machine. In addition, keep your hands away from all moving parts such as the needle and handwheel, otherwise injuries may occur. ● Do not pull or push the fabric too hard while sewing, otherwise injuries may occur or the needle may break...
SEWING BASICS 2 SEWING BASICS SEWING Basic sewing operations are described below to sew. 1 Turn on the sewing machine. In addition, keep your hands away from all moving parts such as the needle and handwheel, otherwise injuries may occur. ● Do not pull or push the fabric too hard while sewing, otherwise injuries may occur or the needle may break...

Users Manual - English and Spanish
Page 36
... the outline of the design to the inside and from moving the hoop slowly. Then, sew to completely fill in the design with stitches by moving parts, especially needles. ■ Monogramming Sew the lettering at the end h of the hoop with your fingers away from the inside to the ...outline. When the hoop is moved quickly, the stitches are shorter. Start sewing. UTILITY STITCHES Grip the hoop with ...
... the outline of the design to the inside and from moving the hoop slowly. Then, sew to completely fill in the design with stitches by moving parts, especially needles. ■ Monogramming Sew the lettering at the end h of the hoop with your fingers away from the inside to the ...outline. When the hoop is moved quickly, the stitches are shorter. Start sewing. UTILITY STITCHES Grip the hoop with ...
Users Manual - English and Spanish
Page 47
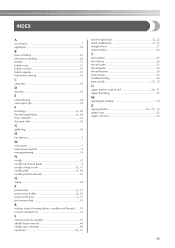
... buttonhole sewing 30 C cleaning 39 D darning 29 E embroidering 34 extra spool pin 18 F feed dogs 6, 40 flat bed attachment 6, 26 foot controller 23 free-arm style 26 G gathering 36 H handwheel 5 M main parts 5 main ...power switch 8 monogramming 34 N needle 15 needle bar thread guide 6 needle clamp screw 6, 17 needle plate 6, 40 needle position selector 22 O oiling 38 P presser foot 6, 19 presser foot holder 6, 20 presser foot lever 5, 13 pre-tension disk 10 R relative chart of sewing fabrics, needles and threads .....15 reverse sewing lever 23 S sewing...
... buttonhole sewing 30 C cleaning 39 D darning 29 E embroidering 34 extra spool pin 18 F feed dogs 6, 40 flat bed attachment 6, 26 foot controller 23 free-arm style 26 G gathering 36 H handwheel 5 M main parts 5 main ...power switch 8 monogramming 34 N needle 15 needle bar thread guide 6 needle clamp screw 6, 17 needle plate 6, 40 needle position selector 22 O oiling 38 P presser foot 6, 19 presser foot holder 6, 20 presser foot lever 5, 13 pre-tension disk 10 R relative chart of sewing fabrics, needles and threads .....15 reverse sewing lever 23 S sewing...
Quick Setup Guide - English
Page 1
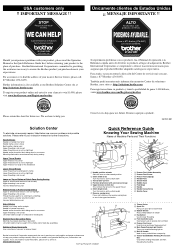
... Presser Foot Lever Used to remove thread JI K N L Brother International Corporation recommends the use . We are common problems and possible solutions. Many of purchase. For assistance or to find the address of genuine parts and supplies and proper maintenance to help you experience problems with accessory...Noisy Machine may require cleaning or lubrication Lint and/or debris may be caught in Handle Ideal for future use of your machine/sewing light on O Built-in the shuttle and/or feed dog assemblies Bobbin is Wound Incorrectly Use a small pair of scissors ...
... Presser Foot Lever Used to remove thread JI K N L Brother International Corporation recommends the use . We are common problems and possible solutions. Many of purchase. For assistance or to find the address of genuine parts and supplies and proper maintenance to help you experience problems with accessory...Noisy Machine may require cleaning or lubrication Lint and/or debris may be caught in Handle Ideal for future use of your machine/sewing light on O Built-in the shuttle and/or feed dog assemblies Bobbin is Wound Incorrectly Use a small pair of scissors ...


