

Instruction Manual - English
Page 4
... parts which might cause the needle to break. Turn off the power switch. Be sure to the machine will not be secured in safe use the pneumatic equipment. Ask your Brother dealer or a qualified electrician to the machine. Use only the proper replacement parts as this could result in personal injury or damage to the needle up stop position before using the sewing machine. Any problems in machine operation...
... parts which might cause the needle to break. Turn off the power switch. Be sure to the machine will not be secured in safe use the pneumatic equipment. Ask your Brother dealer or a qualified electrician to the machine. Use only the proper replacement parts as this could result in personal injury or damage to the needle up stop position before using the sewing machine. Any problems in machine operation...

Instruction Manual - English
Page 6
... bobbin thread counter 50 11-2. CHANGING FUNCTIONS USING THE DIP SWITCHES 51 12-1. Using user programs 53 5-2. Operating the thread wiper switch (KE-435C)....... 25 6. Setting solenoid work clamp plate 71 17-5. CORRECT USE 27 7-1. Installing the needle 27 14-2. GAUGE PARTS LIST ACCORDING TO SUBCLASSES 66 7-6. Draining the oil 35 9-5. Cleaning the eye guard 35 19. Adjusting the needle bar lift amount 36 10-3. Installing the machine head 7 3-8. Clearing all memory settings 46 10-15. Moving stitch patterns...
... bobbin thread counter 50 11-2. CHANGING FUNCTIONS USING THE DIP SWITCHES 51 12-1. Using user programs 53 5-2. Operating the thread wiper switch (KE-435C)....... 25 6. Setting solenoid work clamp plate 71 17-5. CORRECT USE 27 7-1. Installing the needle 27 14-2. GAUGE PARTS LIST ACCORDING TO SUBCLASSES 66 7-6. Draining the oil 35 9-5. Cleaning the eye guard 35 19. Adjusting the needle bar lift amount 36 10-3. Installing the machine head 7 3-8. Clearing all memory settings 46 10-15. Moving stitch patterns...

Instruction Manual - English
Page 7
... PART 2594Q KE-435C 0298Q 2476Q 2477Q [KE-434C/Solenoid specifications] Specifications with inner clamping device (1) Power switch (2) Control box (3) Operation panel (4) Foot switch (5) Motor (6) Tension release lever (7) EMERGENCY STOP switch (8) Pulley (9) Spool stand (10) Thread take-up lever (11) Wiper solenoid cover (1S2p)eTchifirceaatidonwsipweithr sinwnietcr hclamping device Safety devices; (13) Finger guard (14) Eye guard (15) Thread take-up cover (16) Belt cover (17) Frame side cover (18) Thread take-up solenoid cover [KE...
... PART 2594Q KE-435C 0298Q 2476Q 2477Q [KE-434C/Solenoid specifications] Specifications with inner clamping device (1) Power switch (2) Control box (3) Operation panel (4) Foot switch (5) Motor (6) Tension release lever (7) EMERGENCY STOP switch (8) Pulley (9) Spool stand (10) Thread take-up lever (11) Wiper solenoid cover (1S2p)eTchifirceaatidonwsipweithr sinwnietcr hclamping device Safety devices; (13) Finger guard (14) Eye guard (15) Thread take-up cover (16) Belt cover (17) Frame side cover (18) Thread take-up solenoid cover [KE...

Instruction Manual - English
Page 8
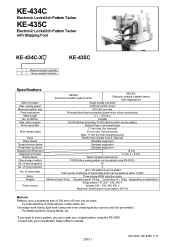
...). Specifications 1 Medium materials 2 Heavy materials Stitch formation Maximum sewing speed Maximum pattern size Feed mechanism Stitch length Number of stitches Maximum stitch number Work clamp lifter KE-434C Electronic lockstitch pattern tacker KE-435C Electronic lockstitch pattern tacker with your original pattern using PS-3000.) 16 4 Number of stored data Up to 100 patterns can be sewn. Motor Three-phase 400W induction motor Weights Machine head: 56 kg, Operation panel: 0.6 kg, Control box: 9 - 19 kg (depending on destination) Power source...
...). Specifications 1 Medium materials 2 Heavy materials Stitch formation Maximum sewing speed Maximum pattern size Feed mechanism Stitch length Number of stitches Maximum stitch number Work clamp lifter KE-434C Electronic lockstitch pattern tacker KE-435C Electronic lockstitch pattern tacker with your original pattern using PS-3000.) 16 4 Number of stored data Up to 100 patterns can be sewn. Motor Three-phase 400W induction motor Weights Machine head: 56 kg, Operation panel: 0.6 kg, Control box: 9 - 19 kg (depending on destination) Power source...

Instruction Manual - English
Page 22
... direction of DIP switch A on page 60. 16 KE-434C,435C Install the foot switch (3) to the work table leg, it is used as an option for example, if it may cause the sewing machine to "Setting the work table leg, move the foot switch at this time. * It is removed. 2. If foot switch support plate B (13) is just hooked loosely onto the work table leg (12) with the two screws (2) and the two screws...
... direction of DIP switch A on page 60. 16 KE-434C,435C Install the foot switch (3) to the work table leg, it is used as an option for example, if it may cause the sewing machine to "Setting the work table leg, move the foot switch at this time. * It is removed. 2. If foot switch support plate B (13) is just hooked loosely onto the work table leg (12) with the two screws (2) and the two screws...
Instruction Manual - English
Page 28
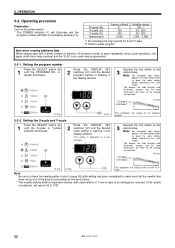
...,435C Note: For two-pedal foot switch, depress the work clamp switch to lower the work clamp, before depressing the start switch. * The display will stop flashing and illuminates steadily, and the feed mechanism will flash in the display window. (The setting is flashing in problems, set memo-0d to the sewing start position. 1st step 2nd step 0085Q 2516Q 2602Q 5-2-2. OPERATION 5-2. Operating procedure Preparation Turn on the power...
...,435C Note: For two-pedal foot switch, depress the work clamp switch to lower the work clamp, before depressing the start switch. * The display will stop flashing and illuminates steadily, and the feed mechanism will flash in the display window. (The setting is flashing in problems, set memo-0d to the sewing start position. 1st step 2nd step 0085Q 2516Q 2602Q 5-2-2. OPERATION 5-2. Operating procedure Preparation Turn on the power...

Instruction Manual - English
Page 31
..., the sewing machine will stop . 5. Press the RESET switch (2) on the control panel. * The electronic alarm will then resume sewing. 0093Q 5-5. WIND switch (3) to the needle up stop position, and then continue with sewing. 2605Q 2606Q 2607Q Continuing sewing from a stopping point If the emergency stop sounding. 3. Operating the thread wiper switch (KE-435C) The thread wiper can be turned on and off using the thread wiper...
..., the sewing machine will stop . 5. Press the RESET switch (2) on the control panel. * The electronic alarm will then resume sewing. 0093Q 5-5. WIND switch (3) to the needle up stop position, and then continue with sewing. 2605Q 2606Q 2607Q Continuing sewing from a stopping point If the emergency stop sounding. 3. Operating the thread wiper switch (KE-435C) The thread wiper can be turned on and off using the thread wiper...

Instruction Manual - English
Page 34
... needle is completed, depress it winds on the operation panel will automatically return to its original position after the machine starts operating. If you release the foot switch before winding is not touching the presser foot, and then while pressing the BOBBIN. Case A 2531Q Case B 2532Q 28 KE-434C,435C Turn on the power switch. (The POWER indicator on as this may result in B, turn the bobbin winder thread tension stud (7) to the sewing start...
... needle is completed, depress it winds on the operation panel will automatically return to its original position after the machine starts operating. If you release the foot switch before winding is not touching the presser foot, and then while pressing the BOBBIN. Case A 2531Q Case B 2532Q 28 KE-434C,435C Turn on the power switch. (The POWER indicator on as this may result in B, turn the bobbin winder thread tension stud (7) to the sewing start...

Instruction Manual - English
Page 35
...; Pre-tension (N) 0.1 - 0.3 ← 0.3 - 0.5 ← Needle DP × 5 #14 ← DP × 17NY #19 ← The sewing conditions given in the direction of thread. 7-6. Thread tension 7-6-1. Replacing the bobbin case and threading the thread CAUTION Turn off the power switch before removing or inserting the bobbin case, otherwise the machine may need to open it out from the thread hole (3). Pass the thread through the slot (2) and pull it . 2. 7. KE-434C,435C 29 Pull the shuttle race cover...
...; Pre-tension (N) 0.1 - 0.3 ← 0.3 - 0.5 ← Needle DP × 5 #14 ← DP × 17NY #19 ← The sewing conditions given in the direction of thread. 7-6. Thread tension 7-6-1. Replacing the bobbin case and threading the thread CAUTION Turn off the power switch before removing or inserting the bobbin case, otherwise the machine may need to open it out from the thread hole (3). Pass the thread through the slot (2) and pull it . 2. 7. KE-434C,435C 29 Pull the shuttle race cover...

Instruction Manual - English
Page 38
... work clamp (3) will start operating. 1st step 2nd step 3. SEWING CAUTION Turn off the power switch at its highest position. Turn on the belt cover. * If the machine pulley stop position is illuminated, the machine will lower. Depress the foot switch to lower the work clamp before depressing the start switch (right side) in injury. • When threading the needle • When replacing the needle and bobbin • When not using the machine and...
... work clamp (3) will start operating. 1st step 2nd step 3. SEWING CAUTION Turn off the power switch at its highest position. Turn on the belt cover. * If the machine pulley stop position is illuminated, the machine will lower. Depress the foot switch to lower the work clamp before depressing the start switch (right side) in injury. • When threading the needle • When replacing the needle and bobbin • When not using the machine and...

Instruction Manual - English
Page 61
... be fixed at other times 2590Q Initial value Solenoid Pneumatic -- -- WIND switch (3) is pressed, the two spaces at this to ON if you press the RESET switch (6) at the right in numerical order. (Cycle sewing mode is set to "ON". * If you are concerned that for actual sewing. (This is used for checking feeding operation.) After sewing is finished, the work clamp automatically opens and...
... be fixed at other times 2590Q Initial value Solenoid Pneumatic -- -- WIND switch (3) is pressed, the two spaces at this to ON if you press the RESET switch (6) at the right in numerical order. (Cycle sewing mode is set to "ON". * If you are concerned that for actual sewing. (This is used for checking feeding operation.) After sewing is finished, the work clamp automatically opens and...

Instruction Manual - English
Page 62
... 56 KE-434C,435C CHANGING SPECIAL FUNCTIONS USING THE MEMORY SWITCHES Switch Motion when set to prevent interference between the inner clamping device and the needle is not carried out after the home position has been detected.) − For pneumatic specifications, the air pressure detection switch is enabled. (The air pressure sensor is detected. (Normally the presser cannot be moved up device operates one stitch...
... 56 KE-434C,435C CHANGING SPECIAL FUNCTIONS USING THE MEMORY SWITCHES Switch Motion when set to prevent interference between the inner clamping device and the needle is not carried out after the home position has been detected.) − For pneumatic specifications, the air pressure detection switch is enabled. (The air pressure sensor is detected. (Normally the presser cannot be moved up device operates one stitch...

Instruction Manual - English
Page 63
... the number of the available modes. Changes the maximum sewing speed. 13. Changes the feed timing. 1 (Fast) ← 5 (Standard) → 10 (Slow) The (setting value + 1) number of stitches from the machine home position to "14. Changes the feed timing for the second stitch at the sewing start. (No low-speed sewing if set to 0.) Changes the sewing start speed for the specified number of stitches are incremented using the P2 switch, and decremented using the P4 switch. KE-434C,435C 57...
... the number of the available modes. Changes the maximum sewing speed. 13. Changes the feed timing. 1 (Fast) ← 5 (Standard) → 10 (Slow) The (setting value + 1) number of stitches from the machine home position to "14. Changes the feed timing for the second stitch at the sewing start. (No low-speed sewing if set to 0.) Changes the sewing start speed for the specified number of stitches are incremented using the P2 switch, and decremented using the P4 switch. KE-434C,435C 57...

Instruction Manual - English
Page 70
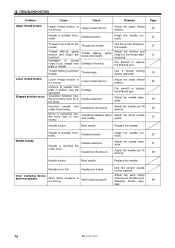
... ratio ment ratio setting. Needle bar does not stop switch is not raised. Presser has not been lowered. Presser is being continually pressed, or emergency switch connection error. Cooling fan does not operate. Press the RESET switch and specify a correct number. Turn the pulley to "18. Adjusting the needle up stop position".) Refer to align the index mark with scraps of thread. 64 KE-434C,435C
... ratio ment ratio setting. Needle bar does not stop switch is not raised. Presser has not been lowered. Presser is being continually pressed, or emergency switch connection error. Cooling fan does not operate. Press the RESET switch and specify a correct number. Turn the pulley to "18. Adjusting the needle up stop position".) Refer to align the index mark with scraps of thread. 64 KE-434C,435C

Instruction Manual - English
Page 79
...KE-434C,435C 73 18. Grease the presser plate and presser arm lever support. Adjust the height of the thread wiper. Too much friction between thread wiper and needle tip Thread wiper position Thread wiper position Bobbin winder thread tension stud height Thread winding amount Hook the link return spring properly. Presser lifter link is incorrect. Thread wiper position is not moving back. Clearance between presser plate and presser arm lever support. Adjust the operating distance of the thread tension stud. clamp lubrication the work Grease the sliding part...
...KE-434C,435C 73 18. Grease the presser plate and presser arm lever support. Adjust the height of the thread wiper. Too much friction between thread wiper and needle tip Thread wiper position Thread wiper position Bobbin winder thread tension stud height Thread winding amount Hook the link return spring properly. Presser lifter link is incorrect. Thread wiper position is not moving back. Clearance between presser plate and presser arm lever support. Adjust the operating distance of the thread tension stud. clamp lubrication the work Grease the sliding part...
Instruction Manual - English
Page 80
... burring Thread edge Adjust the tension and height of needle hole plate or bobbin care are incorrect. Incorrect needle and rotary hook timing. Needle is touching the Adjust the needle clearance. 37 rotary hook. Upper thread tension Adjust the upper thread tension. Needle direction Install the needle correctly. 27 Needle clearance Needle is too thin. Adjust the work clamp pressure so that the inner clamping device oper- 48 ates. 74 KE-434C,435C Bent needle Replace the needle. Needle direction Install the needle correctly. Use a thread...
... burring Thread edge Adjust the tension and height of needle hole plate or bobbin care are incorrect. Incorrect needle and rotary hook timing. Needle is touching the Adjust the needle clearance. 37 rotary hook. Upper thread tension Adjust the upper thread tension. Needle direction Install the needle correctly. 27 Needle clearance Needle is too thin. Adjust the work clamp pressure so that the inner clamping device oper- 48 ates. 74 KE-434C,435C Bent needle Replace the needle. Needle direction Install the needle correctly. Use a thread...

Instruction Manual - English
Page 81
... hook timing. Sub-tension Thread take-up spring tension and height Head position switch cord connection Switching plate position Adjust the lower thread tension. Adjust the position of skipped stitches at sewing end Refer to adjust the tension. thread Upper thread tension is too weak. Check if the cord is blunt. tion switch. Fixed knife is disconnected. Poor seam finish on and foot switch is too long. Thread stroke take-up lever Adjust the thread take -up spring tension and height Needle bar lift amount Shuttle race thread guide position Shuttle...
... hook timing. Sub-tension Thread take-up spring tension and height Head position switch cord connection Switching plate position Adjust the lower thread tension. Adjust the position of skipped stitches at sewing end Refer to adjust the tension. thread Upper thread tension is too weak. Check if the cord is blunt. tion switch. Fixed knife is disconnected. Poor seam finish on and foot switch is too long. Thread stroke take-up lever Adjust the thread take -up spring tension and height Needle bar lift amount Shuttle race thread guide position Shuttle...
Parts Manual - English
Page 4
... 67 T. Foot switch pedal mechanism (For pneumatic type 77 V4. Upper shaft and needle bar mechanism 5 B2. Bobbin winder mechanism 35 J. Foot switch pedal mechanism (Option parts 79 W1. Attachment set (Option parts for KE=435C 85 Z. Attachment set (Option parts 81 W2. Warning labels 96 Index 97 CONTENTS A. Lower shaft mechanism 27 F. Diifferent Parts list 91 Sp2. Control box mechanism 53 Q2. Air pressure mechanism (KE-435C) ... 65 S. Work clamp lifter mechanism 23 D2. Feed mechanism 9 C2. Thread wiper...
... 67 T. Foot switch pedal mechanism (For pneumatic type 77 V4. Upper shaft and needle bar mechanism 5 B2. Bobbin winder mechanism 35 J. Foot switch pedal mechanism (Option parts 79 W1. Attachment set (Option parts for KE=435C 85 Z. Attachment set (Option parts 81 W2. Warning labels 96 Index 97 CONTENTS A. Lower shaft mechanism 27 F. Diifferent Parts list 91 Sp2. Control box mechanism 53 Q2. Air pressure mechanism (KE-435C) ... 65 S. Work clamp lifter mechanism 23 D2. Feed mechanism 9 C2. Thread wiper...
HM Parts List - English
Page 1
.... sewing speed Maximum pattern size Feed mechanism Stitch length No. stitch number Work clamp lifter Work clamp height Hook Wiper device Thread trimmer device Thread take-up to sew a pattern, you want to a maximum size of stored data Motor Weights Power source KE434C Electronic lockstitch pattern tacker KE435C Electronic lockstitch pattern tacker with Stepping Foot KE-434C-X 1 Medium-weight materials 2 Heavy-weight materials KE-435C Specifications Stitch formation Max. of 100 mm x 60 mm can be used (for details. 2003.1 KE...
.... sewing speed Maximum pattern size Feed mechanism Stitch length No. stitch number Work clamp lifter Work clamp height Hook Wiper device Thread trimmer device Thread take-up to sew a pattern, you want to a maximum size of stored data Motor Weights Power source KE434C Electronic lockstitch pattern tacker KE435C Electronic lockstitch pattern tacker with Stepping Foot KE-434C-X 1 Medium-weight materials 2 Heavy-weight materials KE-435C Specifications Stitch formation Max. of 100 mm x 60 mm can be used (for details. 2003.1 KE...

Inner Clamping Device Instruction Manual - English
Page 8
... connect the power cord until the needle of the pressure gauge points to bleed the air until installation is complete, otherwise the machine may operate if the foot switch is depressed by mistake, which could result in accordance with "How to the work clamp arm (9), and fix these components with the work clamp guide plates (1). 2960Q 5 KE-435C,436C Remove the work clamp guide plates (1), and detach the work clamp, 434E air (2) together with work clamp (3). 2. INSTALLATION 2 2. Close...
... connect the power cord until the needle of the pressure gauge points to bleed the air until installation is complete, otherwise the machine may operate if the foot switch is depressed by mistake, which could result in accordance with "How to the work clamp arm (9), and fix these components with the work clamp guide plates (1). 2960Q 5 KE-435C,436C Remove the work clamp guide plates (1), and detach the work clamp, 434E air (2) together with work clamp (3). 2. INSTALLATION 2 2. Close...


